ActiveMQ笔记(4):搭建Broker集群(cluster)
上一篇介绍了基于Networks of Borkers的2节点HA方案,这一篇继续来折腾Networks of Brokers,当应用规模日渐增长时,2节点的broker可能仍然抗不住访问压力,这时候就需要多加一些broker,弄一个更大规模的Broker集群,但是怎么合理设置broker之间的网络桥接,却是有讲究的,先来看一种不太好的设计:
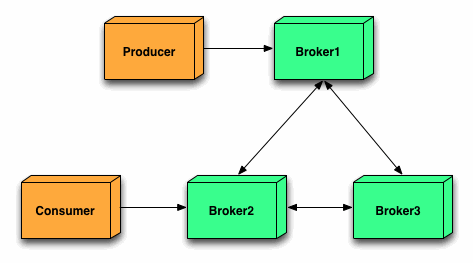
这个架构看上去没瑕疵,没毛病,3个broker之间两两互通,整体可用性极高,但是从消息的路由角度来看,却不是一个好的设计,当producer向broker1发送一条消息时,Consumer得到消息的路径可能有如下2条:
a) producer -> broker1 -> broker2
b) producer -> broker1 -> broker3 -> broker2
当broker更多时,情况会更复杂,比如下面这张图:
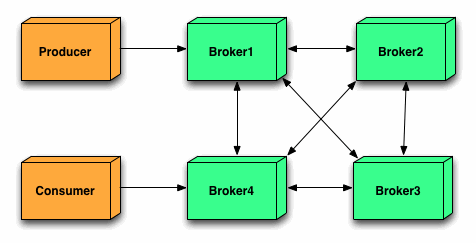
消息的路由途径将会更多:
a) producer -> broker1 -> broker4
b) producer -> broker1 -> broker2 -> broker4
c) producer -> broker1 -> broker2 -> broker3 -> broker4
d) producer -> broker1 -> broker3 -> broker4
不难想像,每多经过一个节点,消息处理的延时将会增加一些,如果Broker越多,情况越复杂,最终系统对外表现为消息处理有时很快,有时很慢,整体性能很不稳定,所以实际生产中,不要采用所有Broker之间两两互连的方案。
合理的方案如下:

这张图的灵感,应该来自组建局域网中的星形网络,在中心放置一个Borker充当Hub,与其它所有Broker互连,这样不管Consumer连接到外围的哪个Broker,消息的路由途径都比较稳定(最多经过3个Broker),这种架构性能虽然稳定了,但是中心的Hub就变成单点隐患,如果中间的DockerHub挂了,整个系统也就废了。
改进后的架构如下:
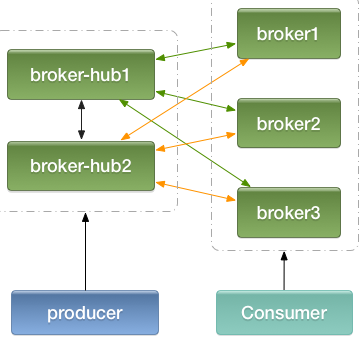
本质上仍然是一个星形网络,只不过将hub弄成二个互备,然后每个hub都与其它外围的broker相连,消费者连接到broker1/broker2/broker3,生产者(Producer)连接到hub1/hub2,消息的最长路径不超过3个broker (注:生产者也可以连接到broker1/2/3,与消费者一样,但是消息经过的最长路径会变成4)
如果以后要扩张,比如增加了Broker4,Broker5...,直接修改hub1/2上的配置,增加与新的broker的连接即可,不影响消息的路由途径长度。
最后,在本机演练一把,给出一些配置示例:
1、端口规划
activemq1: 61616 (broker1)

activemq2: 61626 (broker2)

activemq3: 61636 (broker3)

activemq4: 61646 (broker-hub1)

activemq5: 61656 (broker-hub2)
共5个activemq实例,端口61616、61626、61636为broker1、broker2、broker3,61645、61656为broker-hub1、broker-hub2
2、activemq.xml配置
以boker1为例,配置文件内容如下:
<beans
xmlns="http://www.springframework.org/schema/beans"
xmlns:xsi="http://www.w3.org/2001/XMLSchema-instance"
xsi:schemaLocation="http://www.springframework.org/schema/beans http://www.springframework.org/schema/beans/spring-beans.xsd
http://activemq.apache.org/schema/core http://activemq.apache.org/schema/core/activemq-core.xsd"> <bean class="org.springframework.beans.factory.config.PropertyPlaceholderConfigurer">
<property name="locations">
<value>file:${activemq.conf}/credentials.properties</value>
</property>
</bean> <broker xmlns="http://activemq.apache.org/schema/core" brokerName="broker1">
<persistenceAdapter>
<kahaDB directory="${activemq.data}/kahadb"/>
</persistenceAdapter>
<transportConnectors>
<transportConnector name="openwire"
uri="tcp://0.0.0.0:61616?maximumConnections=1000&wireFormat.maxFrameSize=104857600"/>
</transportConnectors>
</broker> <import resource="jetty.xml"/>
</beans>
broker2及broker3,大家参考该配置修改端口号及brokerName即可。
broker-hub1的配置:
<beans
xmlns="http://www.springframework.org/schema/beans"
xmlns:xsi="http://www.w3.org/2001/XMLSchema-instance"
xsi:schemaLocation="http://www.springframework.org/schema/beans http://www.springframework.org/schema/beans/spring-beans.xsd
http://activemq.apache.org/schema/core http://activemq.apache.org/schema/core/activemq-core.xsd"> <bean class="org.springframework.beans.factory.config.PropertyPlaceholderConfigurer">
<property name="locations">
<value>file:${activemq.conf}/credentials.properties</value>
</property>
</bean> <broker xmlns="http://activemq.apache.org/schema/core" brokerName="broker-hub1">
<networkConnectors>
<networkConnector uri="static:(tcp://127.0.0.1:61656,tcp://127.0.0.1:61616,tcp://127.0.0.1:61626,tcp://127.0.0.1:61636)" duplex="true"/>
</networkConnectors>
<persistenceAdapter>
<kahaDB directory="${activemq.data}/kahadb"/>
</persistenceAdapter>
<transportConnectors>
<transportConnector name="openwire"
uri="tcp://0.0.0.0:61646?maximumConnections=1000&wireFormat.maxFrameSize=104857600"/>
</transportConnectors>
</broker> <import resource="jetty.xml"/>
</beans>
broker-hub2的配置:
<beans
xmlns="http://www.springframework.org/schema/beans"
xmlns:xsi="http://www.w3.org/2001/XMLSchema-instance"
xsi:schemaLocation="http://www.springframework.org/schema/beans http://www.springframework.org/schema/beans/spring-beans.xsd
http://activemq.apache.org/schema/core http://activemq.apache.org/schema/core/activemq-core.xsd"> <bean class="org.springframework.beans.factory.config.PropertyPlaceholderConfigurer">
<property name="locations">
<value>file:${activemq.conf}/credentials.properties</value>
</property>
</bean> <broker xmlns="http://activemq.apache.org/schema/core" brokerName="broker-hub2">
<networkConnectors>
<networkConnector uri="static:(tcp://127.0.0.1:61616,tcp://127.0.0.1:61626,tcp://127.0.0.1:61636)" duplex="true"/>
</networkConnectors>
<persistenceAdapter>
<kahaDB directory="${activemq.data}/kahadb"/>
</persistenceAdapter>
<transportConnectors>
<transportConnector name="openwire"
uri="tcp://0.0.0.0:61656?maximumConnections=1000&wireFormat.maxFrameSize=104857600"/>
</transportConnectors>
</broker> <import resource="jetty.xml"/>
</beans>
3、java代码中spring配置文件
a) 生产者
 <bean id="jmsFactory" class="org.apache.activemq.pool.PooledConnectionFactory" destroy-method="stop">

     <property name="connectionFactory">

         <bean class="org.apache.activemq.ActiveMQConnectionFactory">

             <!--broker服务的地址-->

             <property name="brokerURL" value="failover:(tcp://localhost:61646,tcp://localhost:61656)"/>

             <!--默认值为1000,如果不需要这么大,可以调小-->

             <property name="maxThreadPoolSize" value="100"/>

             <!--<property name="userName" value="system"/>-->

             <!--<property name="password" value="manager"/>-->

         </bean>

     </property>

 </bean>
b) 消费者
 <bean id="jmsFactory" class="org.apache.activemq.pool.PooledConnectionFactory" destroy-method="stop">

     <property name="connectionFactory">

         <bean class="org.apache.activemq.ActiveMQConnectionFactory">

             <!--broker服务的地址-->

             <property name="brokerURL" value="failover:(tcp://localhost:61616,tcp://localhost:61626,tcp://localhost:61636)"/>

             <!--默认值为1000,如果不需要这么大,可以调小-->

             <property name="maxThreadPoolSize" value="100"/>

             <!--<property name="userName" value="system"/>-->

             <!--<property name="password" value="manager"/>-->

         </bean>

     </property>

 </bean>
ActiveMQ笔记(4):搭建Broker集群(cluster)的更多相关文章
- ActiveMQ: 搭建Broker集群(cluster)
上一篇介绍了基于Networks of Borkers的2节点HA方案,这一篇继续来折腾Networks of Brokers,当应用规模日渐增长时,2节点的broker可能仍然抗不住访问压力,这时候 ...
- ELK学习笔记之ElasticSearch的集群(Cluster),节点(Node),分片(Shard),Indices(索引),replicas(备份)之间关系
[Cluster]集群,一个ES集群由一个或多个节点(Node)组成,每个集群都有一个cluster name作为标识----------------------------------------- ...
- Dubbo入门到精通学习笔记(十四):ActiveMQ集群的安装、配置、高可用测试,ActiveMQ高可用+负载均衡集群的安装、配置、高可用测试
文章目录 ActiveMQ 高可用集群安装.配置.高可用测试( ZooKeeper + LevelDB) ActiveMQ高可用+负载均衡集群的安装.配置.高可用测试 准备 正式开始 ActiveMQ ...
- redis单点、redis主从、redis哨兵sentinel,redis集群cluster配置搭建与使用
目录 redis单点.redis主从.redis哨兵 sentinel,redis集群cluster配置搭建与使用 1 .redis 安装及配置 1.1 redis 单点 1.1.2 在命令窗口操作r ...
- ActiveMQ broker 集群, 静态发现和动态发现
下载 activemq 压缩包解压后,conf 目录下有各种示例配置文件,红线标出的是静态发现和动态发现的配置. 1. 静态配置 启动3个 broker,端口分别为61616,61618,61620, ...
- 超详细,多图文使用galera cluster搭建mysql集群并介绍wsrep相关参数
超详细,多图文使用galera cluster搭建mysql集群并介绍wsrep相关参数 介绍galera cluster原理的文章已经有一大堆了,百度几篇看一看就能有相关了解,这里就不赘述了.本文主 ...
- CentOS 7 环境搭建kafka集群
Kafka是一个MQ服务,流行的MQ服务器有三个,分别是ActiveMQ,RabbbitMQ和Kafka 目录说明:/home/fuqinqin/packages : 安装包存放目录/home/fuq ...
- activeMQ从入门到简单集群指南
1.什么是amq MQ是消息中间件,基于JAVA的JMS消息服务机制来传递信息. 2.mq的作用 MQ给程序之间提供了一个缓冲,避免了在程序交互频繁的情况下,提高程序性能瓶颈和数据的可靠性 3.mq怎 ...
- MongoDB 搭建分片集群
在MongoDB(版本 3.2.9)中,分片是指将collection分散存储到不同的Server中,每个Server只存储collection的一部分,服务分片的所有服务器组成分片集群.分片集群(S ...
随机推荐
- 1Z0-053 争议题目解析
1Z0-053 争议题目解析 Summary 题目NO. 题目解析链接地址 题库答案 参考答案 考查知识点 24 http://www.cnblogs.com/jyzhao/p/5319220.ht ...
- 账号密码管理系统Access版本
哈哈,花了我整整五天时间,账号密码管理系统软件终于成功编写完成了.由于我的各大论坛的账号密码特别多,记性又不好.所以一直以来都想要这么一个软件的,但是以前学习的都是面向过程的编程语言,一直无法实现这个 ...
- Windows环境下vscode-go安装笔记
一.介绍 对于Visual Studio Code开发工具,有一款优秀的GoLang插件,它的主页为:https://github.com/microsoft/vscode-go 这款插件的特性包括: ...
- iOS: 为画板App增加 Undo/Redo(撤销/重做)操作
这个随笔的内容以上一个随笔为基础,(在iOS中实现一个简单的画板),上一个随笔实现了一个简单的画板: 今天我们要为这个画板增加Undo/Redo操作,当画错了一笔,可以撤销它,或者撤销之后后悔了, ...
- 前端打包构建工具gulp快速入门
因为之前一直有人给我推荐gulp,说他这里好哪里好的.实际上对我来说够用就行.grunt熟悉以后实际上他的配置也不难,说到效率的话确实是个问题,尤其项目大了以后,目前位置遇到的项目都还可以忍受.不过不 ...
- 解决 Tomcat Server in Eclipse unable to start within 45 seconds 不能启动的问题
1.在 Eclipse 下方 Servers TAB页,双击 "Tomcat 7.0 at localhost": 2.在右上角处点开 Timeouts 的设定,修改Start( ...
- glibc 各版本发布时间以及内核默认glibc版本
最近有些软件要求glibc 2.14+,centos 6.x自带的版本是2.12的,特查了下glibc 各版本发布时间以及与对应的内核,如下: Complete glibc release histo ...
- nw.js自定义最小化图标的click事件
选择frameless时,最小化和关闭按钮的点击事件需要自己来做,办法是: /* * 下面两个模块一定要引入到js文件中 */ var gui = require('nw.gui'); var win ...
- 3Sum algorithm - 非常容易理解的实现 (java)
原题重述:(点击图片可以进入来源链接) 这到题目的中文解释是, 输入一个数组,例如{-1 0 1 2 -1 -4},从数组中找三个数(a,b,c),使得其和0,输出所有的(a,b,c)组合. 要求ab ...
- 步步深入:MySQL架构总览->查询执行流程->SQL解析顺序
前言: 一直是想知道一条SQL语句是怎么被执行的,它执行的顺序是怎样的,然后查看总结各方资料,就有了下面这一篇博文了. 本文将从MySQL总体架构--->查询执行流程--->语句执行顺序来 ...