三、IDS4建立authorization server
建立authorization server
一、环境搭建
1、创建项目

2、引用NuGet的identityserver4

3、配置asp.net core 管道
打开Startup.cs, 编辑Configure方法:
public void Configure(IApplicationBuilder app, IHostingEnvironment env)

{

    app.UseDeveloperExceptionPage();

    app.UseIdentityServer();

}
就是使用上面这个中间件.
4、运行方式改为使用控制台运行而不是IISExpress, 以便查看各种debug信息.
把IISExpress相关的内容删掉, 然后端口改为5000.

Program.cs里的BuildWebHost也应该加上Url:
        public static IWebHostBuilder CreateWebHostBuilder(string[] args) =>

            WebHost.CreateDefaultBuilder(args)

                .UseUrls("http://0.0.0.0:5000")

                .UseStartup<Startup>();
其实不加也好用.
运行就会弹出控制台:
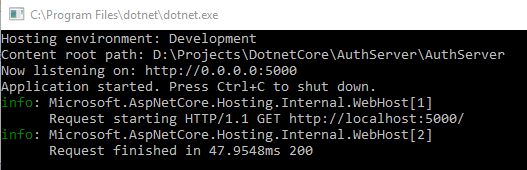
二、配置Identity Server
还是Startup.cs,编辑ConfigureServices方法:
这里不仅要把IdentityServer注册到容器中, 还要至少对其配置三点内容:
1. 哪些API可以使用这个authorization server.
2. 那些客户端Client(应用)可以使用这个authorization server.
3. 指定可以使用authorization server授权的用户.
首先需要把上面这些做成一个配置文件:
建立Configuration/InMemoryConfiguration.cs:
namespace ids4.Configuration

{

    public class InMemoryConfiguration

    {

        public static IEnumerable<ApiResource> ApiResources()

        {

            return new[]

            {

                new ApiResource("socialnetwork", "社交网络")

            };

        }

        public static IEnumerable<Client> Clients()

        {

            return new[]

            {

                new Client

                {

                    ClientId = "socialnetwork",

                    ClientSecrets = new [] { new Secret("secret".Sha256()) },

                    AllowedGrantTypes = GrantTypes.ResourceOwnerPasswordAndClientCredentials,

                    AllowedScopes = new [] { "socialnetwork" }

                }

            };

        }

        public static IEnumerable<TestUser> Users()

        {

            return new[]

            {

                new TestUser

                {

                    SubjectId = "",

                    Username = "mail@qq.com",

                    Password = "password"

                }

            };

        }

    }

}
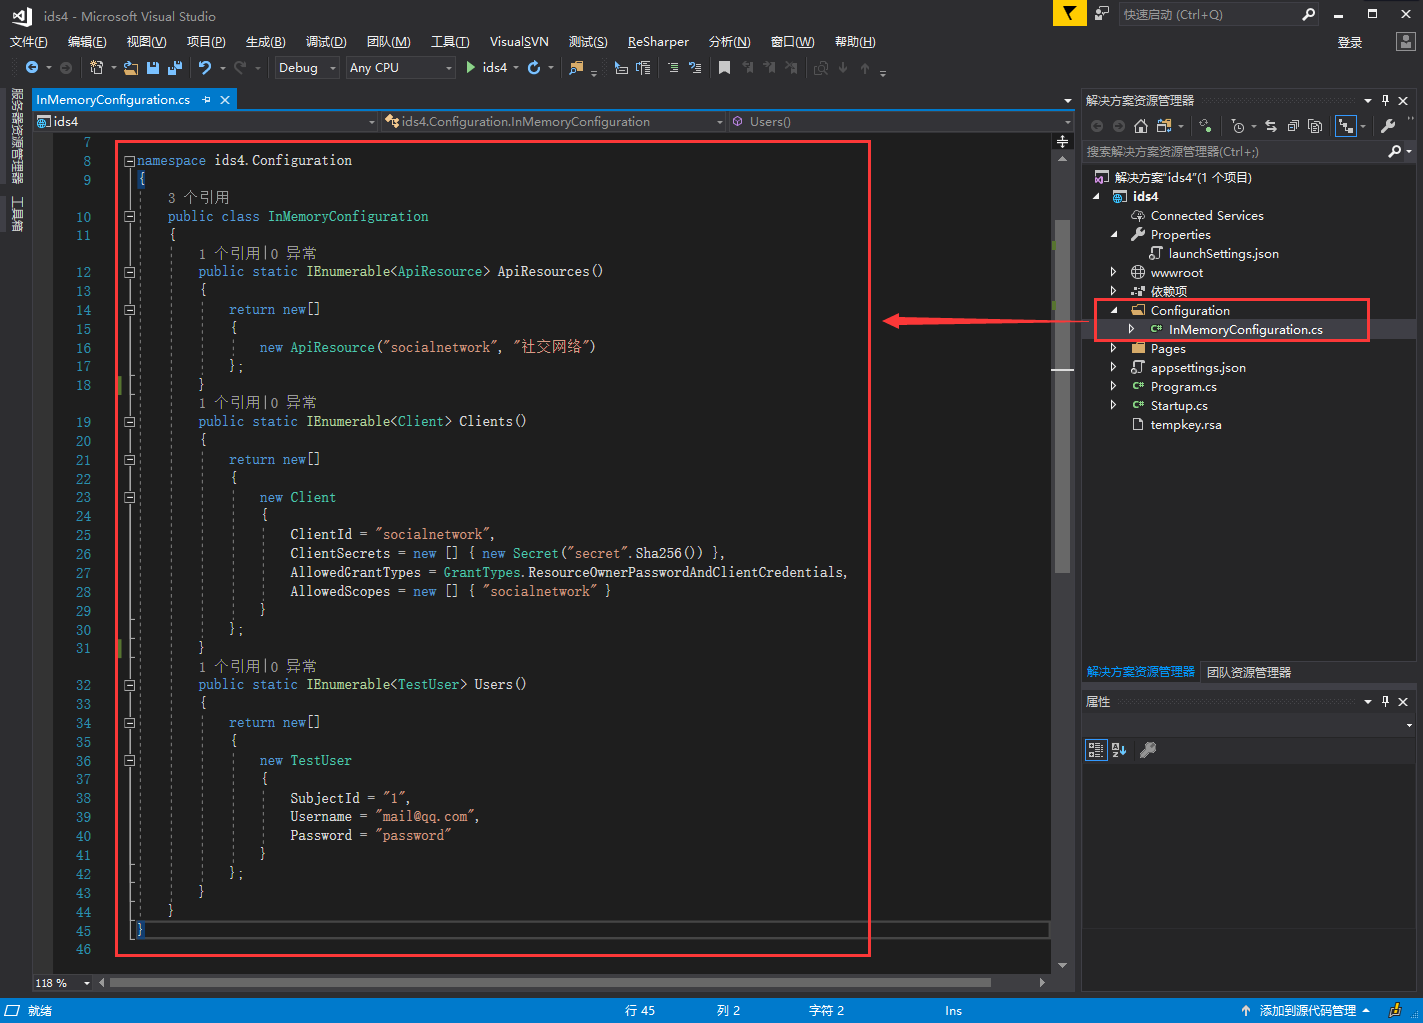
ApiResources: 这里指定了name和display name, 以后api使用authorization server的时候, 这个name一定要一致, 否则就不好用的.
Clients: Client的属性太多了, 这里就指定几个. 其中ClientSecrets是Client用来获取token用的. AllowedGrantType: 这里使用的是通过用户名密码和ClientCredentials来换取token的方式. ClientCredentials允许Client只使用ClientSecrets来获取token. 这比较适合那种没有用户参与的api动作. AllowedScopes: 这里只用socialnetwork
Users: 这里的内存用户的类型是TestUser, 只适合学习和测试使用, 实际生产环境中还是需要使用数据库来存储用户信息的, 例如接下来会使用asp.net core identity. TestUser的SubjectId是唯一标识.
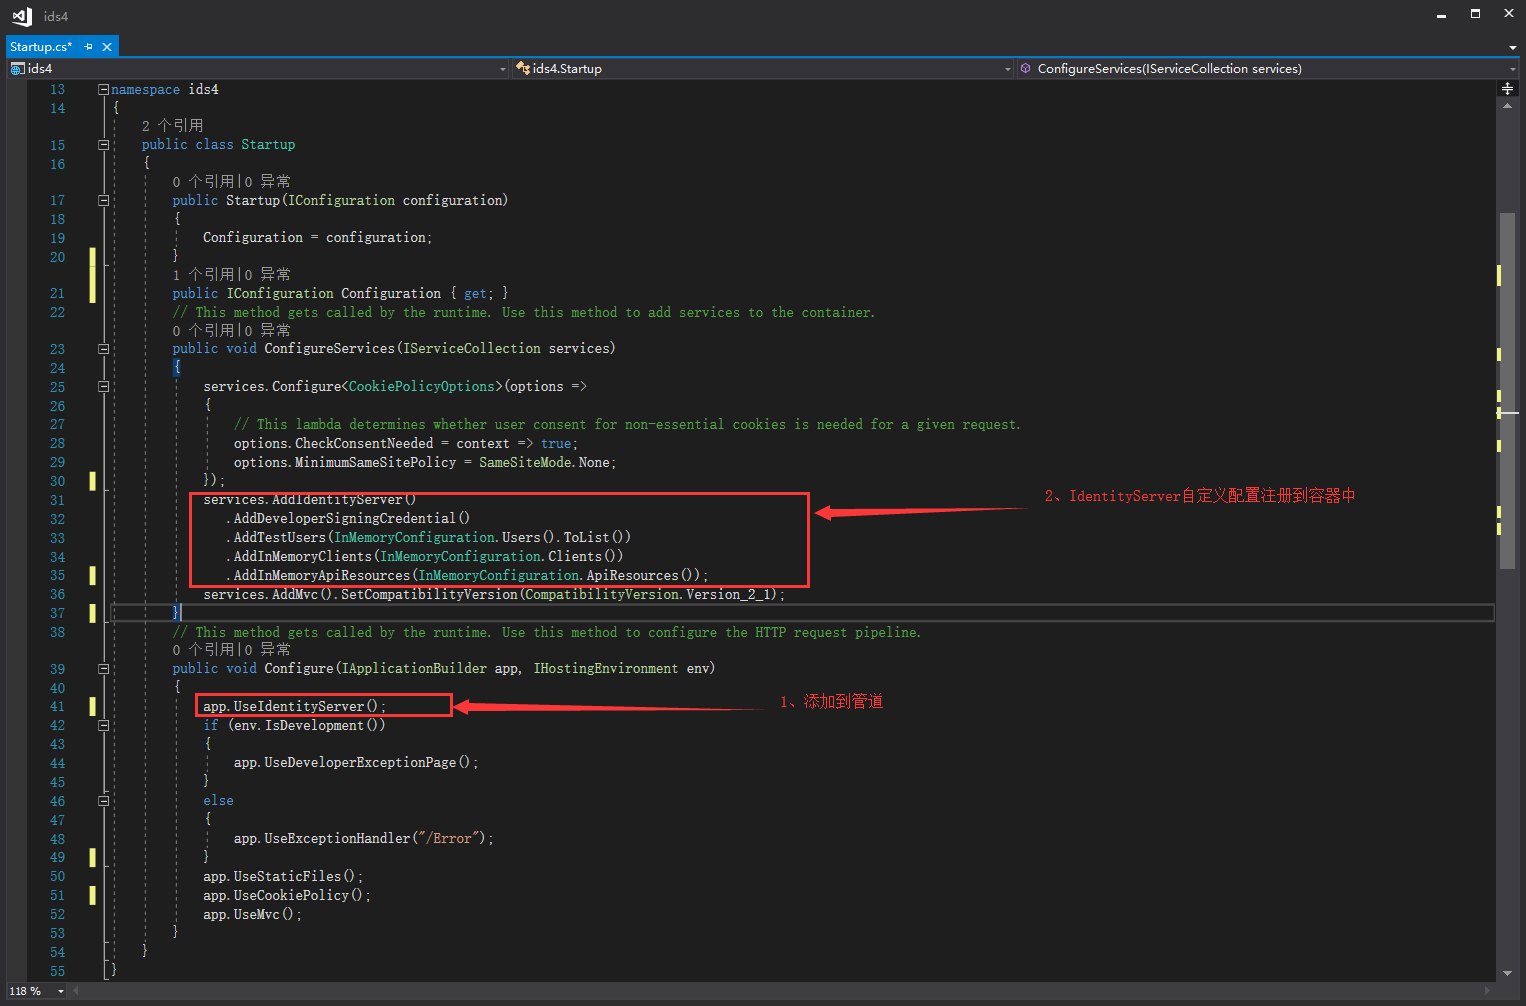
然后回到StartUp的ConfigureServices:
前一篇文章讲过, 我们需要对token进行签名, 这意味着identity server需要一对public和private key. 幸运的是, 我们可以告诉identity server在程序的运行时候对这项工作进行设定: AddDeveloperSigningCredential(), 它默认会存到硬盘上的, 所以每次重启服务不会破坏开发时的数据同步. 这个方法只适合用于identity server4在单个机器运行, 如果是production farm你得使用AddSigningCredential()这个方法.
public void ConfigureServices(IServiceCollection services)

{

    services.AddIdentityServer()

        .AddDeveloperSigningCredential()

        .AddTestUsers(InMemoryConfiguration.Users().ToList())

        .AddInMemoryClients(InMemoryConfiguration.Clients())

        .AddInMemoryApiResources(InMemoryConfiguration.ApiResources());

}
注意-StartUp.cs总配置总计就两处:
然后运行一下:
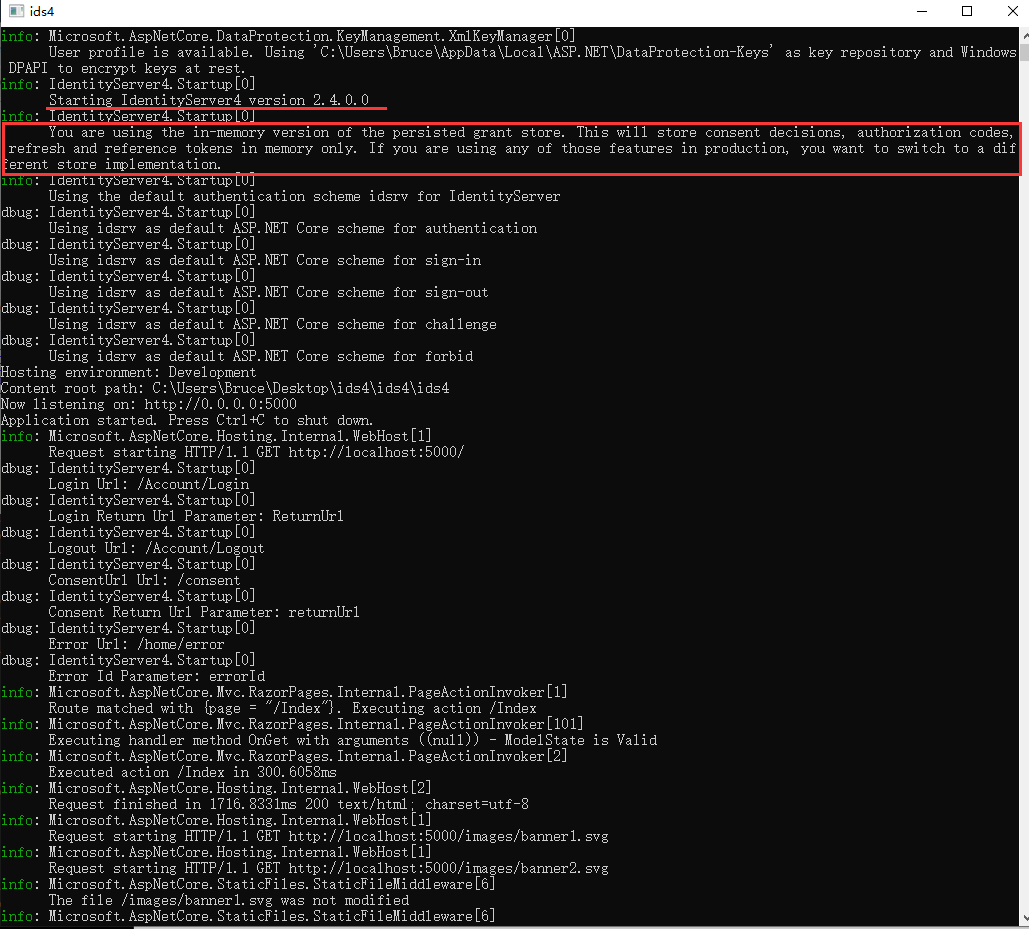
没报错, 红线部分是内存配置版的一些解释.
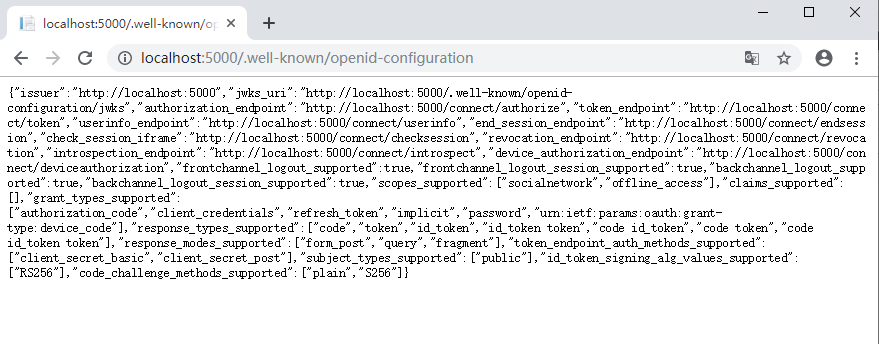
此时要访问 http://localhost:5000/.well-known/openid-configuration
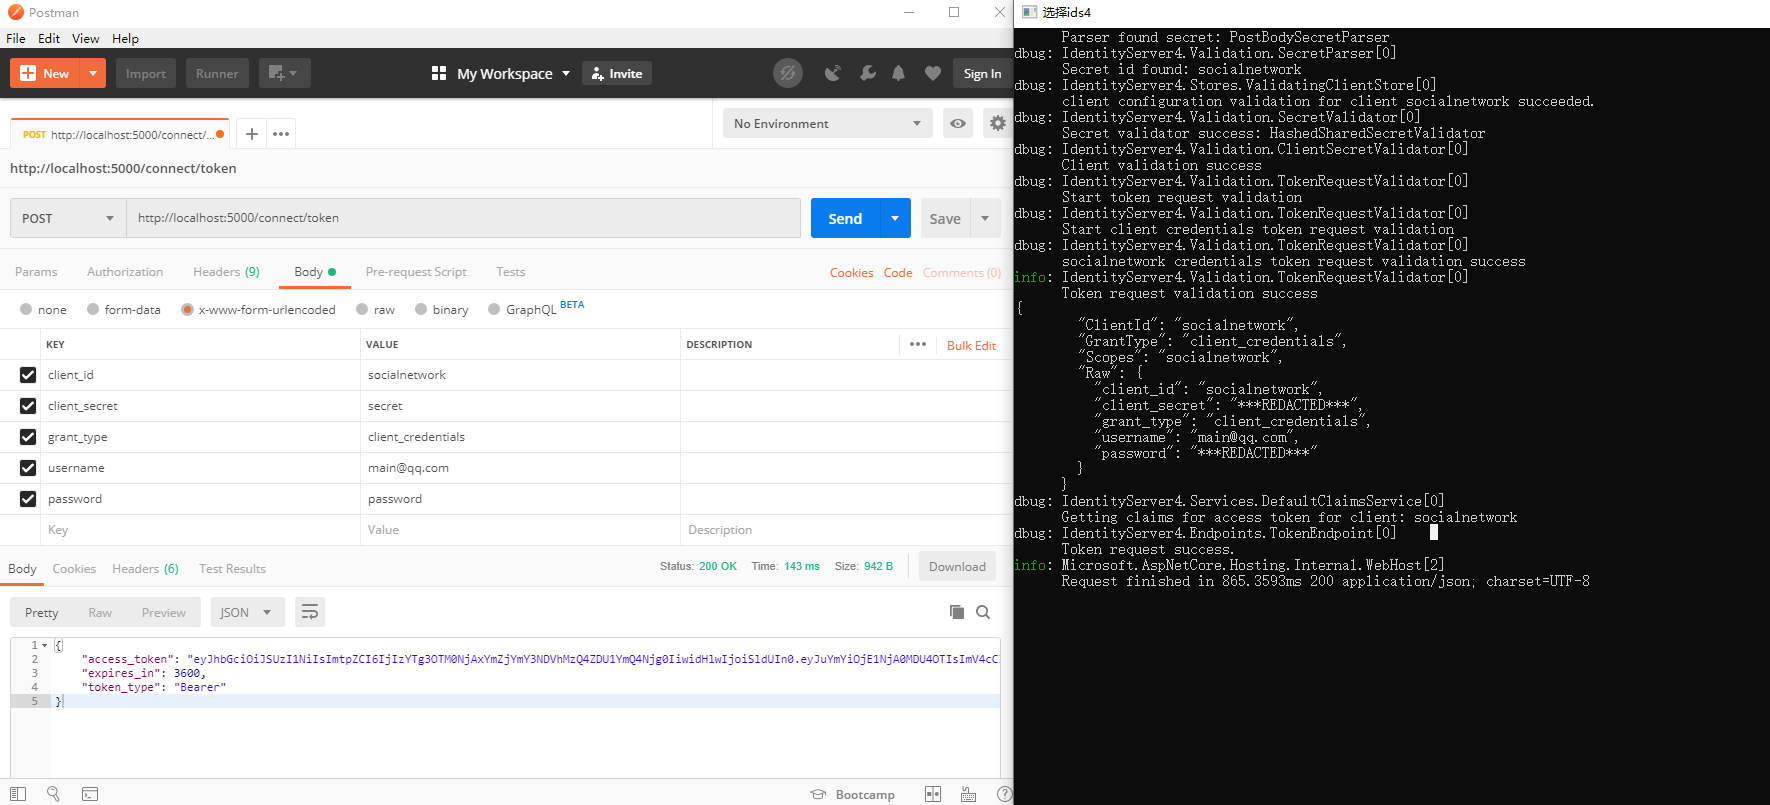
三、获取Token,打开postman
访问http://localhost:5000/connect/token
1、发送一个正确的数据:
client_id                 socialnetwork

client_secret           secret

grant_type              client_credentials

username               main@qq.com

password                password

GIf

2、由于identity server我们设置的是 ResourceOwnerPasswordAndClientCredentials 这个GrantType, 所以使用用户名密码以及使用ClientCredentials都可以. 那我们把用户名和密码去掉, 只发送Client Credentials:
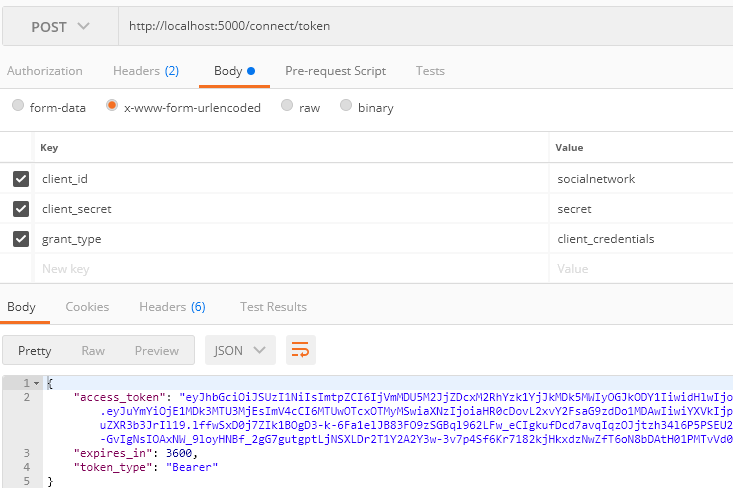
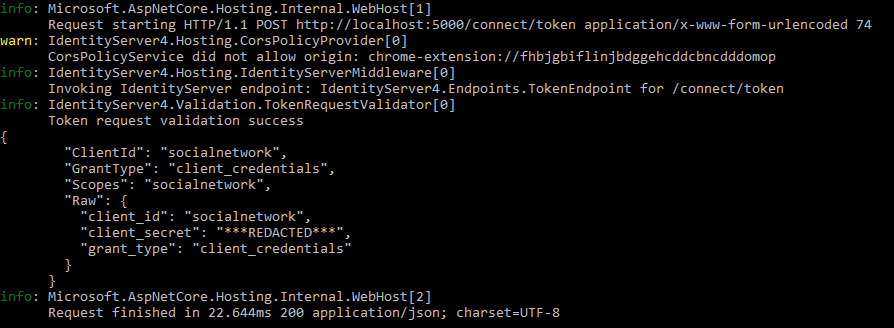
仍然获取到了token. 控制台上的信息与上一个稍有不同, 没有user相关的信息了:
3、然后我们发送一个错误的client_id, 然后得到的结果是: invalid_client. 控制台的信息如下:


三、IDS4建立authorization server的更多相关文章
- 四、IDS4建立Authorization server和Client
一.准备 创建一个名为QuickstartIdentityServer的ASP.NET Core Web 空项目(asp.net core 2.2),端口5000创建一个名为Api的ASP.NET C ...
- 使用Identity Server 4建立Authorization Server (1)
预备知识: http://www.cnblogs.com/cgzl/p/7746496.html 本文内容基本完全来自于Identity Server 4官方文档: https://identitys ...
- 从头编写asp.net core 2.0 web api 基础框架 (5) + 使用Identity Server 4建立Authorization Server (7) 可运行前后台源码
前台使用angular 5, 后台是asp.net core 2.0 web api + identity server 4. 从头编写asp.net core 2.0 web api 基础框架: 第 ...
- 使用Identity Server 4建立Authorization Server (4)
预备知识: http://www.cnblogs.com/cgzl/p/7746496.html 第一部分: http://www.cnblogs.com/cgzl/p/7780559.html 第二 ...
- ASP.NET Core3.1使用Identity Server4建立Authorization Server
前言 网上关于Identity Server4的资料有挺多的,之前是一直看杨旭老师的,最近项目中有使用到,在使用.NET Core3.1的时候有一些不同.所以在此记录一下. 预备知识: https:/ ...
- 使用Identity Server 4建立Authorization Server
使用Identity Server 4建立Authorization Server (6) - js(angular5) 客户端 摘要: 预备知识: http://www.cnblogs.com/cg ...
- 使用Identity Server 4建立Authorization Server (2)
第一部分: http://www.cnblogs.com/cgzl/p/7780559.html 第一部分主要是建立了一个简单的Identity Server. 接下来继续: 建立Web Api项目 ...
- 使用Identity Server 4建立Authorization Server (5)
预备知识: http://www.cnblogs.com/cgzl/p/7746496.html 第一部分: http://www.cnblogs.com/cgzl/p/7780559.html 第二 ...
- 使用Identity Server 4建立Authorization Server (6) - js(angular5) 客户端
预备知识: http://www.cnblogs.com/cgzl/p/7746496.html 第一部分: http://www.cnblogs.com/cgzl/p/7780559.html 第二 ...
随机推荐
- 吉首大学2019年程序设计竞赛(重现赛) J 滑稽树下你和我 (递归)
链接:https://ac.nowcoder.com/acm/contest/992/J来源:牛客网 时间限制:C/C++ 1秒,其他语言2秒 空间限制:C/C++ 32768K,其他语言65536K ...
- CSAW CTF Qualification Round 2018 - shell->code
原题 Linked lists are great! They let you chain pieces of data together. nc pwn.chal.csaw.io 9005 链接:h ...
- ltp-ddt nand_mtd_dd_rw_jffs2
error: 由于在uboot下没有发现坏块,将核心代码剥离出来调试: flash_eraseall -q -j /dev/mtd1mkdir -p /mnt/partition_nand_1419m ...
- Ehcahe spring
Ehcache系列二:Spring缓存注解@Cache使用 标签: CacheableCacheEvictCachePut 2016-06-06 16:37 2235人阅读 评论(0) 收藏 举报 ...
- Flutter-icon
常用屬性 Icon( Icons.access_alarm,//设置使用哪种图标 size: 300,//设置图标大小 color: Colors.yellow,//设置图标颜色 textDirect ...
- cornerNet部分学习内容记录
cornerNet来源灵感是基于多人姿态估计的从下往上思想,预测角的热图,根据嵌入式向量对角进行分组,其主干网络也来自于姿态估计的环面网络. cornerNet的总体框架结构图如下: CornerN ...
- 接口上传base64编码图片
package com.*.util; import java.io.FileInputStream; import java.io.FileOutputStream; import java.io. ...
- Ubuntu查找软件命令
查找软件: apt-cache search <your search item>
- cmd美化
原本的cmd 虽然原本的cmd很简约黑底白字,但是看久了也会视觉疲劳 美化(丑化) 打开cmd右键头部选择属性 字体选项这里可以修改字体的大小和选择字体,修改之后下方会有预览,颜色选项这里点选屏幕文字 ...
- el-tag标签使用三元表达动态改变type类型
<el-tag :type="item.payCode=='在线' ? 'success' : 'danger'" >{{item.payCode}}</el-t ...