
【Netty】WebSocket
一、前言
前面学习了codec和ChannelHandler之间的关系,接着学习WebSocket。
二、WebSocket
2.1. WebSocket介绍
WebSocket协议允许客户端和服务器随时传输消息,要求他们异步处理接收的消息,而几乎所有的浏览器都支持WebSocket协议,Netty支持WebSocket协议的所有实现,可以在应用中直接使用。
2.2. WebSocket应用示例
下面示例展示了如何使用WebSocket协议实现基于浏览器的实时聊天应用,示例逻辑图如下图所示。

处理逻辑如下
· 客户端发送消息。
· 消息转发至其他所有客户端。
本示例中只实现服务端部分,客户端网页为index.html。
2.3 添加WebSocket支持
升级握手机制可用于从标准HTTP或HTTPS协议切换到WebSocket,使用WebSocket的应用程序以HTTP/S开头,当请求指定URL时将会启动该协议。本应用有如下惯例:如果URL请求以/ ws结尾,我们将使用升级的WebSocket协议,否则,将使用HTTP/S协议,连接升级后,所有数据将使用WebSocket传输。下图展示服务端的逻辑。
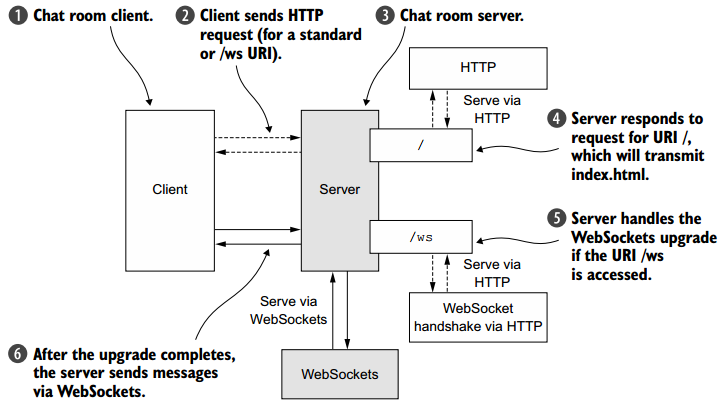
1. 处理HTTP请求
首先我们实现处理HTTP请求的组件,该组件将为访问聊天室的页面提供服务,并显示连接的客户端发送的消息。下面是HttpRequestHandler代码,其继承SimpleChannelInboundHandler。
public class HttpRequestHandler

    extends SimpleChannelInboundHandler<FullHttpRequest> {

    private final String wsUri;

    private static final File INDEX;

    static {

        URL location = HttpRequestHandler.class

            .getProtectionDomain()

            .getCodeSource().getLocation();

        try {

            String path = location.toURI() + "index.html";

            path = !path.contains("file:") ? path : path.substring(5);

            INDEX = new File(path);

        } catch (URISyntaxException e) {

            throw new IllegalStateException(

                "Unable to locate index.html", e);

        }

    }

    public HttpRequestHandler(String wsUri) {

        this.wsUri = wsUri;

    }

    @Override

    public void channelRead0(ChannelHandlerContext ctx,

        FullHttpRequest request) throws Exception {

        if (wsUri.equalsIgnoreCase(request.getUri())) {

            ctx.fireChannelRead(request.retain());

        } else {

            if (HttpHeaders.is100ContinueExpected(request)) {

                send100Continue(ctx);

            }

            RandomAccessFile file = new RandomAccessFile(INDEX, "r");

            HttpResponse response = new DefaultHttpResponse(

            request.getProtocolVersion(), HttpResponseStatus.OK);

            response.headers().set(

                HttpHeaders.Names.CONTENT_TYPE,

                "text/plain; charset=UTF-8");

            boolean keepAlive = HttpHeaders.isKeepAlive(request);

            if (keepAlive) {

                response.headers().set(

                    HttpHeaders.Names.CONTENT_LENGTH, file.length());

                response.headers().set( HttpHeaders.Names.CONNECTION,

                    HttpHeaders.Values.KEEP_ALIVE);

            }

            ctx.write(response);

            if (ctx.pipeline().get(SslHandler.class) == null) {

                ctx.write(new DefaultFileRegion(

                file.getChannel(), 0, file.length()));

            } else {

                ctx.write(new ChunkedNioFile(file.getChannel()));

            }

            ChannelFuture future = ctx.writeAndFlush(

                LastHttpContent.EMPTY_LAST_CONTENT);

            if (!keepAlive) {

                future.addListener(ChannelFutureListener.CLOSE);

            }

        }

    }

    private static void send100Continue(ChannelHandlerContext ctx) {

        FullHttpResponse response = new DefaultFullHttpResponse(

            HttpVersion.HTTP_1_1, HttpResponseStatus.CONTINUE);

        ctx.writeAndFlush(response);

    }

    @Override

    public void exceptionCaught(ChannelHandlerContext ctx, Throwable cause)

        throws Exception {

        cause.printStackTrace();

        ctx.close();

    }

}
上述代码用于处理纯HTTP请求,对于WebSocket而言,数据使用帧进行传输,完整的数据包含多帧。
2. 处理WebSocket帧
WebSocket定义了六种帧,如下图所示。
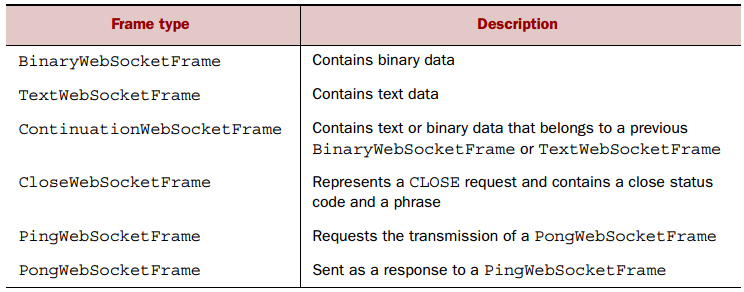
对于聊天应用而言,其包含如下帧:CloseWebSocketFrame、PingWebSocketFrame、PongWebSocketFrame、TextWebSocketFrame。
下面代码展示了用于处理TextWebSocketFrames的ChannelHandler。
public class TextWebSocketFrameHandler

    extends SimpleChannelInboundHandler<TextWebSocketFrame> {

    private final ChannelGroup group;

    public TextWebSocketFrameHandler(ChannelGroup group) {

        this.group = group;

    }

    @Override

    public void userEventTriggered(ChannelHandlerContext ctx,

        Object evt) throws Exception {

        if (evt == WebSocketServerProtocolHandler

            .ServerHandshakeStateEvent.HANDSHAKE_COMPLETE) {

            ctx.pipeline().remove(HttpRequestHandler.class);

            group.writeAndFlush(new TextWebSocketFrame(

                "Client " + ctx.channel() + " joined"));

            group.add(ctx.channel());

        } else {

            super.userEventTriggered(ctx, evt);

        }

    }

    @Override

    public void channelRead0(ChannelHandlerContext ctx,

        TextWebSocketFrame msg) throws Exception {

        group.writeAndFlush(msg.retain());

    }

}
3. 初始化ChannelPipeline
为在ChannelPipeline中添加ChannelHandler,需要继承ChannelInitializer并且实现initChannel方法,下面是ChatServerInitializer的代码。
public class ChatServerInitializer extends ChannelInitializer<Channel> {

    private final ChannelGroup group;

    public ChatServerInitializer(ChannelGroup group) {

        this.group = group;

    }

    @Override

    protected void initChannel(Channel ch) throws Exception {

        ChannelPipeline pipeline = ch.pipeline();

        pipeline.addLast(new HttpServerCodec());

        pipeline.addLast(new ChunkedWriteHandler());

        pipeline.addLast(new HttpObjectAggregator(64 * 1024));

        pipeline.addLast(new HttpRequestHandler("/ws"));

        pipeline.addLast(new WebSocketServerProtocolHandler("/ws"));

        pipeline.addLast(new TextWebSocketFrameHandler(group));

    }

}
对于使用HTTP协议(升级前)和WebSocket协议(升级后)的管道中的处理器分别如下图所示。

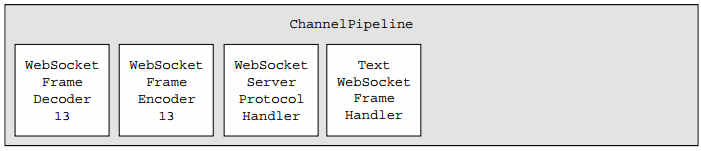
4. Bootstrapping
ChatServer类用于启动服务器并且安装ChatServerInitializer,其代码如下。
public class ChatServer {

    private final ChannelGroup channelGroup =

        new DefaultChannelGroup(ImmediateEventExecutor.INSTANCE);

    private final EventLoopGroup group = new NioEventLoopGroup();

    private Channel channel;

    public ChannelFuture start(InetSocketAddress address) {

        ServerBootstrap bootstrap = new ServerBootstrap();

        bootstrap.group(group)

            .channel(NioServerSocketChannel.class)

            .childHandler(createInitializer(channelGroup));

        ChannelFuture future = bootstrap.bind(address);

        future.syncUninterruptibly();

        channel = future.channel();

        return future;

    }

    protected ChannelInitializer<Channel> createInitializer(

        ChannelGroup group) {

        return new ChatServerInitializer(group);

    }

    public void destroy() {

        if (channel != null) {

            channel.close();

        }

        channelGroup.close();

        group.shutdownGracefully();

    }

    public static void main(String[] args) throws Exception {

        if (args.length != 1) {

            System.err.println("Please give port as argument");

            System.exit(1);

        }

        int port = Integer.parseInt(args[0]);

        final ChatServer endpoint = new ChatServer();

        ChannelFuture future = endpoint.start(

            new InetSocketAddress(port));

        Runtime.getRuntime().addShutdownHook(new Thread() {

            @Override

            public void run() {

                endpoint.destroy();

            }

        });

        future.channel().closeFuture().syncUninterruptibly();

    }

}
上述代码就完成了服务端的所有代码,接着进行测试。
2.4 加密应用
上述代码中可正常进行通信,但是并未加密,首先需要添加SecureChatServerInitializer,其代码如下。
public class SecureChatServerInitializer extends ChatServerInitializer {

    private final SslContext context;

    public SecureChatServerInitializer(ChannelGroup group,

        SslContext context) {

        super(group);

        this.context = context;

    }

    @Override

    protected void initChannel(Channel ch) throws Exception {

        super.initChannel(ch);

        SSLEngine engine = context.newEngine(ch.alloc());

        ch.pipeline().addFirst(new SslHandler(engine));

    }

}
然后添加SecureChatServerInitializer,代码如下。
public class SecureChatServer extends ChatServer {

    private final SslContext context;

    public SecureChatServer(SslContext context) {

        this.context = context;

    }

    @Override

    protected ChannelInitializer<Channel> createInitializer(

        ChannelGroup group) {

        return new SecureChatServerInitializer(group, context);

    }

    public static void main(String[] args) throws Exception {

        if (args.length != 1) {

            System.err.println("Please give port as argument");

            System.exit(1);

        }

        int port = Integer.parseInt(args[0]);

        SelfSignedCertificate cert = new SelfSignedCertificate();

        SslContext context = SslContext.newServerContext(

        cert.certificate(), cert.privateKey());

        final SecureChatServer endpoint = new SecureChatServer(context);

        ChannelFuture future = endpoint.start(new InetSocketAddress(port));

        Runtime.getRuntime().addShutdownHook(new Thread() {

            @Override

            public void run() {

                endpoint.destroy();

            }

        });

        future.channel().closeFuture().syncUninterruptibly();

    }

}
2.5 测试应用
在编译的classes文件夹中加入index.html(客户端),其中index.html的源码如下
<!DOCTYPE html>

<html>

<head>

<meta charset="UTF-8">

<title>WebSocket Chat</title>

</head>

<body>

    <script type="text/javascript">

        var socket;

        if (!window.WebSocket) {

            window.WebSocket = window.MozWebSocket;

        }

        if (window.WebSocket) {

            socket = new WebSocket("ws://localhost:8080/ws");

            socket.onmessage = function(event) {

                var ta = document.getElementById('responseText');

                ta.value = ta.value + '\n' + event.data

            };

            socket.onopen = function(event) {

                var ta = document.getElementById('responseText');

                ta.value = "connected!";

            };

            socket.onclose = function(event) {

                var ta = document.getElementById('responseText');

                ta.value = ta.value + "connection is shutdown";

            };

        } else {

            alert("your broswer do not support WebSocket!");

        }

        function send(message) {

            if (!window.WebSocket) {

                return;

            }

            if (socket.readyState == WebSocket.OPEN) {

                socket.send(message);

            } else {

                alert("connection is not start.");

            }

        }

    </script>

    <form onsubmit="return false;">

        <h3>WebSocket ChatRoom:</h3>

        <textarea id="responseText" style="width: 500px; height: 300px;"></textarea>

        <br>

        <input type="text" name="message"  style="width: 300px" value="">

        <input type="button" value="Send Message" onclick="send(this.form.message.value)">

        <input type="button" onclick="javascript:document.getElementById('responseText').value=''" value="Clear message">

    </form>

    <br>

    <br>

</body>

</html>
然后启动ChatServer(非加密方式),最后在浏览器中访问localhost:8080(可打开多个窗口,多个客户端),其运行效果如下。


可以看到两个客户端之间可以正常进行通信,互相发送消息。
三、总结
本篇博文通过一个示例讲解了WebSocket协议的具体使用,可完成不同客户端之间的通信,也谢谢各位园友的观看~
【Netty】WebSocket的更多相关文章
- 【Netty】源码分析目录
前言 为方便系统的学习Netty,特整理文章目录如下. [Netty]第一个Netty应用 [Netty]Netty核心组件介绍 [Netty]Netty传输 [Netty]Netty之ByteBuf ...
- 【Netty】(7)---搭建websocket服务器
[Netty](7)---搭建websocket服务器 说明:本篇博客是基于学习某网有关视频教学. 目的:创建一个websocket服务器,获取客户端传来的数据,同时向客户端发送数据 一.服务端 1. ...
- 【Netty】(8)---理解ChannelPipeline
ChannelPipeline ChannelPipeline不是单独存在,它肯定会和Channel.ChannelHandler.ChannelHandlerContext关联在一起,所以有关概念这 ...
- 【Netty】(6) ---源码ServerBootstrap
[Netty]6 ---源码ServerBootstrap 之前写了两篇与Bootstrap相关的文章,一篇是ServerBootstrap的父类,一篇是客户端Bootstrap类,博客地址: [Ne ...
- 【Netty】(5)源码 Bootstrap
[Netty]5 源码 Bootstrap 上一篇讲了AbstractBootstrap,为这篇做了个铺垫. 一.概述 Bootstrap 是 Netty 提供的一个便利的工厂类, 我们可以通过它来完 ...
- 【Netty】netty学习之nio了解
[一]五种IO模型: (1)阻塞IO(2)非阻塞IO(任务提交,工作线程处理,委托线程等待工作线程处理结果的同时,也可以做其他的事情)(3)IO复用模型.(委托线程接收多个任务,将任务提交给工作线程. ...
- 【转】WebSocket 是什么原理?为什么可以实现持久连接?
WebSocket是HTML5出的东西 也就是说HTTP协议没有变化 但HTTP是不支持持久连接的(长连接,循环连接的不算)或者说WebSocket干脆就不是基于HTTP来执行的.但是...说不通啊. ...
- 【Netty】netty学习之nio网络编程的模型
[一]NIO服务器编程结构 [二]Netty3.x服务端线程模型
- 【Netty】Netty入门之WebSocket小例子
服务端: 引入Netty依赖 <!-- netty --> <dependency> <groupId>io.netty</groupId> <a ...
随机推荐
- cocoapods安装好后repo换源
1.pod repo 然后会出现以下内容,如下是我已经换了之后的,而你的URL还是github的 master - Type: git (master) - URL: https://git.cod ...
- Linux学习---vi/vim命令
Vim是从 vi 发展出来的一个文本编辑器.代码补完.编译及错误跳转等方便编程的功能特别丰富,在程序员中被广泛使用. 所以本文直接用Vim编辑器 基本上 vi/vim 共分为三种模式,分别是命令模式( ...
- 【Spark2.0源码学习】-1.概述
Spark作为当前主流的分布式计算框架,其高效性.通用性.易用性使其得到广泛的关注,本系列博客不会介绍其原理.安装与使用相关知识,将会从源码角度进行深度分析,理解其背后的设计精髓,以便后续 ...
- java OJ题目判断输入结束(与C语言的EOF结束等价)
/* * java 作Oj题目是会有输入若干数据的情况,不好判断输入结束符, * 类似于C语言中的EOF符号 * 在这里提供了一种方法 * */ import java.util.Iterator; ...
- mybatis插入List集合数据
处女帖 今天做完一个定时任务将一个表中的数据每天统计到另外一个表中,开始是用循环的方式向数据库添加,觉得数据库可能访问压力过大,所以就使用了mybatis的foreach标签来稍微的减少压力. 首先封 ...
- [系统启动]Printk与sched_clock_init的一点分析
作者:Younger Liu, 本作品采用知识共享署名-非商业性使用-相同方式共享 3.0 未本地化版本许可协议进行许可. 在分析Linu内核启动的过程中,发现一段"不平常" ...
- 深入解析MySQL视图view
阅读目录---深入解析MySQL视图view 创建视图 查看视图 视图的更改 create or replace view alter DML drop 使用with check option约束 嵌 ...
- 【NLP】3000篇搜狐新闻语料数据预处理器的python实现
3000篇搜狐新闻语料数据预处理器的python实现 白宁超 2017年5月5日17:20:04 摘要: 关于自然语言处理模型训练亦或是数据挖掘.文本处理等等,均离不开数据清洗,数据预处理的工作.这里 ...
- iOS 详解NSObject协议
协议就是一组接口的集合,遵守一个协议之后就拥有的该协议中所有方法的声明.NSObject这个类遵守了NSObject协议,并且实现了NSObject协议里的所有方法,所以NSObject类及其子类 ...
- CSS3特效----图片动态提示效果
需掌握的知识点: 1.掌握两个HTML5新标签figure以及figcaption的用法 2.掌握transform的属性特点,并能熟练运用 3.学会通过transition及transform配合, ...