
SpringMVC上传图片总结(1)---常规方法进行图片上传,使用了MultipartFile、MultipartHttpServletRequest
原文地址:https://blog.csdn.net/chenchunlin526/article/details/70945877
SpringMVC上传图片总结(1)---常规方法进行图片上传,使用了MultipartFile、MultipartHttpServletRequest
<?xml version="1.0" encoding="UTF-8"?><web-app xmlns:xsi="http://www.w3.org/2001/XMLSchema-instance"xmlns:web="http://java.sun.com/xml/ns/javaee" xmlns="http://java.sun.com/xml/ns/javaee"xsi:schemaLocation="http://java.sun.com/xml/ns/javaee http://java.sun.com/xml/ns/javaee/web-app_3_0.xsd"id="WebApp_ID" version="3.0"><listener><listener-class>org.springframework.web.context.ContextLoaderListener</listener-class></listener><filter><filter-name>logFilter</filter-name><filter-class>com.ourchem.web.filter.LogFilter</filter-class></filter><filter-mapping><filter-name>logFilter</filter-name><url-pattern>*.do</url-pattern></filter-mapping><filter-mapping><filter-name>logFilter</filter-name><url-pattern>/j_spring_security_check</url-pattern></filter-mapping><filter-mapping><filter-name>logFilter</filter-name><url-pattern>/j_spring_security_logout</url-pattern></filter-mapping><!-- 配置spring security 权限过滤器 --><filter><filter-name>springSecurityFilterChain</filter-name><filter-class>org.springframework.web.filter.DelegatingFilterProxy</filter-class></filter><filter-mapping><filter-name>springSecurityFilterChain</filter-name><url-pattern>/*</url-pattern></filter-mapping><!-- SpringMVC的字符编码过滤器 --><filter><filter-name>encodingFilter</filter-name><filter-class>org.springframework.web.filter.CharacterEncodingFilter</filter-class><init-param><param-name>encoding</param-name><param-value>UTF-8</param-value></init-param><init-param><param-name>forceEncoding</param-name><param-value>false</param-value></init-param></filter><filter-mapping><filter-name>encodingFilter</filter-name><url-pattern>/*</url-pattern></filter-mapping><!-- SpringMVC的前端控制器 --><servlet><servlet-name>spring-mvc</servlet-name><servlet-class>org.springframework.web.servlet.DispatcherServlet</servlet-class><init-param><param-name>contextConfigLocation</param-name><param-value>classpath:springmvc-servlet.xml</param-value></init-param><load-on-startup>1</load-on-startup></servlet><servlet-mapping><servlet-name>spring-mvc</servlet-name><!-- 由SpringMVC拦截.do的请求 --><url-pattern>*.do</url-pattern></servlet-mapping><session-config><session-timeout>60</session-timeout></session-config><welcome-file-list><welcome-file>/WEB-INF/jsp/index.jsp</welcome-file><welcome-file>/index.jsp</welcome-file></welcome-file-list><error-page><error-code>404</error-code><location>/WEB-INF/jsp/404.jsp</location></error-page><error-page><error-code>500</error-code><location>/WEB-INF/jsp/500.jsp</location></error-page></web-app>
<?xml version="1.0" encoding="UTF-8"?><beans xmlns="http://www.springframework.org/schema/beans"xmlns:xsi="http://www.w3.org/2001/XMLSchema-instance"xmlns:p="http://www.springframework.org/schema/p"xmlns:context="http://www.springframework.org/schema/context"xmlns:mvc="http://www.springframework.org/schema/mvc"xmlns:aop="http://www.springframework.org/schema/aop"xsi:schemaLocation="http://www.springframework.org/schema/beanshttp://www.springframework.org/schema/beans/spring-beans-3.1.xsdhttp://www.springframework.org/schema/contexthttp://www.springframework.org/schema/context/spring-context-3.1.xsdhttp://www.springframework.org/schema/aophttp://www.springframework.org/schema/aop/spring-aop-3.0.xsdhttp://www.springframework.org/schema/mvchttp://www.springframework.org/schema/mvc/spring-mvc-3.1.xsd"><aop:aspectj-autoproxy /><mvc:annotation-driven /><!-- 把标记了@Controller注解的类转换为bean --><context:component-scan base-package="com.ourchem.web.**.controller" use-default-filters="false" ><context:include-filter type="annotation" expression="org.springframework.stereotype.Controller"/></context:component-scan><!-- 上传文件的设置 ,maxUploadSize=-1,表示无穷大。uploadTempDir为上传的临时目录 --><bean id="multipartResolver"class="org.springframework.web.multipart.commons.CommonsMultipartResolver"><!-- 设置上传文件的最大尺寸为10MB 10*1024*1024 --><property name="maxUploadSize"><value>10485760</value></property></bean><bean class="org.springframework.web.servlet.mvc.annotation.AnnotationMethodHandlerAdapter" /><bean class="org.springframework.web.servlet.mvc.annotation.DefaultAnnotationHandlerMapping" /><!-- 对模型视图名称的解析,即在模型视图名称添加前后缀 -->
<bean id="viewResolver"class="org.springframework.web.servlet.view.InternalResourceViewResolver"><property name="viewClass" value="org.springframework.web.servlet.view.JstlView" /><property name="prefix" value="/WEB-INF/jsp/"></property><property name="suffix" value=".jsp"></property></bean></beans>
<%@ page language="java" contentType="text/html; charset=UTF-8"pageEncoding="UTF-8"%><%@ taglib prefix="sec" uri="http://www.springframework.org/security/tags"%><%@ taglib prefix='fmt' uri="http://java.sun.com/jsp/jstl/fmt" %><!DOCTYPE html><html lang="zh-CN"><head><%@ include file="/common/common.jsp"%><title>${projectName }一上传文件</title></head><body><%@ include file="/common/include.jsp" %><div id="top"><div id="layoutHeader"><%@ include file="/common/head.jsp" %></div><div id="layoutMain"><div class="infor-tit">上传文件</div><div class="personal-btn"><a class="fl del-back" href="${basePath }/cms/notices/toUpload.do">返回上传</a></div><div class="infor2-container"><form class="fl-l" id="uploadForm" enctype="multipart/form-data" method="post" action="<c:url value= '/cms/notices/upload.do'/>" ><!-- 上传文件1:<input type="file" name="file"/><br/> --><!-- 上传文件2:<input type="file" name="file"/><br/> -->上传文件3:<input type="file" name="file"/><input type="submit" value="提 交"/></form><h2>上传结果(单个文件):</h2><img alt="" src="${basePath }${fileUrl }" /><!-- <h2>上传结果(单个文件):</h2> --><%-- <img alt="" src="${basePath }${fileUrl }" /> --%><!-- 多文件上传则用这个,把上面的input标签注释全部打开,然后把上面的单个文件显示注释掉 --><h2>上传结果(多个文件):</h2><c:forEach items="${fileUrlList}" var="fileUrl" varStatus="status"><img alt="" src="${basePath }${fileUrl }" /></c:forEach></div></div></div><%@include file="/common/bottom.jsp" %><script type="text/javascript"src="${basePath}/scripts/custom/ie-placeholder.js"></script></body></html>
<%@ page language="java" contentType="text/html; charset=UTF-8"pageEncoding="UTF-8"%><%@ taglib prefix="sec" uri="http://www.springframework.org/security/tags"%><%@ taglib prefix='fmt' uri="http://java.sun.com/jsp/jstl/fmt" %><!DOCTYPE html><html lang="zh-CN"><head><%@ include file="/common/common.jsp"%><title>${projectName }一上传文件</title></head><body><%@ include file="/common/include.jsp" %><div id="top"><div id="layoutHeader"><%@ include file="/common/head.jsp" %></div><div id="layoutMain"><div class="infor-tit">上传文件</div><div class="personal-btn"><a class="fl del-back" href="${basePath }/cms/notices/toUpload.do">返回上传</a></div><div class="infor2-container"><form class="fl-l" id="uploadForm" enctype="multipart/form-data" method="post" action="<c:url value= '/cms/notices/upload.do'/>" >上传文件1:<input type="file" name="file1"/><br/><br/><br/>上传文件2:<input type="file" name="file2"/><br/><br/><br/>上传文件3:<input type="file" name="file3"/><input type="submit" value="提 交"/></form><h2>上传结果(多个文件):</h2><c:forEach items="${fileUrlList}" var="fileUrl" varStatus="status"><img alt="" src="${basePath }${fileUrl }" /></c:forEach></div></div></div><%@include file="/common/bottom.jsp" %><script type="text/javascript"src="${basePath}/scripts/custom/ie-placeholder.js"></script></body></html>
/*** 单个文件上传,方式一,使用MultipartFile作为方法参数接收传入的文件* 用 transferTo方法来保存图片,保存到本地磁盘。** @RequestParam("file")中的file对应input标签中的name属性值* @author chunlynn*/@RequestMapping("upload")public String upload(@RequestParam("file") MultipartFile file, HttpServletRequest request, ModelMap model) {// 先判断文件是否为空if (!file.isEmpty()) {// 获得原始文件名String fileName = file.getOriginalFilename();// 重命名文件String newfileName = new Date().getTime() + String.valueOf(fileName);//获得物理路径webapp所在路径/*** request.getSession().getServletContext().getRealPath("/")表示当前项目的根路径,如* D:\Workspaces\eclipse_luna\.metadata\.plugins\org.eclipse.wst.server.core\tmp3\wtpwebapps\sky\*/String pathRoot = request.getSession().getServletContext().getRealPath("");// 项目下相对路径String path = FILE_PATH + newfileName;// 创建文件实例File tempFile = new File(pathRoot + path);// 判断父级目录是否存在,不存在则创建if (!tempFile.getParentFile().exists()) {tempFile.getParentFile().mkdir();}// 判断文件是否存在,否则创建文件(夹)if (!tempFile.exists()) {tempFile.mkdir();}try {// 将接收的文件保存到指定文件中file.transferTo(tempFile);} catch (IllegalStateException e) {e.printStackTrace();} catch (IOException e) {e.printStackTrace();}// 方法一:model属性也行model.addAttribute("fileUrl", path); //保存路径,用于jsp页面回显// 方法二:Request域属性也行,两个二选一即可。// request.setAttribute("fileUrl", path);}// getWiewPath方法里就处理了一些路径,相当于转发forward,返回 return "cms/notices/upload";return getViewPath("upload"); // 转发到upload.jsp页面}@RequestMapping("/toUpload")public String toUpload() {// 相当于转发forward,转发到cms/notices/upload.jsp页面,框架会找到该逻辑视图名对应的 View并渲染return getViewPath("upload");}/**单文件上传,方式二,利用MultipartHttpServletRequest来解析request中的文件
* 用 transferTo方法来保存图片,保存到本地磁盘。* 普通request是无法解析请求中的文件的。MultipartHttpServletRequest是springmvc框架中的一个接口,默认实现类是DefaultMultipartHttpServletRequest@author chunlynn/@RequestMapping("upload2")
public String upload2(HttpServletRequest request, HttpServletResponse response, ModelMap model) {
// 先实例化一个文件解析器CommonsMultipartResolver coMultipartResolver = new CommonsMultipartResolver(request.getSession().getServletContext());
// 判断request请求中是否有文件上传if (coMultipartResolver.isMultipart(request)) {// 转换requestMultipartHttpServletRequest multiRequest = (MultipartHttpServletRequest) request;// 获得文件MultipartFile file = multiRequest.getFile("file");if (!file.isEmpty()) {
// 获得原始文件名String fileName = file.getOriginalFilename();String newfileName = new Date().getTime() + String.valueOf(fileName);//获得物理路径webapp所在路径String pathRoot = request.getSession().getServletContext().getRealPath("");// 项目下相对路径String path = FILE_PATH + newfileName;// 创建文件实例File tempFile = new File(pathRoot + path); //文件保存路径为pathRoot + pathif (!tempFile.getParentFile().exists()) {tempFile.getParentFile().mkdir();}if (!tempFile.exists()) {tempFile.mkdir();}try {// Transfer the received file to the given destination file.file.transferTo(tempFile);} catch (IllegalStateException e) {e.printStackTrace();} catch (IOException e) {e.printStackTrace();}
// 方法一:model属性也行model.addAttribute("fileUrl", path); //保存路径,用于jsp页面回显// 方法二:Request域属性也行,两个二选一即可。// request.setAttribute("fileUrl", path); //保存路径,用于jsp页面回显}}
return getViewPath("upload");}
/**多文件上传,方式一:利用MultipartFile[]作为方法的参数接收传入的文件用 transferTo方法来保存图片,保存到本地磁盘。@author chunlynn/@RequestMapping("upload3")public String upload3(@RequestParam("file") MultipartFile[] files, HttpServletRequest request,HttpServletResponse response, ModelMap model) {
List<String> fileUrlList = new ArrayList<String>(); //用来保存文件路径,用于jsp页面回显用String path = "";
// 先判断文件files不为空if (files != null && files.length > 0) {for (MultipartFile file : files) { //循环遍历,取出单个文件,下面的操作和单个文件就一样了if (!file.isEmpty()) {//这个判断必须加上
// 获得原始文件名String fileName = file.getOriginalFilename();String newfileName = new Date().getTime() + String.valueOf(fileName);//获得物理路径webapp所在路径String pathRoot = request.getSession().getServletContext().getRealPath("");// 项目下相对路径path = FILE_PATH + newfileName;// 创建文件实例File tempFile = new File(pathRoot + path); //文件保存路径为pathRoot + pathif (!tempFile.getParentFile().exists()) { /这个判断必须加上tempFile.getParentFile().mkdir();}if (!tempFile.exists()) {tempFile.mkdir();}try {// Transfer the received file to the given destination file.file.transferTo(tempFile);} catch (IllegalStateException e) {e.printStackTrace();} catch (IOException e) {e.printStackTrace();}
fileUrlList.add(path);}}
// 方法一:model属性保存图片路径也行model.addAttribute("fileUrlList", fileUrlList); //保存路径,用于jsp页面回显// 方法二:request域属性保存图片路径也行,两个二选一即可。// request.setAttribute("fileUrlList", fileUrlList); //保存路径,用于jsp页面回显
}
return getViewPath("upload");}/**多文件上传,方式二:利用MultipartHttpServletRequest来解析Request中的文件用 transferTo方法来保存图片,保存到本地磁盘。@author chunlynn*/@RequestMapping("upload4")public String upload4(HttpServletRequest request, HttpServletResponse response, ModelMap model) {
// 先实例化一个文件解析器CommonsMultipartResolver coMultiResolver = new CommonsMultipartResolver(request.getSession().getServletContext());
// 判断request请求中是否有文件上传if (coMultiResolver.isMultipart(request)) {
List<String> fileUrlList = new ArrayList<String>(); //用来保存文件路径,用来jsp页面遍历回显// 转换RequestMultipartHttpServletRequest multiRequest = (MultipartHttpServletRequest) request;// 获得文件,方式一List<MultipartFile> files = multiRequest.getFiles("file");for (MultipartFile file : files) { //循环遍历,取出单个文件,下面的操作和单个文件就一样了if (!file.isEmpty()) { //这个判断必须要加
// 获得原始文件名String fileName = file.getOriginalFilename();String newfileName = new Date().getTime() + String.valueOf(fileName);//获得物理路径webapp所在路径String pathRoot = request.getSession().getServletContext().getRealPath("");// 项目下相对路径String path = FILE_PATH + newfileName;// 创建文件实例File tempFile = new File(pathRoot + path); //文件保存路径为pathRoot + pathif (!tempFile.getParentFile().exists()) {tempFile.getParentFile().mkdir();}
if (!tempFile.exists()) {tempFile.mkdir();}
try {file.transferTo(tempFile);} catch (IllegalStateException e) {e.printStackTrace();} catch (IOException e) {e.printStackTrace();}
fileUrlList.add(path);}}
// 方法一:model属性保存图片路径也行model.addAttribute("fileUrlList", fileUrlList); //保存路径,用于jsp页面回显// 方法二:request域属性保存图片路径也行,两个二选一即可。// request.setAttribute("fileUrlList", fileUrlList); //保存路径,用于jsp页面回显
}
return getViewPath("upload");}/**多文件上传,方式三:利用MultipartHttpServletRequest来解析Request中的文件,用流的方式将文件存到磁盘使用流来存图片,保存到本地磁盘。@author chunlynn/@RequestMapping("upload5")public String upload5(HttpServletRequest request, HttpServletResponse response, ModelMap model) {
// 先实例化一个文件解析器CommonsMultipartResolver coMultiResolver = new CommonsMultipartResolver(request.getSession().getServletContext());
// 判断request请求中是否有文件上传if (coMultiResolver.isMultipart(request)) {
List<String> fileUrlList = new ArrayList<String>(); //用来保存文件路径// 转换RequestMultipartHttpServletRequest multiRequest = (MultipartHttpServletRequest) request;// 获得文件,方式一,input标签name属性值相同都为"file"List<MultipartFile> files = multiRequest.getFiles("file");for (MultipartFile file : files) { //循环遍历,取出单个文件,下面的操作和单个文件就一样了if (!file.isEmpty()) { //这个判断必须要加
// 获得原始文件名String fileName = file.getOriginalFilename();String newfileName = new Date().getTime() + String.valueOf(fileName);//获得物理路径webapp所在路径String pathRoot = request.getSession().getServletContext().getRealPath("");// 项目下相对路径String path = FILE_PATH + newfileName;
try {//创建输出流,用流将文件保存到指定目录FileOutputStream fos = new FileOutputStream(pathRoot + path);// 获得输入流InputStream in = file.getInputStream();int len = 0;byte[] buffer = new byte[1024]; //创建缓冲区 1kB,byte表示一个字节B,1KB=1024B// Reads some number of bytes from the inputstream and stores them into the buffer array b.while ((len = in.read(buffer)) != -1) { // 如果不用缓存,会一个字节一个字节的写,这样影响效率,效率低下fos.write(buffer, 0, len); //每次1KB的方式写入}fos.flush();fos.close();in.close();} catch (FileNotFoundException e) {e.printStackTrace();} catch (IOException e) {e.printStackTrace();}
fileUrlList.add(path);}}
// 方法一:model属性保存图片路径也行model.addAttribute("fileUrlList", fileUrlList); //保存路径,用于jsp页面回显// 方法二:request域属性保存图片路径也行,两个二选一即可。// request.setAttribute("fileUrlList", fileUrlList); //保存路径,用于jsp页面回显
}
return getViewPath("upload");}/**多文件上传,方式三:利用MultipartHttpServletRequest来解析Request中的文件,用流的方式将文件存到磁盘使用流来存图片,保存到本地磁盘。jsp页面的input标签可以有不同的name属性值@author chunlynn*/@RequestMapping("upload6")public String upload6(HttpServletRequest request, HttpServletResponse response, ModelMap model) {
// 先实例化一个文件解析器CommonsMultipartResolver coMultiResolver = new CommonsMultipartResolver(request.getSession().getServletContext());
// 判断request请求中是否有文件上传if (coMultiResolver.isMultipart(request)) {
List<String> fileUrlList = new ArrayList<String>(); //用来保存文件路径// 转换RequestMultipartHttpServletRequest multiRequest = (MultipartHttpServletRequest) request;
// 获得文件,方式二// Return an java.util.Iterator of String objects containing the parameter names of the multipart files contained in this request.// jsp页面的input标签可以有不同的name属性值Iterator<String> fileNames = multiRequest.getFileNames();
while (fileNames.hasNext()) { //循环遍历MultipartFile file = multiRequest.getFile(fileNames.next()); //取出单个文件if (!file.isEmpty()) { //这个判断必须要加,下面的操作和单个文件就一样了// 获得原始文件名String fileName = file.getOriginalFilename();String newfileName = new Date().getTime() + String.valueOf(fileName);//获得物理路径webapp所在路径String pathRoot = request.getSession().getServletContext().getRealPath("");// 项目下相对路径String path = FILE_PATH + newfileName;
try {//创建输出流,用流将文件保存到指定目录FileOutputStream fos = new FileOutputStream(pathRoot + path);// 获得输入流InputStream in = file.getInputStream();int len = 0;byte[] buffer = new byte[1024]; //创建缓冲区 1kB,byte表示一个字节B,1KB=1024B// Reads some number of bytes from the inputstream and stores them into the buffer array b.while ((len = in.read(buffer)) != -1) { // 如果不用缓存,会一个字节一个字节的写,这样影响效率,效率低下fos.write(buffer, 0, len); //每次1KB的方式写入}fos.flush();fos.close();in.close();
} catch (FileNotFoundException e) {e.printStackTrace();} catch (IOException e) {e.printStackTrace();}
fileUrlList.add(path);}}
// 方法一:model属性保存图片路径也行model.addAttribute("fileUrlList", fileUrlList); //保存路径,用于jsp页面回显// 方法二:request域属性保存图片路径也行,两个二选一即可。// request.setAttribute("fileUrlList", fileUrlList); //保存路径,用于jsp页面回显
}
return getViewPath("upload");}
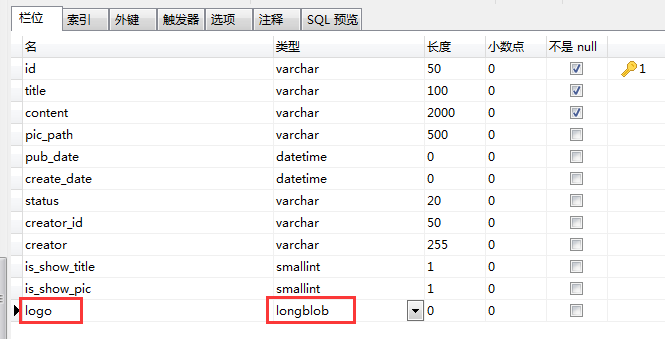
public static final String FILE_PATH = "/upload/chunlynn/"; //相对路径/**单文件上传,利用MultipartHttpServletRequest来解析Request中的文件,用流的方式将文件存到数据库。使用流来存图片,保存进数据库。保存进数据库的多半是用户头像之类的小图片,占用空间比较小的。一次一张。jsp页面的其他参数,可以通过request.getParameter()获取@author chunlynn*/@RequestMapping("upload7")public String upload7(HttpServletRequest request, HttpServletResponse response, ModelMap model) {
// 先实例化一个文件解析器CommonsMultipartResolver coMultiResolver = new CommonsMultipartResolver(request.getSession().getServletContext());// 判断request请求中是否有文件上传if (coMultiResolver.isMultipart(request)) {// 转换RequestMultipartHttpServletRequest multiRequest = (MultipartHttpServletRequest) request;// 获得文件MultipartFile file = multiRequest.getFile("file");
if (!file.isEmpty()) { //这个判断必须要加
try {// 举例,Notices就是一个普通的model类
Notices notices = new Notices();notices.setCreateDate(new Date());notices.setPicPath("/upload/aaa.jpg");// jsp页面中的其他非文件类参数,直接request就可以获取到
notices.setTitle(request.getParameter("title"));if (StringUtil.isNotEmpty(request.getParameter("isShowPic"))) {notices.setIsShowPic(1);} else {notices.setIsShowPic(0);}notices.setIsShowTitle(1);notices.setContent("这是内容content");
// 获得输入流InputStream in = file.getInputStream();byte[] data = new byte[] {};data = inputStreamToByte(in);// 将文件保存到字节数组中notices.setLogo(data); // 将字节数组保存到对象中
noticesService.save(notices); // 保存进数据库in.close();} catch (FileNotFoundException e) {e.printStackTrace();} catch (Exception e) {e.printStackTrace();}}}
return getViewPath("upload");}/**将文件保存到字节数组中This class implements an output stream in which the data is written into a byte array.* @author chunlynn*/public byte[] inputStreamToByte(InputStream in) throws Exception {// This class implements an output stream in which the data is written into a byte array.ByteArrayOutputStream bos = new ByteArrayOutputStream(); // 输出流对象,用来接收文件流,然后写入一个字节数组中int len;byte[] buffer = new byte[1024]; //缓存1KBwhile ((len = in.read(buffer)) != -1) {bos.write(buffer, 0, len);}byte[] data = bos.toByteArray(); // 字节数组,输出流中的文件保存到字节数组bos.close();return data;}/**该方法放在父类controller中* @author chunlynn*/
protected String viewPath = "cms/notices"; //在本controller进行初始化
protected String getViewPath(String viewName) {if (viewPath == null)return viewName;if (viewPath.endsWith(File.separator))return viewPath + viewName;return viewPath + File.separator + viewName;}
}
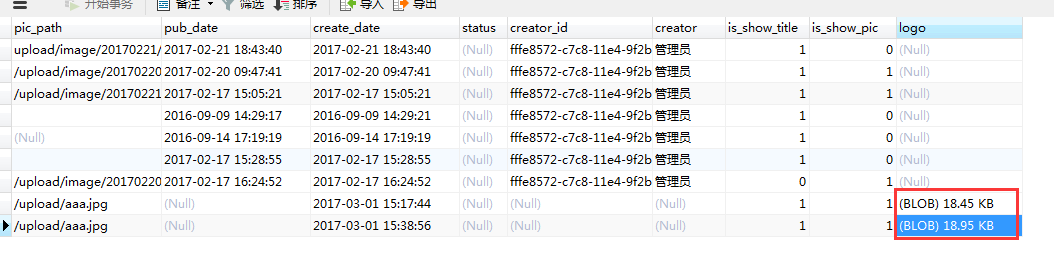
/*** 以字节数组保存在数据库里的图片,如要在jsp页面显示,则调用controller方法,该用户有头像则会显示,然后img标签的src中获得* 的是写在Reponse中的流*/<div id="userLogoContainer" class="head-pic portrait"><c:if test="${! empty domain.LOGO}" var="rs"><img src="<c:url value='/cms/notices/getUserLogo.do'/>" width="100px" height="100px"/></c:if></div>
/**获取用户logo@author chunlynn*/
@RequestMapping(value = "/getUserLogo")public void getUserLogo(HttpServletRequest request, HttpServletResponse response) throws Exception {Loginer loginer = (Loginer) request.getSession().getAttribute(Loginer.SESSION_KEY);User user = userInfoService.getUserById(loginer.getId()); //获取当前用户对象if (user != null) {if (user.getLogo() != null) {byte[] data = new byte[] {};data = (byte[]) user.getLogo(); //获取当前用户对象中的logo数据,转为字节数组response.setContentType("");OutputStream outputStream = response.getOutputStream(); //response的输出流for (int i = 0; i < data.length; i++) {outputStream.write(data[i]); //resp出字节流}outputStream.close(); //关闭输出流}}}
/****/<!-- webuploader.js --><script type="text/javascript" src="${basePath }/scripts/webuploader/webuploader.js"> </script><!-- webuploader.css --><link rel="stylesheet" type="text/css" href="${basePath }/scripts/webuploader/webuploader.css"><script type="text/javascript" src="${basePath }/scripts/cms/mywebuploader.js"></script><!--dom结构部分--><div id="uploader-demo" ><!--用来存放item,图片列表fileList--><div id="fileList" class="uploader-list"></div><div id="filePicker" >选择图片</div></div><!-- <input type="button" id="btn" value="开始上传"> -->
=js文件=
$(function() {
var $ = jQuery,// 展示图片列表的容器
$list = $('#fileList'),// 优化retina, 在retina下这个值是2ratio = window.devicePixelRatio || 1,
// 缩略图大小,像素像素thumbnailWidth = 100 ratio,thumbnailHeight = 100 ratio,
// Web Uploader实例uploader;
// 初始化Web Uploadervar uploader = WebUploader.create({
// 选完文件后,是否自动上传。auto: true,
// swf文件路径swf: basePath + '/scripts/webuploader/Uploader.swf',
// 文件接收服务端。server: basePath + '/cms/notices/upload8.do',
//fileVal : "file", // 指定input标签name的属性值
threads:'5', //同时运行5个线程传输fileNumLimit:'10', //文件总数量只能选择10个
// 选择文件的按钮。可选。// 内部根据当前运行是创建,可能是input元素,也可能是flash.// pick: '#filePicker',pick: { id:'#filePicker', //选择文件的按钮multiple:true },
// 只允许选择图片文件。accept: {title: 'Images',extensions: 'gif,jpg,jpeg,bmp,png',mimeTypes: 'image/'}});
// 当有文件添加进来的时候,//监听fileQueued事件,通过uploader.makeThumb来创建图片预览图。//PS: 这里得到的是Data URL数据,IE6、IE7不支持直接预览。可以借助FLASH或者服务端来完成预览。uploader.on( 'fileQueued', function( file ) {var $li = $('<div id="' + file.id + '" class="file-item thumbnail">' +'<img>' +'<div class="info">' + file.name + '</div>' +'</div>'),$img = $li.find('img');// $list为容器jQuery实例
$list.append( $li );
// 创建缩略图, thumbnailWidth x thumbnailHeight 为 100 x 100uploader.makeThumb( file, function( error, src ) { //webuploader方法if ( error ) {$img.replaceWith('<span>不能预览</span>');return;}$img.attr( 'src', src );}, thumbnailWidth, thumbnailHeight );
});
// 然后剩下的就是上传状态提示了,当文件 上传过程中, 上传成功,上传失败,上传完成// 都分别对应uploadProgress, uploadSuccess, uploadError, uploadComplete事件。
// 文件上传过程中创建进度条实时显示。uploader.on( 'uploadProgress', function( file, percentage ) {var $li = $( '#'+file.id ),$percent = $li.find('.progress span');
// 避免重复创建if ( !$percent.length ) {$percent = $('<p class="progress"><span></span></p>').appendTo( $li ).find('span');}
$percent.css( 'width', percentage * 100 + '%' );});
// 文件上传成功,给item添加成功class, 用样式标记上传成功。uploader.on( 'uploadSuccess', function( file,response) {$( '#'+file.id ).addClass('upload-state-done');});
// 文件上传失败,现实上传出错。uploader.on( 'uploadError', function( file ) {var $li = $( '#'+file.id ),$error = $li.find('div.error');
// 避免重复创建if ( !$error.length ) {$error = $('<div class="error"></div>').appendTo( $li );}$error.text('上传失败');
});
// 完成上传完了,成功或者失败,先删除进度条。uploader.on( 'uploadComplete', function( file ) {$( '#'+file.id ).find('.progress').remove();});
//绑定提交事件$("#btn").click(function() {console.log("上传...");uploader.upload(); //执行手动提交console.log("上传成功");});});
全文完。
SpringMVC上传图片总结(1)---常规方法进行图片上传,使用了MultipartFile、MultipartHttpServletRequest的更多相关文章
- springmvc上传图片并显示--支持多图片上传
实现上传图片功能在Springmvc中很好实现.现在我将会展现完整例子. 开始需要在pom.xml加入几个jar,分别是: <dependency> <groupId>comm ...
- springMVC框架下——通用接口之图片上传接口
我所想要的图片上传接口是指服务器端在完成图片上传后,返回一个可访问的图片地址. spring mvc框架下图片上传非常简单,如下 @RequestMapping(value="/upload ...
- java图片上传,通过MultipartFile方式,如果后台获取null检查是否缺少步骤
本方法基于springMvc 1.首先需要在webap下创建images 2.在springmvc.xml上引入 <bean id="multipartResolver" c ...
- Ionic3学习笔记(十二)拍照上传图片以及从相册选择图片上传
本文为原创文章,转载请标明出处 目录 安装插件 导入 app.module.ts 创建 provider 更多 效果图 1. 安装插件 终端运行: ionic cordova plugin add c ...
- ASP.Net MVC3 图片上传详解(form.js,bootstrap)
图片上传的插件很多,但很多时候还是不能切合我们的需求,我这里给大家分享个我用一个form,file实现上传四张图片的小demo.完全是用jquery前后交互,没有用插件. 最终效果图如下: 玩过花田人 ...
- [上传下载] C# ImageUpload图片上传类教程与源码下载 (转载)
点击下载 ImageUpload.zip 功能如下图片1.设置属性后上传图片,用法如下 /// <summary> /// 图片上传类 /// </summary> //--- ...
- springmvc上传图片并显示图片--支持多图片上传
实现上传图片功能在Springmvc中很好实现.现在我将会展现完整例子. 开始需要在pom.xml加入几个jar,分别是: <dependency> <groupId>comm ...
- Spring+SpringMVC+MyBatis+easyUI整合优化篇(七)图片上传功能
日常啰嗦 前一篇文章<Spring+SpringMVC+MyBatis+easyUI整合优化篇(六)easyUI与富文本编辑器UEditor整合>讲了富文本编辑器UEditor的整合与使用 ...
- SpringMVC框架五:图片上传与JSON交互
在正式图片上传之前,先处理一个细节问题: 每一次发布项目,Tomcat都会重新解压war包,之前上传过的图片会丢失 为了解决这个问题:可以不在Tomcat下保存图片,而是另找一个目录. 上传图片: & ...
随机推荐
- 爬虫爬数据时,post数据乱码解决的方法
近期在写一个爬虫,目标站点是:http://zx.bjmemc.com.cn/.可能是为了防止被爬取数据,它给自身数据加了密. 用谷歌自带的抓包工具也不能捕获到数据. 于是下了Fiddler. ...
- MDL--元数据锁的锁请求与锁等待+元数据锁类对象
1 元数据锁的锁请求与锁等待 元数据锁在MySQL Server层,依照锁的状态被细分为两种.一种是已经施加的锁.一种是等待施加的锁即锁请求,这样被区分的原因,如MySQL对"cla ...
- 构建自己的AngularJS - 作用域和Digest(一)
作用域 第一章 作用域和Digest(一) Angular作用域是简单javascript对象,因此你能够像对其它对象一样加入属性.然而,他们也有一些额外的功能:用于观測数据结构的变化.这样的观察能力 ...
- shape- 设置虚线
<?xml version="1.0" encoding="utf-8"?> <shape xmlns:android="http: ...
- [NOI.AC#35]string 缩点+拓扑排序
链接 因为有交换相邻字母,因此给你字符串就相当于给你了这个字符串的所有排列 把等价的串映射到整数范围,再根据 \(m\) 种魔法连边,缩点后在 DAG 上DP即可 无耻地用了int128 #inclu ...
- Catch Me If You ... Can't Do Otherwise--转载
原文地址:https://dzone.com/articles/catch-me-if-you-cant-do-otherwise I don't know whether it's an anti- ...
- 反序列化xml到treeview
private void Form1_Load(object sender, EventArgs e) { string xmlPath = System.Environment.CurrentDir ...
- CISP/CISA 每日一题 16
CISA 每日一题(答) 作业调度软件的优点: 1.作业信息仅需建立一次,减少错误发生概率: 2.可定义作业间的依赖关系,当某一项作业失败时,依赖于该作业的后续作业就不会被执行: 3.所有成功或失败的 ...
- 洛谷 P1223 排队接水
洛谷 P1223 排队接水 题目描述 有n个人在一个水龙头前排队接水,假如每个人接水的时间为Ti,请编程找出这n个人排队的一种顺序,使得n个人的平均等待时间最小. 输入输出格式 输入格式: 输入文件共 ...
- 20.SpringBoot 之 读取环境变量和绑定属性对象
转自:https://blog.csdn.net/catoop/article/details/50548009