SpringBoot学习(二)—— springboot快速整合spring security组件
Spring Security
简介
spring security的核心功能为认证(Authentication),授权(Authorization),即认证用户是否能访问该系统,和授权用户可以在系统中进行哪些操作。
引入spring security组件
在 pom.xml 中加入
<dependency>

	<groupId>org.springframework.boot</groupId>

	<artifactId>spring-boot-starter-security</artifactId>

</dependency>

<dependency>

	<groupId>org.springframework.security</groupId>

	<artifactId>spring-security-test</artifactId>

	<scope>test</scope>

</dependency>
验证组件是否起到作用,现在不更改框架内的任何内容,启动项目,浏览器中依旧输入 http://localhost:8080 ,可看到如下界面,之前可以直接进入spring boot的初始界面,现在已经看不见了,spring security 导入后默认已经开启了验证,必须先登录验证通过后才能访问。
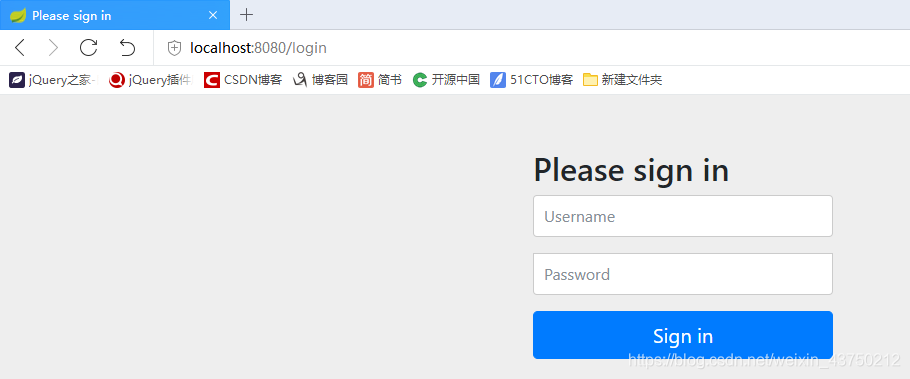
如果代码中不做任何设置,默认的账户是 user,默认的密码随着项目的启动,会打印在控制台中。

输入账号密码,即可进入默认的初始界面。
代码实战
为了最快最简单最直接的认识这个组件,直接把用户密码写入内存中,项目启动即存在,避免还有建表,实体类,数据库操作等与之无关的内容。命名使用最为简单粗暴的方式,排除一切干扰,用最少的精力掌握该组件的使用。
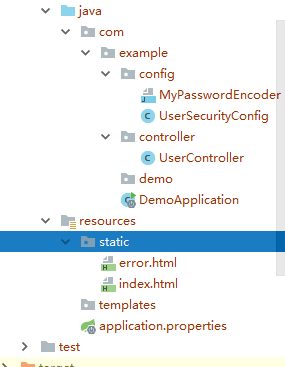
新增代码目录
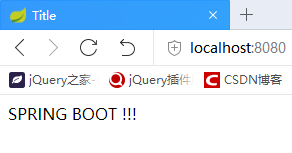
index.html
<!DOCTYPE html>

<html lang="en">

<head>

    <meta charset="UTF-8">

    <title>Title</title>

</head>

<body>

    SPRING BOOT !!!

</body>

</html>
error.html
<!DOCTYPE html>

<html lang="en">

<head>

    <meta charset="UTF-8">

    <title>Title</title>

</head>

<body>

    错误

</body>

</html>
UserController
package com.example.controller;

import org.springframework.stereotype.Controller;

import org.springframework.web.bind.annotation.RequestMapping;

import org.springframework.web.bind.annotation.ResponseBody;

@Controller

@RequestMapping("user")

public class UserController {

    @RequestMapping("/addUser")

    @ResponseBody

    String addUser() {

        return "这是添加用户!!!";

    }

    @RequestMapping("/deleteUser")

    @ResponseBody

    String deleteUser() {

        return "这是删除用户!!!";

    }

    @RequestMapping("/updateUser")

    @ResponseBody

    String updateUser() {

        return "这是修改用户!!!";

    }

    @RequestMapping("/findAllUsers")

    @ResponseBody

    String findAllUsers() {

        return "这是查询用户!!!";

    }

}
UserSecurityConfig
package com.example.config;

import org.springframework.security.config.annotation.authentication.builders.AuthenticationManagerBuilder;

import org.springframework.security.config.annotation.web.builders.HttpSecurity;

import org.springframework.security.config.annotation.web.configuration.EnableWebSecurity;

import org.springframework.security.config.annotation.web.configuration.WebSecurityConfigurerAdapter;

//注解开启 Spring Security 安全认证与授权

@EnableWebSecurity

public class UserSecurityConfig extends WebSecurityConfigurerAdapter {

    //用户认证

    @Override

    protected void configure(AuthenticationManagerBuilder auth) throws Exception {

        //内存里面放着

        auth.inMemoryAuthentication().passwordEncoder(new MyPasswordEncoder())

                //添加用户,密码,角色

                .withUser("zs").password("123456").roles("AAA")

                //链式编程

                .and()

                .withUser("ls").password("123456").roles("BBB")

                .and()

                .withUser("ww").password("123456").roles("CCC", "primary")

                .and()

                .withUser("zl").password("123456").roles("primary");

    }

    //用户授权

    @Override

    protected void configure(HttpSecurity http) throws Exception {

        /**

         * permitAll():允许一切用户访问

         * hasRole():url请求允许访问的角色

         * hasAnyRole() : url请求允许访问的多个角色

         * access():允许访问的角色,permitAll、hasRole、hasAnyRole 底层都是调用 access 方法

         * access("permitAll") 等价于 permitAll()

         */

        http.authorizeRequests().antMatchers("/").permitAll(); // "/":应用首页所以用户都可以访问

        http.authorizeRequests()

                .antMatchers("/user/addUser").hasRole("AAA") // 首斜杠"/"表示应用上下文,/user/addUser 请求允许 AAA 角色访问

                .antMatchers("/user/deleteUser/**").hasAnyRole("AAA", "BBB") //"/user/deleteUser/**"允许 "AAA", "BBB" 角色访问,/**匹配任意

                .antMatchers("/user/updateUser").hasAnyRole("AAA", "BBB", "CCC")//除了这种链式编程,也可以分开写

                .antMatchers("/user/findAllUsers").access("permitAll");

        http.authorizeRequests().anyRequest().authenticated();

        /**

         * formLogin:指定支持基于表单的身份验证

         * 当用户没有登录、没有权限时就会自动跳转到登录页面(默认 /login)

         * 当登录失败时,默认跳转到 /error

         * 登录成功时会放行

         */

        http.formLogin();

    }

}
MyPasswordEncoder
package com.example.config;

import org.springframework.security.crypto.password.PasswordEncoder;

//密码编码,Spring Security 高版本必须进行密码编码,否则报错

public class MyPasswordEncoder implements PasswordEncoder {

    @Override

    public String encode(CharSequence charSequence) {

        return charSequence.toString();

    }

    @Override

    public boolean matches(CharSequence charSequence, String s) {

        return s.equals(charSequence.toString());

    }

}
亲测效果是
以用户名 zs 登录(其角色权限为AAA),可以进入系统,浏览器输入地址可以访问, localhost:8080,localhost:8080/user/addUser,localhost:8080/user/deleteUser,localhost:8080/user/updateUser,localhost:8080/user/findAllUsers
以用户名 ls 登录(其角色权限为BBB),可以进入系统,浏览器输入地址可以访问, localhost:8080,localhost:8080/user/deleteUser,localhost:8080/user/updateUser,localhost:8080/user/findAllUsers
以用户名 ww 登录(其角色权限为CCC),可以进入系统,浏览器输入地址可以访问, localhost:8080,localhost:8080/user/deleteUser,localhost:8080/user/updateUser,localhost:8080/user/findAllUsers
以用户名 zl 登录(其角色权限为CCC),可以进入系统,浏览器输入地址可以访问, localhost:8080,localhost:8080/user/updateUser,localhost:8080/user/findAllUsers
以用户名 admin 登录,不可以进入系统,因为系统中还没有该用户。
SpringBoot学习(二)—— springboot快速整合spring security组件的更多相关文章
- Spring Boot教程(二十七)整合Spring Security
在这一节,我们将对/hello页面进行权限控制,必须是授权用户才能访问.当没有权限的用户访问后,跳转到登录页面. 添加依赖 在pom.xml中添加如下配置,引入对Spring Security的依赖. ...
- SpringBoot学习<二>——SpringBoot的默认配置文件application和多环境配置
一.SpringBoot的默认文件appliction 上一篇文章已经说明,springboot启动会内嵌tomcat,端口也是默认的8080,如果我们想要改变端口如果做呢? 在springboot项 ...
- SpringBoot安全篇Ⅵ --- 整合Spring Security
知识储备: 关于SpringSecurity的详细学习可以查看SpringSecurity的官方文档. Spring Security概览 应用程序的两个主要区域是"认证"和&qu ...
- SpringBoot整合Spring Security
好好学习,天天向上 本文已收录至我的Github仓库DayDayUP:github.com/RobodLee/DayDayUP,欢迎Star,更多文章请前往:目录导航 前言 Spring Securi ...
- springBoot整合spring security实现权限管理(单体应用版)--筑基初期
写在前面 在前面的学习当中,我们对spring security有了一个小小的认识,接下来我们整合目前的主流框架springBoot,实现权限的管理. 在这之前,假定你已经了解了基于资源的权限管理模型 ...
- springBoot整合spring security+JWT实现单点登录与权限管理--筑基中期
写在前面 在前一篇文章当中,我们介绍了springBoot整合spring security单体应用版,在这篇文章当中,我将介绍springBoot整合spring secury+JWT实现单点登录与 ...
- springboot+maven整合spring security
springboot+maven整合spring security已经做了两次了,然而还是不太熟悉,这里针对后台简单记录一下需要做哪些事情,具体的步骤怎么操作网上都有,不再赘述.1.pom.xml中添 ...
- 二:整合Spring Security
整合Spring Security 1.项目创建 2.初次体验 3.用户名配置 3.1 配置文件配置用户名/密码 3.2 Java 配置用户名/密码 4.登录配置 5.忽略拦截 江南一点雨:Sprin ...
- 【手摸手,带你搭建前后端分离商城系统】03 整合Spring Security token 实现方案,完成主业务登录
[手摸手,带你搭建前后端分离商城系统]03 整合Spring Security token 实现方案,完成主业务登录 上节里面,我们已经将基本的前端 VUE + Element UI 整合到了一起.并 ...
随机推荐
- 简单理解TCP通信的三次握手
TCP是主机对主机层的传输控制协议,提供可靠的连接服务,采用三次握手确认建立一个连接. 位码(可以理解为请求状态): 有6种标示:SYN(synchronous建立联机) ACK(acknowledg ...
- Unity - HasExitTime用法
本文详细分析了AnimatorController中动画切换过渡问题,即Translation过渡及hasExitTime的问题.方法为对实际项目中的所有情况进行分类,规划逻辑图,可视化分析解决这些问 ...
- 浅谈线段树 Segment Tree
众所周知,线段树是algo中很重要的一项! 一.简介 线段树是一种二叉搜索树,与区间树相似,它将一个区间划分成一些单元区间,每个单元区间对应线段树中的一个叶结点. 使用线段树可以快速的查找某一个节点在 ...
- 解析fiddler返回的部分数据。
1.通过抓包获取的数据,里面包含的哪些内容是需要我们去关注的? 2.首先上图. 3.图片说明: 此图片中是利用豆瓣API提供的接口实现返回数据.内容与抓包返回的内容格式一致 url:https://a ...
- HashMap - 类注释
了解到Java8以后HashMap的实现换了,也看了很多博客一直在向我这个小菜鸡说HashMap的重要.因此我决定洗心革面,好好正视HashMap 基于jdk 8 先从类注释开始入手学习,顺便提高提高 ...
- Bran的内核开发教程(bkerndev)-07 中断描述符表(IDT)
中断描述符表(IDT) 中断描述符表(IDT)用于告诉处理器调用哪个中断服务程序(ISR)来处理异常或汇编中的"int"指令.每当设备完成请求并需要服务事, 中断请求也会调用I ...
- python 线程、进程与协程
一.什么是线程?什么是进程? 第一,进程是一个实体.每一个进程都有它自己的地址空间,一般情况下,包括文本区域(text region).数据区域(data region)和堆栈(stack regio ...
- vue中改变数组的值视图无变化
今天开发的时候遇到一个多选取消点击状态的,渲染的时候先默认都选中,然后可以取消选中,自建了一个全为true的数组,点击时对应下标的arr[index]改为false,数据改变了状态没更新,突然想起来单 ...
- asp.net core Api集成Swagger
当我们通过vs创建了一个api项目后,便可以开始集成swagger了 一.Swagger集成 从“程序包管理器控制台”窗口进行安装,执行Install-Package Swashbuckle.AspN ...
- C++学习笔记13_操作MySql
1. 链接Mysql #include <winsock.h>#include "mysql.h"#include <stdlib.h>#include & ...