
SpringBoot安全篇Ⅵ --- 整合Spring Security
知识储备:
关于SpringSecurity的详细学习可以查看SpringSecurity的官方文档。
Spring Security概览
应用程序的两个主要区域是"认证"和"授权"(访问控制)。这两个主要区域是Spring Security的两个目标。
"认证"(Authentication),是建立一个他声明的主体的过程(一个"主体"一般是指用户,设备或一些可以在你的应用程序中执行动作的其他系统)。
"授权"(Authorization)指确定一个主体是否允许在你的应用程序执行一个动作的过程。为了抵达需要授权的点, 主体的身份已经有认证过程建立。
一.Spring Security快速入门
1.1 导入spring-boot-starter-security
<dependency>

       <groupId>org.springframework.boot</groupId>

       <artifactId>spring-boot-starter-security</artifactId>

</dependency>
1.2 编写SpringSecurity的配置类,该类需要继承WebSecurityConfigurerAdapter
这边需要开启基于WebSecurity的注解,由于这个注解内部以及有了@Configuration,所以不需要再加上@Configuration了。
@EnableWebSecurity //开启基于WebSecurity的注解(已经开启了@Configuration)

public class MySecurityConfig extends WebSecurityConfigurerAdapter {

}
1.3 在配置类中定制授权规则
 @Override

    protected void configure(HttpSecurity http) throws Exception {

        //super.configure(http);

        //定制请求的授权规则

        http.authorizeRequests().antMatchers("/").permitAll() //让所有人可以访问首页

        .antMatchers("/level1/**").hasRole("VIP1")

        .antMatchers("/level2/**").hasRole("VIP2")

        .antMatchers("/level3/**").hasRole("VIP3");

        //访问测试

        //开启自动配置的登陆功能,如果没有登录,则会来到登录页面

        http.formLogin();

        //该功能开启之后的效果:SpringSecurity自动处理的请求

        //1、/login 来到登录页

        //2、重定向到 /login?error 表示登录失败

        //3、更多信息

    }
1.4 定义认证规则
这边需要注意的是如果不用PasswordEncoder去验证密码会报错误,这里是解决方案
  @Override

    protected void configure(AuthenticationManagerBuilder auth) throws Exception {

        //super.configure(auth);

        //auth.jdbcAuthentication()

        //内存用户验证

    /*    auth.inMemoryAuthentication().withUser("wang").password("123456").roles("VIP1","VIP2").and()

                .withUser("xia").password("654321").roles("VIP2","VIP3");  //表单提交的时候密码是以密文匹配,会报错*/

        auth.inMemoryAuthentication()

                .passwordEncoder(new MyPasswordEncoder())

                .withUser("wang").password("123456").roles("VIP1","VIP2").and()

                .withUser("yun").password("123456").roles("VIP3"); //表单提交的时候密码是以明文匹配

    }
二.注销
在protected void configure(HttpSecurity http) throws Exception(){}方法中开启自动配置的注销功能:
http.logout()
开启后默认规则:
1.访问/logout表示用户注销,清空session
2.注销成功会返回/login?logout页面
配置注销以后直接来到首页;
http.logout().logoutSuccessUrl("/"); //注销以后来到首页
完整代码:
 @Override

    protected void configure(HttpSecurity http) throws Exception {

        //super.configure(http);

        //定制请求的授权规则

        http.authorizeRequests().antMatchers("/").permitAll() //让所有人可以访问首页

        .antMatchers("/level1/**").hasRole("VIP1")

        .antMatchers("/level2/**").hasRole("VIP2")

        .antMatchers("/level3/**").hasRole("VIP3");

        //访问测试

        //开启自动配置的登陆功能,如果没有登录,则会来到登录页面

        //SpringSecurity自动处理的请求

        //默认规则

        //1、/login 来到登录页

        //2、重定向到 /login?error 表示登录失败

        //3、更多信息

        http.formLogin();

        //开启自动配置的注销功能

        //默认规则

        //1.访问/logout表示用户注销,清空session

        //2.注销成功会返回/login?logout页面

        http.logout().logoutSuccessUrl("/"); //注销以后来到首页

    }
三.权限控制
3.1 版本依赖
使用这项功能前需要先将SpringBoot版本切换为1.5.6.RELEASE,SpringBoot2.x的版本使用时遇到了一些问题所以我将SpringBoot版本降级了。如果有Springboot2.x整合Spring Security成功使用权限控制的可以教教我。。。
将SpringBoot版本变为1.5.6.RELEASE后需要将thymeleaf的版本也切换一下:
<properties>
    <java.version>1.8</java.version>
    <thymeleaf.version>3.0.9.RELEASE</thymeleaf.version>
    <thymeleaf-layout-dialect.version>2.3.0</thymeleaf-layout-dialect.version>
    <thymeleaf-extras-springsecurity4.version>3.0.2.RELEASE</thymeleaf-extras-springsecurity4.version>
</properties>
在html使用spring security标签还需要导入thymeleaf-extra-springsecurity4包,版本为上面的版本3.0.2.RELEASE
<dependency>

            <groupId>org.thymeleaf.extras</groupId>

            <artifactId>thymeleaf-extras-springsecurity4</artifactId>

 </dependency>
3.2 权限控制
首先引入标签库
<html xmlns:th="http://www.thymeleaf.org"

      xmlns:sec="http://www.thymeleaf.org/thymeleaf-extras-springsecurity4">
如果没有认证则显示下面内容:
<div sec:authorize="!isAuthenticated()">

    <h2 align="center">游客您好,如果想查看武林秘籍 <a th:href="@{/login}">请登录</a></h2>

</div>
如果角色认证了显示出角色的信息:
<!--如果认证了-->

<div sec:authorize="isAuthenticated()">

    <h2><span sec:authentication="name"></span>,您好,您的角色有<span sec:authentication="principal.authorities"></span></h2>

    <form th:action="@{/logout}" method="post">

        <input type="submit" value="注销"/>

    </form>

</div>
控制只有拥有某个权限时才能显示该内容
<div sec:authorize="hasRole('VIP1')">

    <h3>普通武功秘籍</h3>

    <ul>

        <li><a th:href="@{/level1/1}">罗汉拳</a></li>

        <li><a th:href="@{/level1/2}">武当长拳</a></li>

        <li><a th:href="@{/level1/3}">全真剑法</a></li>

    </ul>

</div>
四.记住我
在protected void configure(HttpSecurity http) throws Exception(){}方法中开启记住我功能:
//开启记住我功能

 http.rememberMe();
开启该功能后,登陆页面会自动多一个记住我的复选框按钮。
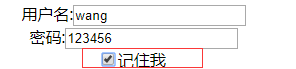
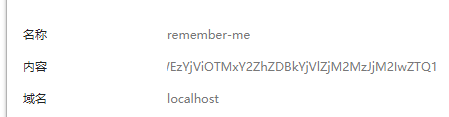
勾选登陆后,会自动生成cookie,下次访问时无需登陆即可访问。
五.自定义登陆页
上述功能都是基于默认规则的登录功能,那么如何制定自己的登录页呢?
5.1 定制Controller登录页
/*

     * 登陆页

     * @return

     */

    @GetMapping("/userlogin")

    public String loginPage() {

        return PREFIX+"login";

    }
5.2 在protected void configure(HttpSecurity http) throws Exception(){}中配置:
http.formLogin().usernameParameter("user").passwordParameter("pwd").loginPage("/userlogin");
一旦定制loginPage,那么loginPage的post请求就是登录。
5.3 登录的表单
<div align="center">

        <form th:action="@{/userlogin}" method="post">

            用户名:<input name="user"/><br>

            密码:<input name="pwd"><br/>

            <input type="checkbox" name="remeber"/>记住我 <br/>

            <input type="submit" value="登陆">

        </form>

</div>
5.4 自定义记住我功能
//开启记住我功能

http.rememberMe().rememberMeParameter("remeber");
SpringBoot安全篇Ⅵ --- 整合Spring Security的更多相关文章
- SpringBoot整合Spring Security
好好学习,天天向上 本文已收录至我的Github仓库DayDayUP:github.com/RobodLee/DayDayUP,欢迎Star,更多文章请前往:目录导航 前言 Spring Securi ...
- springBoot整合spring security+JWT实现单点登录与权限管理--筑基中期
写在前面 在前一篇文章当中,我们介绍了springBoot整合spring security单体应用版,在这篇文章当中,我将介绍springBoot整合spring secury+JWT实现单点登录与 ...
- springboot+maven整合spring security
springboot+maven整合spring security已经做了两次了,然而还是不太熟悉,这里针对后台简单记录一下需要做哪些事情,具体的步骤怎么操作网上都有,不再赘述.1.pom.xml中添 ...
- springBoot整合spring security实现权限管理(单体应用版)--筑基初期
写在前面 在前面的学习当中,我们对spring security有了一个小小的认识,接下来我们整合目前的主流框架springBoot,实现权限的管理. 在这之前,假定你已经了解了基于资源的权限管理模型 ...
- Spring Cloud实战 | 第九篇:Spring Cloud整合Spring Security OAuth2认证服务器统一认证自定义异常处理
本文完整代码下载点击 一. 前言 相信了解过我或者看过我之前的系列文章应该多少知道点我写这些文章包括创建 有来商城youlai-mall 这个项目的目的,想给那些真的想提升自己或者迷茫的人(包括自己- ...
- 【手摸手,带你搭建前后端分离商城系统】03 整合Spring Security token 实现方案,完成主业务登录
[手摸手,带你搭建前后端分离商城系统]03 整合Spring Security token 实现方案,完成主业务登录 上节里面,我们已经将基本的前端 VUE + Element UI 整合到了一起.并 ...
- Spring Boot整合Spring Security
Spring Boot对于该家族的框架支持良好,但是当中本人作为小白配置还是有一点点的小问题,这里分享一下.这个项目是使用之前发布的Spring Boot会员管理系统重新改装,将之前filter登录验 ...
- Spring Boot整合Spring Security自定义登录实战
本文主要介绍在Spring Boot中整合Spring Security,对于Spring Boot配置及使用不做过多介绍,还不了解的同学可以先学习下Spring Boot. 本demo所用Sprin ...
- 二:整合Spring Security
整合Spring Security 1.项目创建 2.初次体验 3.用户名配置 3.1 配置文件配置用户名/密码 3.2 Java 配置用户名/密码 4.登录配置 5.忽略拦截 江南一点雨:Sprin ...
随机推荐
- 基于python的分治法和例题
分治法 分治法的核心 分:将一个复杂的问题分成两个或更多的相同或相似的子问题,再把子问题分成更小的子问题 治:最后的子问题,可以很容易的直接求解 合:所有子问题的解合并起来就是原问题的解 分治法的特征 ...
- 页面跨域与iframe通信(Blocked a frame with origin)
项目中有个需求是在前后端分离的情况下,前台页面将后台页面加载在预留的iframe中:但是遇到了iframe和主窗口双滚动条的情况,由此引申出来了问题: 只保留单个滚动条,那么就要让iframe的高度自 ...
- callback、promise和async、await的使用方法
callback 回调是一个函数被作为一个参数传递到另一个函数里,在那个函数执行完后再执行.通俗的讲就是 B函数被作为参数传递到A函数里,在A函数执行完后再执行B. promise Promise 是 ...
- 将Samba设置为Active Directory域控制器
一 简介 从版本4.0开始,samba可以作为Active Directory(AD)域控制器(DC)运行,如果在生产环境中安装samba,建议运行两个或者多个DC用于故障转移 本文介绍如何让将一个S ...
- ssh免密登陆和加密解密
一 丶实现无密码的远程管理 1.生成公钥 私钥 [root@room9pc14 桌面]# ssh-keygen [root@room9pc14 桌面]# ls /root/.ssh/ 2.上传公钥到虚 ...
- shiro采坑指南—基础概念与实战
说明 代码及部分相关资料根据慕课网Mark老师的视频进行整理. 其他资料: shiro官网 基础概念 Authenticate/Authentication(认证) 认证是指检查用户身份合 ...
- 为什么样本方差的分母是n-1?为什么它又叫做无偏估计?
为什么样本方差的分母是n-1?最简单的原因,是因为因为均值已经用了n个数的平均来做估计在求方差时,只有(n-1)个数和均值信息是不相关的.而你的第n个数已经可以由前(n-1)个数和均值 来唯一确定,实 ...
- 剑指Offer-60~68题
60. \(n\) 个骰子的点数 题目描述: 扔 \(n\) 个骰子,向上面的数字之和为 \(S\).给定 \(n\),请列出所有可能的 \(S\) 值及其相应的概率. 示例: 输入:n = 1 输出 ...
- SQL Server2012高可用之事物复制(发布订阅)测试
(一)测试目的 目前公司使用的SQL SERVER 2012高可用环境为主备模式,其中主库可执行读写操作,备库既不可写也不可读,即采用的高可用技术为"数据库镜像".存在的问题为 ...
- ILSpy反编译工具之C#反汇编
1.下载ILspy工具 https://github.com/icsharpcode/ILSpy#ilspy------- 注意: ILspy需要在电脑上安装.NET Framework 4.0. ...