Spring Boot,Spring Security实现OAuth2 + JWT认证
阅读此文,希望是对JWT以及OAuth2有一定了解的童鞋。
JWT认证,提供了对称加密以及非对称的实现。
涉及到源码中两个服务
spring-boot-oauth-jwt-server
spring-boot-oauth-jwt-resource-server
认证服务端
提供认证、授权服务
实现方式,主要复写AuthorizationServerConfigurerAdapter实现
认证服务1-对称加密方式
对称加密,表示认证服务端和认证客户端的共用一个密钥
实现方式
- AccessToken转换器-定义token的生成方式,这里使用JWT生成token,对称加密只需要加入key等其他信息(自定义)。
          @Bean

          public JwtAccessTokenConverter accessTokenConverter() {

              JwtAccessTokenConverter converter = new JwtAccessTokenConverter();

              converter.setSigningKey("123");

              return converter;

          }
- 告诉spring security token的生成方式
        @Override

            public void configure(AuthorizationServerEndpointsConfigurer endpoints) throws Exception {

                endpoints.tokenStore(tokenStore())

                         .accessTokenConverter(accessTokenConverter())

                         .authenticationManager(authenticationManager);

            }
以上对称加密的JWT方式的认证服务端就OK了,后面有对应的资源服务端的内容。
认证服务2-非对称加密方式(公钥密钥)
服务端生成公钥和密钥,每个客户端使用获取到的公钥到服务器做认证。
因此首先要生成一个证书,导出公钥再后续步骤
实现方式
生成JKS文件
keytool -genkeypair -alias mytest -keyalg RSA -keypass mypass -keystore mytest.jks -storepass mypass

具体参数的意思不另说明。
导出公钥
keytool -list -rfc --keystore mytest.jks | openssl x509 -inform pem -pubkey

生成公钥文本
-----BEGIN PUBLIC KEY----->
MIIBIjANBgkqhkiG9w0BAQEFAAOCAQ8AMIIBCgKCAQEAhAF1qpL+8On3rF2M77lR
+l3WXKpGXIc2SwIXHwQvml/4SG7fJcupYVOkiaXj4f8g1e7qQCU4VJGvC/gGJ7sW
fn+L+QKVaRhs9HuLsTzHcTVl2h5BeawzZoOi+bzQncLclhoMYXQJJ5fULnadRbKN
HO7WyvrvYCANhCmdDKsDMDKxHTV9ViCIDpbyvdtjgT1fYLu66xZhubSHPowXXO15
LGDkROF0onqc8j4V29qy5iSnx8I9UIMEgrRpd6raJftlAeLXFa7BYlE2hf7cL+oG
hY+q4S8CjHRuiDfebKFC1FJA3v3G9p9K4slrHlovxoVfe6QdduD8repoH07jWULu
qQIDAQAB
-----END PUBLIC KEY-----
存储为public.txt。把 mytest.jks和public.txt放入resource目录下
- 这里我们要修改JwtAccessTokenConverter,把证书导入
        @Bean

        public TokenEnhancer accessTokenConverter() {

            final JwtAccessTokenConverter converter = new JwtAccessTokenConverter();

            KeyStoreKeyFactory keyStoreKeyFactory =

                    new KeyStoreKeyFactory(new ClassPathResource("mytest.jks"), "mypass".toCharArray());

            converter.setKeyPair(keyStoreKeyFactory.getKeyPair("mytest"));
        converter<span class="token punctuation">.</span><span class="token function">setAccessTokenConverter</span><span class="token punctuation">(</span><span class="token keyword">new</span> <span class="token class-name">CustomerAccessTokenConverter</span><span class="token punctuation">(</span><span class="token punctuation">)</span><span class="token punctuation">)</span><span class="token punctuation">;</span>

        <span class="token keyword">return</span> converter<span class="token punctuation">;</span>

    <span class="token punctuation">}</span>
以上,就可以实现非对称加密了
额外信息(这部分信息不关乎加密方式)
- 自定义生成token携带的信息
有时候需要额外的信息加到token返回中,这部分也可以自定义,此时我们可以自定义一个TokenEnhancer
TokenEnhancer 接口提供一个 enhance(OAuth2AccessToken var1, OAuth2Authentication var2) 方法,用于对token信息的添加,信息来源于 OAuth2Authentication
这里我们加入了用户的授权信息。
            @Override

            public OAuth2AccessToken enhance(OAuth2AccessToken accessToken, OAuth2Authentication authentication) {

                final Map<String, Object> additionalInfo = new HashMap<>();

                User user = (User) authentication.getUserAuthentication().getPrincipal();

                additionalInfo.put("username", user.getUsername());

                additionalInfo.put("authorities", user.getAuthorities());

                ((DefaultOAuth2AccessToken) accessToken).setAdditionalInformation(additionalInfo);

                return accessToken;

            }
同样要告诉spring security,我们把这个TokenEnhancer加入到TokenEnhancer链中(链,所以可以好多个)
        // 自定义token生成方式

        TokenEnhancerChain tokenEnhancerChain = new TokenEnhancerChain();

        tokenEnhancerChain.setTokenEnhancers(Arrays.asList(customerEnhancer(), accessTokenConverter()));

        endpoints.tokenEnhancer(tokenEnhancerChain);
- 自定义token信息中添加的信息
JWT中,需要在token中携带额外的信息,这样可以在服务之间共享部分用户信息,spring security默认在JWT的token中加入了user_name,如果我们需要额外的信息,需要自定义这部分内容。
JwtAccessTokenConverter是我们用来生成token的转换器,所以我们需要配置这里面的部分信息来达到我们的目的。
JwtAccessTokenConverter默认使用DefaultAccessTokenConverter来处理token的生成、装换、获取。DefaultAccessTokenConverter中使用UserAuthenticationConverter来对应处理token与userinfo的获取、转换。因此我们需要重写下UserAuthenticationConverter对应的转换方法就可以
        @Override

        public Map<String, ?> convertUserAuthentication(Authentication authentication) {

            LinkedHashMap response = new LinkedHashMap();

            response.put("user_name", authentication.getName());

            response.put("name", ((User) authentication.getPrincipal()).getName());

            response.put("id", ((User) authentication.getPrincipal()).getId());

            response.put("createAt", ((User) authentication.getPrincipal()).getCreateAt());

            if (authentication.getAuthorities() != null && !authentication.getAuthorities().isEmpty()) {

                response.put("authorities", AuthorityUtils.authorityListToSet(authentication.getAuthorities()));

            }
        <span class="token keyword">return</span> response<span class="token punctuation">;</span>

    <span class="token punctuation">}</span>
告诉JwtAccessTokenConverter ,把我们的方式替换默认的方式
        @Bean

        public TokenEnhancer accessTokenConverter() {

            final JwtAccessTokenConverter converter = new JwtAccessTokenConverter();

            converter.setSigningKey("123");

            converter.setAccessTokenConverter(new CustomerAccessTokenConverter());

            return converter;

        }
资源服务端
实现方式,主要复写ResourceServerConfigurerAdapter实现
资源服务1-对称加密方式
此处配置与认证服务基本一致,不同的是,资源服务器配置是在ResourceServerConfigurerAdapter做配置,其他的看源码吧,大差不差。
资源服务2-非对称加密方式(公钥)
把 public.txt放入resource目录下
修改JwtAccessTokenConverter如下:
        @Bean

        public JwtAccessTokenConverter accessTokenConverter() {

            JwtAccessTokenConverter converter = new JwtAccessTokenConverter();

            Resource resource = new ClassPathResource("public.txt");

            String publicKey = null;

            try {

                publicKey = inputStream2String(resource.getInputStream());

            } catch (final IOException e) {

                throw new RuntimeException(e);

            }

            converter.setVerifierKey(publicKey);

            converter.setAccessTokenConverter(new CustomerAccessTokenConverter());

            return converter;

        }
然后就可以跑起来了。
效果验证
token获取
code获取:
http://127.0.0.1:8081/oauth/authorize?client_id=clientId&response_type=code&redirect_uri=http://127.0.0.1:8082/login/my
redirect_uri:需要与配置在认证服务器中的一致。
client_id:client_id也是预先在认证服务器中,这里是保存在数据库里的
response_type:写死code
浏览器进入后的页面。

输入账号密码,这个也是保存在数据库,默认是保存在内存中。
授权之后就可以获得code
http://127.0.0.1:8082/login/my?code=rTKETX
根据这个code,POST下获取token
http://127.0.0.1:8081/oauth/token?grant_type=authorization_code&code=rTKETX&redirect_uri=http://127.0.0.1:8082/login/my&client_id=clientId&client_secret=secret
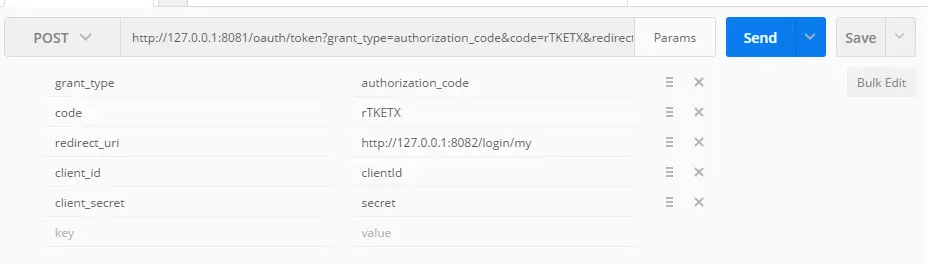
grant_type:这里写死authorization_code
code:上面得到的rTKETX
redirect_uri:同上不变
client_id:同上不变
client_secret:对应的密码
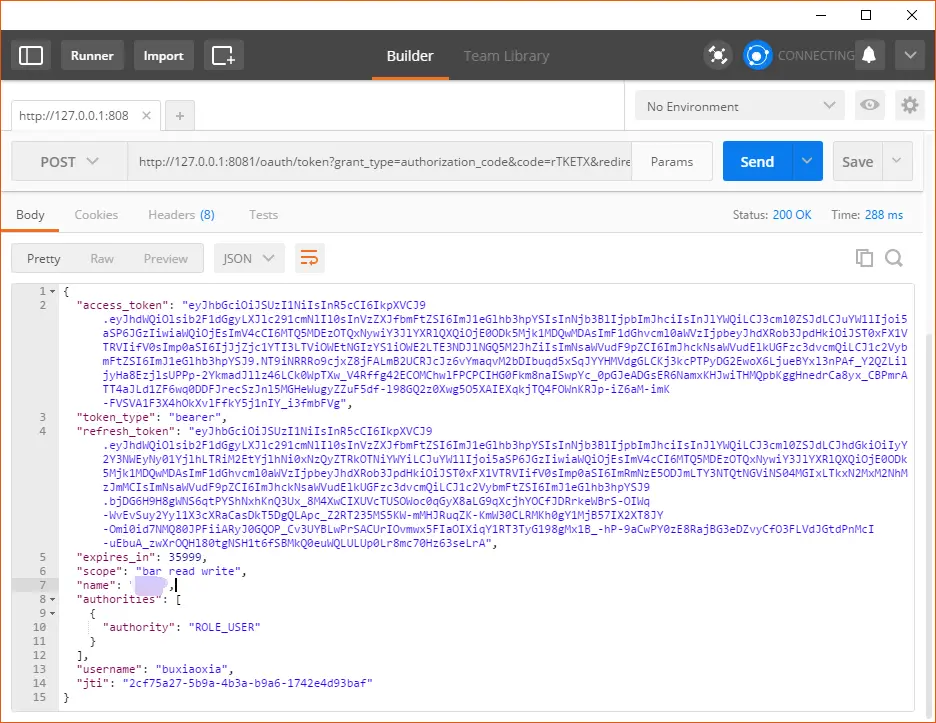
结果返回如下:
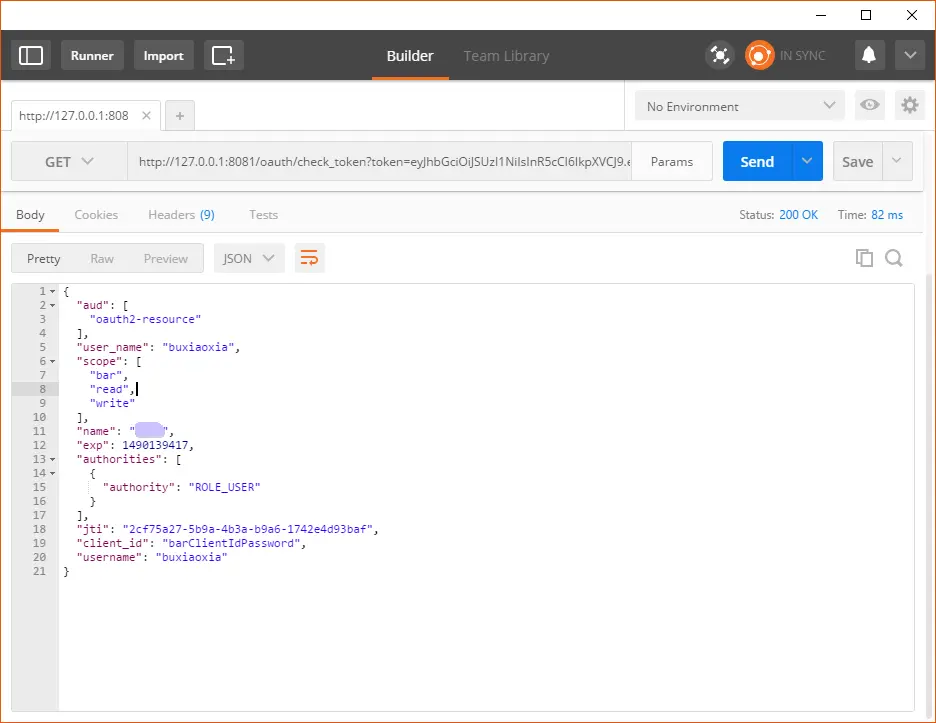
token验证
http://127.0.0.1:8081/oauth/check_token?token=eyJhbGciOiJSUzI1NiIsInR5cCI6IkpXVCJ9...
用户信息获取
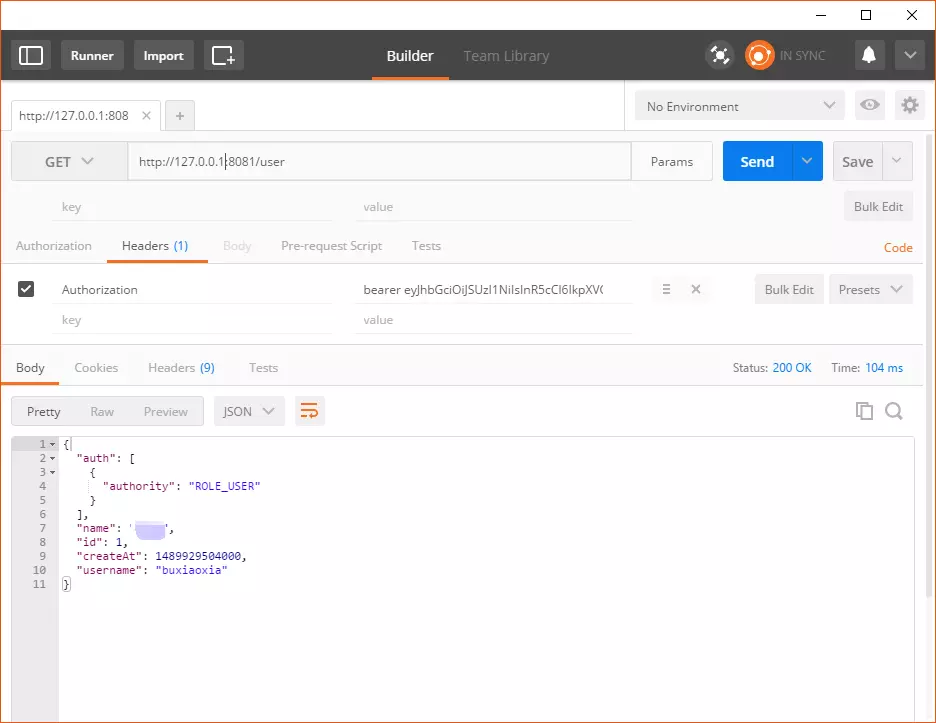
资源服务端就不展示了...
原文地址:https://www.jianshu.com/p/2c231c96a29b
Spring Boot,Spring Security实现OAuth2 + JWT认证的更多相关文章
- Spring Boot+Spring Security+JWT 实现 RESTful Api 认证(二)
Spring Boot+Spring Security+JWT 实现 RESTful Api 认证(二) 摘要 上一篇https://javaymw.com/post/59我们已经实现了基本的登录和t ...
- Spring Boot+Spring Security+JWT 实现 RESTful Api 认证(一)
标题 Spring Boot+Spring Security+JWT 实现 RESTful Api 认证(一) 技术 Spring Boot 2.Spring Security 5.JWT 运行环境 ...
- 基于Spring Boot+Spring Security+JWT+Vue前后端分离的开源项目
一.前言 最近整合Spring Boot+Spring Security+JWT+Vue 完成了一套前后端分离的基础项目,这里把它开源出来分享给有需要的小伙伴们 功能很简单,单点登录,前后端动态权限配 ...
- Spring boot +Spring Security + Thymeleaf 认证失败返回错误信息
[Please make sure to select the branch corresponding to the version of Thymeleaf you are using] Stat ...
- [权限管理系统(四)]-spring boot +spring security短信认证+redis整合
[权限管理系统]spring boot +spring security短信认证+redis整合 现在主流的登录方式主要有 3 种:账号密码登录.短信验证码登录和第三方授权登录,前面一节Sprin ...
- 255.Spring Boot+Spring Security:使用md5加密
说明 (1)JDK版本:1.8 (2)Spring Boot 2.0.6 (3)Spring Security 5.0.9 (4)Spring Data JPA 2.0.11.RELEASE (5)h ...
- 256.Spring Boot+Spring Security: MD5是加密算法吗?
说明 (1)JDK版本:1.8 (2)Spring Boot 2.0.6 (3)Spring Security 5.0.9 (4)Spring Data JPA 2.0.11.RELEASE (5)h ...
- Spring Boot+Spring Security:获取用户信息和session并发控制
说明 (1)JDK版本:1.8(2)Spring Boot 2.0.6(3)Spring Security 5.0.9(4)Spring Data JPA 2.0.11.RELEASE(5)hiber ...
- 快速搭建基于Spring Boot + Spring Security 环境
个人博客网:https://wushaopei.github.io/ (你想要这里多有) 1.Spring Security 权限管理框架介绍 简介: Spring Security 提供了基于 ...
随机推荐
- C博客作业03——函数
0.展示PTA总分 截图展示: 1.本章学习总结 1.1学习内容总结 (a)函数的定义 1)函数是一个完成特定工作的独立程序模块,包括库函数和自定义函数两种,scanf(),printf()等为库函数 ...
- mysql in和not in
mysql> select * from table1; +----------+------------+-----+---------------------+-------+ | name ...
- Unity3D获取Android平台的电量
刚开始的时候以为这个应该不简单.我也开始百度,寻找获取手机的电量的方法.大概有俩种方式:一种是直接访问一个文件,意思是说Android手机的电量等信息保存到了这个文件中.但是我试验的时候没有访问出来, ...
- Java_jdbc 基础笔记之九 数据库连接 (查询Customer对象的方法)
/** * * 写一个查询Customer对象的方法 * */ public Customer getCustomer(String sql, Object... args) { Customer c ...
- 纯CSS样式实现数字加减按钮的最佳方案
前言: 对于数字加减按钮的实现,以前用过不少方案,诸如: 1.使用背景图片——这种效果比较好,缺点是样式控制有点复杂了,还需要使用图片: 2.直接使用“+”“-”——这种方法简单粗暴,最容易实现,缺点 ...
- C语言 字符串切割
#include <stdio.h> #include <stdlib.h> #include <string.h> /* 字符串切割函数 */ /* 知识补充: ...
- 【SpringBoot】SpringBoot快速入门(一)
SpringBoot介绍 Spring Boot使创建可运行的独立,生产级基于Spring的应用程序变得容易.对Spring平台和第三方库整合,这样就可以以最小的麻烦开始使用.大多数Spring Bo ...
- Qt开发经验小技巧21-30
如果出现Z-order assignment: is not a valid widget.错误提示,用记事本打开对应的ui文件,找到为空的地方,删除即可. 善于利用QComboBox的addItem ...
- plsql if
set serveroutput on accept num prompt '请输入一个数字'; declare pnum number := # begin then dbms_ou ...
- Sql server 中将数据行转列列转行(二)
老规矩,先弄一波测试数据,数据填充代码没有什么意义,先折叠起来: /* 第一步:创建临时表结构 */ CREATE TABLE #Student --创建临时表 ( StuName ), --学生名称 ...