基础设计模式-03 从过滤器(Filter)校验链学习职责链模式
1.职责链路模式
1.1UML图
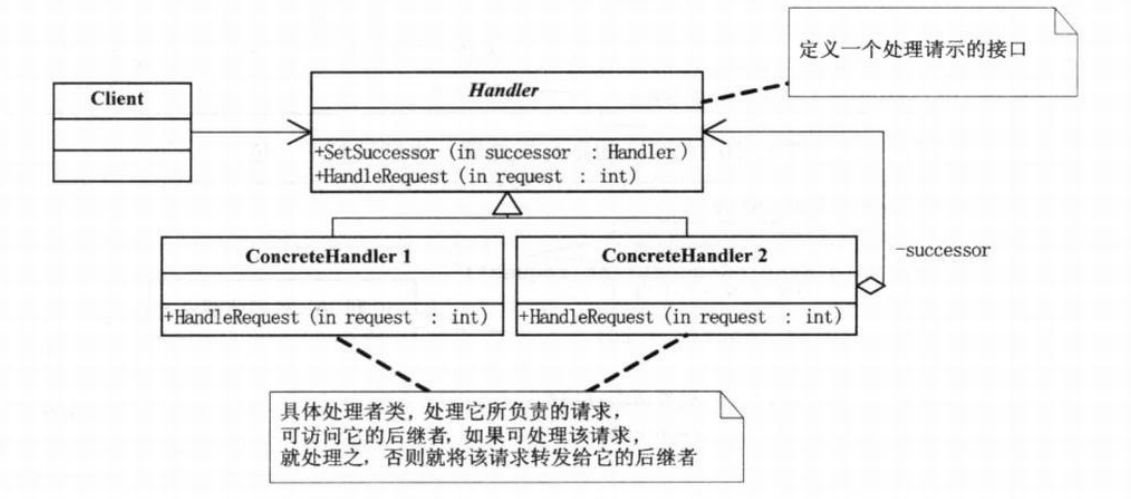
1.2 职责链路模式的概念
为了避免处理对象的耦合关系,将对象连成一个链,沿着这个链进行访问,直到有一个对象处理位置;
1.3 优点
1.按照一定的顺序执行判断;
2.避免校验对象之间耦合关系;
3.不用担心没有代码没有执行到;
2.职责链路模式在过滤器(Filter)中的使用
1.源码查看
1.ApplicationDispatcher
这段代码总共做了三件事:1.过滤器链创建;2.过滤链逐个过滤;3.释放过滤链资源;
 private void invoke(ServletRequest request, ServletResponse response,

            State state) throws IOException, ServletException {

        //。。。。。。。。前面的代码省略

        // Get the FilterChain Here

        ApplicationFilterChain filterChain =

                ApplicationFilterFactory.createFilterChain(request, wrapper, servlet); //创建过滤器校验链条

        // Call the service() method for the allocated servlet instance

        try {

            // for includes/forwards

            if ((servlet != null) && (filterChain != null)) {

               filterChain.doFilter(request, response); //进行过滤器校验

             }

            // Servlet Service Method is called by the FilterChain

        } catch (ClientAbortException e) {

        //。。。。。。。省略中间错误判断代码

    }

        // Release the filter chain (if any) for this request

        try {

            if (filterChain != null)

                filterChain.release();//释放过滤器资源

        } catch (Throwable e) {

            ExceptionUtils.handleThrowable(e);

            wrapper.getLogger().error(sm.getString("standardWrapper.releaseFilters",

                             wrapper.getName()), e);

            // FIXME: Exception handling needs to be similar to what is in the StandardWrapperValue

        }

       //。。。。。。。。。后面的代码省略

    }
2.ApplicationFilterFactory(过滤链条创建过程)
从下面可以看出主要是一下操作:
1.初始化ApplicatFilterChain 过滤器校验链;
2.从上下文环境中,获取之前配置的过滤器数据;
3.将符合URL,serveletName的过滤器配置到ApplicationFilterChain中
 public static ApplicationFilterChain createFilterChain(ServletRequest request,

            Wrapper wrapper, Servlet servlet) {

        // If there is no servlet to execute, return null

        if (servlet == null)

            return null;

        // Create and initialize a filter chain object  初始化链式对象

        ApplicationFilterChain filterChain = null;

        if (request instanceof Request) {

            Request req = (Request) request;

            if (Globals.IS_SECURITY_ENABLED) {

                // Security: Do not recycle

                filterChain = new ApplicationFilterChain();

            } else {

                filterChain = (ApplicationFilterChain) req.getFilterChain();

                if (filterChain == null) {

                    filterChain = new ApplicationFilterChain();

                    req.setFilterChain(filterChain);

                }

            }

        } else {

            // Request dispatcher in use

                 filterChain = new ApplicationFilterChain();

        }

        filterChain.setServlet(servlet);

        filterChain.setServletSupportsAsync(wrapper.isAsyncSupported());

        // Acquire the filter mappings for this Context   获取过滤器配置的上下文

        StandardContext context = (StandardContext) wrapper.getParent();

        FilterMap filterMaps[] = context.findFilterMaps();

        // If there are no filter mappings, we are done

        if ((filterMaps == null) || (filterMaps.length == 0))

            return filterChain;

        // Acquire the information we will need to match filter mappings

        DispatcherType dispatcher =

                (DispatcherType) request.getAttribute(Globals.DISPATCHER_TYPE_ATTR);

        String requestPath = null;

        Object attribute = request.getAttribute(Globals.DISPATCHER_REQUEST_PATH_ATTR);

        if (attribute != null){

            requestPath = attribute.toString();

        }

        String servletName = wrapper.getName();

        // Add the relevant path-mapped filters to this filter chain   将符合需求的过滤器加入到过滤链中

        for (int i = 0; i < filterMaps.length; i++) {

            if (!matchDispatcher(filterMaps[i] ,dispatcher)) {

                continue;

            }

            if (!matchFiltersURL(filterMaps[i], requestPath))

                continue;

            ApplicationFilterConfig filterConfig = (ApplicationFilterConfig)

                context.findFilterConfig(filterMaps[i].getFilterName());

            if (filterConfig == null) {

                // FIXME - log configuration problem

                continue;

            }

            filterChain.addFilter(filterConfig);

        }

        // Add filters that match on servlet name second

        for (int i = 0; i < filterMaps.length; i++) {

            if (!matchDispatcher(filterMaps[i] ,dispatcher)) {

                continue;

            }

            if (!matchFiltersServlet(filterMaps[i], servletName))

                continue;

            ApplicationFilterConfig filterConfig = (ApplicationFilterConfig)

                context.findFilterConfig(filterMaps[i].getFilterName());

            if (filterConfig == null) {

                // FIXME - log configuration problem

                continue;

            }

            filterChain.addFilter(filterConfig);

        }

        // Return the completed filter chain

        return filterChain;

    }
3.ApplicationFilterChain(过滤链增加的具体过程)
这个方法比较简单:1.数组扩容;2.增加新的过滤器;
private ApplicationFilterConfig[] filters = new ApplicationFilterConfig[0];//过滤器存储的实体类

private int pos = 0;//当前过滤位置

private int n = 0;//存储的过滤器的总数
public static final int INCREMENT = 10;
void addFilter(ApplicationFilterConfig filterConfig) {

        // Prevent the same filter being added multiple times

        for(ApplicationFilterConfig filter:filters)

            if(filter==filterConfig)

                return;

        if (n == filters.length) {

            ApplicationFilterConfig[] newFilters =

                new ApplicationFilterConfig[n + INCREMENT];

            System.arraycopy(filters, 0, newFilters, 0, n);

            filters = newFilters;

        }

        filters[n++] = filterConfig;

    }
4.ApplicationFilterChain 的doFilter方法
处理过程:
1.获取pos位置的过滤器;
2.Filter执行,将当前过滤链对象,作为参数进行传递;
3.pos过滤器后移1位进行调用,直到pos大于总过滤器位置;
   @Override

    public void doFilter(ServletRequest request, ServletResponse response)

        throws IOException, ServletException {

        if( Globals.IS_SECURITY_ENABLED ) {

            final ServletRequest req = request;

            final ServletResponse res = response;

            try {

                java.security.AccessController.doPrivileged(

                    new java.security.PrivilegedExceptionAction<Void>() {

                        @Override

                        public Void run()

                            throws ServletException, IOException {

                            internalDoFilter(req,res);

                            return null;

                        }

                    }

                );

            } catch( PrivilegedActionException pe) {

                Exception e = pe.getException();

                if (e instanceof ServletException)

                    throw (ServletException) e;

                else if (e instanceof IOException)

                    throw (IOException) e;

                else if (e instanceof RuntimeException)

                    throw (RuntimeException) e;

                else

                    throw new ServletException(e.getMessage(), e);

            }

        } else {

            internalDoFilter(request,response);

        }

    }

    //实际处理过滤任务的方法

    private void internalDoFilter(ServletRequest request,

                                  ServletResponse response)

        throws IOException, ServletException {

        // Call the next filter if there is one

        if (pos < n) {

            ApplicationFilterConfig filterConfig = filters[pos++];//pos默认是从0开始的,调用后+1

            try {

                Filter filter = filterConfig.getFilter();

                if (request.isAsyncSupported() && "false".equalsIgnoreCase(

                        filterConfig.getFilterDef().getAsyncSupported())) {

                    request.setAttribute(Globals.ASYNC_SUPPORTED_ATTR, Boolean.FALSE);

                }

                if( Globals.IS_SECURITY_ENABLED ) {

                    final ServletRequest req = request;

                    final ServletResponse res = response;

                    Principal principal =

                        ((HttpServletRequest) req).getUserPrincipal();

                    Object[] args = new Object[]{req, res, this};

                    SecurityUtil.doAsPrivilege ("doFilter", filter, classType, args, principal);

                } else {

                    filter.doFilter(request, response, this);//这里是最重要的一点,过滤器将过滤链对象作为一个参数向下传递,从而可以自动的进行链式校验

                }

            } catch (IOException | ServletException | RuntimeException e) {

                throw e;

            } catch (Throwable e) {

                e = ExceptionUtils.unwrapInvocationTargetException(e);

                ExceptionUtils.handleThrowable(e);

                throw new ServletException(sm.getString("filterChain.filter"), e);

            }

            return;

        }
      //。。。。。。。。。。省略部分代码

    }
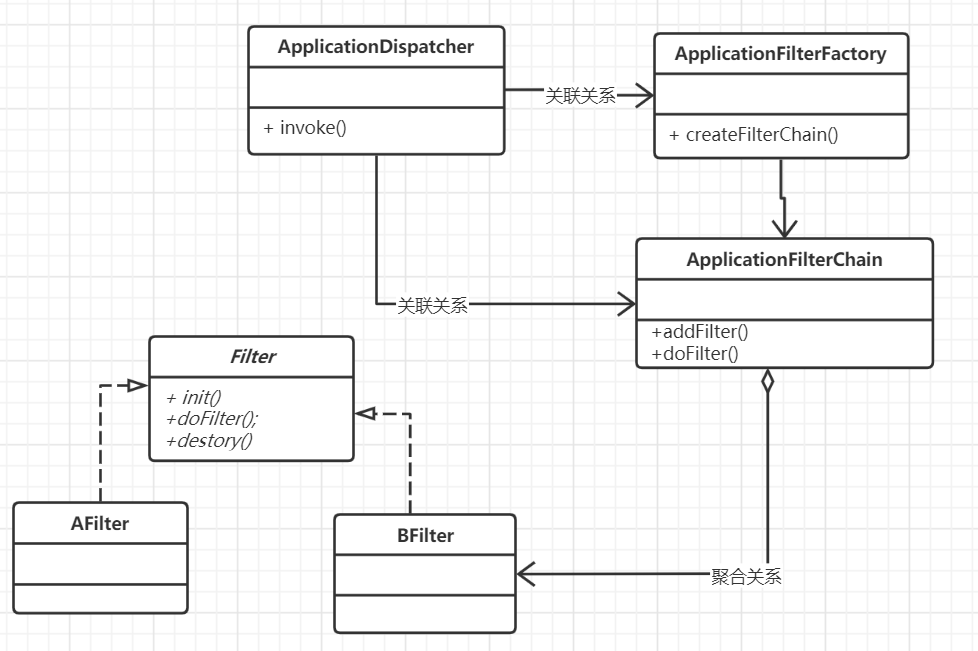
2.UML图(上面的链式调用的图,如有错误还请指出)
3.手写一个通用校验链
业务需求:前端传来数据,动态SQL拼接,判断SQL各个部分是否数据有问题;
1.定义接口
/**

 * 参数校验锁链管理

 * @param

 * @author lpf

 */

public interface CheckChain{

    public abstract void doCheck(Param param) throws Exception;

}
2.对过滤参数进行约束
public interface Param<T extends Param> {

    public abstract <T> T get();

}
3.定义过滤接口
@Service

public interface CheckFilter<T extends Param> {

    /**

     * 参数校验方法

     * @param chain

     * @return

     */

    public abstract void checkParam(Param<T> param, CheckChain chain) throws Exception;

}
4.默认链式校验实现类
/**

 * 默认链式检查

 */

public class DefaultCheckChain implements CheckChain {

    /**

     *

     */

    private ParamCheckWapper[] wappers = new ParamCheckWapper[0];

    private static final int INCREMENT = 10;

    private int n = 0;

    private int pos = 0;

    //进行链式检查

    @Override

    public void doCheck(Param filed) throws Exception {

        if(pos < n){

            ParamCheckWapper wapper = wappers[pos++];

            CheckFilter paramCheck = wapper.getParamCheck();

            Assert.notNull(paramCheck,"链式类不能为空");

            paramCheck.checkParam(filed,this);

        }

    }

    /**

     * 增加要进行过滤处理的类

     * @param checkWapper

     */

    public void addCheck(ParamCheckWapper checkWapper){

        for(ParamCheckWapper wapper : wappers){

            if(wapper == checkWapper){return;} ;

        }

        if(n == wappers.length){

            ParamCheckWapper[] newWappers = new ParamCheckWapper[n + INCREMENT];

            System.arraycopy(wappers, 0, newWappers, 0, n);

            wappers = newWappers;

        }

        wappers[n++] = checkWapper;

    }

}
5.过滤实现类(可以有多个)
/**

 * select参数校验

 * @author lpf

 * @since 2019-11-08

 */

public class SelectParamCheck implements CheckFilter<CheckParam> {

    /**

     * 参数校验

     * @param param

     * @param chain

     */

    @Override

    public void checkParam(Param<CheckParam> param, CheckChain chain) throws Exception{

        CheckParam checkParam = param.get();

        List<SelectField> selects = checkParam.getSelect();

        List<String> columns = checkParam.getColumnList();

        //对select参数进行校验

        selects.forEach(select -> {

            String filed = select.getFiled().toLowerCase();

            boolean flag = columns.contains(filed);

            if(!flag) throw new RuntimeException(select.getFiled()+"不存在,请刷新页面重新选择查询字段!!!");

        });

    }
6.过滤类注册(可以通过yml配置反射生成,或者通过手动注册)
@Service

public class SearchConfigService {

    /**默认检查链*/

    private static DefaultCheckChain checkChain ;

    /**过滤链路表配置*/

    static{

        checkChain = new DefaultCheckChain();

        //参数检查器

        ParamCheckWapper selectParamCheck = new ParamCheckWapper(new SelectParamCheck(),"SelectParamCheck");

        ParamCheckWapper groupParamCheck = new ParamCheckWapper(new GroupbyParamCheck(), "groupParamCheck");

        ParamCheckWapper conditionParamCheck = new ParamCheckWapper(new ConditionParamCheck(), "conditionParamCheck");

        ParamCheckWapper orderbyParamCheck = new ParamCheckWapper(new OrderbyParamCheck(), "orderbyParamCheck");

        //参数链表增加过滤类

        checkChain.addCheck(selectParamCheck);

        checkChain.addCheck(groupParamCheck);

        checkChain.addCheck(conditionParamCheck);

        checkChain.addCheck(orderbyParamCheck);

    }

    /**

     * 参数校验

     */

    public void doCheck(Param param) throws Exception {

        checkChain.doCheck(param);

    }
以上,就是职责链路模式的简单使用,可以通过泛型进行代码剥离,后续涉及到链式校验的时候就可以通过限制参数进行多样使用。降低代码的耦合度;
至此,职责链路设计模式的介绍就结束了;

基础设计模式-03 从过滤器(Filter)校验链学习职责链模式的更多相关文章
- 设计模式之美:Chain of Responsibility(职责链)
索引 意图 结构 参与者 适用性 效果 相关模式 实现 实现方式(一):实现后继者链. 意图 使多个对象都有机会处理请求,从而避免请求的发送者和接收者之间的耦合关系. 将这些对象连成一条链,并沿着这条 ...
- atitit.设计模式(1)--—职责链模式(chain of responsibility)最佳实践O7 日期转换
atitit.设计模式(1)---职责链模式(chain of responsibility)最佳实践O7 日期转换 1. 需求:::日期转换 1 2. 可以选择的模式: 表格模式,责任链模式 1 3 ...
- atitit.(设计模式1)--—职责链(chain of responsibility)最佳实践O7 转换日期
atitit.设计模式(1)---职责链模式(chain of responsibility)最佳实践O7 日期转换 1. 需求:::日期转换 1 2. 能够选择的模式: 表格模式,责任链模式 1 3 ...
- Java设计模式之职责链设计模式
1.什么是-职责链设计模式 责任链模式是一种对象的行为模式.在责任链模式里,很多对象由每一个对象对其下家的引用而连接起来形成一条链.请求在这个链上传递,直到链上的某一个对象决定处理此请求.发出这个请求 ...
- Filter体现职责链模式
1. 前言 Filter—Filter 技术是servlet2.3 新增加的功能.完成的流程:对用户请求进行预处理,接着将请求交给Servlet进行处理并生成响应,最后Filter再对服务器响应进行后 ...
- 重温设计模式(三)——职责链模式(chain of responsibility)
一. 写在前面的 这么多的设计模式,我觉得职责链是我第一次看上去最简单,可是回想起来却又最复杂的一个模式. 因此,这个文章我酝酿了很久,一直也没有胆量发出来,例子也是改了又改,可是仍然觉得不够合理.所 ...
- 《javascript设计模式与开发实践》阅读笔记(13)—— 职责链模式
职责链模式 使多个对象都有机会处理请求,从而避免请求的发送者和接收者之间的耦合关系,将这些对象连成一条链,并沿着这条链传递该请求,直到有一个对象处理它为止. 书里的订单的例子 假设我们负责一个售卖手机 ...
- CSharp设计模式读书笔记(14):职责链模式(学习难度:★★★☆☆,使用频率:★★☆☆☆)
职责链模式(Chain of Responsibility Pattern):避免请求发送者与接收者耦合在一起,让多个对象都有可能接收请求,将这些对象连接成一条链,并且沿着这条链传递请求,直到有对象 ...
- 职责链模式(chain of responsibility)
一. 写在前面的 这么多的设计模式,我觉得职责链是我第一次看上去最简单,可是回想起来却又最复杂的一个模式. 因此,这个文章我酝酿了很久,一直也没有胆量发出来,例子也是改了又改,可是仍然觉得不够合理.所 ...
随机推荐
- java实现找素数
** 找素数** 素数就是不能再进行等分的整数.比如:7,11.而9不是素数,因为它可以平分为3等份.一般认为最小的素数是2,接着是3,5,- 请问,第100002(十万零二)个素数是多少? 请注意: ...
- Java实现第十届蓝桥杯数列求值
试题 C: 数列求值 本题总分:10 分 [问题描述] 给定数列 1, 1, 1, 3, 5, 9, 17, -,从第 4 项开始,每项都是前 3 项的和.求 第 20190324 项的最后 4 位数 ...
- 震惊!当Python遇到Excel后,将开启你的认知虫洞
本文主要内容: 1. Excel,你为什么如此强大 2. 软件开发也需要团队作战 3. Excel的集成方案演化 4. macOS特有的集成方案:applescript 5. Python与Exc ...
- “造轮运动”之 ORM框架系列(三)~ 干货呈上
这一趴里面,我就来正式介绍一下CoffeeSQL的干货. 首先要给CoffeeSQL来个定位:最开始就是由于本人想要了解ORM框架内部的原理,所以就四处搜寻有关的博客与学习资料,就是在那个夏天 ...
- C#基础篇——泛型
前言 在开发编程中,我们经常会遇到功能非常相似的功能模块,只是他们的处理的数据不一样,所以我们会分别采用多个方法来处理不同的数据类型.但是这个时候,我们就会想一个问题,有没有办法实现利用同一个方法来传 ...
- 网络KPI异常检测之时序分解算法
时间序列数据伴随着我们的生活和工作.从牙牙学语时的“1, 2, 3, 4, 5, ……”到房价的走势变化,从金融领域的刷卡记录到运维领域的核心网性能指标.时间序列中的规律能加深我们对事物和场景的认识, ...
- 定时器+echarts运行时间太长导致内存溢出页面崩溃
最近做的项目需要在页面上展示echarts图表,且数据每隔10s刷新一次,然后发现时间长了以后chorme浏览器会显示页面崩溃.一开始以为是定时器的原因,试了网上的很多方法,比如把setInterva ...
- 关联函数-web_reg_save_param
int web_reg_save_param(const char *ParamName,<List of Attributes>,LAST) 返回值:成功时返回LR_PASS,失败时返回 ...
- Python数据结构01 线性结构
栈 实现 后进先出的结构,主要有如下操作 *Stack() *push(item) *pop() *peek() *isEmpty() *size() class Stack(): def __ini ...
- Swagger之外的选择
今天给大家安利一款接口文档生成器--JApiDocs. swagger想必大家都用过吧,非常方便,功能也十分强大.如果要说swaager有什么缺点,想必就是注解写起来比较麻烦.如果我说有一款不用写注解 ...