opencv-python 4.9.2. 轮廓特征
矩
图像的矩可帮助你计算某些特征,如对象的质心,对象的面积等特征。函数cv.moments()给出了计算的所有矩值的字典。
从这一刻起,你可以提取有用的数据,如面积,质心等。质心由关系给出,
$$ C_{x}=\frac{M_{10}}{M_{00}} $$和 $$ C_{y}=\frac{M_{01}}{M_{00}} $$。
这可以按如下方式完成:
import cv2 as cv
img = cv.imread(r'C:\Users\yuyalong\Pictures\Saved Pictures\rectangle.jpg')
imgray = cv.cvtColor(img, cv.COLOR_BGR2GRAY)
ret, thresh = cv.threshold(imgray, 127, 255, 0)
# 获取轮廓点
contours, hierarchy = cv.findContours(thresh, cv.RETR_TREE, cv.CHAIN_APPROX_SIMPLE)
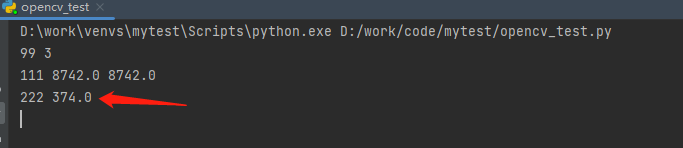
print(99, len(contours))
# 找到最内层的元素, 这里是2是因为图像总共有三层
cnt = contours[2]
# 标记选中的区域
res1 = cv.drawContours(img, cnt, -1, (0, 255, 0), 3)
# 计算矩
M = cv.moments(cnt)
# 计算质心
cx = int(M['m10'] / M['m00'])
cy = int(M['m01'] / M['m00'])
# 画出质心
cv.circle(img, (cx, cy), 5, (255, 0, 0), -1)
cv.imshow('img', img)
cv.waitKey(0)

轮廓面积
轮廓区域由函数cv.contourArea()或M['m00']给出。
import cv2 as cv

img = cv.imread(r'C:\Users\yuyalong\Pictures\Saved Pictures\rectangle.jpg')

imgray = cv.cvtColor(img, cv.COLOR_BGR2GRAY)

ret, thresh = cv.threshold(imgray, 127, 255, 0)

# 获取轮廓点

contours, hierarchy = cv.findContours(thresh, cv.RETR_TREE, cv.CHAIN_APPROX_SIMPLE)

print(99, len(contours))

# 找到最内层的元素, 这里是2是因为图像总共有三层

cnt = contours[2]

# 标记选中的区域

res1 = cv.drawContours(img, cnt, -1, (0, 255, 0), 3)

# 计算矩

M = cv.moments(cnt)

# 计算轮廓面积

area = cv.contourArea(cnt)

print(111, area, M['m00'])

轮廓周长
轮廓周长也被称为弧长。可以使用cv.arcLength()函数找到它。第二个参数指定形状是闭合轮廓(如果传递为True),还是仅仅是曲线。
import cv2 as cv

img = cv.imread(r'C:\Users\yuyalong\Pictures\Saved Pictures\rectangle.jpg')

imgray = cv.cvtColor(img, cv.COLOR_BGR2GRAY)

ret, thresh = cv.threshold(imgray, 127, 255, 0)

# 获取轮廓点

contours, hierarchy = cv.findContours(thresh, cv.RETR_TREE, cv.CHAIN_APPROX_SIMPLE)

print(99, len(contours))

# 找到最内层的元素, 这里是2是因为图像总共有三层

cnt = contours[2]

# 标记选中的区域

res1 = cv.drawContours(img, cnt, -1, (0, 255, 0), 3)

# 计算轮廓周长

perimeter = cv.arcLength(cnt, True)

print(222, perimeter)
轮廓近似
它根据我们指定的精度将轮廓形状近似为具有较少顶点数的另一个形状。它是Douglas-Peucker算法的一种实现方式。 要理解这一点,可以假设你试图在图像中找到一个正方形,但是由于图像中的一些问题,你没有得到一个完美的正方形,而是一个“坏形状”(如下图第一张图所示)。现在你可以使用此功能来近似形状。在这里,第二个参数称为epsilon,它是从轮廓到近似轮廓的最大距离。这是一个准确度参数。需要选择适当的epsilon才能获得正确的输出。参数越小,两直线越接近。
epsilon = 0.01 * cv.arcLength(cnt, True)

approx = cv.approxPolyDP(cnt, epsilon, True)
import cv2 as cv

img = cv.imread(r'C:\Users\yuyalong\Pictures\Saved Pictures\rectangle1.jpg')

imgray = cv.cvtColor(img, cv.COLOR_BGR2GRAY)

ret, thresh = cv.threshold(imgray, 127, 255, 0)

# 获取轮廓点

contours, hierarchy = cv.findContours(thresh, cv.RETR_TREE, cv.CHAIN_APPROX_SIMPLE)

print(99, len(contours))

# 找到最内层的元素, 这里是2是因为图像总共有三层

cnt = contours[2]

# 计算轮廓近似 epsilon=弧长的5%的近似曲线

epsilon = 0.05 * cv.arcLength(cnt, True)

approx = cv.approxPolyDP(cnt, epsilon, True)

# 绘制轮廓近似

res3 = cv.drawContours(img, [approx], -1, (0, 0, 255), 3)

cv.imshow('img', img)

cv.waitKey(0)
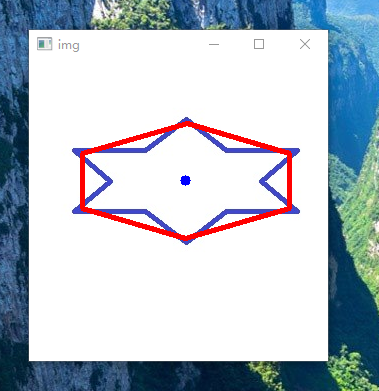
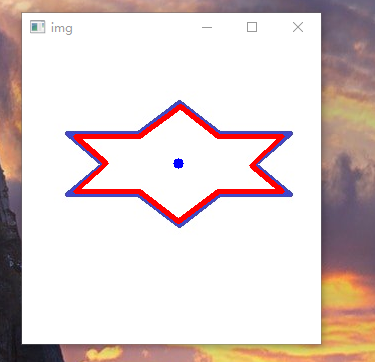
下边第一幅图是 epsilon=弧长的5%的近似曲线, 第二幅图是 epsilon=弧长的1%的近似曲线
凸包
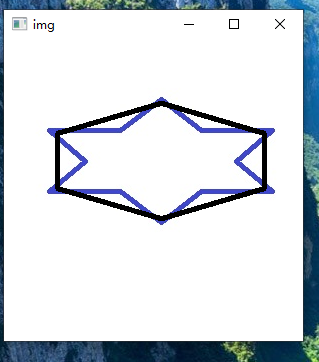
凸包看起来类似于轮廓近似,但它不是(两者在某些情况下可能提供相同的结果)。这里,cv.convexHull()函数检查曲线的凸性缺陷并进行修正。一般而言,凸曲线是总是凸出或至少平坦的曲线。如果它在内部膨胀,则称为凸性缺陷。例如,检查下面的手形图像。红线表示手的凸包。双面箭头标记显示凸起缺陷,即船体与轮廓的局部最大偏差。
hull = cv.convexHull(points[, hull[, clockwise[, returnPoints]]
参数详情:
- points:是我们传入的轮廓。
- hull:是输出,通常我们忽略它。
- clocwise:方向标志。如果为True,则输出凸包顺时针方向。否则,它逆时针方向。
- reurnPoints:默认为True。然后它返回凸包点的坐标。如果为False,则返回与凸包点对应的轮廓点的索引。
import cv2 as cv

img = cv.imread(r'C:\Users\yuyalong\Pictures\Saved Pictures\rectangle1.jpg')

imgray = cv.cvtColor(img, cv.COLOR_BGR2GRAY)

ret, thresh = cv.threshold(imgray, 127, 255, 0)

# 获取轮廓点

contours, hierarchy = cv.findContours(thresh, cv.RETR_TREE, cv.CHAIN_APPROX_SIMPLE)

print(99, len(contours))

# 找到最内层的元素, 这里是2是因为图像总共有三层

cnt = contours[2]

# 凸包

hull = cv.convexHull(cnt)

# 绘制凸包

res4 = cv.drawContours(img, [hull], -1, (0, 0, 0), 3)

cv.imshow('img', img)

cv.waitKey(0)
检查凸性
函数cv.isContourConvex()可以检查曲线是否凸的,它只返回True或False,没有什么理解上的问题。
k = cv.isContourConvex(cnt)
边界矩形
有两种类型的边界矩形。
a.直边矩形
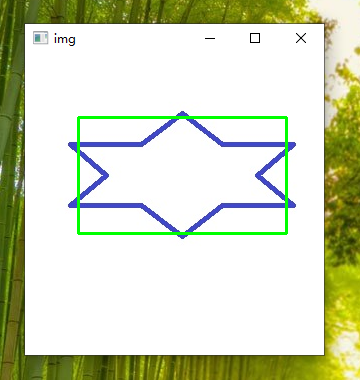
它是一个直的矩形,它不考虑对象的旋转。因此,边界矩形的面积不是最小的。它由函数cv.boundingRect()找到。
设(x,y)为矩形的左上角坐标,(w,h)为宽度和高度。
x,y,w,h = cv.boundingRect(cnt)

cv.rectangle(img,(x,y),(x+w,y+h),(0,255,0),2)
import cv2 as cv

img = cv.imread(r'C:\Users\yuyalong\Pictures\Saved Pictures\rectangle1.jpg')

imgray = cv.cvtColor(img, cv.COLOR_BGR2GRAY)

ret, thresh = cv.threshold(imgray, 127, 255, 0)

# 获取轮廓点

contours, hierarchy = cv.findContours(thresh, cv.RETR_TREE, cv.CHAIN_APPROX_SIMPLE)

print(99, len(contours))

# 找到最内层的元素, 这里是2是因为图像总共有三层

cnt = contours[2]

# 直边矩形

x, y, w, h = cv.boundingRect(cnt)

cv.rectangle(img, (x, y), (x + w, y + h), (0, 255, 0), 2)

cv.imshow('img', img)

cv.waitKey(0)
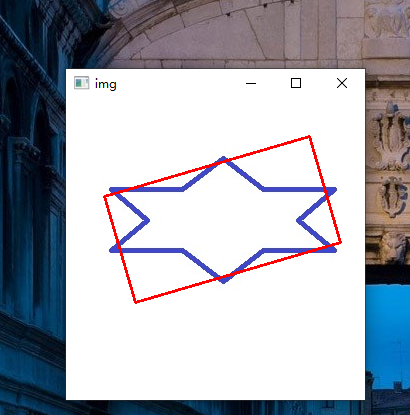
b.旋转矩形
这里,以最小面积绘制边界矩形,因此它也考虑旋转。使用的函数是cv.minAreaRect()。它返回一个Box2D结构,其中包含以下detals - (center(x,y),(width,height),rotation of rotation)。但要画这个矩形,我们需要矩形的4个角。它是由函数cv.boxPoints()获得的。
rect = cv.minAreaRect(cnt)

box = cv.boxPoints(rect)

box = np.int0(box)

cv.drawContours(img,[box],0,(0,0,255),2)
import cv2 as cv

import numpy as np

img = cv.imread(r'C:\Users\yuyalong\Pictures\Saved Pictures\rectangle1.jpg')

imgray = cv.cvtColor(img, cv.COLOR_BGR2GRAY)

ret, thresh = cv.threshold(imgray, 127, 255, 0)

# 获取轮廓点

contours, hierarchy = cv.findContours(thresh, cv.RETR_TREE, cv.CHAIN_APPROX_SIMPLE)

print(99, len(contours))

# 找到最内层的元素, 这里是2是因为图像总共有三层

cnt = contours[2]

# 旋转矩形

rect = cv.minAreaRect(cnt)

box = cv.boxPoints(rect)

box = np.int0(box)

cv.drawContours(img, [box], 0, (0, 0, 255), 2)

cv.imshow('img', img)

cv.waitKey(0)
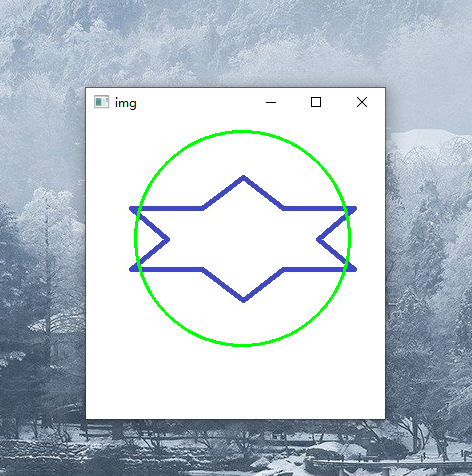
最小外接圈
接下来,我们使用函数cv.minEnclosingCircle()找到对象的外接圆。它是一个完全覆盖物体的圆圈,面积最小。
(x,y),radius = cv.minEnclosingCircle(cnt)

center = (int(x),int(y))

radius = int(radius)

cv.circle(img,center,radius,(0,255,0),2)
import cv2 as cv

import numpy as np

img = cv.imread(r'C:\Users\yuyalong\Pictures\Saved Pictures\rectangle1.jpg')

imgray = cv.cvtColor(img, cv.COLOR_BGR2GRAY)

ret, thresh = cv.threshold(imgray, 127, 255, 0)

# 获取轮廓点

contours, hierarchy = cv.findContours(thresh, cv.RETR_TREE, cv.CHAIN_APPROX_SIMPLE)

print(99, len(contours))

# 找到最内层的元素, 这里是2是因为图像总共有三层

cnt = contours[2]

# 最小外接圆

(x, y), radius = cv.minEnclosingCircle(cnt)

center = (int(x), int(y))

radius = int(radius)

cv.circle(img, center, radius, (0, 255, 0), 2)

cv.imshow('img', img)

cv.waitKey(0)
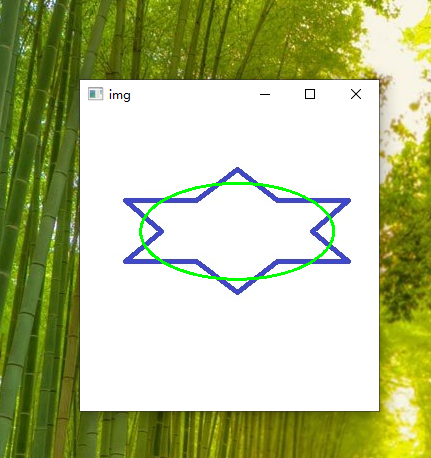
椭圆拟合
接下来是将椭圆拟合到一个对象上。它返回刻有椭圆的旋转矩形。
ellipse = cv.fitEllipse(cnt)

cv.ellipse(img, ellipse, (0, 255, 0), 2)
import cv2 as cv

import numpy as np

img = cv.imread(r'C:\Users\yuyalong\Pictures\Saved Pictures\rectangle1.jpg')

imgray = cv.cvtColor(img, cv.COLOR_BGR2GRAY)

ret, thresh = cv.threshold(imgray, 127, 255, 0)

# 获取轮廓点

contours, hierarchy = cv.findContours(thresh, cv.RETR_TREE, cv.CHAIN_APPROX_SIMPLE)

print(99, len(contours))

# 找到最内层的元素, 这里是2是因为图像总共有三层

cnt = contours[2]

# 拟合椭圆

ellipse = cv.fitEllipse(cnt)

cv.ellipse(img, ellipse, (0, 255, 0), 2)

cv.imshow('img', img)

cv.waitKey(0)
拟合一条线
类似地,我们可以在一组点上拟合一条线。
rows,cols = img.shape[:2]

[vx,vy,x,y] = cv.fitLine(cnt, cv.DIST_L2,0,0.01,0.01)

lefty = int((-x*vy/vx) + y)

righty = int(((cols-x)*vy/vx)+y)

cv.line(img,(cols-1,righty),(0,lefty),(0,255,0),2)
import cv2 as cv

import numpy as np

img = cv.imread(r'C:\Users\yuyalong\Pictures\Saved Pictures\rectangle1.jpg')

imgray = cv.cvtColor(img, cv.COLOR_BGR2GRAY)

ret, thresh = cv.threshold(imgray, 127, 255, 0)

# 获取轮廓点

contours, hierarchy = cv.findContours(thresh, cv.RETR_TREE, cv.CHAIN_APPROX_SIMPLE)

print(99, len(contours))

# 找到最内层的元素, 这里是2是因为图像总共有三层

cnt = contours[2]

# 拟合一条线

rows, cols = img.shape[:2]

[vx, vy, x, y] = cv.fitLine(cnt, cv.DIST_L2, 0, 0.01, 0.01)

lefty = int((-x * vy / vx) + y)

righty = int(((cols - x) * vy / vx) + y)

cv.line(img, (cols - 1, righty), (0, lefty), (0, 255, 0), 2)

cv.imshow('img', img)

cv.waitKey(0)

上边完整代码
点击查看代码
import cv2 as cv

import numpy as np

img = cv.imread(r'C:\Users\yuyalong\Pictures\Saved Pictures\rectangle1.jpg')

imgray = cv.cvtColor(img, cv.COLOR_BGR2GRAY)

ret, thresh = cv.threshold(imgray, 127, 255, 0)

# 获取轮廓点

contours, hierarchy = cv.findContours(thresh, cv.RETR_TREE, cv.CHAIN_APPROX_SIMPLE)

print(99, len(contours))

# 找到最内层的元素, 这里是2是因为图像总共有三层

cnt = contours[2]

# 标记选中的区域

# res1 = cv.drawContours(img, cnt, -1, (0, 255, 0), 3)

# 计算矩

M = cv.moments(cnt)

# 计算质心

cx = int(M['m10'] / M['m00'])

cy = int(M['m01'] / M['m00'])

# 画出质心

cv.circle(img, (cx, cy), 5, (255, 0, 0), -1)

# 计算轮廓面积

area = cv.contourArea(cnt)

print(111, area, M['m00'])

# 计算轮廓周长

perimeter = cv.arcLength(cnt, True)

print(222, perimeter)

# 计算轮廓近似 epsilon=弧长的5%的近似曲线

epsilon = 0.01 * cv.arcLength(cnt, True)

approx = cv.approxPolyDP(cnt, epsilon, True)

res3 = cv.drawContours(img, [approx], -1, (0, 0, 255), 3)

# 凸包

hull = cv.convexHull(cnt)

res4 = cv.drawContours(img, [hull], -1, (0, 0, 0), 3)

# 检查凸性

k = cv.isContourConvex(cnt)

print(333, k)

# 直边矩形

x, y, w, h = cv.boundingRect(cnt)

cv.rectangle(img, (x, y), (x + w, y + h), (0, 255, 0), 2)

# 旋转矩形

rect = cv.minAreaRect(cnt)

box = cv.boxPoints(rect)

box = np.int0(box)

cv.drawContours(img, [box], 0, (0, 0, 255), 2)

# 最小外接圆

(x, y), radius = cv.minEnclosingCircle(cnt)

center = (int(x), int(y))

radius = int(radius)

cv.circle(img, center, radius, (0, 255, 0), 2)

# 拟合椭圆

ellipse = cv.fitEllipse(cnt)

cv.ellipse(img, ellipse, (0, 255, 0), 2)

# 拟合一条线

rows, cols = img.shape[:2]

[vx, vy, x, y] = cv.fitLine(cnt, cv.DIST_L2, 0, 0.01, 0.01)

lefty = int((-x * vy / vx) + y)

righty = int(((cols - x) * vy / vx) + y)

cv.line(img, (cols - 1, righty), (0, lefty), (0, 255, 0), 2)

cv.imshow('img', img)

cv.waitKey(0)
opencv-python 4.9.2. 轮廓特征的更多相关文章
- opencv2.4.13+python2.7学习笔记--OpenCV中的图像处理--图像轮廓特征和几何矩
阅读对象:对概率论中的期望有一点了解. 1.图像几何矩 1.1简述 图像的几何矩包括空间矩.中心矩和中心归一化矩.几何矩具有平移.旋转和尺度不变性,一般是用来做大粒度的区分,用来过滤显然不相关的图像. ...
- OpenCV Python教程(3、直方图的计算与显示)
转载请详细注明原作者及出处,谢谢! 本篇文章介绍如何用OpenCV Python来计算直方图,并简略介绍用NumPy和Matplotlib计算和绘制直方图 直方图的背景知识.用途什么的就直接略过去了. ...
- OpenCV + python 实现人脸检测(基于照片和视频进行检测)
OpenCV + python 实现人脸检测(基于照片和视频进行检测) Haar-like 通俗的来讲,就是作为人脸特征即可. Haar特征值反映了图像的灰度变化情况.例如:脸部的一些特征能由矩形特征 ...
- opencv+python视频实时质心显示
利用opencv+python实现以下功能: 1)获取实时视频,分解帧频: 2)将视频做二值化处理: 3) 将视频做滤波处理(去除噪点,获取准确轮廓个数): 4)识别图像轮廓: 5)计算质心: 6)描 ...
- Erlang/Elixir: 使用 OpenCV, Python 搭建图片缩略图服务器
这篇文章是在OSX上测试和运行的的, Ubuntu下的安装和配置请移步到这里 应用程序进程树, 默认 Poolboy 中初始化10个用于处理图片的 Python 工作进程(Worker) 首先安装Op ...
- opencv python实用操作
画多边形 fillConvexPloy与fillConvexPloy的区别 fillConvexPloy 用来画单个凸多边形: 如果点集的连线不是凹多边形,则会找一个最小的凸多边形把该凹多边形包住画出 ...
- Win7 64bit+Anaconda(3-5.0.1,Python3.6)+Pycharm(community-2017.3.3)+OpenCV(python‑3.4.0‑cp36‑cp36m)(转载)
Anaconda(3-5.0.1,Python3.6)下载链接:https://pan.baidu.com/s/1bqFwLMB 密码:37ih Pycharm(community-2017.3.3) ...
- 解决Windows Server 2012 R2 Datacenter云服务器无法运行opencv python程序的问题
写了个基于opencv的python程序,pyinstaller 32位机打包后在win7/win10 32/64正常运行,在Windows Server 2012 R2 Datacenter云服务器 ...
- OpenCV Python 4.0安装
1.安装OpenCV-Python 如果你是第一次使用OpenCV Python开发包,想要安装OpenCV Python4.0只要执行如下命令行即可: pip install opencv-pyth ...
- Ubuntu系统---安装Caffe (+OpenCV+Python+CPU-only)
安装配置Ubuntu14.04+Caffe (+OpenCV+Python+CPU-only) 记录 [作者:Wu Ping.时间:20180428.] 本人已经安装很多次的Caffe了:从开始的初探 ...
随机推荐
- linux基础知识面试题
Linux 开机启动过程 主机加电自检,加载 BIOS 硬件信息. 读取 MBR 的引导文件(GRUB.LILO). 引导 Linux 内核. 运行第一个进程 init (进程号永远为 1 ). 进入 ...
- PHP Redis - Set(集合)
Redis 的 set 无序集合,与 list 类似,特殊之处在于 set 可以自动排重,不会出现重复数据 集合中最大的成员数为 232-1 (4294967295, 每个集合可存储40多亿个成员). ...
- python Schedule
pip install schedule import schedule # 定义需要执行的方法 def job(): print("a simple scheduler in python ...
- Python调用钉钉群机器人发送群消息
1.首先需要一个钉钉群,群才有机器人 2.群设置->智能群助手->添加机器人->自定义机器人 3.添加自定义机器人,配置如下:给机器人命名,选择加签.保存机器人的秘钥.Webhook ...
- springboot项目记录2用户注册功能
七.注册-业务层 7.1规划异常 7.1.1用户在进行注册的时候,可能会产生用户名被占用的错误,抛出一个异常: RuntimeException异常,作为该异常的子类,然后再去定义具体的异常类型继承这 ...
- springboot 日志处理
引言 springboot框架集成logback日志 logback是由log4j创始人设计的又一个开源日志组件.目前,logback分为三个模块:logback-core,logback-class ...
- JS第一节课
document.getElementById() id document.getElementsByClassName() class document.getElementsByNa ...
- JSP和servlet之间的相互传值
1.从一个jsp页面跳转到另一个jsp页面时的参数传递 (1)使用request对象获取客户端提交的信息 login.jsp页面代码如下: 点击查看代码 <%@ page language=&q ...
- maya灯光导入houdini插件开发
加入工作室时师兄给了两道测试题,由于第一道是完善师兄的一个houdini项目管理插件,我只是开发了一些小功能,所以不好意思拿出来. 第二道题就完全是由自己开发的一个小插件,功能是把maya里的灯光导入 ...
- java: javacTask: 源发行版 8 需要目标发行版 1.8
idea同一工作空间中不同工程使用不同的jkd版本.在本地idea同时使用jdk1.7和jdk1.8,不同的java工程使用不同的jdk版本,但是在java代码编译时报错,其报错信息为:[java: ...