SpringBoot——入门及原理
SpringBoot 用来简化 Spring应用开发,约定大于配置,去繁从简,是由 Pivotal团队提供的全新框架。其设计目的是用来简化新 Spring应用的初始搭建以及开发过程。该框架使用了特定的方式来进行配置(有特殊需求可以添加自己的配置覆盖默认配置),从而使开发人员不再需要定义样板化的配置。SpringBoot 可以看成是 J2EE的一站式解决方案。
一、SpringBoot 的优点
【1】快速创建独立运行的 Spring项目以及与主流框架集成。
【2】使用嵌入式的 Servlet容器,应用无需打成 war包,可以打成 jar包,通过 java -jar的方式直接运行。
【3】starters(启动器)自动依赖与版本控制。
【4】大量的自动配置,简化开发,也可以修改默认值。
【5】无需配置XML,无代码生成,开箱即用。
【6】准生产环境的运行时应用监控。
【7】与云计算的天然集成。
二、解决微服务部署和运维难的问题:Spring Boot

搭建项目 构建连接 批处理
三、Spring Boot 入门项目
HelloWorld(也可以参考五,快速创建一个 SpringBoot项目)
【1】准备环境:为 Maven 的 settings.xml 配置文件的 profiles 标签添加如下信息:
 1 <profile>

 2 <id>jdk-1.8</id>

 3 <activation>

 4     <activeByDefault>true</activeByDefault>

 5     <jdk>1.8</jdk>

 6 </activation>

 7 <properties>

 8     <maven.compiler.source>1.8</maven.compiler.source>

 9     <maven.compiler.target>1.8</maven.compiler.target>

10     <maven.compiler.compilerVersion>1.8</maven.compiler.compilerVersion>

11 </properties>

12 </profile>
【2】将 IDEA 的 Maven更换为我们自己本地安装的 Maven。(自行百度更换)创建一个 maven工程(jar),在 pom.xml中导入如下依赖:
 1 <parent>

 2     <groupId>org.springframework.boot</groupId>

 3     <artifactId>spring-boot-starter-parent</artifactId>

 4     <version>2.0.0.RELEASE</version>

 5 </parent>

 6 <dependencies>

 7     <dependency>

 8         <groupId>org.springframework.boot</groupId>

 9     <artifactId>spring-boot-starter-web</artifactId>

10     </dependency>

11 </dependencies>
【3】编写一个主程序,启动 SpringBoot应用
1 @SpringBootApplication

2 public class Hello {

3    public static void main(String[] args) throws Exception {

4        //启动spring应用

5        SpringApplication.run(Hello.class, args);

6    }

7 }
【4】编写相关的 Controller、Service类
1 @Controller

2 public class HelloController {

3    @ResponseBody

4    @RequestMapping("/hello")

5    public String hello(){

6        return "hello world!";

7    }

8 }
【5】运行主测试程序。简化部署应用<可以将应用打包成一个可执行的 jar包>:通过 Maven Projects中 的 package(双击)即可。生成 jar的位置:默认在项目的 target目录下的“项目名称.jar”文件。运行jar:在命令行可以通过 “java -jar jar文件名.jar” 命令运行项目。
1 <build>

2    <plugins>

3    <plugin>

4         <groupId>org.springframework.boot</groupId>

5     <artifactId>spring-boot-maven-plugin</artifactId>

6    </plugin>

7    </plugins>

8 </build>
四、Hello World 探究(POM文件)
【1】父项目(spring-boot-starter-parent):
1 <parent>

2     <groupId>org.springframework.boot</groupId>

3     <artifactId>spring-boot-starter-parent</artifactId>

4     <version>2.0.0.RELEASE</version>

5 </parent>
【2】进入 spring-boot-starter-parent发现它还有一个父项目 :
1 <parent>

2     <groupId>org.springframework.boot</groupId>

3     <artifactId>spring-boot-dependencies</artifactId>

4     <version>2.0.0.RELEASE</version>

5     <relativePath>../../spring-boot-dependencies</relativePath>

6 </parent>
【3】进入 spring-boot-dependencies后,发现如下信息,与之前我们创建的分布式项目继承的 Maven父项目功能是一样的,用来管理所有 jar包依赖的版本。称为 SpringBoot的版本仲裁中心,以后我们导入依赖默认是不需要写版本;(没有在dependencies 里面管理的依赖,需要声明版本号)
1 <properties>

2     <activemq.version>5.15.3</activemq.version>

3     <antlr2.version>2.7.7</antlr2.version>

4     <appengine-sdk.version>1.9.62</appengine-sdk.version>

5     <artemis.version>2.4.0</artemis.version>

6     <aspectj.version>1.8.13</aspectj.version>

7     <assertj.version>3.9.1</assertj.version>

8     <... 此处省略 .../>

9 </properties>
【4】启动器(spring-boot-starter-web)
1 <dependency>

2     <groupId>org.springframework.boot</groupId>

3     <artifactId>spring-boot-starter-web</artifactId>

4 </dependency>
spring-boot-starter-web:spring-boot-starter 指 spring-boot 场景启动器;进入官网可以到有许多场景启动器,简单点说就是通过此功能将相关 jar包给组合在起来,我们使用时只需要引入一个 Web Starter就可以轻松搞定。Spring Boot 将所有的功能场景都抽取出来,做成一个个的 starters(启动器),只需要在项目里面引入这些 starter相关场景,所有依赖都会导入进来。要用什么功能就导入什么场景启动器。
点击 web右边的 pom可以看到 SpringBoot为我们依赖的其它 jar包,帮我们导入了web模块正常运行所依赖的所有组件。如下:
 1 <dependencies>

 2     <dependency>

 3         <groupId>org.springframework.boot</groupId>

 4     <artifactId>spring-boot-starter</artifactId>

 5     </dependency>

 6     <dependency>

 7     <groupId>org.springframework.boot</groupId>

 8     <artifactId>spring-boot-starter-tomcat</artifactId>

 9     </dependency>

10     <dependency>

11     <groupId>org.hibernate</groupId>

12     <artifactId>hibernate-validator</artifactId>

13     </dependency>

14     <dependency>

15     <groupId>com.fasterxml.jackson.core</groupId>

16     <artifactId>jackson-databind</artifactId>

17     </dependency>

18     <dependency>

19     <groupId>org.springframework</groupId>

20     <artifactId>spring-web</artifactId>

21     </dependency>

22     <dependency>

23     <groupId>org.springframework</groupId>

24     <artifactId>spring-webmvc</artifactId>

25     </dependency>

26 </dependencies>
【5】主程序类(Java类):@SpringBootApplication:此注解声明的类,是 SpringBoot的主配置类,SpringBoot就应该运行这个类的 main方法来启动 SpringBoot。
 1 //@ImportResource(locations={"classpath:bean.xml"})

 2 //@SpringBootApplication 来标注一个主程序类,说明这是一个SpringBoot应用

 3 @SpringBootApplication

 4 public class HellowordQuickStartApplication {

 5

 6     public static void main(String[] args) {

 7         /*SpringBoot应用启动项

 8         HellowordQuickStartApplication.class 参数必须是用@SpringBootApplication注解修饰的类

 9             */

10         SpringApplication.run(HellowordQuickStartApplication.class, args);

11     }

12 }
@SpringBootApplication(主要由:@SpringBootConfiguration/@EnableAutoConfiguration/@ComponentScan 组成)
 1 @Target(ElementType.TYPE)

 2 @Retention(RetentionPolicy.RUNTIME)

 3 @Documented

 4 @Inherited

 5 @SpringBootConfiguration

 6 @EnableAutoConfiguration

 7 @ComponentScan(excludeFilters = {

 8        @Filter(type = FilterType.CUSTOM, classes = TypeExcludeFilter.class),

 9        @Filter(type = FilterType.CUSTOM, classes = AutoConfigurationExcludeFilter.class) })

10 public @interface SpringBootApplication {
@SpringBootConfiguration:标注在某个类上,表示此类是一个SpringBoot的配置类。由以下注解组合形成:配置类 == 配置文件,配置类也是容器的一个组件,底层由 @Component等等组成。
1 @Target({ElementType.TYPE})

2 @Retention(RetentionPolicy.RUNTIME)

3 @Documented

4 @Configuration //表示此类是一个配置类  是spring的一个组件

5 public @interface SpringBootConfiguration {
@EnableAutoConfiguration:开启自动配置功能。也是一个组合注解,由以下注解组成(部分重要注解):
1 @AutoConfigurationPackage

2 @Import(AutoConfigurationImportSelector.class)

3 public @interface EnableAutoConfiguration {
@AutoConfigurationPackage:自动依赖相关的配置包,也是一个组合注解,主要由 @import 等注解组合
1 @Import({Registrar.class})//给容器中导入一个组件;导入的组件由此组建决定。

2 public @interface AutoConfigurationPackage {
进入 @Import(Registrar.class) 中的 Registrar类中,通过断点,可以查看到我注释的一些信息。
 1 static class Registrar implements ImportBeanDefinitionRegistrar, DeterminableImports {

 2     Registrar() {

 3     }

 4     //registerBeanDefinitions方法中的metadata可以查看到我们启动类使用的注解 @SpringBootApplication

 5     public void registerBeanDefinitions(AnnotationMetadata metadata, BeanDefinitionRegistry registry) {

 6         AutoConfigurationPackages.register(registry, new String[]{(new AutoConfigurationPackages.PackageImport(metadata)).getPackageName()});

 7     }

 8     //new AutoConfigurationPackages.PackageImport(metadata) 可以解析出我们当前主启动所在的package包

 9     public Set<Object> determineImports(AnnotationMetadata metadata) {

10         return Collections.singleton(new AutoConfigurationPackages.PackageImport(metadata));

11     }

12 }
@Import(Registrar.class)作用:将主配置类的所在包以及下边所有子包里面的所有组件扫描到 Spring容器中。这也就能理解为什么会自动扫描我们写的 @Controller类了。
@Import(AutoConfigurationImportSelector.class):进入 AutoConfigurationImportSelector.class 类中,查看如下方法:
 1 public String[] selectImports(AnnotationMetadata annotationMetadata) {

 2     if(!this.isEnabled(annotationMetadata)) {

 3         return NO_IMPORTS;

 4     } else {

 5         try {

 6             AutoConfigurationMetadata autoConfigurationMetadata = AutoConfigurationMetadataLoader.loadMetadata(this.beanClassLoader);

 7             AnnotationAttributes attributes = this.getAttributes(annotationMetadata);

 8             // 主要用到的是 这个 configurations 后面会有重点说明

 9             List<String> configurations = this.getCandidateConfigurations(annotationMetadata, attributes);

10             configurations = this.removeDuplicates(configurations);

11             configurations = this.sort(configurations, autoConfigurationMetadata);

12             Set<String> exclusions = this.getExclusions(annotationMetadata, attributes);

13             this.checkExcludedClasses(configurations, exclusions);

14             configurations.removeAll(exclusions);

15             configurations = this.filter(configurations, autoConfigurationMetadata);

16             this.fireAutoConfigurationImportEvents(configurations, exclusions);

17             return StringUtils.toStringArray(configurations);

18         } catch (IOException var6) {

19             throw new IllegalStateException(var6);

20         }

21     }

22 }
这是导入组件的选择器方法,将所有需要导入的组件以全类名的方式返回,这些组件最终被添加到容器中。其中List<String> configurations 会给容器中导入非常多的自动配置类(xxxAutoConfiguration),就是给容器中导入这个场景需要的所有组件,并配置好这些组件。有了自动配置类,免去了我们手动编写配置注入功能组件等的工作;自动配置类共109个,如下部分所示:

☹ 那么我们就有疑问,这些自动配置类都是从哪里来的?
进入这个方法:this.getCandidateConfigurations(annotationMetadata, attributes)
1 protected List<String> getCandidateConfigurations(AnnotationMetadata metadata, AnnotationAttributes attributes) {

2     // *** 后边需要了解的方法 ***

3     //SpringFactoriesLoader.loadFactoryNames(EnableAutoConfiguration.class,classLoader);

4     List<String> configurations = SpringFactoriesLoader.loadFactoryNames(this.getSpringFactoriesLoaderFactoryClass(), this.getBeanClassLoader());

5     Assert.notEmpty(configurations, "No auto configuration classes found in META-INF/spring.factories. If you are using a custom packaging, make sure that file is correct.");

6     return configurations;

7 }
进入 SpringFactoriesLoader.loadFactoryNames(EnableAutoConfiguration.class,classLoader)方法,具体注释说明:
 1 public static List<String> loadFactoryNames(Class<?> factoryClass, @Nullable ClassLoader classLoader) {

 2     //org.springframework.context.ApplicationContextInitializer

 3     String factoryClassName = factoryClass.getName();

 4     return (List)loadSpringFactories(classLoader).getOrDefault(factoryClassName, Collections.emptyList());

 5 }

 6 private static Map<String, List<String>> loadSpringFactories(@Nullable ClassLoader classLoader) {

 7     MultiValueMap<String, String> result = (MultiValueMap)cache.get(classLoader);

 8     if(result != null) {

 9         return result;

10     } else {

11         try {

12             //通过类加载器(classLoader获取)META-INF/spring.factories(也就是配置了109个自动配置类的文件) 资源

13             Enumeration<URL> urls = classLoader != null?classLoader.getResources("META-INF/spring.factories"):ClassLoader.getSystemResources("META-INF/spring.factories");

14             LinkedMultiValueMap result = new LinkedMultiValueMap();

15

16             while(urls.hasMoreElements()) {

17                 URL url = (URL)urls.nextElement();

18                 UrlResource resource = new UrlResource(url);

19                 //将urls 当做一个properties配置文件

20                 Properties properties = PropertiesLoaderUtils.loadProperties(resource);

21                 Iterator var6 = properties.entrySet().iterator();

22

23                 while(var6.hasNext()) {

24                     Entry<?, ?> entry = (Entry)var6.next();

25                     //将META-INF/spring.factories文件中的EnableAutoConfiguration下的配置进行加载   如下图所示

26                     List<String> factoryClassNames = Arrays.asList(StringUtils.commaDelimitedListToStringArray((String)entry.getValue()));

27                     result.addAll((String)entry.getKey(), factoryClassNames);

28                 }

29             }

30

31             cache.put(classLoader, result);

32             return result;

33         } catch (IOException var9) {

34             throw new IllegalArgumentException("Unable to load factories from location [META-INF/spring.factories]", var9);

35         }

36     }

37 }

我们进入其中一个自动配置类中看看 SpringBoot是不是真的帮我们已经配置好了一些属性(WebMvcAutoConfiguration):
 1 //这里我就摘出一些重要的配置,来帮我我们观察即可。

 2 @Configuration

 3 public class WebMvcAutoConfiguration {

 4     @Bean

 5     @ConditionalOnMissingBean

 6         /*视图解析器 , SpringBoot中的所有配置文件都是.java形式,方法的名字,就是以前xml中的id。

 7         等等都是用注解表示的,这个我们后面会重点说明,这里就先了解一下*/

 8     //我们可以看到SpringBoot已经帮我们配置好了视图解析器 等等一些功能 我们直接使用就好

 9     public InternalResourceViewResolver defaultViewResolver() {

10         InternalResourceViewResolver resolver = new InternalResourceViewResolver();

11         resolver.setPrefix(this.mvcProperties.getView().getPrefix());

12         resolver.setSuffix(this.mvcProperties.getView().getSuffix());

13         return resolver;

14     }

15 }
总结:SpringBoot 在启动的时候从类路径下的 META-INF/spring.factories 中获取 EnableAutoConfiguration 指定的值,将这些值作为自动配置类导入到容器中,自动配置类就生效,帮我们进行自动配置工作。如此一来,就具有我们在 SSM等环境下写了一大堆配置文件后才具有的功能。而这些所有配置文件都在 spring-boot-autoconfigure-2.0.0.RELEASE.jar 中。
五、使用 Spring Initializer 快速创建 Spring Boot 项目

注意:Artifact 中不能大小写混合使用。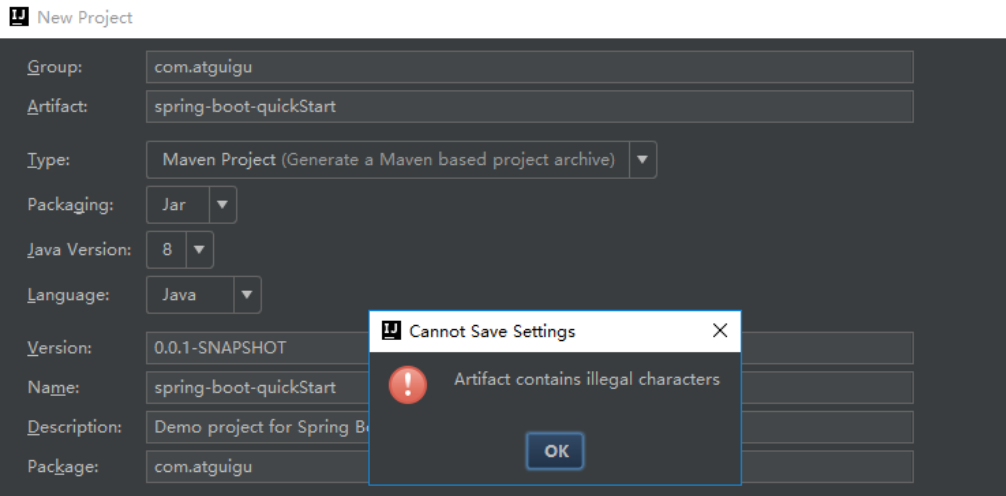
通过需求选择 starts,例如选择 Web。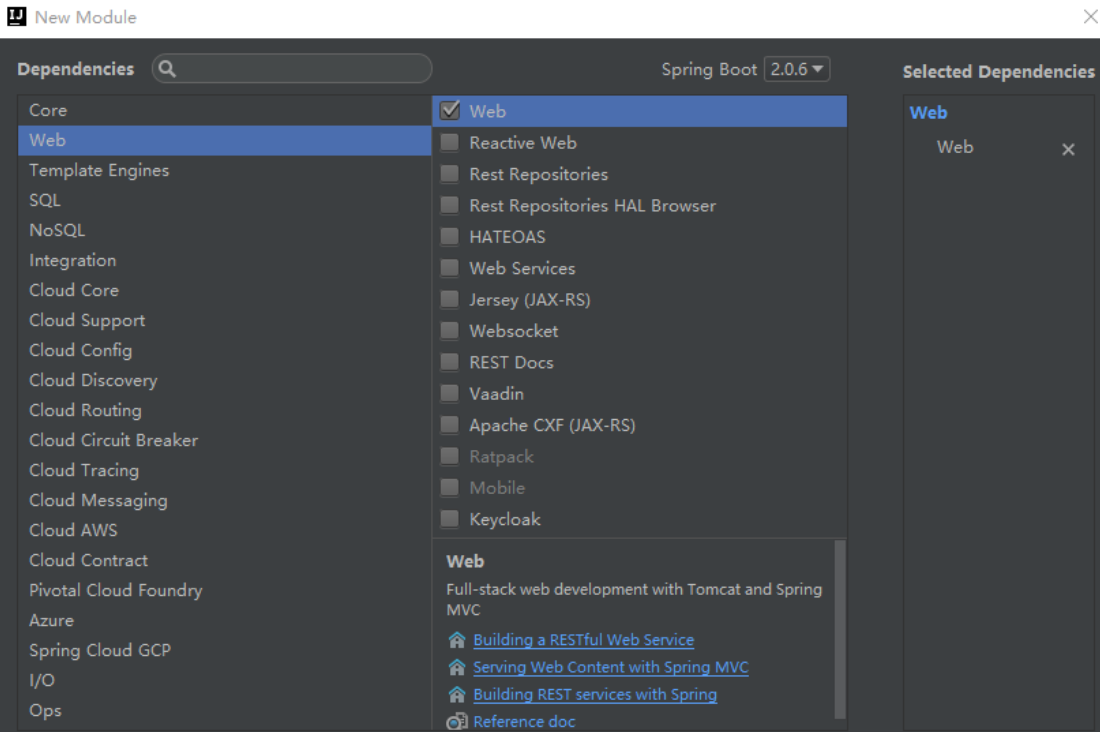
我们就会发现 pom.xml文件中,就会自动配置了我们引入的 starts。
 1 <!-- 摘取一部分 -->

 2 <parent>

 3     <groupId>org.springframework.boot</groupId>

 4     <artifactId>spring-boot-starter-parent</artifactId>

 5     <version>2.0.0.RELEASE</version>

 6     <relativePath/> <!-- lookup parent from repository -->

 7 </parent>

 8

 9 <properties>

10     <project.build.sourceEncoding>UTF-8</project.build.sourceEncoding>

11     <project.reporting.outputEncoding>UTF-8</project.reporting.outputEncoding>

12     <java.version>1.8</java.version>

13 </properties>

14 <dependencies>

15     <dependency>

16         <groupId>org.springframework.boot</groupId>

17         <artifactId>spring-boot-starter-web</artifactId>

18     </dependency>

19

20     <dependency>

21         <groupId>org.springframework.boot</groupId>

22         <artifactId>spring-boot-starter-test</artifactId>

23         <scope>test</scope>

24     </dependency>

25

26     <dependency>

27         <groupId>org.springframework.boot</groupId>

28         <artifactId>spring-boot-configuration-processor</artifactId>

29         <optional>true</optional>

30     </dependency>

31 </dependencies>
添加 controller 层:新注解 @RestController == @ResponseBody 与 @Controller的合体;
1 //这个类的所有方法返回的数据直接写给浏览器(如果是对象转为JSON)

2 //@ResponseBody@Controller

3 @RestController

4 public class HelloWordController {

5     @RequestMapping("/hello")

6     public String hello(){

7         return "hell";

8     }

9 }
优点:默认生成的 SpringBoot项目,我们只需要编写自己的逻辑。默认生成的 Resources 配置文件的目录结构:
【1】static:保存所有的静态资源。 (js/css/image)
【2】templates:保存所有的模板页面(SpringBoot默认 jar包使用嵌入式的 Tomcat,默认不支持 JSP页面)但可以使用模板引擎。(freemarker、thymeleaf)
【3】application.properties:SpringBoot 应用的配置文件。默认的配置都在此文件可以修改。
SpringBoot——入门及原理的更多相关文章
- springboot入门之版本依赖和自动配置原理
前言 Spring Boot makes it easy to create stand-alone, production-grade Spring based Applications that ...
- SpringBoot入门Demo
前言:相信做java后台编程的童鞋都知道Spring家族,Spring作为我们项目中必备的框架.JavaSpringBoot号称javaEE的颠覆者,这引起了本Y的好奇,这才花费了一点时间,学习了下s ...
- javaConfig&springBoot入门
javaConfig&springBoot入门 1. javaConfig基础 1.1 为什么要学习javaConfig 因为:Springboot原理基于它的!!!(为学习springBoo ...
- SpringBoot入门学习看这一篇就够了
1.SpringBoot是什么? SpringBoot是一套基于Spring框架的微服务框架. 2.为什么需要SpringBoot 由于Spring是一个轻量级的企业开发框架,主要的功能就是用于整合和 ...
- 大白话说Java泛型(一):入门、原理、使用
文章首发于[博客园-陈树义],点击跳转到原文<大白话说Java泛型(一):入门.原理.使用> 远在 JDK 1.4 版本的时候,那时候是没有泛型的概念的.当时 Java 程序员们写集合类的 ...
- springboot之启动原理解析
前言 SpringBoot为我们做的自动配置,确实方便快捷,但是对于新手来说,如果不大懂SpringBoot内部启动原理,以后难免会吃亏.所以这次博主就跟你们一起一步步揭开SpringBoot的神秘面 ...
- SpringBoot入门教程(二)CentOS部署SpringBoot项目从0到1
在之前的博文<详解intellij idea搭建SpringBoot>介绍了idea搭建SpringBoot的详细过程, 并在<CentOS安装Tomcat>中介绍了Tomca ...
- SpringBoot入门基础
目录 SpringBoot入门 (一) HelloWorld. 2 一 什么是springboot 1 二 入门实例... 1 SpringBoot入门 (二) 属性文件读取... 16 一 自定义属 ...
- SpringBoot系列二:SpringBoot自动配置原理
主程序类的注解 @SpringBootApplication 注解,它其实是个组合注解,源码如下: @Target({ElementType.TYPE}) @Retention(RetentionPo ...
- React Native 从入门到原理一
React Native 从入门到原理一 React Native 是最近非常火的一个话题,介绍如何利用 React Native 进行开发的文章和书籍多如牛毛,但面向入门水平并介绍它工作原理的文章却 ...
随机推荐
- 使用Wireshark完成实验2-TCP
1.打开Google Chorme,进入https://gaia.cs.umass.edu/wireshark-labs/alice.txt 2.将文本保存,进入https://gaia.cs.uma ...
- Dapper上传图片
<h2>添加商品</h2> <table class="table table-bordered"> <tr> <td> ...
- ??????FormDataAccess
using Genersoft.Fms.Center.Pub.Com;using Genersoft.Platform.AdpBizIntegration.Entity;using Genersoft ...
- 前端自动化测试框架Cypress环境搭建
1. 下载安装node.js(之前的随笔里写过安装nodejs具体步骤这里不过多介绍了) 下载地址:https://nodejs.org/en/ 2.安装路径(这是安装完成nodejs的路径) 3. ...
- mac中chrome常用快捷键
1.标签页和窗口快捷键 ⌘-N 打开新窗口. ⌘-T ...
- RabbitMQ安装失败 地址提示错误
最后设置为: D:\RabbitMQ\rabbitmq_server-3.7.10-rc.3\sbin>set ERLANG_HOME=D:\Erlang\erl10.2
- 阿里云centos7 磁盘挂载
适用于多磁盘的情况 1. 查看本地所有磁盘 fdisk -l 2.格式化磁盘系统 mkfs.ext3 /dev/vdb (/dev/vdb 为未挂载的磁盘路径) 2.创建挂载点 mkdir /ho ...
- 【confluence】jira issue宏中如何把优先级图标转义成文字
在confluece中,关于表格处理有2个非常好的插件. Table Filter and Charts for Confluence (插件文档:https://docs.stiltsoft ...
- CSS3之伸缩布局
一 主轴方向 在伸缩布局中, 默认伸缩项是从左至右的排版的 主轴的排版的方向默认就是row, 默认就是从左至右 1.默认情况下主轴是水平方向的, 但是也可以修改为垂直方向.只要看到flex-direc ...
- raid随笔
1.raid 0 准备两个磁盘 [root@localhost ~]# lsblkNAME MAJ:MIN RM SIZE RO TYPE MOUNTPOINTsda 8:0 0 40G 0 disk ...