
Shell36计
常用命令:
date:查看日期
[root@centos-01 conf]# date

2018年 07月 12日 星期四 15:17:39 CST

[root@centos-01 conf]#
[root@centos-01 conf]# date +%F (获取当前日期)

2018-07-12

[root@centos-01 conf]# date +%T (获取当前时间)

15:19:11

[root@centos-01 conf]#
[root@centos-01 conf]# date +%Y%m%d (时间戳的形式显示)

20180712

[root@centos-01 conf]# date +%w (当前星期几)

4

[root@centos-01 conf]# date +%W (本年度第几周)

28

[root@centos-01 conf]#
[root@centos-01 conf]# date +%s (当前时间戳)

1531380280

[root@centos-01 conf]#
[root@centos-01 conf]# date -d "-1 day" +%F (查找昨天的日期)

2018-07-11

[root@centos-01 conf]#
read:用户实现交互
[root@centos-01 conf]# read -p "Please input a number: " n (告诉用户输入一个数字,当输入完数字之后,这个数字就赋值给n了)

Please input a number: 10

[root@centos-01 conf]#
[root@centos-01 conf]# echo $n

10

[root@centos-01 conf]#
exec:定义该脚本的日志的输出,当脚本中不加exec是会将错误输出到屏幕
[root@centos-01 ~]# vim 1.sh ^C

[root@centos-01 ~]# cat 1.sh

#!/bin/bash

exec >> /tmp/1.log >>/tmp/1.log  (这里的1代码正确的,2代表错误的)

date

echo 111

dddddddd

date

[root@centos-01 ~]# cat /tmp/1.log

2018年 07月 12日 星期四 15:34:49 CST

111

1.sh:行5: dddddddd: 未找到命令

2018年 07月 12日 星期四 15:34:49 CST

[root@centos-01 ~]#
makepasswd:生成一个字符串(没有这个命令的安装expect包)
[root@centos-01 ~]# yum install -y expect
[root@centos-01 ~]# mkpasswd

7AlhYz+1r

[root@centos-01 ~]# mkpasswd -s 0 (默认mkpasswd生成的字符串会有一个特殊字符,如果不想要这个特殊字符可以用-s 0)

KIlai53ey

[root@centos-01 ~]#
[root@centos-01 ~]# mkpasswd -s 0 -l 20  (-l 指定生成的字符串长度)

fw5prcafohyywaiZH6vl

[root@centos-01 ~]#
[root@centos-01 ~]# mkpasswd -l 10 -c 0 -d 0 -s 0 -C 10 (生成自由大写字母的字符串:l长度、c小写字母、C大写字母、d数字 s特殊符号)

QEQQOXTSEC

[root@centos-01 ~]#
test命令:测试
需求:判断一个文件是否有读权限 -d判断一个文件是否是目录、-f是否是文件、-w文件是否可写 -e文件是否存在
[root@centos-01 ~]# vim 2.sh^C

[root@centos-01 ~]# cat 2.sh

#!/bin/bash

filename=/root/1.sh

if test -r $filename

then

        echo "It can read"

fi

[root@centos-01 ~]# sh 2.sh

It can read

[root@centos-01 ~]#
[root@centos-01 ~]# if [ -r $filename ] == if test -r $filename (两种写法相同[]代替了test)
sleep:休眠
[root@centos-01 ~]# sleep 3

[root@centos-01 ~]#
需求:每隔3秒输出123
[root@centos-01 ~]# vim 4.sh^C

[root@centos-01 ~]# cat 4.sh

#!/bin/bash

while true

do

        echo 123

        sleep 3

done

[root@centos-01 ~]# sh 4.sh

123

123

^C

[root@centos-01 ~]#
[root@centos-01 ~]# while true == while : (左右两边意思相同)
break和continue
[root@centos-01 ~]# vim 3.sh^C

[root@centos-01 ~]# cat 3.sh

#!/bin/bash

for i in `seq 1 5`

do

        echo $i

        if [ $i == 3 ]

        then

                break

        fi

done

[root@centos-01 ~]# sh 3.sh

1

2

3

[root@centos-01 ~]#
echo命令:加上-n输出的结果就不换行了
[root@centos-01 ~]# echo 111; echo 222

111

222

[root@centos-01 ~]# echo -n 111; echo -n 222

111222[root@centos-01 ~]#
[root@centos-01 ~]# echo -e "111\n222" (支持加换行符)

111

222

[root@centos-01 ~]#
我们想实现在一个脚本里输出脚本内容
方法一
[root@centos-01 ~]# vim 5.sh^C

[root@centos-01 ~]# cat 5.sh

#!/bin/bash

echo -e "for i in \`seq 1 5\`\ndo\n echo \$i\ndone" >/tmp/test.sh

[root@centos-01 ~]# sh 5.sh

[root@centos-01 ~]# cat /tmp/test.sh

for i in `seq 1 5`

do

 echo $i

done

[root@centos-01 ~]#
方法二
[root@centos-01 ~]# cat 5.sh

#!/bin/bash

#echo -e "for i in \`seq 1 5\`\ndo\n echo \$i\ndone" >/tmp/test.sh

cat << EOF > /tmp/test2.sh

#!/bin/bash

for i in \`seq 1 5\`

do

        echo \$i

done

EOF

[root@centos-01 ~]# sh 5.sh

[root@centos-01 ~]# cat /tmp/test2.sh

#!/bin/bash

for i in `seq 1 5`

do

        echo $i

done

[root@centos-01 ~]#

1.grep、sed、awk
2.点号(.)表示任意一个字符、*需要前面有一个符号配合使用表示前面的字符有0个或多个(下面的例子是匹配a0次或多次)
[root@centos-01 ~]# echo 'aaaabbbb' |grep 'a*'

aaaabbbb

[root@centos-01 ~]#
+号一个或多个前面的字符
[root@centos-01 ~]# echo 'abbbb' |grep -E 'a+b'

abbbb

[root@centos-01 ~]#
?匹配前面的字符0或1次
[root@centos-01 ~]# echo 'abbbb' |grep -E 'a?b'

abbbb

[root@centos-01 ~]#
.*匹配任意字符
[root@centos-01 ~]# echo 'abbbbdddddd' |grep  '.*'

abbbbdddddd

[root@centos-01 ~]#
grep -r遍历目录
set -i 查找替换,将文件以冒号作为分隔将最后一段的冒号内容和第一段的内容交换位置
[root@centos-01 ~]# head /etc/passwd

root:x:0:0:root:/root:/bin/bash

bin:x:1:1:bin:/bin:/sbin/nologin

daemon:x:2:2:daemon:/sbin:/sbin/nologin

adm:x:3:4:adm:/var/adm:/sbin/nologin

lp:x:4:7:lp:/var/spool/lpd:/sbin/nologin

sync:x:5:0:sync:/sbin:/bin/sync

shutdown:x:6:0:shutdown:/sbin:/sbin/shutdown

halt:x:7:0:halt:/sbin:/sbin/halt

mail:x:8:12:mail:/var/spool/mail:/sbin/nologin

operator:x:11:0:operator:/root:/sbin/nologin

[root@centos-01 ~]# head /etc/passwd |sed -r 's/(^[^:]+)(:.*:)([^:]+$)/\3\2\1/'  (和vim的查找替换类似用s)

/bin/bash:x:0:0:root:/root:root

/sbin/nologin:x:1:1:bin:/bin:bin

/sbin/nologin:x:2:2:daemon:/sbin:daemon

/sbin/nologin:x:3:4:adm:/var/adm:adm

/sbin/nologin:x:4:7:lp:/var/spool/lpd:lp

/bin/sync:x:5:0:sync:/sbin:sync

/sbin/shutdown:x:6:0:shutdown:/sbin:shutdown

/sbin/halt:x:7:0:halt:/sbin:halt

/sbin/nologin:x:8:12:mail:/var/spool/mail:mail

/sbin/nologin:x:11:0:operator:/root:operator

[root@centos-01 ~]#
awk -F 可以跟正则表达式
[root@centos-01 ~]# head /etc/passwd |awk -F ':|+' '{print NF}'

7

7

7

7

7

7

7

7

7

7

[root@centos-01 ~]#
awk调用shell变量
需求:用awk打印出test文本文件的第a段(a是一个变量)
[root@centos-01 ~]# head /etc/passwd > ./test.txt

[root@centos-01 ~]# less test.txt

root:x:0:0:root:/root:/bin/bash

bin:x:1:1:bin:/bin:/sbin/nologin

daemon:x:2:2:daemon:/sbin:/sbin/nologin

adm:x:3:4:adm:/var/adm:/sbin/nologin

lp:x:4:7:lp:/var/spool/lpd:/sbin/nologin

sync:x:5:0:sync:/sbin:/bin/sync

shutdown:x:6:0:shutdown:/sbin:/sbin/shutdown

halt:x:7:0:halt:/sbin:/sbin/halt

mail:x:8:12:mail:/var/spool/mail:/sbin/nologin

operator:x:11:0:operator:/root:/sbin/nologin

[root@centos-01 ~]#
[root@centos-01 ~]# vim 6.sh^C
[root@centos-01 ~]# cat 6.sh
#!/bin/bash
a=5
awk -v b=$a -F ':' '{print $b}' test.txt [root@centos-01 ~]# sh 6.sh
root
bin
daemon
adm
lp
sync
shutdown
halt
operator
[root@centos-01 ~]#
需求2:打印第三行大于3的行,第三列大于3的多出来啦
[root@centos-01 ~]# vim 6.sh ^C

[root@centos-01 ~]# cat 6.sh

#!/bin/bash

a=3

awk -v b=$a -F ':' '$3>b' test.txt

[root@centos-01 ~]# sh 6.sh

lp:x::7:lp:/var/spool/lpd:/sbin/nologin

sync:x::0:sync:/sbin:/bin/sync

shutdown:x::0:shutdown:/sbin:/sbin/shutdown

halt:x::0:halt:/sbin:/sbin/halt

mail:x::12:mail:/var/spool/mail:/sbin/nologin

operator:x::0:operator:/root:/sbin/nologin

[root@centos-01 ~]#
awk做数学运算
需求:将第三段相加求和
[root@centos-01 ~]# awk -F ':' '{sum+=$3}; END {print sum}' test.txt

47

[root@centos-01 ~]#
查看网络状态
[root@centos-01 ~]# netstat -na | awk '/^tcp/ {++S[$NF]} END {for(a in S) print a, S[a]}'

LISTEN 8

ESTABLISHED 1

[root@centos-01 ~]#

1.双竖线或者的意思:当前面的命令执行成功了就不执行后面的命令了,前面的命令执行不成功才执行后面的命令
[root@centos-01 ~]# ls 1.sh || 2.sh

1.sh

[root@centos-01 ~]#
2.&&并且的意思:只有当前面的命令执行成功了才执行后面的命令
[root@centos-01 ~]# ls 1.sh && ls 2.sh

1.sh

2.sh

[root@centos-01 ~]#
3.$符号可以定义一个变量
[root@centos-01 ~]# a=1 $a

[root@centos-01 ~]# echo $a

1

[root@centos-01 ~]#
作为参数使用$1、$2、$3,下面的start就是命令的$1参数
[root@centos-01 ~]# /etc/init.d/network start
$?指的是上一个命令的返回值,返回值为0时说明上一条命令执行成功了。
[root@centos-01 ~]# ls 1.sh

1.sh

[root@centos-01 ~]# echo $?

0

[root@centos-01 ~]#
!$表示的是上一条命令的最后一个参数
[root@centos-01 ~]# ls 1.sh

1.sh

[root@centos-01 ~]# ls !$

ls 1.sh

1.sh

[root@centos-01 ~]#
``反引号调用一条命令的结果
[root@centos-01 ~]# a=`wc -l 1.sh|awk '{print $1}'`

[root@centos-01 ~]# echo $a

6

[root@centos-01 ~]#
|管道 它只能处理经由前面一个指令传出的正确输出信息,对错误信息信息没有直接处理能力。然后,传递给下一个命令,作为标准的输入.
[root@centos-01 ~]# ls -l|wc -l

18

[root@centos-01 ~]#
*同配表示所有任意字符
[root@centos-01 ~]# ls *.sh

1.sh  2.sh  3.sh  4.sh  5.sh  6.sh

[root@centos-01 ~]#
?表示一个字符
[root@centos-01 ~]# ls ?.sh

1.sh  2.sh  3.sh  4.sh  5.sh  6.sh

[root@centos-01 ~]#
\脱义字符(\')转成正常字符
#号注释
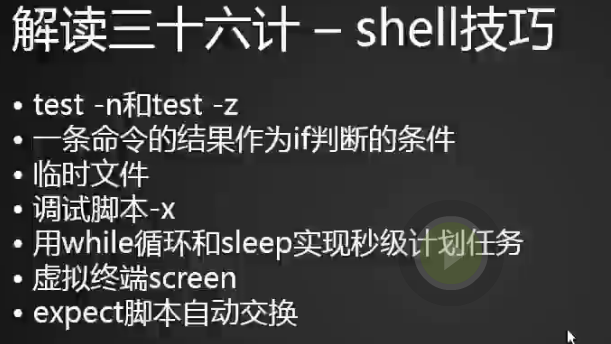
1.test -n test-z判断一个变量是否为空-n表示不为空,-z表示为空
[root@centos-01 ~]# b=

[root@centos-01 ~]# echo $b

[root@centos-01 ~]# if [ -n "$b" ]; then echo "not null"; fi

[root@centos-01 ~]# if [ -z "$b" ]; then echo "not null"; fi

not null

[root@centos-01 ~]#
[root@centos-01 ~]# vim 7.sh ^C

[root@centos-01 ~]# cat 7.sh

#!/bin/bash

while :

do

read -p "Please input a number: " n

n1=`echo $n|sed 's/[0-9]//g'`

if [ -n "$n1" ]

then

        echo "The number your input is not a number "

        continue

else

        break

fi

done

echo $n

[root@centos-01 ~]# sh 7.sh

Please input a number: 12a

The number your input is not a number

Please input a number: 13

13

[root@centos-01 ~]#
一条命令的结果作为if判断条件
[root@centos-01 ~]# if grep -q 'root12' /etc/passwd ; then echo ok ; fi

[root@centos-01 ~]# if grep -q 'root12' /etc/passwd ; then echo ok ; else echo not ok; fi

not ok

[root@centos-01 ~]#
[root@centos-01 ~]# if ls 1.sh > /dev/null 2>/dev/null ; then echo ok; else echo not ok; fi

ok

[root@centos-01 ~]#
临时文件
将前面命令的输出作为后面脚本的素材
-x调试脚本
screen虚拟终端,我们进入虚拟终端,在终端里执行一条命令,退出终端ctrl+a+d,再次进入终端screen+r,方便我们检测运行时间比较长的脚本。
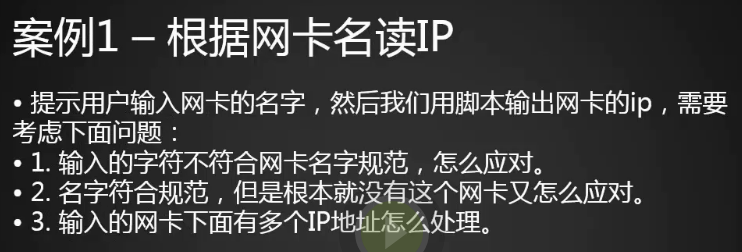
[root@centos-02 ~]# cat 8.sh

#!/bin/bash

ip addr |egrep '^[1-9]+:' |awk -F ':' '{print $1,$2}' > /tmp/if_list.txt

while true

do

	read -p "please input networkname(all networks `cat /tmp/if_list.txt|awk '{print $2}'|xargs |sed 's/ /,/'`): " e

	if [ -n "$e" ]

	then

	if grep -qw "$e" /tmp/if_list.txt

	then

		break

	else

	echo "input networkname is error"

		continue

	fi

	else

	echo "nothing"

	fi

done

getip() {

	## "ip addr show dev em1"

	n1=`grep -w "$1" /tmp/if_list.txt|awk '{print $1}'`

	n2=$[$n1+1]

	line1=`ip addr |grep -wn "$1:"|awk -F ':' '{print $1}'`

	line2=`ip addr |grep -n "^$n2:"|awk -F ':' '{print $1}'`

	if [ -z "$line2" ]

	then

		ip addr |sed -n "$line1,$"p|grep 'inet '|awk -F ' +|/' '{print $3}'

	else

		ip addr |sed -n "$line1,$line2"p|grep 'inet '|awk -F ' +|/' '{print $3}'

	fi

}

myip=`getip $e`

if [ -z "$myip" ]

then

	echo "network$e nothaveip"

else

	echo "network$e,ip:"

	echo "$myip"

fi

[root@centos-02 ~]#
http://github.com/aminglinux/shell/blob/master/expect.txt
1.自动远程登录
[root@centos-02 ~]# vim 1.expect^C

[root@centos-02 ~]# cat 1.expect

#! /usr/bin/expect

#定义变量host和passwd

set host "192.168.242.132"

set passwd "root"

#登录远程机器,要使用spawn命令

spawn ssh  root@$host

#以下为expect交互部分,当输出yes/no的时候,脚本会自动提供yes,\r为回车的意思,exp_continue的作用是继续执行{ }内下面的语句,如果不加,下面的就不会生效了。

expect {

"yes/no" { send "yes\r"; exp_continue}

"assword:" { send "$passwd\r" }

}

#interact的作用是,登录完远程机器后,不要退出来,一直保持登录状态,如果不加这句,登录完后马上会退出。

interact

[root@centos-02 ~]# chmod a+x 1.expect

[root@centos-02 ~]# ./1.expect

spawn ssh root@192.168.242.132

The authenticity of host '192.168.242.132 (192.168.242.132)' can't be established.

ECDSA key fingerprint is 15:ce:01:bd:cf:ed:1c:10:b5:e7:d3:8f:ca:66:a1:19.

Are you sure you want to continue connecting (yes/no)? yes

Warning: Permanently added '192.168.242.132' (ECDSA) to the list of known hosts.

root@192.168.242.132's password:

Last login: Tue Jul 24 17:18:35 2018

[root@centos-02 ~]#
2. 远程登录后执行命令
[root@centos-02 ~]# vim 2.expect^C

[root@centos-02 ~]# cat 2.expect

#!/usr/bin/expect

set user "root"

set passwd "root"

spawn ssh $user@192.168.242.132

expect {

"yes/no" { send "yes\r"; exp_continue}

"password:" { send "$passwd\r" }

}

#这里的*为通配符号,比如']#'或者']$'都匹配,它的意思是当遇到']*'时,发送下面的指令。

expect "]*"

send "touch /tmp/12.txt\r"

expect "]*"

send "echo 1212 > /tmp/12.txt\r"

expect "]*"

send "exit\r"

#增加expect eof的目的是,保证脚本中所有的指令都能执行完成。它相当于是一个结尾符。

expect eof

[root@centos-02 ~]# chmod a+x 2.expect

[root@centos-02 ~]# ./2.expect

spawn ssh root@192.168.242.132

root@192.168.242.132's password:

Last login: Tue Jul 24 17:22:28 2018 from centos-02

[root@centos-02 ~]# touch /tmp/12.txt

[root@centos-02 ~]# echo 1212 > /tmp/12.txt

[root@centos-02 ~]# exit

登出

Connection to 192.168.242.132 closed.

[root@centos-02 ~]#
3. 给expect脚本增加参数
[root@centos-02 ~]# vim 3.expect^C

[root@centos-02 ~]# cat 3.expect

#!/usr/bin/expect

#定义第一个参数,类似于shell的$1

set user [lindex $argv 0]

#定义第二个参数,类似于shell的$2

set host [lindex $argv 1]

set passwd "root"

#定义第三个参数,类似于shell的$3

set cm [lindex $argv 2]

spawn ssh $user@$host

expect {

"yes/no" { send "yes\r"}

"password:" { send "$passwd\r" }

}

expect "]*"

send "$cm\r"

expect "]*"

send "exit\r"

[root@centos-02 ~]# chmod +x 3.expect

[root@centos-02 ~]# ./3.expect root 192.168.242.132 "ls /tmp/"

spawn ssh root@192.168.242.132

root@192.168.242.132's password:

Last login: Tue Jul 24 21:27:57 2018 from centos-02

[root@centos-02 ~]# ls /tmp/

12.txt

[root@centos-02 ~]# [root@centos-02 ~]#
执行多条命令
[root@centos-02 ~]# ./3.expect root 192.168.242.132 "ls /tmp/; w"

spawn ssh root@192.168.242.132

root@192.168.242.132's password:

Last login: Tue Jul 24 21:28:33 2018 from centos-02

[root@centos-02 ~]# ls /tmp/; w

12.txt

 21:30:09 up  4:20,  3 users,  load average: 0.00, 0.01, 0.05

USER     TTY      FROM             LOGIN@   IDLE   JCPU   PCPU WHAT

root     tty1                      17:18    4:11m  0.00s  0.00s -bash

root     pts/0    192.168.242.1    17:10    1.00s  0.05s  0.00s /usr/bin/expect

root     pts/2    centos-02        21:30    0.00s  0.00s  0.00s w

[root@centos-02 ~]# [root@centos-02 ~]#
4. 自动同步文件
[root@centos-02 ~]# vim 4.expect^C

[root@centos-02 ~]# cat 4.expect

#!/usr/bin/expect

set passwd "root"

#spawn后面的命令不是ssh,而是rsync

spawn rsync -av root@192.168.242.132:/tmp/12.txt /root/

expect {

"yes/no" { send "yes\r"}

"password:" { send "$passwd\r" }

}

#如果不加expect eof,则rsync命令不会正常执行完成的。

expect eof

[root@centos-02 ~]# chmod +x 4.expect

[root@centos-02 ~]# ./4.expect

spawn rsync -av root@192.168.242.132:/tmp/12.txt /root/

root@192.168.242.132's password:

receiving incremental file list

12.txt

sent 43 bytes  received 96 bytes  92.67 bytes/sec

total size is 5  speedup is 0.04

[root@centos-02 ~]#
构建文件发布系统
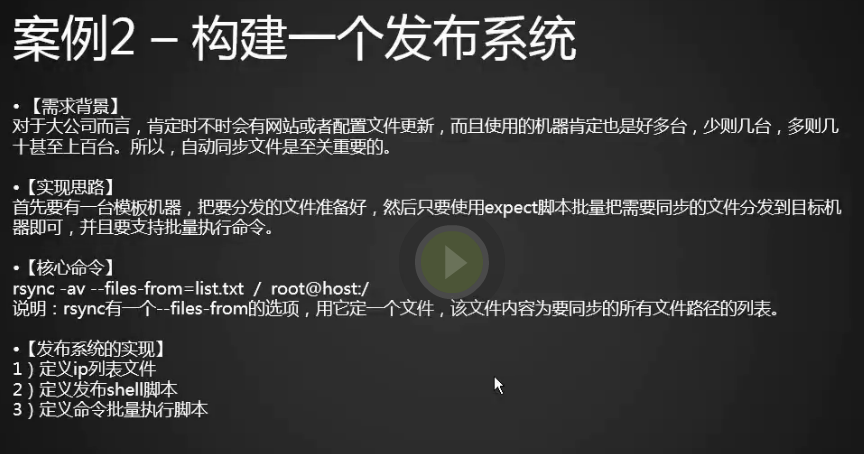
【需求背景】

对于大公司而言,肯定时不时会有网站或者配置文件更新,而且使用的机器肯定也是好多台,少则几台,多则几十甚至上百台。所以,自动同步文件是至关重要的。

【实现思路】

首先要有一台模板机器,把要分发的文件准备好,然后只要使用expect脚本批量把需要同步的文件分发到目标机器即可,并且要支持批量执行命令。

【核心命令】

rsync -av --files-from=list.txt  /  root@host:/

说明:rsync有一个--files-from的选项,用它定一个文件,该文件内容为要同步的所有文件路径的列表。list.txt文件内容如下:

/data/wwwroot/data/aaa.php

/data/wwwroot/abc/123.js

....
1.首先定义一个ip列表
[root@centos-02 ~]# vim ip.list^C

[root@centos-02 ~]# cat ip.list

192.168.242.132

[root@centos-02 ~]#
2.创建同步的文件列表文件
[root@centos-02 ~]# vim list.txt^C

[root@centos-02 ~]# cat list.txt

/tmp/12.txt

[root@centos-02 ~]#
3.定义要发布的shell的脚本
[root@centos-02 ~]# vim d.sh ^C

[root@centos-02 ~]# cat d.sh

#!/bin/bash

##定义发布用的expect脚本,如果已经存在需要先删除

[ -f ./rsync.expect ] && rm -f ./rsync.expect

##以下操作会将这部分代码写入./rsync.expect文件里

cat > ./rsync.expect <<EOF

#!/usr/bin/expect

set passwd "root"

set host [lindex \$argv 0]

set file [lindex \$argv 1]

spawn rsync -av --files-from=\$file / root@\$host:/

expect {

"yes/no" { send "yes\\r"}

"password:" { send "\$passwd\\r" }

}

expect eof

EOF

#给rsync.expect脚本执行权限

chmod a+x ./rsync.expect

for ip in `cat ip.list`

do

    #list.txt内容为要同步的所有文件列表

    ./rsync.expect $ip list.txt

done

[root@centos-02 ~]#
4.定义命令批量执行脚本
[root@centos-02 ~]# vim e.sh^C

[root@centos-02 ~]# cat e.sh

#!/bin/bash

##定义批量执行命令的expect脚本

[ -f ./exe.expect ] && rm -f ./exe.expect

cat >./exe.expect <<EOF

#!/usr/bin/expect

set host [lindex \$argv 0]

set passwd "root"

set cm [lindex \$argv 1]

spawn ssh root@\$host

expect {

"yes/no" { send "yes\\r"}

"password:" { send "\$passwd\\r" }

}

expect "]*"

send "\$cm\\r"

expect "]*"

send "exit\\r"

expect eof

EOF

chmod a+x ./exe.expect

for ip in `cat ip.list`

do

    echo $ip

    ##当要执行的命令为多条或者有参数时,需要用双引号引起来,命令直接用分号作为分隔符。

    ./exe.expect $ip "w;free -m;ls /tmp"

done

[root@centos-02 ~]#
5.执行发布脚步
[root@centos-02 ~]# sh d.sh

spawn rsync -av --files-from=list.txt / root@192.168.242.132:/

root@192.168.242.132's password:

building file list ... done

sent 68 bytes  received 12 bytes  53.33 bytes/sec

total size is 5  speedup is 0.06

[root@centos-02 ~]#
6.执行批量执行脚本
[root@centos-02 ~]# sh e.sh

192.168.242.132

spawn ssh root@192.168.242.132

root@192.168.242.132's password:

Last login: Tue Jul 24 21:30:09 2018 from centos-02

[root@centos-02 ~]# w;free -m;ls /tmp

 22:12:38 up  5:02,  3 users,  load average: 0.00, 0.01, 0.05

USER     TTY      FROM             LOGIN@   IDLE   JCPU   PCPU WHAT

root     tty1                      17:18    4:54m  0.00s  0.00s -bash

root     pts/0    192.168.242.1    17:10    6.00s  0.11s  0.00s sh e.sh

root     pts/2    centos-02        22:12    0.00s  0.00s  0.00s w

              total        used        free      shared  buff/cache   available

Mem:            977         111         627           6         239         713

Swap:          2047           0        2047

12.txt

[root@centos-02 ~]# exit

登出

Connection to 192.168.242.132 closed.

[root@centos-02 ~]#
Shell36计的更多相关文章
- SQLSERVER 使用 ROLLUP 汇总数据,实现分组统计,合计,小计
表结构: CREATE TABLE [dbo].[Students]( ,) NOT NULL, ) NULL, [Sex] [int] NOT NULL, ) NULL, ) NULL, , ) N ...
- 萌新笔记——Cardinality Estimation算法学习(二)(Linear Counting算法、最大似然估计(MLE))
在上篇,我了解了基数的基本概念,现在进入Linear Counting算法的学习. 理解颇浅,还请大神指点! http://blog.codinglabs.org/articles/algorithm ...
- PB gird类型数据窗口 设置分组、分组小计、合计
今天遇到一个需求,gird表格数据如下: 部门 类型 数据 A 类型1 1 A 类型2 2 B 类型1 3 B 类型2 4 合计 10 实际需要显示的结果为: 部门 ...
- 当攻击者熟读兵法,Camouflage病毒实战演示暗度陈仓之计
"明修栈道,暗度陈仓"的典故许多人都听说过,该典故出自楚汉争霸时期,刘邦意图进入关中,需要攻下关中咽喉之地--陈仓.韩信献出一计:表面上浩浩荡荡地修复通往陈仓的栈道以迷惑陈仓守将, ...
- UWP学习记录11-设计和UI
UWP学习记录11-设计和UI 1.输入和设备 通用 Windows 平台 (UWP) 中的用户交互组合了输入和输出源(例如鼠标.键盘.笔.触摸.触摸板.语音.Cortana.控制器.手势.注视等)以 ...
- UWP学习记录10-设计和UI之控件和模式7
UWP学习记录10-设计和UI之控件和模式7 1.导航控件 Hub,中心控件,利用它你可以将应用内容整理到不同但又相关的区域或类别中. 中心的各个区域可按首选顺序遍历,并且可用作更具体体验的起始点. ...
- UWP学习记录9-设计和UI之控件和模式6
UWP学习记录9-设计和UI之控件和模式6 1.图形和墨迹 InkCanvas是接收和显示墨迹笔划的控件,是新增的比较复杂的控件,这里先不深入. 而形状(Shape)则是可以显示的各种保留模式图形对象 ...
- UWP学习记录8-设计和UI之控件和模式5
UWP学习记录8-设计和UI之控件和模式5 1.日历.日期和时间控件 日期和时间控件提供了标准的本地化方法,可供用户在应用中查看并设置日期和时间值. 有四个日期和时间控件可供选择,选择的依据如下: 日 ...
- UWP学习记录7-设计和UI之控件和模式4
UWP学习记录7-设计和UI之控件和模式4 1.翻转视图 使用翻转视图浏览集合中的图像或其他项目(例如相册中的照片或产品详细信息页中的项目),一次显示一个项目. 对于触摸设备,轻扫某个项将在整个集合中 ...
随机推荐
- How to open a web site with the default web browser in a NEW window
http://delphi.about.com/cs/adptips2004/a/bltip0504_4.htm When using ShellExecute (as explained in th ...
- CMSIS-SVD Schema File Ver. 1.1 (draft)
http://www.keil.com/pack/doc/cmsis/svd/html/group__schema__1__1__gr.html <?xml version="1.0& ...
- Spring集合 (List,Set,Map,Properties) 实例
下面例子向您展示Spring如何注入值到集合类型(List, Set, Map, and Properties). 支持4个主要的集合类型: List – <list/> Set – &l ...
- 引用计数的cocos2dx对象内存管理和直接new/delete box2d对象内存管理冲突的解决方法
转载请注明: http://blog.csdn.net/herm_lib/article/details/9316601 项目中用到了cocos2dx和box2d,cocos2dx的内存是基于引用计数 ...
- ADS-B显示终端6.0
改动日志 1 更新背景地图. 增加了全国范围内的飞行限制区.飞行危急区.限制区採用黄色区域表示.危急区採用红色区域表示.全部原始资料均来自民航局发布的航行情报资料汇编. 2为解决显示元素过多,屏幕显 ...
- RTMP协议发送H.264编码及AAC编码的音视频,实现摄像头直播
RTMP(Real Time Messaging Protocol)是专门用来传输音视频数据的流媒体协议,最初由Macromedia 公司创建,后来归Adobe公司所有,是一种私有协议,主要用来联系F ...
- linux shell 正则表达式(BREs,EREs,PREs)差异比较(转,当作资料查)
转载: 在计算机科学中,是指一个用来描述或者匹配一系列符合某个句法规则的字符串的单个字符串.在很多文本编辑器或其他工具里,正则表达式通常被用来检索和/或 替换那些符合某个模式的文本内容.许多程序设计语 ...
- (windows)一台电脑上安装两个Mysql服务
原文:https://my.oschina.net/u/1472917/blog/410732 最近需要在一台电脑上安装两个Mysql服务,需求稍微有些奇怪,但确实很必要.本人原本为了本机测试Word ...
- spingBoot-自定义过滤器
package com.cx.springboot.filters; import java.io.IOException; import javax.servlet.Filter; import j ...
- mysql DATE_FORMAT(date, format) 函数
DATE_FORMAT(date, format) 函数用法 DATE_FORMAT(date, format) 函数根据format字符串格式化date值. 1.把字符串转为日期格式 实例: SEL ...