网络基础配置--usg系统升级
1、usg2000系统升级
1.1、TFTP设置
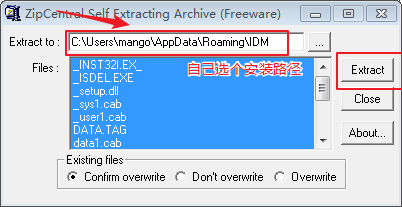
这里用到一个工具:3CDeamon, 是在由3Com开发类别 Web Development Freeware 软件,是一个简易服务器工具,含TFTP服务器、FTP服务器、Syslog服务器及TFTP客户机。3CDaemon,支持多种协议的小型服务软件,其功能简练、使用方便是最大的优点。
下载站点:
1、http://www.updatestar.com/directdownload/3cdaemon/2005987
2、https://pan.baidu.com/s/1gumyFTmtUKQvJVS3mjQ_0g u7on
下载后直接安装即可


1.2、升级步骤
查看设备的版本
[SD-JN-]dis version

::  //

Huawei Versatile Routing Platform Software

Software Version : USG2110 V300R001C00SPC900 (VRP (R) Software, Version 5.30)

Copyright (C) - Huawei Technologies Co., Ltd.

Secoway USG2110-F uptime is  week,  day,  hour,  minutes

RPU's Version Information:

512M           bytes SDRAM

64M            bytes FLASH

Pcb            Version : VER.D

CPLD Logic     Version :

Small BootROM  Version :

Big BootROM    Version :
查看设备上的文件
<SD-JN->dir

::  //

Directory of flash:/

      -rw-    Apr   ::   SUP_512M.BIN

      drw-         -  Aug   ::   url

      -rw-          May   ::   private-data.txt

      -rw-         Aug   ::   um_database_cfg.zip

      -rw-        Aug   ::   vrpcfg.zip

      -rw-     Aug   ::   utm_update.zip

 KB total ( KB free)
先备份下原先的系统文件
<SD-JN-70>tftp 192.168.0.3 put sup_512M.bin

14:20:27  2018/05/10

  Transfer file in binary mode.

  Now begin to copy file to remote tftp server, please wait for a while... /

  TFTP: 23981700 bytes sent in 149 seconds.

  File uploaded successfully.
<SD-JN-70>tftp 192.168.0.3 put um_database_cfg.zip

14:26:38  2018/05/10

  Transfer file in binary mode.

  Now begin to copy file to remote tftp server, please wait for a while... \

  TFTP:      780 bytes sent in 1 second.

  File uploaded successfully.

<SD-JN-70>tftp 192.168.0.3 put vrpcfg.zip

14:26:50  2018/05/10

  Transfer file in binary mode.

  Now begin to copy file to remote tftp server, please wait for a while... \

  TFTP:     3267 bytes sent in 1 second.

  File uploaded successfully.

<SD-JN-70>tftp 192.168.0.3 put utm_update.zip

14:27:01  2018/05/10

  Transfer file in binary mode.

  Now begin to copy file to remote tftp server, please wait for a while... |

  TFTP:  1971449 bytes sent in 13 seconds.

  File uploaded successfully.
下载镜像文件
<SD-JN->tftp 192.168.0.3 get sup_512M.bin

::  //

The file sup_512M.bin exists. Overwrite it?[Y/N]:y

  Transfer file in binary mode.

-- :: SD-JN- %%01VFS//OVERWRITE(l): When asked whether to overwrite the file sup_512M.bin, the user entered Y.

  Now begin to download file from remote tftp server, please wait for a while... |

  TFTP:  bytes received in  seconds.

  File downloaded successfully.
查看目前启动的镜像
<SD-JN->dis startup   #华三是dis boot-loader

::  //

MainBoard:

  Configed startup system software:          flash:/SUP_512M.BIN

  Startup system software:                   flash:/SUP_512M.BIN

  Next startup system software:              flash:/SUP_512M.BIN

  Startup saved-configuration file:          flash:/vrpcfg.zip

  Next startup saved-configuration file:     flash:/vrpcfg.zip
设定启动时要加载的镜像
<SD-JN->startup system-software SUP_512M.BIN

::  //

Info:System software for the next startup:flash:/sup_512m.bin, start reading file....

Succeeded in setting the software for booting system.
重启
<SD-JN->reboot

::  //

  System will reboot, could you want to save current configuration [Y/N]?y

 Next config file is flash:/vrpcfg.zip

Now saving the current configuration to the device..................................................

Info:The current configuration was saved to the device successfully.

  System will reboot! Continue?[Y/N]:y
重启时间大约要经过4分钟左右。可以看到版本已经升级到SPC600了。
<SD-JN->dis version

::  //

Huawei Versatile Routing Platform Software

Software Version : USG2110 V300R001C10SPC600 (VRP (R) Software, Version 5.30)

Copyright (C) - Huawei Technologies Co., Ltd.

Secoway USG2110-F uptime is  week,  day,  hour,  minutes

RPU's Version Information:

512M           bytes SDRAM

64M            bytes FLASH

Pcb            Version : VER.D

CPLD Logic     Version :

Small BootROM  Version :

Big BootROM    Version :
------------------------------------------------------------------------------------------------------------------------------------------------
2、官方教程
操作步骤
- 在PC2上通过FTP方式登录USG。
本文档中以Windows操作系统自带的FTP client为例进行介绍,在实际操作过程中,建议您使用第三方FTP client程序来传送文件,例如Cute FTP等。
显示信息如下:
C:\> ftp 192.168.0.1

Connected to 192.168.0.1.

220 FTP service ready.

User (192.168.0.1:(none)): ftpuser

331 Password required for ftpuser.

Password:

230 User logged in.

ftp> - 设置文件的传输模式,同时设置PC2上存放升级所需文件的目录路径为D:\FTP,该文件夹必须已经存在。此处仅以D:\FTP为例进行说明,您可以根据实际需要配置为其他的目录。
ftp> binary   /输入binary命令,以二进制格式传输文件

ftp> lcd D:\FTP /设置PC2上存放升级所需文件的目录 - 使用put命令,将v300r001c10spc600.bin上传至USG的Flash中。上传的文件不能和Flash中已有的文件同名。如果Flash中已经有同名的文件,将会直接覆盖原来的文件。
ftp> put D:\FTP\v300r001c10spc600.bin
受网络状况影响,上传版本软件时将会需要一段时间,请您耐心等待上传完成提示。上传完成后,请您确认设备Flash中文件的大小与PC2上文件的大小是否一致,如果不一致,请重新上传,确保文件完整上传到设备SD卡或Flash中。
- 使用put命令,将经过配置转换工具转换并手工调整后的配置文件如vrpcfg_new.cfg上传至USG的Flash中。上传的文件不能和Flash中已有的文件同名。如果Flash中已经有同名的文件,将会直接覆盖原来的文件。
ftp> put D:\FTP\vrpcfg_new.cfg
上传完成后,请您确认设备Flash中文件的大小与PC2上文件的大小是否一致,如果不一致,请重新上传,确保文件完整上传到设备Flash中。
- 文件上传完成后,退出FTP环境,在PC1上通过Telnet或SSH方式登录到USG的命令行环境中。
- 在用户视图下使用startup system-software filename命令设置USG下次启动时使用的版本软件。
<USG> startup system-software v300r001c10spc600.bin

  Info:System software for the next startup:flash:/v300r001c10spc600.bin, starting reading file....

Succeeded in setting the software for booting system. - 在用户视图下使用startup saved-configuration filename命令设置USG下次启动时使用的配置文件。
<USG> startup saved-configuration vrpcfg_new.cfg

Info: Succeeded in setting the configuration for booting system. - 在用户视图下使用reboot命令重新启动USG。
执行reboot命令后,设备将会显示两次提示信息,请您不保存配置重新启动。重启后请您耐心等待,待设备启动完成后再进行后续操作。
注意:第一个是否保存当前配置的提示,执行y后当前配置会覆盖本次升级的目标配置。如果确认已将当前配置同步保存到升级目标配置,请输入n。
<USG> reboot

   System will reboot, could you want to save current configuration [Y/N]?n

System will reboot, continue?[Y/N]:y说明:设备启动耗时受当前的硬件配置以及配置文件影响。配置越多,需要恢复配置的时间就越长。
网络基础配置--usg系统升级的更多相关文章
- Linux网络基础配置
这是看itercast视频的笔记 Linux网络基础配置 以太网连接 在Linux中,以太网接口被命令为:eth0, eth1等, 0,1代表网卡编号 通过lspci命令可以查看网上硬件信息(如果是u ...
- docker数据卷管理及网络基础配置
数据卷 数据卷容器 数据卷迁移数据 端口映射 容器间通信 数据卷的管理 当需要查看容器内应用产生的数据或者把容器内数据备份及多个容器数据共享.有两种方式,数据卷以及数据卷容器. 数据卷 数据卷是一个可 ...
- linux基础之网络基础配置
基础命令:ifconfig/route/netstat,ip/ss,nmcli 一.ifconfig/route/netstat相关命令 1. ifconfig - configure a netw ...
- docker网络基础配置
常用两种方式: 1)映射容器端口到宿主机 2)容器互联机制 --------------------------------------------- 端口映射实现访问容器的用法: docker ru ...
- 网络基础配置--开启SSH,关闭Telnet
1.Telnet和SSH对比 1.1.TELNET 使用Telnet这个用来访问远程计算机的TCP/IP协议以控制你的网络设备相当于在离开某个建筑时大喊你的用户名和口令.很快会有人进行监听,并且他们会 ...
- docker-ce-17.09 网络基础配置
一.端口映射实现访问容器 1.我们先从pull一个nginx镜像,然后后台运行该镜像 > docker pull nginx > docker run -d -P nginx:latest ...
- 基于RHEL8/CentOS8的网络基础配置
在rhel7上,同时支持network.service和NetworkManager.service(简称NM).默认情况下,这2个服务都有开启,但许多人都会将NM禁用掉.而在rhel8上,已废弃ne ...
- 七、【Docker笔记】Docker中网络基础配置
一个系统一般都包含多个服务组件,这些大量的服务组件不可能放在同一个容器中,这就需要多个容器之间可以互相通信.Docker提供了两种方式来实现网络服务:映射容器端口到宿主主机.容器互联机制. 一.端口映 ...
- Linux:网络基础配置
一.修改主机名 hostname 查看主机名 1.hostname zy 修改主机名为zy,临时生效,重新登录系统生效. 2.想要永久修改,,需修改配置文件: vi /etc/sysconf ...
随机推荐
- Winhex数据恢复学习笔记(三)
上次对文件系统进行简单的分析,这次就文件的镜像功能做一介绍 1.首先镜像的概念:镜像就是数据的副本,是原来数据在相同位置上以相同的排列模式生成的拷贝,所以镜像可以用来还原原始数据,代替原始数据工作,镜 ...
- java----DOS命令
dir /? 查看帮助 dir /s 查看当前的目录,以及子目录
- 向github上提交自己的project
参考博客:https://blog.csdn.net/m0_37725003/article/details/80904824 step I: 创建自己的github账户(username:fourm ...
- linux:安装并使用activeMQ
1.下载安装包:curl -O https://archive.apache.org/dist/activemq/5.14.0/apache-activemq-5.14.0-bin.tar.gz 2. ...
- 饮冰三年-人工智能-linux-01通过VM虚拟机安装contes系统
先决条件:VM虚拟机的安装.contes系统的镜像文件 1:创建新的虚拟机 2:下一步,稍后安装操作系统 3:选择对应的系统 4:选择对应的路径 至此虚拟机已经创建完成(相当于买了一台新电脑) 5:编 ...
- 从零开始学C#——不再更新,直接进入高阶教程
从零开始学习C#不再更新,直接进入高阶教程. 入门教程,请自行谷歌.百度吧,有很多这样的教程. 编程是一件实践性很强的事情,那么接下来的文章将开始进行开发项目. 还在编程中迷茫的人们,先暂时放下一切的 ...
- 在Git.oschina.net中配置TortoiseGit使用sshkey,无需输入账号和密码
ssh的方式 git@oschina.com:用户名/版本库t.git 此篇文章针对于这种 黄海正在开发的项目位置 https://gitee.com/dslx/BigData.g ...
- CentOS6 YUM安装MariaDB10.3.10
1.先新增加一个MariaDB.repo vi /etc/yum.repos.d/MariaDB.repo [mariadb] name = MariaDB baseurl = http://mirr ...
- git报错处理
今天又遇到了这个问题,记录一下. 报错 原因及解决办法: 本文作者starof,因知识本身在变化,作者也在不断学习成长,文章内容也不定时更新,为避免误导读者,方便追根溯源,请诸位转载注明出处:http ...
- NEST - 编写布尔查询
Writing bool queries Version:5.x 英文原文地址:Writing bool queries 在使用查询 DSL 时,编写 bool 查询会很容易把代码变得冗长.举个栗子, ...