
使用Azure人脸API对图片进行人脸识别
人脸识别是人工智能机器学习比较成熟的一个领域。人脸识别已经应用到了很多生产场景。比如生物认证,人脸考勤,人流监控等场景。对于很多中小功能由于技术门槛问题很难自己实现人脸识别的算法。Azure人脸API对人脸识别机器学习算法进行封装提供REST API跟SDK方便用户进行自定义开发。
Azure人脸API可以对图像中的人脸进行识别,返回面部的坐标、性别、年龄、情感、愤怒还是高兴、是否微笑,是否带眼镜等等非常有意思的信息。
Azure人脸API也是一个免费服务,每个月30000次事务的免费额度。
创建人脸服务
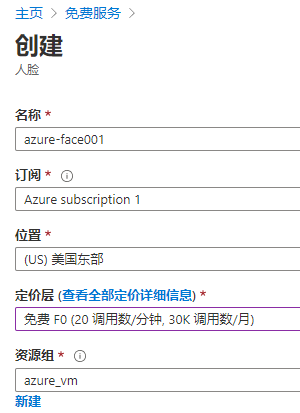
填写实例名,选择一个区域,同样选离你近的。
获取秘钥跟终结点
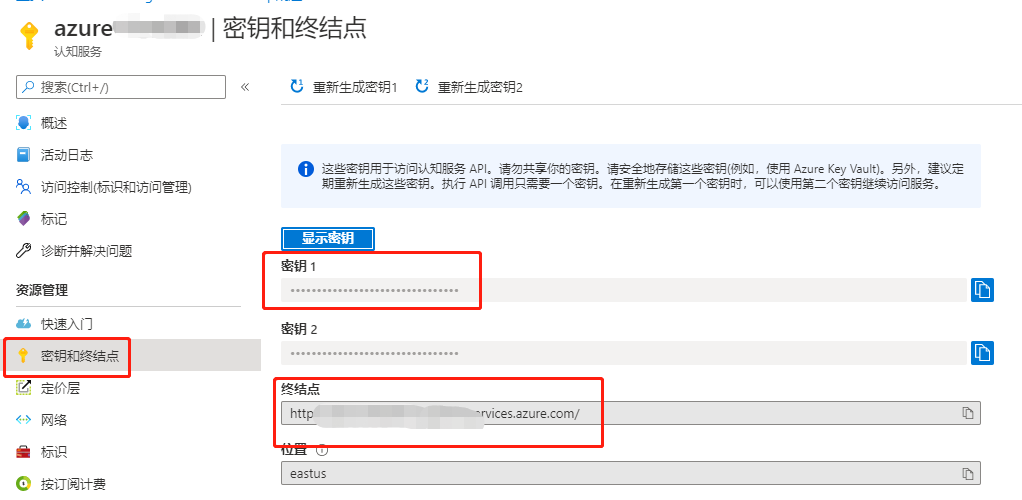
选中侧边菜单“秘钥于终结点”,获取信息,这2个信息后面再sdk调用中需要用到。
新建WPF应用
新建一个WPF应用实现以下功能:
- 选择图片后把原图显示出来
- 选中后马上进行识别
- 识别成功后把脸部用红框描述出来
- 当鼠标移动到红框内的时候显示详细脸部信息
安装SDK
使用nuget安装对于的sdk包:
Install-Package Microsoft.Azure.CognitiveServices.Vision.Face -Version 2.5.0-preview.2
实现界面
编辑MainWindow.xml放置图像显示区域、文件选中、描述显示区域
<Window x:Class="FaceWpf.MainWindow"

        xmlns="http://schemas.microsoft.com/winfx/2006/xaml/presentation"

        xmlns:x="http://schemas.microsoft.com/winfx/2006/xaml"

        xmlns:d="http://schemas.microsoft.com/expression/blend/2008"

        xmlns:mc="http://schemas.openxmlformats.org/markup-compatibility/2006"

        xmlns:local="clr-namespace:FaceWpf"

        mc:Ignorable="d"

        Title="MainWindow" Height="600" Width="800">

    <Grid x:Name="BackPanel">

        <Image x:Name="FacePhoto" Stretch="Uniform" Margin="0,0,0,50" MouseMove="FacePhoto_MouseMove" />

        <DockPanel DockPanel.Dock="Bottom">

            <Button x:Name="BrowseButton" Width="72" Height="80" VerticalAlignment="Bottom" HorizontalAlignment="Left"

                     Content="选择图片..."

                     Click="BrowseButton_Click" />

            <StatusBar VerticalAlignment="Bottom">

                <StatusBarItem>

                    <TextBlock Name="faceDescriptionStatusBar" Height="80" FontSize="20" Text="" Width="500" TextWrapping="Wrap"/>

                </StatusBarItem>

            </StatusBar>

        </DockPanel>

    </Grid>

</Window>
图片选择并显示
  // 选择图片并上传

        private async void BrowseButton_Click(object sender, RoutedEventArgs e)

        {

            var openDlg = new Microsoft.Win32.OpenFileDialog();

            openDlg.Filter = "JPEG Image(*.jpg)|*.jpg";

            bool? result = openDlg.ShowDialog(this);

            if (!(bool)result)

            {

                return;

            }

            // Display the image file.

            string filePath = openDlg.FileName;

            Uri fileUri = new Uri(filePath);

            BitmapImage bitmapSource = new BitmapImage();

            bitmapSource.BeginInit();

            bitmapSource.CacheOption = BitmapCacheOption.None;

            bitmapSource.UriSource = fileUri;

            bitmapSource.EndInit();

            FacePhoto.Source = bitmapSource;

            // Detect any faces in the image.

            Title = "识别中...";

            _faceList = await UploadAndDetectFaces(filePath);

            Title = String.Format(

                "识别完成. {0}个人脸", _faceList.Count);

            if (_faceList.Count > 0)

            {

                // Prepare to draw rectangles around the faces.

                DrawingVisual visual = new DrawingVisual();

                DrawingContext drawingContext = visual.RenderOpen();

                drawingContext.DrawImage(bitmapSource,

                    new Rect(0, 0, bitmapSource.Width, bitmapSource.Height));

                double dpi = bitmapSource.DpiX;

                // Some images don't contain dpi info.

                _resizeFactor = (dpi == 0) ? 1 : 96 / dpi;

                _faceDescriptions = new String[_faceList.Count];

                for (int i = 0; i < _faceList.Count; ++i)

                {

                    DetectedFace face = _faceList[i];

                    //画方框

                    drawingContext.DrawRectangle(

                        Brushes.Transparent,

                        new Pen(Brushes.Red, 2),

                        new Rect(

                            face.FaceRectangle.Left * _resizeFactor,

                            face.FaceRectangle.Top * _resizeFactor,

                            face.FaceRectangle.Width * _resizeFactor,

                            face.FaceRectangle.Height * _resizeFactor

                            )

                    );

                    _faceDescriptions[i] = FaceDescription(face);

                }

                drawingContext.Close();

                RenderTargetBitmap faceWithRectBitmap = new RenderTargetBitmap(

                    (int)(bitmapSource.PixelWidth * _resizeFactor),

                    (int)(bitmapSource.PixelHeight * _resizeFactor),

                    96,

                    96,

                    PixelFormats.Pbgra32);

                faceWithRectBitmap.Render(visual);

                FacePhoto.Source = faceWithRectBitmap;

                faceDescriptionStatusBar.Text = _defaultStatusBarText;

            }

        }
调用SDK进行识别
指定需要识别的要素,调用sdk进行图像识别
   // 上传图片使用faceclient识别

        private async Task<IList<DetectedFace>> UploadAndDetectFaces(string imageFilePath)

        {

            IList<FaceAttributeType> faceAttributes =

                new FaceAttributeType[]

                {

            FaceAttributeType.Gender, FaceAttributeType.Age,

            FaceAttributeType.Smile, FaceAttributeType.Emotion,

            FaceAttributeType.Glasses, FaceAttributeType.Hair

                };

            using (Stream imageFileStream = File.OpenRead(imageFilePath))

            {

                IList<DetectedFace> faceList =

                    await _faceClient.Face.DetectWithStreamAsync(

                        imageFileStream, true, false, faceAttributes);

                return faceList;

            }

        }
显示脸部的描述
对人脸识别后的结果信息组装成字符串,当鼠标移动到人脸上的时候显示这些信息。
 /// <summary>

        /// 鼠标移动显示脸部描述

        /// </summary>

        /// <param name="sender"></param>

        /// <param name="e"></param>

        private void FacePhoto_MouseMove(object sender, MouseEventArgs e)

        {

            if (_faceList == null)

                return;

            Point mouseXY = e.GetPosition(FacePhoto);

            ImageSource imageSource = FacePhoto.Source;

            BitmapSource bitmapSource = (BitmapSource)imageSource;

            var scale = FacePhoto.ActualWidth / (bitmapSource.PixelWidth / _resizeFactor);

            bool mouseOverFace = false;

            for (int i = 0; i < _faceList.Count; ++i)

            {

                FaceRectangle fr = _faceList[i].FaceRectangle;

                double left = fr.Left * scale;

                double top = fr.Top * scale;

                double width = fr.Width * scale;

                double height = fr.Height * scale;

                if (mouseXY.X >= left && mouseXY.X <= left + width &&

                    mouseXY.Y >= top && mouseXY.Y <= top + height)

                {

                    faceDescriptionStatusBar.Text = _faceDescriptions[i];

                    mouseOverFace = true;

                    break;

                }

            }

            if (!mouseOverFace) faceDescriptionStatusBar.Text = _defaultStatusBarText;

        }
 /// <summary>

        /// 脸部描述

        /// </summary>

        /// <param name="face"></param>

        /// <returns></returns>

        private string FaceDescription(DetectedFace face)

        {

            StringBuilder sb = new StringBuilder();

            sb.Append("人脸: ");

            // 性别年龄

            sb.Append(face.FaceAttributes.Gender.Value == Gender.Female ? "女性" : "男性");

            sb.Append(", ");

            sb.Append(face.FaceAttributes.Age.ToString() + "岁");

            sb.Append(", ");

            sb.Append(String.Format("微笑 {0:F1}%, ", face.FaceAttributes.Smile * 100));

            // 显示超过0.1的表情

            sb.Append("表情: ");

            Emotion emotionScores = face.FaceAttributes.Emotion;

            if (emotionScores.Anger >= 0.1f) sb.Append(

                String.Format("生气 {0:F1}%, ", emotionScores.Anger * 100));

            if (emotionScores.Contempt >= 0.1f) sb.Append(

                String.Format("蔑视 {0:F1}%, ", emotionScores.Contempt * 100));

            if (emotionScores.Disgust >= 0.1f) sb.Append(

                String.Format("厌恶 {0:F1}%, ", emotionScores.Disgust * 100));

            if (emotionScores.Fear >= 0.1f) sb.Append(

                String.Format("恐惧 {0:F1}%, ", emotionScores.Fear * 100));

            if (emotionScores.Happiness >= 0.1f) sb.Append(

                String.Format("高兴 {0:F1}%, ", emotionScores.Happiness * 100));

            if (emotionScores.Neutral >= 0.1f) sb.Append(

                String.Format("自然 {0:F1}%, ", emotionScores.Neutral * 100));

            if (emotionScores.Sadness >= 0.1f) sb.Append(

                String.Format("悲伤 {0:F1}%, ", emotionScores.Sadness * 100));

            if (emotionScores.Surprise >= 0.1f) sb.Append(

                String.Format("惊喜 {0:F1}%, ", emotionScores.Surprise * 100));

            sb.Append(face.FaceAttributes.Glasses);

            sb.Append(", ");

            sb.Append("头发: ");

            if (face.FaceAttributes.Hair.Bald >= 0.01f)

                sb.Append(String.Format("秃头 {0:F1}% ", face.FaceAttributes.Hair.Bald * 100));

            IList<HairColor> hairColors = face.FaceAttributes.Hair.HairColor;

            foreach (HairColor hairColor in hairColors)

            {

                if (hairColor.Confidence >= 0.1f)

                {

                    sb.Append(hairColor.Color.ToString());

                    sb.Append(String.Format(" {0:F1}% ", hairColor.Confidence * 100));

                }

            }

            return sb.ToString();

        }
运行
到此我们的应用打造完成了。先让我们选择一张结衣的图片试试:
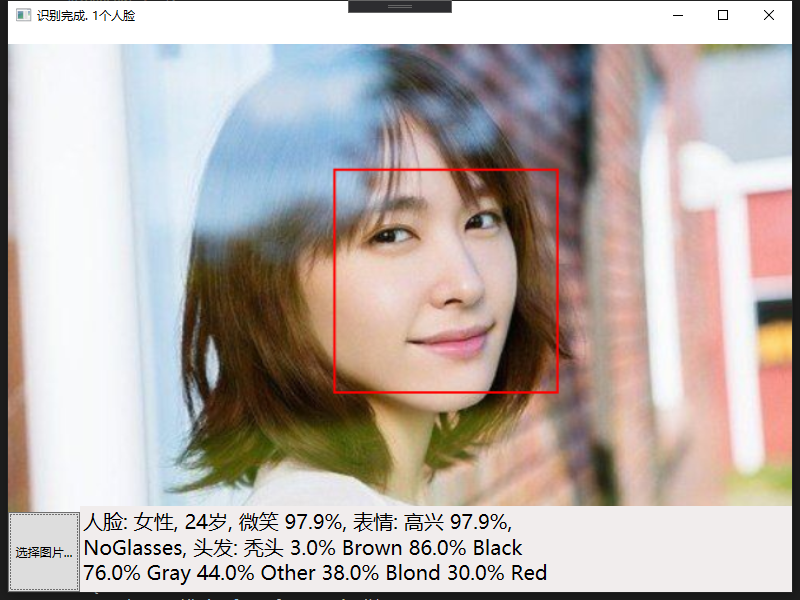
看看我们的结衣微笑率97.9%。
再选一张杰伦的图片试试:
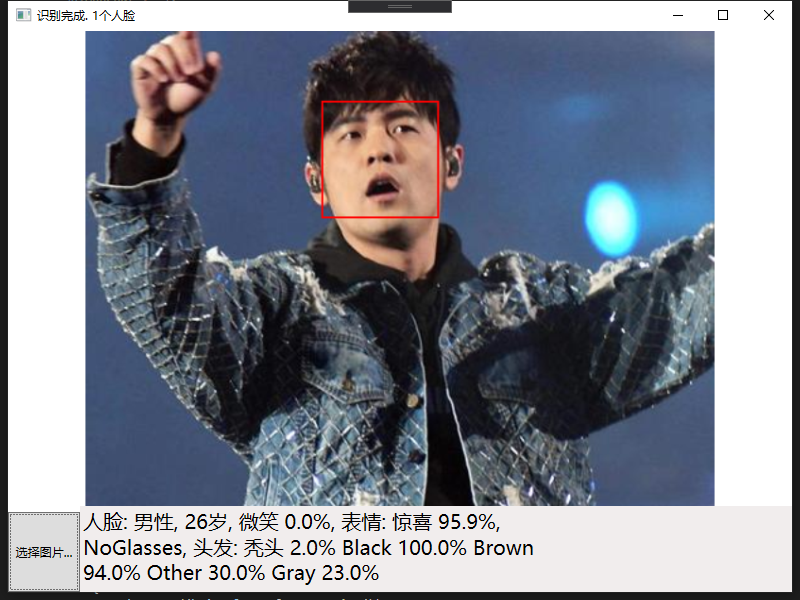
嗨,杰伦就是不喜欢笑,微笑率0% 。。。
总结
通过简单的一个wpf的应用我们演示了如果使用Azure人脸API进行图片中的人脸检测,真的非常方便,识别代码只有1行而已。如果不用C# sdk还可以使用更加通用的rest api来调用,这样可以适配任何开发语言。Azure人脸API除了能对图片中的人脸进行检测,还可以对多个人脸进行比对,检测是否是同一个人,这样就可以实现人脸考勤等功能了,这个下次再说吧。
使用Azure人脸API对图片进行人脸识别的更多相关文章
- 借助百度云API进行人脸识别
前言:本篇博客是笔者第一次使用百度云api进行人脸检测,主要内容包括两部分,一是获取接口,二是借助接口进行人脸检测.笔者也是初步了解这方面的内容,也是参考了杂七杂八的博文,内容可能存在错误及其他毛病, ...
- 树莓派+百度api实现人脸识别
title: 树莓派+百度api实现人脸识别 tags: 树莓派 date: 2018-5-31 20:06:00 --- 树莓派对接百度api 我以前玩安卓的时候一直用的讯飞的平台和api,对于百度 ...
- 转:基于开源项目OpenCV的人脸识别Demo版整理(不仅可以识别人脸,还可以识别眼睛鼻子嘴等)【模式识别中的翘楚】
文章来自于:http://blog.renren.com/share/246648717/8171467499 基于开源项目OpenCV的人脸识别Demo版整理(不仅可以识别人脸,还可以识别眼睛鼻子嘴 ...
- keras系列︱人脸表情分类与识别:opencv人脸检测+Keras情绪分类(四)
引自:http://blog.csdn.net/sinat_26917383/article/details/72885715 人脸识别热门,表情识别更加.但是表情识别很难,因为人脸的微表情很多,本节 ...
- 基于OpenCV读取摄像头进行人脸检测和人脸识别
前段时间使用OpenCV的库函数实现了人脸检测和人脸识别,笔者的实验环境为VS2010+OpenCV2.4.4,opencv的环境配置网上有很多,不再赘述.检测的代码网上很多,记不清楚从哪儿copy的 ...
- Opencv与dlib联合进行人脸关键点检测与识别
前言 依赖库:opencv 2.4.9 /dlib 19.0/libfacedetection 本篇不记录如何配置,重点在实现上.使用libfacedetection实现人脸区域检测,联合dlib标记 ...
- facenet 人脸识别(二)——创建人脸库搭建人脸识别系统
搭建人脸库 选择的方式是从百度下载明星照片 照片下载,downloadImageByBaidu.py # coding=utf-8 """ 爬取百度图片的高清原图 &qu ...
- 人脸真伪验证与识别:ICCV2019论文解析
人脸真伪验证与识别:ICCV2019论文解析 Face Forensics++: Learning to Detect Manipulated Facial Images 论文链接: http://o ...
- Tensorflow object detection API 搭建物体识别模型(二)
二.数据准备 1)下载图片 图片来源于ImageNet中的鲤鱼分类,下载地址:https://pan.baidu.com/s/1Ry0ywIXVInGxeHi3uu608g 提取码: wib3 在桌面 ...
随机推荐
- day69 cookie与session
目录 一.forms源码解析 二.cookie与session发展史 三.cookie操作 四.session操作 五.CBV如何添加装饰器 一.forms源码解析 # from组件的切入点是is_v ...
- 数据可视化基础专题(六):Pandas基础(五) 索引和数据选择器(查找)
1.序言 如何切片,切块,以及通常获取和设置pandas对象的子集 2.索引的不同选择 对象选择已经有许多用户请求的添加,以支持更明确的基于位置的索引.Pandas现在支持三种类型的多轴索引. .lo ...
- css换行后缩进,css缩进技巧
一般情况下像下图这样需要缩进的,一般都会外面一个div里面两块需要两个div然后用定位或者flex.table.浮动后设置宽度等来实现 已知宽度的情况下上面列的方法都适用 不知宽度的情况下可以用fle ...
- 如何理解Javascript中的函数(Function)
Function类型 首先得知道,每个函数都是Function类型的实例,所以函数本身是对象. 示例1: function sum (num1, num2){ return sum1 + sum2; ...
- 一文快速掌握华为云IPv6基础知识及使用指南
随着5G.物联网等新兴技术领域的发展,IP空间需求巨大,IPv6成为万物互联的基础,势在必行:华为云作为IPv6成熟商用开拓者,针对金融.广电.媒资等不同行业推出IPv6解决方案,助力企业平滑升级到I ...
- CSS上划线、下划线、删除线等方法
text-decoration:underline; 下划线 text-decoration:overline; 顶划线 text-decoration:line-through; 删 ...
- Web应用程序安全与风险
一.Web应用程序安全与风险 更多渗透测试相关内容请关注此地址:https://blog.csdn.net/weixin_45380284 1.web发展历程 静态内容阶段(HTML) CGI程序阶段 ...
- Java之枚举类
有时候,变量的取值只在一个有限的集合内. 例如:pizza的大小只有小.中.大和超大这四种尺寸.当然,可以将这些尺寸分别编码为1.2.3.4或者S.M.L.X.但这样存在着一定的隐患.在变量中很有可能 ...
- Just test it!!软件测试测起来!!
(图片: josh@unsplash,字数:700,时间:1分钟) (一) 一切的软件质量保障活动,归根结底,就两种类型. 一种是基于代码执行的,一种是不基于代码执行的. 测试之于肉眼自查.静态检查. ...
- 题解 洛谷 P4492 【[HAOI2018]苹果树】
考虑生成一颗二叉树的过程,加入第一个节点方案数为\(1\),加入第二个节点方案数为\(2\),加入第三个节点方案数为\(3\),发现生成一颗\(n\)个节点的二叉树的方案数为\(n!\). 所以题目中 ...