自建CA实现HTTPS
说明:这里是Linux服务综合搭建文章的一部分,本文可以作为自建CA搭建https网站的参考。
注意:这里所有的标题都是根据主要的文章(Linux基础服务搭建综合)的顺序来做的。
如果需要查看相关软件版本和主机配置要求,请根据目录自行查看。
Linux服务综合搭建的文章目录
====================================================
5、foundation通过Rsyslog搭建集中日志服务器
8、rhel7 JAVA web环境搭建(使用Tomcat8整合httpd)
10、foundation配置kerberos和NTP服务以及安全的NFS挂载
====================================================
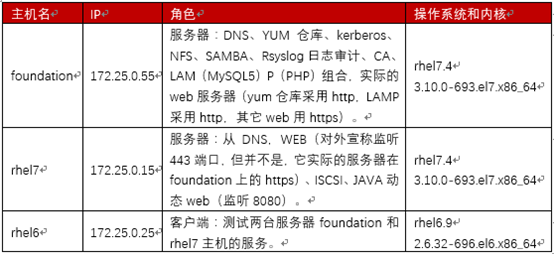
主机角色说明
9、foundation自建CA实现HTTPS
自建CA,并且实现https网站,域名为www.mei.com。
注意,证书请求时要生成www.mei.com的证书。
9.1 自建CA并颁发证书给foundation主机
9.1.1 自建CA
[root@foundation CA]# touch /etc/pki/CA/index.txt

[root@foundation CA]# echo "01" >/etc/pki/CA/serial

#生成私钥

[root@foundation CA]# openssl genrsa -out /etc/pki/CA/private/cakey.pem 2048

Generating RSA private key, 2048 bit long modulus

...................+++

..................+++

e is 65537 (0x10001)

#CA自签

[root@foundation CA]# openssl req -new -x509 -key /etc/pki/CA/private/cakey.pem -days 7300 -out /etc/pki/CA/cacert.pem

You are about to be asked to enter information that will be incorporated

into your certificate request.

What you are about to enter is what is called a Distinguished Name or a DN.

There are quite a few fields but you can leave some blank

For some fields there will be a default value,

If you enter '.', the field will be left blank.

-----

Country Name (2 letter code) [XX]:cn

State or Province Name (full name) []:chongqing

Locality Name (eg, city) [Default City]:yubei

Organization Name (eg, company) [Default Company Ltd]:mei

Organizational Unit Name (eg, section) []:ops

Common Name (eg, your name or your server's hostname) []:foundation.mei.com

Email Address []:mail.mei.com
9.1.2 生成证书请求并签发
#生成私钥

[root@foundation CA]# openssl genrsa -out /etc/pki/tls/private/server.key 2048

Generating RSA private key, 2048 bit long modulus

....................................+++

....................................+++

e is 65537 (0x10001)

#生成证书请求,注意我们要签发的是www.mei.com这个域名的证书

[root@foundation CA]# openssl req -new -key /etc/pki/tls/private/server.key -days 365 -out /etc/pki/tls/server.csr

You are about to be asked to enter information that will be incorporated

into your certificate request.

What you are about to enter is what is called a Distinguished Name or a DN.

There are quite a few fields but you can leave some blank

For some fields there will be a default value,

If you enter '.', the field will be left blank.

-----

Country Name (2 letter code) [XX]:cn

State or Province Name (full name) []:chongqing

Locality Name (eg, city) [Default City]:yubei

Organization Name (eg, company) [Default Company Ltd]:mei

Organizational Unit Name (eg, section) []:ops

Common Name (eg, your name or your server's hostname) []:www.mei.com

Email Address []:

Please enter the following 'extra' attributes

to be sent with your certificate request

A challenge password []:

An optional company name []:

#签发证书

[root@foundation CA]# openssl ca -in  /etc/pki/tls/server.csr -out /etc/pki/tls/certs/server.crt -days 365

Check that the request matches the signature

Signature ok

Certificate Details:

        Serial Number: 2 (0x2)

        Validity

            Not Before: Jul  9 21:10:35 2019 GMT

            Not After : Jul  8 21:10:35 2020 GMT

        Subject:

            countryName               = cn

            stateOrProvinceName       = chongqing

            organizationName          = mei

            organizationalUnitName    = ops

            commonName                = www.mei.com

        X509v3 extensions:

            X509v3 Basic Constraints:

                CA:FALSE

            Netscape Comment:

                OpenSSL Generated Certificate

            X509v3 Subject Key Identifier:

                DB:0D:93:04:A2:A4:F4:AC:3D:24:0C:FF:00:8C:3E:23:15:66:20:1E

            X509v3 Authority Key Identifier:

                keyid:BB:E6:BE:EA:5A:9E:C6:1A:29:65:48:09:DB:4F:EE:36:AD:95:E5:2B

Certificate is to be certified until Jul  8 21:10:35 2020 GMT (365 days)

Sign the certificate? [y/n]:y

1 out of 1 certificate requests certified, commit? [y/n]y

Write out database with 1 new entries

Data Base Updated
9.2 搭建HTTPS网站
这是使用8008端口作为网站端口,然后做网站重定向到https。
如果要做把PHP作为https发布,可以直接在打完LAMP环境后将PHP相关网页直接拷贝到https所在的站目录下,然后做重定向即可。
9.2.1 安装软件包和配置防火墙
1 [root@foundation CA]# yum install mod_ssl

2

3 [root@foundation CA]# firewall-cmd --permanent --add-service=https && firewall-cmd --reload

4

5 [root@foundation html]# firewall-cmd --permanent --add-port=8008/tcp --add-port=8008/udp

6 success

7 [root@foundation html]# firewall-cmd --reload
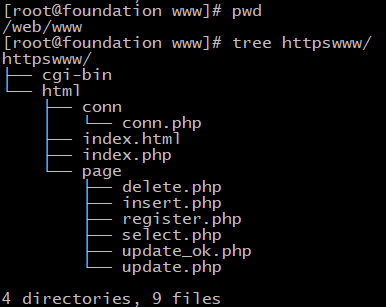
9.2.2 创建网站目录和生成相应的网页内容
创建网站目录
至于网站目录SELinux相关的问题由于前面配置时讲过,这里就不赘述了。
下面的index.html中的内容为字串:test
所有有关PHP的文件都是我从以前配置LAMP时的测试文件。如果仅仅是自己搭建一个PHP网站,可以自己写PHP测试文件的内容。
9.2.3 创建虚拟主机并做好配置
[root@foundation /]# cat /etc/httpd/conf.d/httpswww.conf

<VirtualHost *:443>

    DocumentRoot "/web/www/httpswww/html"

    ServerName www.mei.com

    SSLEngine on

    SSLProtocol all -SSLv2

    SSLCipherSuite HIGH:MEDIUM:!aNULL:!MD5

    SSLCertificateFile /etc/pki/tls/certs/server.crt

    SSLCertificateKeyFile /etc/pki/tls/private/server.key

    <Directory /web/www>

        AllowOverride None

        Require all granted

    </Directory>

    <Directory /web/www/httpswww/html>

        AllowOverride None

        Require all granted

    </Directory>

    ErrorLog "logs/httpswww_error.log"

    CustomLog "logs/httpswww_access.log" combined

</VirtualHost>

<VirtualHost *:8008>

    ServerName www.mei.com

    RewriteEngine  On #开启重写引擎

    #RewriteRule ^(/.*)$ https://%{HTTP_POST}$1 [redirect=301]

    RewriteCond %{SERVER_PORT} !^443$  #重写

    RewriteRule ^(.*)?$ https://%{SERVER_NAME}$1 [R=301,L]  #重写的策略

</VirtualHost>
.3 测试
拷贝foundation中的CA证书到rhel7主机,可以把证书放到网站上自由下载,这里就不做了,直接使用scp拷贝。
[root@foundation CA]# scp /etc/pki/CA/cacert.pem foundation@rhel7.mei.com:/home/foundation/
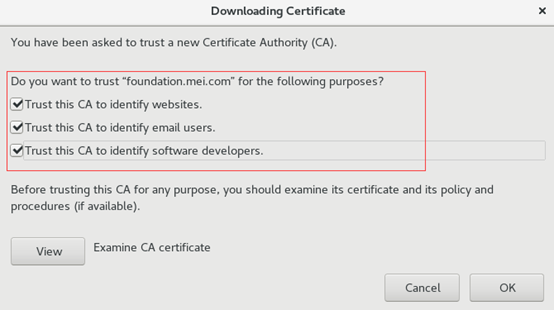
打开Firefox添加证书
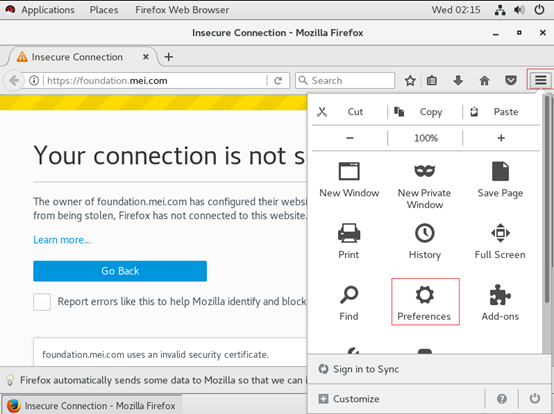
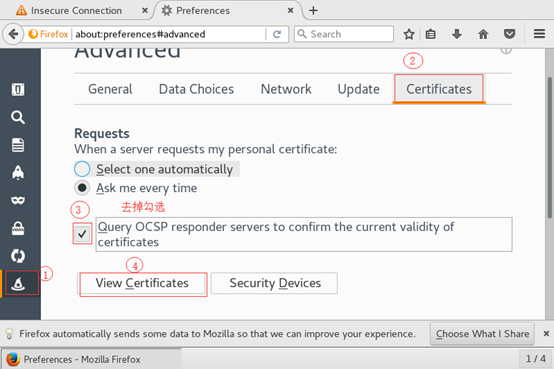
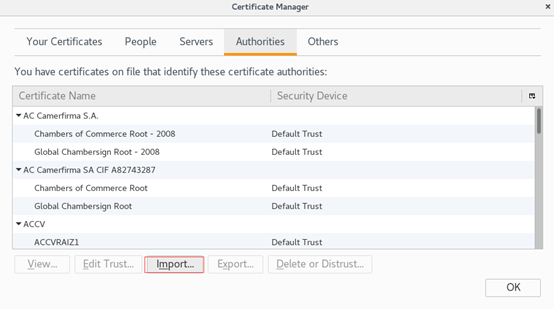
选择import后找到刚才拷过来的证书文件双击,来到下面的界面,勾选一下选项。
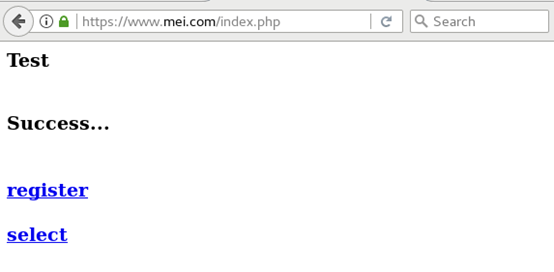
输入http地址访问

看到下面的效果,并显示是https且证书安全,说明成功!

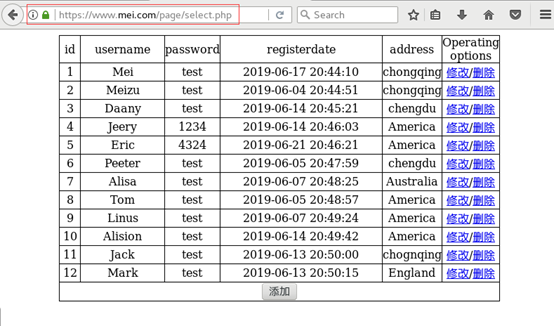
再测试一下我们的PHP内容:

能够跳到https,并且证书安全。
点击select能够正确查询到数据库中的内容,并显示证书是安全的,同时还是https
最后希望大家提意见、转发、评论和交流!!!
自建CA实现HTTPS的更多相关文章
- 使用OpenSSL自建CA + Nginx配置HTTPS
Ubuntu 16.04(ECS),OpenSSL 1.0.2g 1 Mar 2016,Nginx 1.10.3 (Ubuntu), 浏览器:Chrome 67,Firefox 61,Edge 40 ...
- 信安实践——自建CA证书搭建https服务器
1.理论知识 https简介 HTTPS(全称:Hyper Text Transfer Protocol over Secure Socket Layer),是以安全为目标的HTTP通道,简单讲是HT ...
- Https、OpenSSL自建CA证书及签发证书、nginx单向认证、双向认证及使用Java访问
0.环境 本文的相关源码位于 https://github.com/dreamingodd/CA-generation-demo 必须安装nginx,必须安装openssl,(用apt-get upd ...
- 自建CA证书搭建https服务器
由于CA收费,所以可以自建CA,通过将CA导入浏览器实现https的效果,曾经12306购票就需要自行导入网站证书. 关于https 2015年阿里巴巴将旗下淘宝.天猫(包括移动客户端)全站启用HTT ...
- 基于OpenSSL自建CA和颁发SSL证书
关于SSL/TLS介绍见文章 SSL/TLS原理详解.关于证书授权中心CA以及数字证书等概念,请移步 OpenSSL 与 SSL 数字证书概念贴 . openssl是一个开源程序的套件.这个套件有三个 ...
- 自建证书配置HTTPS服务器
1.写这篇博客的初衷是因为最近iOS9出来了,苹果官方默认要求使用HTTPS,所以自己想整一个HTTPS服务器,也想好好了解一下HTTPS通信,也知道了HTTPS其实就是在HTTP的基础上加上了SSL ...
- openssl req(生成证书请求和自建CA)(转)
openssl req(生成证书请求和自建CA) 伪命令req大致有3个功能:生成证书请求文件.验证证书请求文件和创建根CA.由于openssl req命令选项较多,所以先各举几个例子,再集中 ...
- 自建 CA 中心并签发 CA 证书
目录 文章目录 目录 CA 认证原理浅析 基本概念 PKI CA 认证中心(证书签发) X.509 标准 证书 证书的签发过程 自建 CA 签发证书并认证 HTTPS 网站的过程 使用 OpenSSL ...
- openssl ca(签署和自建CA)
用于签署证书请求.生成吊销列表CRL以及维护已颁发证书列表和这些证书状态的数据库.因为一般人无需管理crl,所以本文只介绍openssl ca关于证书管理方面的功能. 证书请求文件使用CA的私钥签署之 ...
随机推荐
- Anno微服务Viper(控制面板) 支持在线部署
1.Anno简介? Anno是一个微服务框架引擎.入门简单.安全.稳定.高可用.全平台可监控.依赖第三方框架少.可在线升级部署. 2.Viper简介 Viper 是一个基于Anno微服务引擎开发的Da ...
- centos 7查看系统网络情况netstat
查看系统网络情况 netstat ➢ 基本语法 netstat [选项] ➢ 选项说明 -an 按一定顺序排列输出 -p 显示哪个进程在调用 应用案例 请查看服务名为 sshd 的服务的信息. ➢ N ...
- 一个例子让你秒懂 Qt Creator 编译原理
小北师兄作品 首发于微信公众号 小北师兄 微信 ID: ncuneupa 由于排版原因,文章可能读起来不太清晰,如果想看更好的排版,可以来我的公众号:小北师兄 大家好,我是你们的小北师兄,由于工作原因 ...
- Java基准性能测试--JMH使用介绍
JMH是什么 JMH是Java Microbenchmark Harness的简称,一个针对Java做基准测试的工具,是由开发JVM的那群人开发的.想准确的对一段代码做基准性能测试并不容易,因为JVM ...
- MetingJS 是如何配合 Aplayer 加载歌单的?
Meting.js 介绍 Meting.js 依赖 APlayer.js,扩展了 APlayer.js 的功能,能够使 APlayer.js 加载网易云音乐.QQ 音乐.虾米音乐中的歌单. 安装 &l ...
- Unity接入ShareSDK实现QQ登录和QQ分享、微信分享
原文链接:Unity接入ShareSDK实现QQ登录和QQ分享.微信分享 由于微信登录需要企业审核,我这里就不说明了,有需要的可以去官网看一下文档,和QQ登录比多了一个打包的步骤. 第一步:到官网申请 ...
- 二、RabbitMQ 进阶特性及使用场景 [.NET]
前言 经过上一篇的介绍,相信大家对RabbitMQ 的各种概念有了一定的了解,及如何使用RabbitMQ.Client 去发送和消费消息. 特性及使用场景 1. TTL 过期时间 TTL可以用来指定q ...
- 温故知新,.Net Core遇见Digital Signature(MD5/RSA/SM),微服务签名机制设计
什么是数字签名(Digital Signature) 数字签名(Digital Signature)是只有信息的发送者才能产生的别人无法伪造的一段数字串,这段数字串同时也是对信息的发送者发送信息真实性 ...
- 5.15、tomcat下部署JPress
1.说明: jpress类似于wordpress,wordpress是php语言开发的国外开源软件,jpress是java语言 开发的国内开源软件: 2.下载软件包: [root@slave-node ...
- 暑假自学java第三天
1,java中有个c++中没有的数据类型 bite:byte的取值范围为-128~127,占用1个字节(-2的7次方到2的7次方-1) 在通常情况下,如果JAVA中出现了一个整数数字比如35,那么这个 ...