
多线程之Lock接口
之前写了一下synchronized关键字的一点东西,那么除了synchronized可以加锁外,JUC(java.util.concurrent)提供的Lock接口也可以实现加锁解锁的功能。
看完本文,希望您可以了解或者掌握:
1:Lock接口的实现
2:Condition的原理和概念
3:ReentrantLock的实现原理,可以手写一个简单的ReentrantLock
4:ReadWriteLock的概念和实现原理,可以手写一个简单的ReadWriteLock
5:能够了解到模板模型,AQS
锁的本质:
1:加锁,其实就是加了一种权限或者说是规则。
2:获得锁,其实也就是获得了访问资源的权限。
一:Lock接口
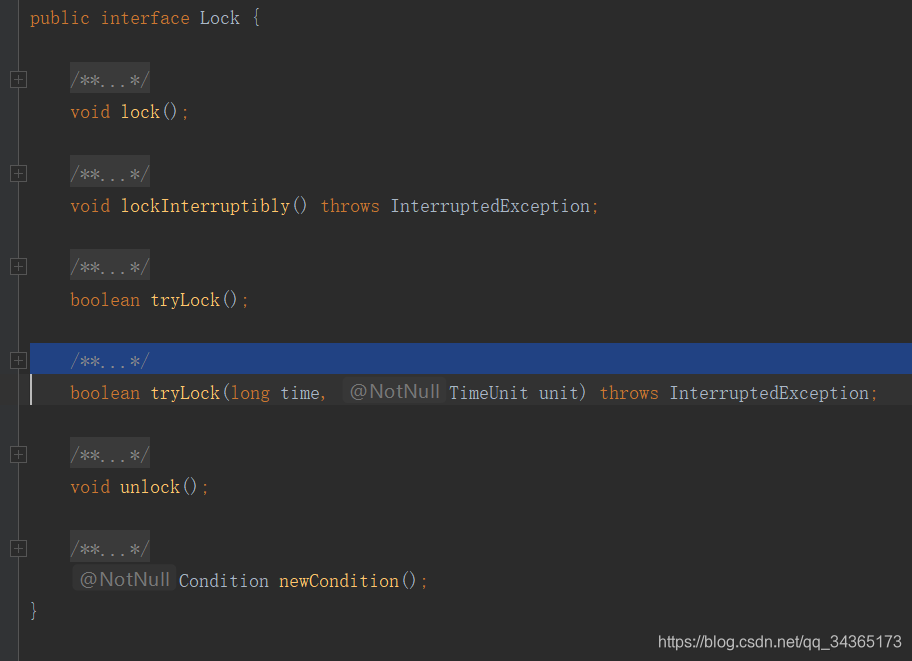

上图是Lock接口中的一些方法,下面说下每个方法的作用:
1:lock(),lock接口是对资源进行加锁,而且加锁的时候是不死不休的,就是我加不到锁,我就一直等待着,直到我加到锁为止。
2:tryLock(),tryLock接口是尝试加锁,它就是我尝试一下去加锁,若是锁已经被占用,就不会再去等了。
3:tryLock(long time, TimeUnit unit),这个接口有个超时限制,若是锁已经被占用,就等待一段时间,时间到了后,要是锁还是被占用,就放弃。
4:lockInterruptibly(),lockInterruptibly是任人摆布的,就是说当有别的线程调用了interrupt打断它之后,它就不会再去加锁了。
下面是一个测试例子:
//定义一个锁

    public static volatile Lock lock = new ReentrantLock();

    public static void main(String[] args) throws InterruptedException {

        lock.lock();

        Thread thread = new Thread(new Runnable() {

            @Override

            public void run() {

                System.out.println("try lock start......");

                lock.tryLock();

                System.out.println("try lock end......");

                System.out.println("lock start......");

                lock.lock();

                System.out.println("lock end......");

                System.out.println("try lock start......");

                try {

                    lock.tryLock(5, TimeUnit.SECONDS);

                } catch (InterruptedException e) {

                    e.printStackTrace();

                }

                System.out.println("try lock end......");

                System.out.println("try lock start......");

                try {

                    lock.lockInterruptibly();

                } catch (InterruptedException e) {

                    e.printStackTrace();

                }

                System.out.println("try lock end......");

            }

        });

        thread.start();

        Thread.sleep(5000);

        thread.interrupt();

        Thread.sleep(2000);

        lock.unlock();

    }
二:Condition
之前说了wait、notify,挂起和唤醒线程,那么Lock接口中也提供了一个Condition,Condition的底层实现机制是park和unpark,我们知道park和unpark当先唤醒后挂起时不会发生死锁,那么Condition也是一样,而且Condition中的挂起也有释放锁的语义,所以Condition在加锁或者先唤醒后挂起两种情况下都不会死锁,下面看下栗子:
  //定义一个锁

    static Lock lock = new ReentrantLock();

    static Condition condition = lock.newCondition();

    public static void main(String[] args) throws InterruptedException {

        test1();

    }

    public static void test1() throws InterruptedException {

        Thread thread = new Thread(new Runnable() {

            @Override

            public void run() {

                lock.lock();

                System.out.println("子线程获取锁。。。");

                try {

                    System.out.println("子线程挂起开始。。。");

                    condition.await();

                    System.out.println("子线程挂起结束。。。");

                } catch (InterruptedException e) {

                    e.printStackTrace();

                } finally {

                    lock.unlock();

                }

            }

        });

        thread.start();

        Thread.sleep(2000);

        lock.lock();

        System.out.println("主线程获取锁。。。");

        condition.signal();

        lock.unlock();

    }

    public static void test2() throws InterruptedException {

        Thread thread = new Thread(new Runnable() {

            @Override

            public void run() {

                lock.lock();

                System.out.println("子线程获取锁。。。");

                try {

                    Thread.sleep(8000);

                    System.out.println("子线程挂起开始。。。");

                    condition.await();

                    System.out.println("子线程挂起结束。。。");

                } catch (InterruptedException e) {

                    e.printStackTrace();

                } finally {

                    lock.unlock();

                }

            }

        });

        thread.start();

        Thread.sleep(1000);

        lock.lock();

        System.out.println("主线程获取锁。。。");

        condition.signal();

        lock.unlock();

    }
上面测试例子中,两种情况都会执行完毕,不会死锁。
wait/notify提供的等待集合是单个的,而Condition可以提供多个等待集,下面是测试例子:
public class ConditionDemo2 {

    public static void main(String[] args) throws InterruptedException {

        ThreadQueue queue = new ThreadQueue(5);

        Thread thread = new Thread(new Runnable() {

            @Override

            public void run() {

                for (int i=0;i<20;i++){

                    try {

                        queue.put("元素" + i);

                    } catch (InterruptedException e) {

                        e.printStackTrace();

                    }

                }

            }

        });

        thread.start();

        Thread.sleep(3000);

        System.out.println("循环的从队列拿元素。。。");

        for (int i=0;i<10;i++){

            queue.get();

            Thread.sleep(3000);

        }

    }

}

//定义一个阻塞队列

//put元素时,若队列已满,就阻塞,直到再有空间,未满就put元素进去

//take元素时,若队列中没有元素,就阻塞,直到再有元素,有元素就直接取

class ThreadQueue {

    //定义一个可重入锁

    Lock lock = new ReentrantLock();

    Condition putCondition = lock.newCondition();

    Condition getCondition = lock.newCondition();

    //队列长度

    private volatile int length;

    //用来存放元素的集合

    List<Object> list = new ArrayList<>();

    public ThreadQueue(int length) {

        this.length = length;

    }

    //往队列中放元素

    public void put(Object obj) throws InterruptedException {

        lock.lock();

        for (;;) {

            //若队列还有空间,就直接放入队列,并且唤醒拿元素的等待集合,可以去拿元素了

            //若队列空间已经满了,就直接阻塞

            if (list.size() < length) {

                list.add(obj);

                System.out.println("put: " + obj);

                getCondition.signal();

                break;

            } else {

                putCondition.await();

            }

        }

        lock.unlock();

    }

    //从队列中拿元素

    public Object get() throws InterruptedException {

        lock.lock();

        Object obj;

        for (;;) {

            //若队列中有元素就直接取,然后把取走后的元素从队列中移除,并且唤醒放元素的等待集

             合,可以继续放元素了

            //若队列中没有元素,就阻塞等待元素

            if (list.size() > 0) {

                obj = list.get(0);

                list.remove(0);

                System.out.println("get: " + obj);

                putCondition.signal();

                break;

            } else {

                getCondition.await();

            }

        }

        lock.unlock();

        return obj;

    }

}
三:ReentrantLock
ReentrantLock是Lock接口的一个实现,它是一个可重入锁,会有一个值去记录重入的次数。若在一个线程中加锁加了n次,那么解锁就要调用n次,如果加锁次数大于解锁次数,就不能完全释放锁,若加锁次数小于解锁次数,即解锁多调了几次,那么就会报错。下面是例子:
  /定义一个锁

    static Lock lock = new ReentrantLock();

    public static void main(String[] args) {

        System.out.println("here i am 1.......");

        lock.lock();

        System.out.println("here i am 2.......");

        lock.lock();

        System.out.println("here i am 3.......");

        lock.unlock();

        lock.unlock();

        //会报java.lang.IllegalMonitorStateException异常

        //lock.unlock();

        new Thread(new Runnable() {

            @Override

            public void run() {

                lock.lock();

                System.out.println("子线程获取锁.......");

                lock.unlock();

            }

        }).start();

    }
下面简单实现一个可重入锁:
思考:
1. 实现可重入锁需要哪些准备呢?
2. 需要实现哪些方法呢?
那么,实现一个可重入锁,需要以下内容:
1:需要知道那个线程获取到了锁。
2:如果获取不到锁,就放入等待队列,那么就需要一个队列存放挂起的线程。
3:需要知道线程重入的次数,即需要一个变量去记录线程重入的次数。
4:需要加锁,解锁的方法
下面提供一个简单的实现,有大量注释,可以方便查阅:
public class ThreadLock2 implements Lock {

    //用于显示那个线程获取到锁

    public volatile AtomicReference<Thread> owner = new AtomicReference<>();

    //用于存放没有获取到锁,挂起的线程

    public static BlockingDeque<Thread> waiter = new LinkedBlockingDeque<>();

    //锁重入的次数

    volatile AtomicInteger count = new AtomicInteger(0);

    //尝试加锁

    @Override

    public boolean tryLock() {

        int ct = count.get();

        //ct!=0,说明锁已被占用

        if (ct != 0) {

            //判断锁的拥有者是不是当前线程,若是,就把重入次数加一

            if (owner.get() == Thread.currentThread()) {

                count.set(ct + 1);

                return true;

            }

        //锁未被占用,就去抢锁

        } else {

            //CAS方式去抢锁

            if (count.compareAndSet(ct, ct+1)) {

                owner.set(Thread.currentThread());

                return true;

            }

        }

        return false;

    }

    //加锁

    @Override

    public void lock() {

        if (!tryLock()) {

            //抢锁失败,就加入等待队列

            waiter.offer(Thread.currentThread());

            //循环的去抢锁

            for (;;) {

                //取出队列头部的线程

                Thread head = waiter.peek();

                //若队列头部的元素是当前线程,就去抢锁

                if (head == Thread.currentThread()) {

                    if (tryLock()) {

                        //抢到锁就从等待队列中取出

                        waiter.poll();

                        return;

                    } else {

                        //抢不到锁就直接挂起

                        LockSupport.park();

                    }

                } else {

                    //不是队列头部的线程,就直接挂起

                    LockSupport.park();

                }

            }

        }

    }

    //解锁

    @Override

    public void unlock() {

        if (tryUnlock()) {

            //释放锁成功后,就从等待队列中唤醒线程

            Thread thread = waiter.peek();

            if (thread != null) {

                LockSupport.unpark(thread);

            }

        }

    }

    //尝试解锁

    public boolean tryUnlock() {

        //判断当前线程是不是锁拥有者

        //不是就抛出异常

        //是的话就释放锁

        if (owner.get() != Thread.currentThread()) {

            //测试类运行可能会进入这个错误,这和环境可能有关,但是代码的具体实现思路应该是没有

            //问题的

            throw new IllegalMonitorStateException();

        } else {

            //释放锁,就把重入次数减一

            int ct = count.get();

            int nextCt = ct - 1;

            count.set(nextCt);

            //当重入次数为0,就完全释放锁,把锁拥有者置为null

            if (nextCt == 0) {

                owner.set(null);

                return true;

            } else {

                return false;

            }

        }

    }

    @Override

    public boolean tryLock(long time, TimeUnit unit) throws InterruptedException {

        return false;

    }

    @Override

    public void lockInterruptibly() throws InterruptedException {

    }

    @Override

    public Condition newCondition() {

        return null;

    }

}
测试类:
static ThreadLock2 lock = new ThreadLock2();

    static volatile int i = 0;

    public static void main(String[] args) throws InterruptedException {

        for (int i=0;i<6;i++) {

            new Thread(new Runnable() {

                @Override

                public void run() {

                    for (int i=0;i<100000;i++) {

                        add();

                    }

                }

            }).start();

        }

        Thread.sleep(2000);

        System.out.println(i);

    }

    public static void add() {

        lock.lock();

        i++;

        lock.unlock();

    }
四:synchronized和Lock的区别
4.1 synchronized
优点:
1. synchronized使用起来比较简单,语义也比较清晰。
2. JVM为synchronized提供了很多的优化,如锁消除,锁粗化,偏向锁等。
3. synchronized可以自动释放锁,可以避免死锁发生
缺点:
无法实现锁的一些高级特性,如公平锁,共享锁等。
4.2 Lock接口
优点:
synchronized的缺点就是Lock的缺点,Lock接口可以实现一些锁的高级特性。
缺点:
Lock接口需要手动的去释放锁,使用中不注意的话可能会造成死锁。
五:ReadWriteLock
ReadWriteLock读写锁,提供了一个读锁,一个写锁,读锁是共享锁,可以由多个线程持有,写锁是独占锁,只能有一个线程可以获得写锁,读写锁适用于读场景比较多的地方。
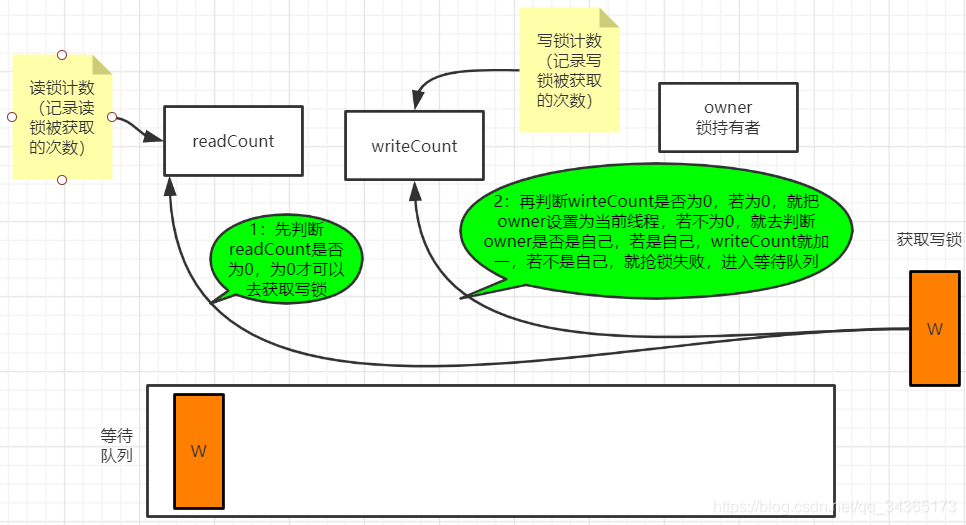
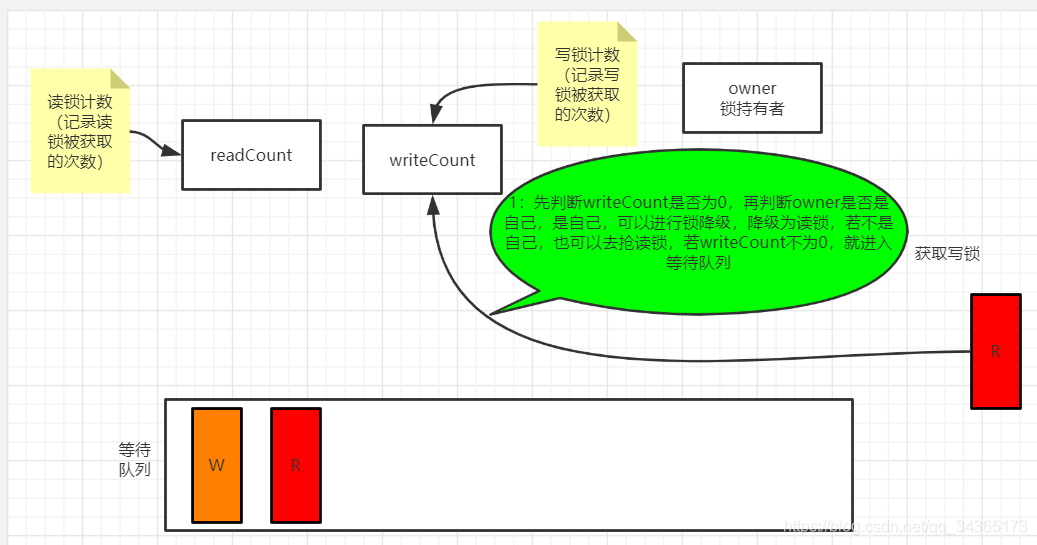
读写锁,一个线程获取到了读锁后就不能再去获取写锁,读写是互斥的,一个线程获取到了写锁,可以锁降级为读锁,降级为读锁后,就获取不了写锁了;写锁只能由一个线程获取(写写互斥),读锁可以由多个线程共同获取,想要获取写锁,只能等到所有的读锁全部释放后,才可以去获取,想要获取读锁,也要等到写锁释放后才可以获取。
获取写锁的过程:
获取读锁的过程:
下面是实现ReadWriteLock的一个例子:
public class ReadWriteLock2 {

    //锁拥有者

    private Thread owner = null;

    //等待队列,存放阻塞挂起的线程

    private LinkedBlockingDeque<Node> waiters = new LinkedBlockingDeque<>();

    //读锁

    private AtomicInteger readCount = new AtomicInteger(0);

    //写锁

    private AtomicInteger writeCount = new AtomicInteger(0);

    class Node {

        //标识是读锁还是写锁,0为读锁,1为写锁

        int type = 0;

        //线程

        Thread thread = null;

        int arg = 0;

        public Node(int type, Thread thread, int arg) {

            this.type = type;

            this.thread = thread;

            this.arg = arg;

        }

    }

    //获取写锁,即独占锁

    public void lock() {

        int arg = 1;

        //尝试获取独占锁,若成功则退出,若失败继续抢锁

        if (!tryLock(arg)) {

            //抢锁失败,就放入等待队列

            Node node = new Node(0, Thread.currentThread(), arg);

            waiters.offer(node);

            //自旋抢锁

            for(;;) {

                Node head = waiters.peek();

                //判断当前线程是否在队列头部,若在就尝试抢锁,否则就挂起

                if (head != null && head.thread == Thread.currentThread()) {

                    if (tryLock(arg)) {

                        //抢锁成功就把线程从队列中移除,然后返回

                        waiters.poll();

                        return;

                    } else {

                        //抢锁失败就挂起

                        LockSupport.park();

                    }

                } else {

                    //不是队列头部就挂起

                    LockSupport.park();

                }

            }

        }

    }

    //尝试获取写锁,即独占锁

    public boolean tryLock(int arg) {

        //若读锁已被获取,就返回false,因为要获取写锁,要等到所有的读锁释放

        if (readCount.get() != 0) {

            return false;

        }

        int ct = writeCount.get();

        if (ct != 0) {

            //若写锁已被获取,且是当前线程获取,那么就把writeCount加1

            if (owner == Thread.currentThread()) {

                writeCount.set(ct + arg);

                return true;

            }

        } else {

            //若写锁没被获取,就用CAS方式去抢锁

            if (writeCount.compareAndSet(ct, ct + arg)){

                //抢锁成功就把当前线程赋予owner

                owner = Thread.currentThread();

                return true;

            }

        }

        return false;

    }

    //释放写锁,即独占锁

    public boolean unLock() {

        int arg = 1;

        if (tryUnLock(arg)) {

            //释放锁成功,取出队列头部线程,唤醒

            Node headNode = waiters.peek();

            if (headNode != null) {

                LockSupport.unpark(headNode.thread);

            }

            return true;

        }

        return false;

    }

    //尝试释放写锁,即独占锁

    public boolean tryUnLock(int arg) {

        //若锁的拥有者不是当前线程就抛异常

        if (owner != Thread.currentThread()) {

            throw new IllegalMonitorStateException();

        } else {

            //若是当前线程拥有锁,就把writeCount减一,直到writeCount为0时,完全释放锁

            int ct = writeCount.get();

            int next = ct - arg;

            if (next == 0) {

                //把owner置为null,释放锁成功

                owner = null;

                return true;

            } else {

                return false;

            }

        }

    }

    //获取读锁,即共享锁

    public void sharedLock() {

        int arg = 1;

        if (trySharedLock(arg) < 0) {

            //抢锁失败,就放入等待队列

            Node node = new Node(1, Thread.currentThread(), arg);

            waiters.offer(node);

            for (;;) {

                Node headNode = waiters.peek();

                //判断当前线程是否在队列头部,若在就尝试抢锁,否则就挂起

                if (headNode != null && headNode.thread == Thread.currentThread()) {

                    if (trySharedLock(arg) >= 0) {

                        //抢锁成功就把线程从队列中移除,然后返回

                        waiters.poll();

                        //若下一个线程是读锁,就把它唤醒

                        Node next = waiters.peek();

                        if (next != null && next.type == 0) {

                            LockSupport.unpark(next.thread);

                        }

                    } else {

                        //抢锁失败就挂起

                        LockSupport.park();

                    }

                } else {

                    //不是队列头部就挂起

                    LockSupport.park();

                }

            }

        }

    }

    //尝试获取读锁,即共享锁

    public int trySharedLock(int arg) {

        //自旋抢锁

        for (;;) {

            //若写锁没有释放,且不是当前线程持有,就返回错误值-1,因为写锁释放后,才可以获取读锁

            if (writeCount.get() != 0 && owner != Thread.currentThread()) {

                return -1;

            }

            int ct = readCount.get();

            if (readCount.compareAndSet(ct, ct + arg)) {

                return 1;

            }

        }

    }

    //尝试释放读锁,即共享锁

    public boolean tryUnSharedLock(int arg) {

        for (;;) {

            int ct = readCount.get();

            int nextCt = ct - arg;

            //直到readCount为0时才是完全释放锁

            if (readCount.compareAndSet(ct, nextCt)) {

                return nextCt == 0;

            }

        }

    }

    //释放读锁,即共享锁

    public boolean unSharedLock() {

        int arg = 1;

        if (tryUnSharedLock(arg)) {

            //释放锁成功,取出队列头部线程,唤醒

            Node headNode = waiters.peek();

            if (headNode != null) {

                LockSupport.unpark(headNode.thread);

            }

            return true;

        }

        return false;

    }

}
测试类:
   static ReadWriteLock2 lock = new ReadWriteLock2();

    volatile static int i = 0;

    static void add() {

        i++;

    }

    public static void main(String[] args) throws InterruptedException {

        long startTime = System.currentTimeMillis();

        for (int a=1; a<=20000; a++){

            final int n = a;

            new Thread(new Runnable() {

                @Override

                public void run() {

                    if (n%5 ==0){

                        lock.lock();

                        add();

                        lock.unLock();

                    }else{

                        lock.sharedLock();

                        System.out.println("i=" +i);

                        int a = i;

                        lock.unSharedLock();

                    }

                }

            }).start();

        }

        while (true){

            System.out.println("目前耗时:" + (System.currentTimeMillis()-startTime) /1000 + "s");

            Thread.sleep(1000L);

            System.out.println("i=" + i);

        }

    }
下面提供另外两个例子:改造hashMap为安全的,和实现模拟一个缓存:
public class MapDemo {

    //将hashMap改造成线程安全的

    private Map<String, Object> map = new HashMap<>();

    private ReadWriteLock lock = new ReentrantReadWriteLock();

    //初始化读锁和写锁

    private Lock writeLock = lock.writeLock();

    private Lock readLock = lock.readLock();

    //根据key值获取元素

    public Object get(String key) {

        readLock.lock();

        try {

           return map.get(key);

        } finally {

            readLock.unlock();

        }

    }

    //获取所有的key

    public Object[] allKeys() {

        readLock.lock();

        try {

            return map.keySet().toArray();

        } finally {

            readLock.unlock();

        }

    }

    //放入元素

    public Object put(String key, String value) {

        writeLock.lock();

        try {

            return map.put(key, value);

        } finally {

            writeLock.unlock();

        }

    }

    //清除所有元素

    public void clear() {

        writeLock.lock();

        try {

           map.clear();

        } finally {

            writeLock.unlock();

        }

    }

}

点击并拖拽以移动

//做一个缓存,从缓存中取元素

public class CacheDemo {

    //初始化一个读写锁

    private static ReadWriteLock lock = new ReentrantReadWriteLock();

    //用于判断缓存是否可用,是否有元素

    private static volatile boolean isCache;

    static Object get(String key) {

        Object obj = null;

        //加读锁

        lock.readLock().lock();

        try {

            //若缓存可用,直接从缓存中取数据

            if(isCache) {

                obj = Cache.map.get(key);

            } else {

                //释放读锁

                lock.readLock().unlock();

                //加写锁,并不会马上获取到写锁,会等到所有读锁释放

                lock.writeLock().lock();

                try {

                    //若缓存不可用,从数据库取数据,然后放入缓存

                    if (!isCache) {

                        obj = dataBaseGetData.getData();

                        Cache.map.put(key, obj);

                        isCache = true;

                    }

                    //锁降级,将写锁降级为读锁

                    lock.readLock().lock();

                }  finally {

                    //释放写锁

                    lock.writeLock().unlock();

                }

            }

        } finally {

            //释放读锁

            lock.readLock().unlock();

        }

        return obj;

    }

}

//模拟从数据库获取元素

class dataBaseGetData {

    static String getData() {

        System.out.println("从数据库取元素。。。");

        return "name:hello,age:20";

    }

}

//模拟缓存

class Cache {

    static Map<String, Object> map = new HashMap<>();

}
六:模板模式
模板模式就是说,有一个母版,就像PPT一样,然后把母版复制过来自己去实现自己想要的就可以了,下面是个简单的例子:
//母版

class mb {

    void title() {

        throw new UnsupportedOperationException();

    }

    void content() {

        throw new UnsupportedOperationException();

    }

    void foot() {

        throw new UnsupportedOperationException();

    }

    public final void show() {

        System.out.println("这是一个标题");

        title();

        System.out.println("字体:微软雅黑");

        System.out.println("这是内容:");

        content();

        System.out.println("内容结束");

        System.out.println("这是底部:");

        foot();

    }

}

class PPT1 extends mb {

    @Override

    void title() {

        System.out.print("你好啊");

    }

    @Override

    void content() {

        System.out.print("java。。。");

        System.out.print("c++");

        System.out.print("中国");

    }

    @Override

    void foot() {

        System.out.print("结束了");

    }

}
根据上面的例子改造ReentrantLock和ReadWriteLock的实现方式,先做一个模板:
public class CommonLock {

    //锁拥有者

    Thread owner = null;

    //等待队列,存放阻塞挂起的线程

    LinkedBlockingDeque<Node> waiters = new LinkedBlockingDeque<>();

    //读锁

    AtomicInteger readCount = new AtomicInteger(0);

    //写锁

    AtomicInteger writeCount = new AtomicInteger(0);

    class Node {

        //标识是读锁还是写锁,0为读锁,1为写锁

        int type = 0;

        //线程

        Thread thread = null;

        int arg = 0;

        public Node(int type, Thread thread, int arg) {

            this.type = type;

            this.thread = thread;

            this.arg = arg;

        }

    }

    //获取读锁,即独占锁

    public void lock() {

        int arg = 1;

        //尝试获取独占锁,若成功则退出,若失败继续抢锁

        if (!tryLock(arg)) {

            //抢锁失败,就放入等待队列

            Node node = new Node(0, Thread.currentThread(), arg);

            waiters.offer(node);

            //自旋抢锁

            for(;;) {

                Node head = waiters.peek();

                //判断当前线程是否在队列头部,若在就尝试抢锁,否则就挂起

                if (head != null && head.thread == Thread.currentThread()) {

                    if (tryLock(arg)) {

                        //抢锁成功就把线程从队列中移除,然后返回

                        waiters.poll();

                        return;

                    } else {

                        //抢锁失败就挂起

                        LockSupport.park();

                    }

                } else {

                    //不是队列头部就挂起

                    LockSupport.park();

                }

            }

        }

    }

    //释放写锁,即独占锁

    public boolean unLock() {

        int arg = 1;

        if (tryUnLock(arg)) {

            //释放锁成功,取出队列头部线程,唤醒

            Node headNode = waiters.peek();

            if (headNode != null) {

                LockSupport.unpark(headNode.thread);

            }

            return true;

        }

        return false;

    }

    //获取读锁,即共享锁

    public void sharedLock() {

        int arg = 1;

        if (trySharedLock(arg) < 0) {

            //抢锁失败,就放入等待队列

            Node node = new Node(1, Thread.currentThread(), arg);

            waiters.offer(node);

            for (;;) {

                Node headNode = waiters.peek();

                //判断当前线程是否在队列头部,若在就尝试抢锁,否则就挂起

                if (headNode != null && headNode.thread == Thread.currentThread()) {

                    if (trySharedLock(arg) >= 0) {

                        //抢锁成功就把线程从队列中移除,然后返回

                        waiters.poll();

                        //若下一个线程是读锁,就把它唤醒

                        Node next = waiters.peek();

                        if (next != null && next.type == 1) {

                            LockSupport.unpark(next.thread);

                        }

                    } else {

                        //抢锁失败就挂起

                        LockSupport.park();

                    }

                } else {

                    //不是队列头部就挂起

                    LockSupport.park();

                }

            }

        }

    }

    //释放读锁,即共享锁

    public boolean unSharedLock() {

        int arg = 1;

        if (tryUnSharedLock(arg)) {

            //释放锁成功,取出队列头部线程,唤醒

            Node headNode = waiters.peek();

            if (headNode != null) {

                LockSupport.unpark(headNode.thread);

            }

            return true;

        }

        return false;

    }

    //尝试获取写锁,即独占锁

    public boolean tryLock(int arg) {

        throw new UnsupportedOperationException();

    }

    //尝试释放写锁,即独占锁

    public boolean tryUnLock(int arg) {

        throw new UnsupportedOperationException();

    }

    //尝试获取读锁,即共享锁

    public int trySharedLock(int arg) {

        throw new UnsupportedOperationException();

    }

    //尝试释放读锁,即共享锁

    public boolean tryUnSharedLock(int arg) {

        throw new UnsupportedOperationException();

    }

}
改造后的ReentrantLock:
 //private Thread owner = null;

    //锁拥有者

    volatile AtomicReference<Thread> owner = new AtomicReference<>();

    //等待队列

    private LinkedBlockingQueue<Thread> waiters = new LinkedBlockingQueue<>();

    //记录重入的次数

    volatile AtomicInteger count = new AtomicInteger(0);

    CommonLock lock = new CommonLock(){

        //尝试获取写锁,即独占锁

        @Override

        public boolean tryLock(int arg) {

            //若读锁已被获取,就返回false,因为要获取写锁,要等到所有的读锁释放

            if (lock.readCount.get() != 0) {

                return false;

            }

            int ct = lock.writeCount.get();

            if (ct != 0) {

                //若写锁已被获取,且是当前线程获取,那么就把writeCount加1

                if (lock.owner == Thread.currentThread()) {

                    lock.writeCount.set(ct + arg);

                    return true;

                }

            } else {

                //若写锁没被获取,就用CAS方式去抢锁

                if (lock.writeCount.compareAndSet(ct, ct + arg)){

                    //抢锁成功就把当前线程赋予owner

                    lock.owner = Thread.currentThread();

                    return true;

                }

            }

            return false;

        }

        //尝试释放写锁,即独占锁

        @Override

        public boolean tryUnLock(int arg) {

            //若锁的拥有者不是当前线程就抛异常

            if (lock.owner != Thread.currentThread()) {

                throw new IllegalMonitorStateException();

            } else {

                //若是当前线程拥有锁,就把writeCount减一,直到writeCount为0时,完全释放锁

                int ct = lock.writeCount.get();

                int next = ct - arg;

                if (next == 0) {

                    //把owner置为null,释放锁成功

                    lock.owner = null;

                    return true;

                } else {

                    return false;

                }

            }

        }

    };

    @Override

    public void lock() {

       lock.lock();

    }

    @Override

    public void unlock() {

       lock.unLock();

    }

    @Override

    public void lockInterruptibly() throws InterruptedException {

    }

    @Override

    public boolean tryLock() {

        return lock.tryLock(1);

    }

    public boolean tryUnlock() {

        return lock.tryUnLock(1);

    }

    @Override

    public boolean tryLock(long time, TimeUnit unit) throws InterruptedException {

        return false;

    }

    @Override

    public Condition newCondition() {

        return null;

    }
改造后的ReadWriteLock:
public class ReadWriteLock2 implements ReadWriteLock {

    CommonLock lock = new CommonLock(){

        //尝试获取写锁,即独占锁

        @Override

        public boolean tryLock(int arg) {

            //若读锁已被获取,就返回false,因为要获取写锁,要等到所有的读锁释放

            if (lock.readCount.get() != 0) {

                return false;

            }

            int ct = lock.writeCount.get();

            if (ct != 0) {

                //若写锁已被获取,且是当前线程获取,那么就把writeCount加1

                if (lock.owner == Thread.currentThread()) {

                    lock.writeCount.set(ct + arg);

                    return true;

                }

            } else {

                //若写锁没被获取,就用CAS方式去抢锁

                if (lock.writeCount.compareAndSet(ct, ct + arg)){

                    //抢锁成功就把当前线程赋予owner

                    lock.owner = Thread.currentThread();

                    return true;

                }

            }

            return false;

        }

        //尝试释放写锁,即独占锁

        @Override

        public boolean tryUnLock(int arg) {

            //若锁的拥有者不是当前线程就抛异常

            if (lock.owner != Thread.currentThread()) {

                throw new IllegalMonitorStateException();

            } else {

                //若是当前线程拥有锁,就把writeCount减一,直到writeCount为0时,完全释放锁

                int ct = lock.writeCount.get();

                int next = ct - arg;

                if (next == 0) {

                    //把owner置为null,释放锁成功

                    lock.owner = null;

                    return true;

                } else {

                    return false;

                }

            }

        }

        //尝试获取读锁,即共享锁

        @Override

        public int trySharedLock(int arg) {

            //自旋抢锁

            for (;;) {

                //若写锁没有释放,且不是当前线程持有,就返回错误值-1,因为写锁释放后,才可以获取读锁

                if (writeCount.get() != 0 && owner != Thread.currentThread()) {

                    return -1;

                }

                int ct = readCount.get();

                if (readCount.compareAndSet(ct, ct + arg)) {

                    return 1;

                }

            }

        }

        //尝试释放读锁,即共享锁

        @Override

        public boolean tryUnSharedLock(int arg) {

            for (;;) {

                int ct = readCount.get();

                int nextCt = ct - arg;

                //直到readCount为0时才是完全释放锁

                if (readCount.compareAndSet(ct, nextCt)) {

                    return nextCt == 0;

                }

            }

        }

    };

    @Override

    public Lock readLock() {

        return new Lock() {

            @Override

            public void lock() {

                lock.sharedLock();

            }

            @Override

            public void lockInterruptibly() throws InterruptedException {

            }

            @Override

            public boolean tryLock() {

                return lock.trySharedLock(0) == 1;

            }

            @Override

            public boolean tryLock(long time, TimeUnit unit) throws InterruptedException {

                return false;

            }

            @Override

            public void unlock() {

                lock.tryUnSharedLock(0);

            }

            @Override

            public Condition newCondition() {

                return null;

            }

        };

    }

    @Override

    public Lock writeLock() {

        return new Lock() {

            @Override

            public void lock() {

                lock.lock();

            }

            @Override

            public void lockInterruptibly() throws InterruptedException {

            }

            @Override

            public boolean tryLock() {

                return lock.tryLock(1);

            }

            @Override

            public boolean tryLock(long time, TimeUnit unit) throws InterruptedException {

                return false;

            }

            @Override

            public void unlock() {

                lock.unLock();

            }

            @Override

            public Condition newCondition() {

                return null;

            }

        };

    }

}
七:AQS抽象队列同步器
JUC包就是基于AQS实现的,AQS的设计模式就是模板模式,数据结构是双向链表和锁状态(state),底层实现是CAS。它的state不像上面读写锁说的是两个count,它用一个state实现,即我们知道int类型有8个字节,它的实现是前4个字节可以标识读锁,后四个字节可以标识写锁。
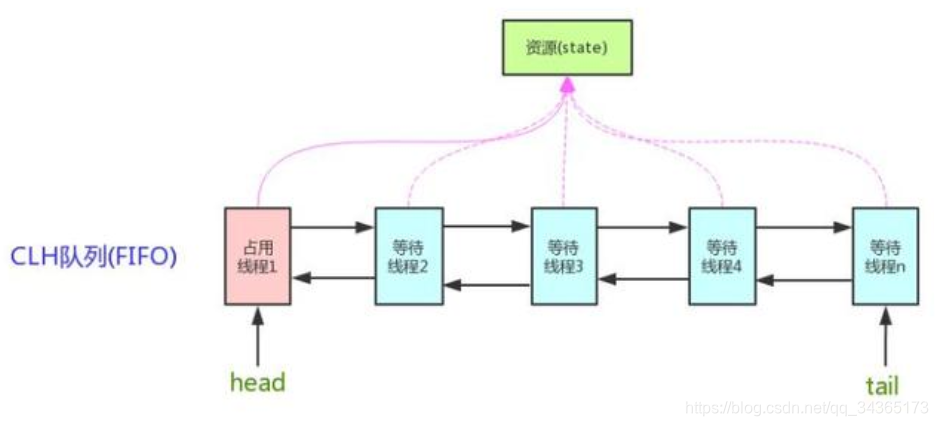
AQS本文不做详细解释。。。
好了到此,Lock接口的相关内容已经结束了。
多线程之Lock接口的更多相关文章
- 多线程之Lock的基本介绍
基本介绍 java.util.concurrent.locks是java1.5之后出现的一种锁实现方式,是一个接口.但是在这之前已经有一个同步机制的实现就是synchronized关键字,那为什么还要 ...
- 多线程之Lock
Java并发编程:Lock 在上一篇文章中我们讲到了如何使用关键字synchronized来实现同步访问.本文我们继续来探讨这个问题,从Java 5之后,在java.util.concurrent.l ...
- Java——多线程之Lock锁
Java多线系列文章是Java多线程的详解介绍,对多线程还不熟悉的同学可以先去看一下我的这篇博客Java基础系列3:多线程超详细总结,这篇博客从宏观层面介绍了多线程的整体概况,接下来的几篇文章是对多线 ...
- Java多线程之Callable接口与Runnable的实现以及选择
通过实现Runnable接口的实现 package Thread; import java.util.concurrent.ExecutorService;import java.util.concu ...
- Java多线程之Lock的使用
import java.util.concurrent.ExecutorService; import java.util.concurrent.Executors; import java.util ...
- java多线程之Lock线程同步
1.线程同步: package cn.itcast.heima2; import java.util.concurrent.locks.Lock; import java.util.concurren ...
- Java多线程之Lock的使用(转)
package thread.lock; import java.util.concurrent.ExecutorService; import java.util.concurrent.Execut ...
- (转)Java多线程之Lock的使用 (待整理)
import java.util.concurrent.ExecutorService; import java.util.concurrent.Executors; import java.util ...
- Java多线程之Callable接口的实现
Callable 和 Future接口 Callable是类似于Runnable的接口,实现Callable接口的类和实现Runnable的类都是可被其它线程执行的任务. Callable和Runn ...
随机推荐
- How DRI and DRM Work
How DRI and DRM Work Introduction This page is intended as an introduction to what DRI and DRM are, ...
- 翻译:《实用的Python编程》03_01_Script
目录 | 上一节 (2.7 对象模型) | 下一节 (3.2 深入函数) 3.1 脚本 在该部分,我们将深入研究编写 Python 脚本的惯例. 什么是脚本? 脚本就是运行和终止一系列语句的程序. # ...
- 《C++ Primer》笔记 第4章 表达式
C++的表达式要不然是右值(right-value or read-value),要不然就是左值(left-value or location-value). 当一个对象被用作右值的时候,用的是对象的 ...
- Zeebe服务学习1-简单部署与实现demo
1.Zeebe是什么? Camunda公司研发的工作流引擎Zeebe,目标是对微服务的编排.具体详细介绍可以参考官网:https://zeebe.io/what-is-zeebe/ 2.背景 随着微服 ...
- HDOJ-1754(线段树+单点更新)
I Hate It HDOJ-1754 这道题是线段树简单的入门题,只是简单考察了线段树的基本使用,建树等操作. 这里需要注意的是输入要不使用scanf要不使用快速输入. 这里的maxs数组需要开大一 ...
- FreeBSD 虚拟网卡 网桥 路由 映射
网关与路由 netstat -r Routing tables #路由表 Destination Gateway Flags Refs Use Netif Expire 目的地 网关 状态 接口 超时 ...
- P3160 [CQOI2012]局部极小值 题解(状压DP+容斥)
题目链接 P3160 [CQOI2012]局部极小值 双倍经验,双倍快乐 解题思路 存下来每个坑(极小值点)的位置,以这个序号进行状态压缩. 显然,\(4*7\)的数据范围让极小值点在8个以内(以下示 ...
- SpringMVC源码分析和启动流程
https://yq.aliyun.com/articles/707995 在Spring的web容器启动时会去读取web.xml文件,相关启动顺序为:<context-param> -- ...
- Python爬虫知识
一.爬虫 1.概述 网络爬虫,搜索引擎就是爬虫的应用者. 2.爬虫分类 (1)通用爬虫,常见就是搜索引擎,无差别的收集数据,存储,提取关键字,构建索引库,给用户提供搜索接口. 爬取一般流程: 初始化一 ...
- Python中的描述器
21.描述器:Descriptors 1)描述器的表现 用到三个魔术方法.__get__() __set__() __delete__() 方法签名如下: object.__get__(self ...