解决树莓派新内核无法使用18B20和没有声音的问题
现在新版的树莓派内核由于为了兼容树莓派2和树莓派B+等以前的版本,采用了和原来不同的内核运行方式,使用了设备树的方式,更加灵活。但是由于可能不习惯这样的方式以及没太多相关这方面的介绍,导致很多用户更新了内核后出现比如接18B20无法读取设备信息,以及树莓派没有声音输出的问题。
在这里细心的用户就会发现在新内核boot分区下多了个overlays文件夹,里面有很多dtb文件,这些其实就是树莓派的设备树,打开README,就可以知道该怎么使用了。

下面是来自README的话:
Introduction
============
This directory contains Device Tree overlays. Device Tree makes it possible
to support many hardware configurations with a single kernel and without the
need to explicitly load or blacklist kernel modules. Note that this isn't a
"pure" Device Tree configuration (c.f. MACH_BCM2835) - some on-board devices
are still configured by the board support code, but the intention is to
eventually reach that goal.
On Raspberry Pi, Device Tree usage is controlled from /boot/config.txt. By
default, the Raspberry Pi kernel boots with device tree enabled. You can
completely disable DT usage (for now) by adding:
device_tree=
to your config.txt, which should cause your Pi to revert to the old way of
doing things after a reboot.
如果要禁用设备树就直接在boot/config.txt里写device_tree=然后保存重启即可。
那么我们要怎么使用设备树呢?就拿启用W1来读取18B20数据来说,Readme里有这样一段:
Using Overlays
==============
Overlays are loaded using the "dtoverlay" directive. As an example, consider the
popular lirc-rpi module, the Linux Infrared Remote Control driver. In the
pre-DT world this would be loaded from /etc/modules, with an explicit
"modprobe lirc-rpi" command, or programmatically by lircd. With DT enabled,
this becomes a line in config.txt:
dtoverlay=lirc-rpi
This causes the file /boot/overlays/lirc-rpi-overlay.dtb to be loaded. By
default it will use GPIOs 17 (out) and 18 (in), but this can be modified using
DT parameters:
dtoverlay=lirc-rpi,gpio_out_pin=17,gpio_in_pin=13
Parameters always have default values, although in some cases (e.g. "w1-gpio")
it is necessary to provided multiple overlays in order to get the desired
behaviour. See the list of overlays below for a description of the parameters and their defaults.
也就是说,在使用config.txt里添加dtoverlay=【设备树名】来启动设备树,同样也可以在这里指定加载的设备树参数,实际上这个操作就和之前的内核在系统里添加模块类似,只不过这里是在内核启动的时候加载,之前的是在系统启动后加载。
那么我们就可以照搬添加w1到config.txt里面然后重启读取18B20了,Readme里也有相关参数说明:
Name: w1-gpio
Info: Configures the w1-gpio Onewire interface module.
Use this overlay if you *don't* need a GPIO to drive an external pullup.
Load: dtoverlay=w1-gpio,<param>=<val>
Params: gpiopin GPIO for I/O (default "4")
pullup Non-zero, "on", or "y" to enable the parasitic
power (2-wire, power-on-data) feature
Name: w1-gpio-pullup
Info: Configures the w1-gpio Onewire interface module.
Use this overlay if you *do* need a GPIO to drive an external pullup.
Load: dtoverlay=w1-gpio-pullup,<param>=<val>,...
Params: gpiopin GPIO for I/O (default "4")
pullup Non-zero, "on", or "y" to enable the parasitic
power (2-wire, power-on-data) feature
extpullup GPIO for external pullup (default "5")
这里提供了更多的参数进行选择,如果你打算采用寄生的连接方式这里也提供了参数实现内部上拉,当然如果你想保留原来的连接电路方式不进行电路改动的话那么我们就这样设置好了:
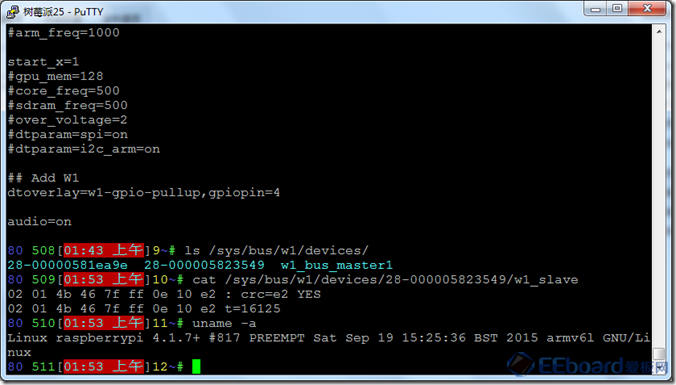
在config.txt里插入下面的内容:
dtoverlay=w1-gpio-pullup,gpiopin=4
这样就可以按照原来的电路连接方式连接18B20,保存重启后一样的载入w1-gpio和w1-therm后就可以读取到18B20数据了。
如果你要启用树莓派的音频的话,在里面添加一行
audio=on即可,新版的内核禁用了audio的原因是因为树莓派PWM和audio使用的是同一个接口,可能介于很多人希望使用树莓派的硬件PWM的原因,所以才这样灵活的设计让大家有更多自由使用的空间。
Readme关于audio和pwm的原文:
he Overlay and Parameter Reference
===================================
N.B. When editing this file, please preserve the indentation levels to make it simple to parse
programmatically. NO HARD TABS.
Name: <The base DTB>
Info: Configures the base Raspberry Pi hardware
Load: <loaded automatically>
Params:
audio Set to "on" to enable the onboard ALSA audio
interface (default "off")
====================
Name: pwm
Info: Configures a single PWM channel
Legal pin,function combinations for each channel:
PWM0: 12,4(Alt0) 18,2(Alt5) 40,4(Alt0) 52,5(Alt1)
PWM1: 13,4(Alt0) 19,2(Alt5) 41,4(Alt0) 45,4(Alt0) 53,5(Alt1)
N.B.:
1) Pin 18 is the only one available on all platforms, and
it is the one used by the I2S audio interface.
Pins 12 and 13 might be better choices on an A+, B+ or Pi2.
2) The onboard analogue audio output uses both PWM channels.
3) So be careful mixing audio and PWM.
4) Currently the clock must have been enabled and configured
by other means.
Load: dtoverlay=pwm-2chan,<param>=<val>
Load: dtoverlay=pwm,<param>=<val>
Params: pin Output pin (default 18) - see table
func Pin function (default 2 = Alt5) - see above
clock PWM clock frequency (informational)
Name: pwm-2chan
Info: Configures both PWM channels
Legal pin,function combinations for each channel:
PWM0: 12,4(Alt0) 18,2(Alt5) 40,4(Alt0) 52,5(Alt1)
PWM1: 13,4(Alt0) 19,2(Alt5) 41,4(Alt0) 45,4(Alt0) 53,5(Alt1)
N.B.:
1) Pin 18 is the only one available on all platforms, and
it is the one used by the I2S audio interface.
Pins 12 and 13 might be better choices on an A+, B+ or Pi2.
2) The onboard analogue audio output uses both PWM channels.
3) So be careful mixing audio and PWM.
4) Currently the clock must have been enabled and configured
by other means.
Load: dtoverlay=pwm-2chan,<param>=<val>
Params: pin Output pin (default 18) - see table
pin2 Output pin for other channel (default 19)
func Pin function (default 2 = Alt5) - see above
func2 Function for pin2 (default 2 = Alt5)
clock PWM clock frequency (informational)
更多信息大家自己去阅读/boot/overlays/README
解决树莓派新内核无法使用18B20和没有声音的问题的更多相关文章
- linux如何编译安装新内核支持NTFS文件系统?(以redhat7.2x64为例)
内核,是一个操作系统的核心.它负责管理系统的进程.内存.设备驱动程序.文件和网络系统,决定着系统的性能和稳定性.Linux作为一个自由软件,在广大爱好者的支持下,内核版本不断更新.新的内核修订了旧内核 ...
- 启动新内核出现:Kernel panic - not syncing: Attempted to kill init! exitcode=0x00000004
转载请注明出处:http://blog.csdn.net/qq_26093511/article/details/51841281 启动新内核出现错误:Kernel panic - not synci ...
- linux新内核中关闭硬盘的DMA
vortex86 SIS550 Minit-5250E瘦客户机,使用CF卡启动,显示不支持DMA. 搜索得新内核已基本不再使用ide=nodma参数了,查到这篇文章:“Debian下关闭CF卡的DMA ...
- linux 解决Ubuntu编译内核uImage出现问题“mkimage” command not found - U-Boot images will not be built问题
解决Ubuntu编译内核uImage出现问题“mkimage” command not found - U-Boot images will not be built问题 http://www.lin ...
- linux新内核的freeze框架以及意义【转】
转自:https://blog.csdn.net/dog250/article/details/5303442 linux的电源管理发展非常迅速,比如在挂起到内存的时候,系统会冻结住所有的进程,也就是 ...
- delphi 解决android 9上无法使用http协议
delphi 解决android 9上无法使用http协议 安卓9不让客户端通过非https方式访问服务端数据(不允许发送明文http请求)的问题. 解决方法: 1.选择安卓平台编译一次程序,在项目根 ...
- linux 增加新用户无法使用sudo命令解决办法
昨天一不小心把自己的系统搞崩了,也没有快照,没法进行还原操作,所以只能重装系统解决了,装完系统以后一切正常,当我新增了一个用户,使用sudo命令切换到root用户时,发现怎么都切换不过去,经过百度发现 ...
- linux新内核的时钟机制代码
http://blog.chinaunix.net/uid-22810130-id-384173.html 如果说cfs是linux的一个很有创意的机制的话,那么linux中另一个创意就是nohz,我 ...
- 发现大量的TIME_WAIT解决办法 -- 修改内核参数
今天早上一上班,有同事就反映公司好几个网站都打不开,登陆数据库 服务器(windows),发现很卡,于是重启了下服务器,进入系统后,没过一会问题依旧,查看了下系统进程,发现mysql占用率达到99%, ...
随机推荐
- 洛谷——P1113 杂务
P1113 杂务 题目描述 John的农场在给奶牛挤奶前有很多杂务要完成,每一项杂务都需要一定的时间来完成它.比如:他们要将奶牛集合起来,将他们赶进牛棚,为奶牛清洗乳房以及一些其它工作.尽早将所有杂务 ...
- python 去掉换行符或者改为其他方式结尾的方法(end='')
输入参数不换行,就是打印之后不换行,在python2.7中使用 "," >>>def test(): print 'hello', print "wor ...
- 【二分】Codeforces Round #435 (Div. 2) D. Mahmoud and Ehab and the binary string
题意:交互题:存在一个至少有一个0和一个1的长度为n的二进制串,你可以进行最多15次询问,每次给出一个长度为n的二进制串,系统返回你此串和原串的海明距离(两串不同的位数).最后要你找到任意一个0的位置 ...
- 【动态规划/递推】BZOJ1806[IOI2007]- Miners
IOI历史上的著名水题,我这种蒟蒻都能写的东西. [思路] 用1.2.3分别代替三种食物,0表示当前矿井没有食物.f[i][a][b][c][d]当前第i个食物,矿1的食物顺序由上至下为a,b:矿2的 ...
- lightoj 1229 - Treblecross 博弈论
思路:SG函数 枚举先手的每一个位置是否有必胜. 1)如果出现了XXX则必胜: 2)如果出现了XX或X.X则必败: 3)否则计算后手的sg值和. 代码如下: #include<iostream& ...
- oracle数据库,mybatis批量insert,缺失values字段
报错:### Error updating database. Cause: java.sql.SQLException: ORA-00926: 缺失 VALUES 关键字### The error ...
- CDOJ 1280 772002画马尾 每周一题 div1 矩阵快速幂 中二版
"问题:众所周知772002很喜欢马尾,所以他决定画几幅马尾送给他的女朋友. 772002会画m种马尾,772002还有n张纸,n张纸分别编号1到n,每张纸上只能画一种马尾. 然而77200 ...
- python实现简单的梯度下降法
代码如下: # 梯度下降法模拟 import numpy as np import matplotlib.pyplot as plt plot_x = np.linspace(-1,6,141) # ...
- iOS framework静态库中使用xib和图片资源详解
一.新建bundle 前2篇文章介绍了iOS 最新framework和.a静态库制作及使用全解 iOS 工程套子工程,主工程和framework工程或.a library静态库工程联调 我现在是在 ...
- Inno Setup入门(二十五)——Inno Setup类参考(11)
http://379910987.blog.163.com/blog/static/3352379720126693742406/ 今天说说TNewCheckListBox类.该类和ListBox差不 ...
