Spring+Spring MVC+MyBatis整合
一、准备工作
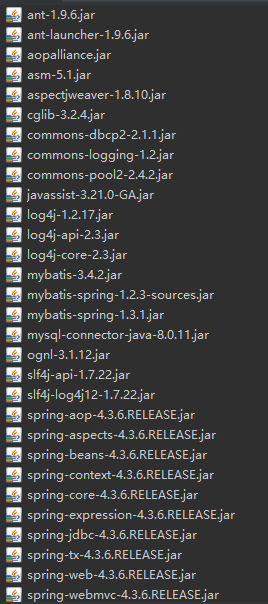
1.1导入所需jar包
1.2数据库
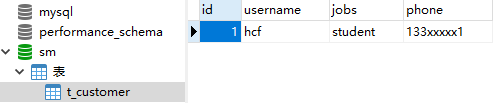
CREATE TABLE `t_customer` (

  `id` int(32) NOT NULL AUTO_INCREMENT,

  `username` varchar(50) CHARACTER SET utf8 COLLATE utf8_general_ci DEFAULT NULL,

  `jobs` varchar(50) CHARACTER SET utf8 COLLATE utf8_general_ci DEFAULT NULL,

  `phone` varchar(16) CHARACTER SET utf8 COLLATE utf8_general_ci DEFAULT NULL,

  PRIMARY KEY (`id`) USING BTREE

) ENGINE=InnoDB AUTO_INCREMENT=19 DEFAULT CHARSET=utf8;
二、编写配置文件
2.1编写db.propertise文件
#dataSource

#Thu Mar 07 16:27:40 CST 2019

jdbc.driver=com.mysql.jdbc.Driver

jdbc.url=jdbc:mysql://localhost:3306/sm

jdbc.username=root

jdbc.password=123456

jdbc.maxTotal=30

jdbc.maxIdle=10

jdbc.initialSize=5
2.2在src目录下创建beans.xml(applicationContext.xml)
<?xml  version="1.0"  encoding="UTF-8"?>

<beans  xmlns="http://www.springframework.org/schema/beans"

        xmlns:aop="http://www.springframework.org/schema/aop"

        xmlns:tx="http://www.springframework.org/schema/tx"

        xmlns:context="http://www.springframework.org/schema/context"

        xmlns:xsi = "http://www.w3.org/2001/XMLSchema-instance"

        xsi:schemaLocation="http://www.springframework.org/schema/beans

            http://www.springframework.org/schema/beans/spring-beans-4.3.xsd

            http://www.springframework.org/schema/context

             http://www.springframework.org/schema/context/spring-context-4.3.xsd

             http://www.springframework.org/schema/tx

             http://www.springframework.org/schema/tx/spring-tx-4.3.xsd

             http://www.springframework.org/schema/aop

             http://www.springframework.org/schema/aop/spring-aop-4.3.xsd" >

    <!-- 读取 db.properties-->

    <context:property-placeholder location = "classpath:db.properties"/>

    <!-- 配置数据源 -->

    <bean id = "dataSource" class = "org.apache.commons.dbcp2.BasicDataSource">

        <!-- 数据库驱动 -->

        <property name = "driverClassName" value = "${jdbc.driver}" />

        <!-- 数据库url -->

        <property name = "url" value = "${jdbc.url}" />

        <!-- 数据库用户名 -->

        <property name = "username" value = "${jdbc.username}" />

        <!-- 数据库密码 -->

        <property name = "password" value = "${jdbc.password}" />

        <!-- 数据库最大连接数 -->

        <property name="maxTotal" value = "${jdbc.maxTotal}"/>

        <!-- 数据库最大空闲数 -->

        <property name="maxIdle" value = "${jdbc.maxIdle}"/>

        <!-- 初始化连接数 -->

        <property name="initialSize" value = "${jdbc.initialSize}"/>

    </bean>

    <!-- 配置事务管理,并指定数据源 -->

    <bean id = "transactionManager"

            class = "org.springframework.jdbc.datasource.DataSourceTransactionManager">

        <property name = "dataSource" ref = "dataSource" />

    </bean>

    <!-- 开启事务注解 -->

    <tx:annotation-driven transaction-manager = "transactionManager" />

    <!-- 扫描 此处会扫描com.ssm.service及com.ssm.service.Impl-->

    <context:component-scan base-package="com.ssm.service"/>

    <!-- 配置MyBatis工厂 -->

    <bean id = "sqlSessionFactory" class = "org.mybatis.spring.SqlSessionFactoryBean">

        <!-- 注入数据源 -->

        <property name="dataSource" ref = "dataSource"/>

        <!-- 指定核心配置文件 -->

        <property name="configLocation" value = "classpath:mybatis-config.xml"/>

    </bean>

    <!-- 基于MapperScannerConfigurer,会自动扫描指定包下的接口文件和映射文件 -->

    <bean class = "org.mybatis.spring.mapper.MapperScannerConfigurer">

        <property name = "basePackage" value = "com.ssm.dao"/>

    </bean>

</beans>
2.3在src目录下创建mybatis-congfig.xml
<?xml version="1.0" encoding="UTF-8"?>

<!DOCTYPE configuration PUBLIC "-//mybatis.org//DTD Config 3.0//EN"

    "http://mybatis.org/dtd/mybatis-3-config.dtd">

<configuration>

    <!-- 采用扫描包定义别名 -->

    <typeAliases>

        <package name="com.ssm.po"/>

    </typeAliases>

    <!-- 配置映射文件 -->

    <mappers>

    </mappers>

</configuration>
2.4在src目录下创建springmvc-config.xml
<?xml version="1.0" encoding="UTF-8"?>

<beans     xmlns="http://www.springframework.org/schema/beans"

        xmlns:xsi="http://www.w3.org/2001/XMLSchema-instance"

        xmlns:context="http://www.springframework.org/schema/context"

        xmlns:mvc="http://www.springframework.org/schema/mvc"

        xmlns:tx="http://www.springframework.org/schema/tx"

         xsi:schemaLocation="

            http://www.springframework.org/schema/beans

            http://www.springframework.org/schema/beans/spring-beans-4.3.xsd

            http://www.springframework.org/schema/mvc

            http://www.springframework.org/schema/mvc/spring-mvc-4.3.xsd

            http://www.springframework.org/schema/context

            http://www.springframework.org/schema/context/spring-context-4.3.xsd">

       <!-- 开启扫描 -->

       <context:component-scan base-package = "com.ssm.controller"/>
    <!--加载注解驱动-->

       <mvc:annotation-driven/>

      <!--配置视图解析器 设置前缀后缀-->

       <bean id = "viewResolver" class = "org.springframework.web.servlet.view.InternalResourceViewResolver">

           <property name="prefix" value = "/WEB-INF/jsp/"></property>

           <property name="suffix" value = ".jsp"></property>

       </bean>

</beans>
2.5web.xml
<?xml version="1.0" encoding="UTF-8"?>

<web-app xmlns:xsi="http://www.w3.org/2001/XMLSchema-instance"

xmlns="http://xmlns.jcp.org/xml/ns/javaee"

xsi:schemaLocation="http://xmlns.jcp.org/xml/ns/javaee http://xmlns.jcp.org/xml/ns/javaee/web-app_3_1.xsd"

id="WebApp_ID" version="3.1">

  <display-name>SSM</display-name>

  <welcome-file-list>

    <welcome-file>index.html</welcome-file>

    <welcome-file>index.htm</welcome-file>

    <welcome-file>index.jsp</welcome-file>

    <welcome-file>default.html</welcome-file>

    <welcome-file>default.htm</welcome-file>

    <welcome-file>default.jsp</welcome-file>

  </welcome-file-list>

  <!-- 配置Spring文件的监听器 -->

  <context-param>

      <param-name>contextConfigLocation</param-name>

      <param-value>classpath:beans.xml</param-value>

  </context-param>

  <listener>

      <listener-class>

          org.springframework.web.context.ContextLoaderListener

      </listener-class>

  </listener>

  <!-- 配置编码过滤器 -->

  <filter>

      <filter-name>encoding</filter-name>

      <filter-class>

          org.springframework.web.filter.CharacterEncodingFilter

      </filter-class>

      <init-param>

          <param-name>encoding</param-name>

          <param-value>UTF-8</param-value>

      </init-param>

  </filter>

  <filter-mapping>

      <filter-name>encoding</filter-name>

      <url-pattern>*.action</url-pattern>

  </filter-mapping>

  <!-- 配置Spring MVC前端控制器 -->

  <servlet>

      <servlet-name>springmvc</servlet-name>

      <servlet-class>

          org.springframework.web.servlet.DispatcherServlet

      </servlet-class>

      <init-param>

          <param-name>contextConfigLocation</param-name>

          <param-value>classpath:springmvc-config.xml</param-value>

      </init-param>

      <!-- 服务器启动立即加载SpringMVC配置文件 -->

      <load-on-startup>1</load-on-startup>

  </servlet>

  <servlet-mapping>

      <servlet-name>springmvc</servlet-name>

      <!-- 拦截所有请求 -->

      <url-pattern>/</url-pattern>

  </servlet-mapping>

</web-app>
三、测试整合
3.1在src目录下创建com.ssm.po包,并创建Customer类
Customer.java
package com.ssm.po;

public class Customer {

    private Integer id;

    private String username;

    private String jobs;

    private String phone;

    public Integer getId() {

        return id;

    }

    public void setId(Integer id) {

        this.id = id;

    }

    public String getUsername() {

        return username;

    }

    public void setUsername(String username) {

        this.username = username;

    }

    public String getJobs() {

        return jobs;

    }

    public void setJobs(String jobs) {

        this.jobs = jobs;

    }

    public String getPhone() {

        return phone;

    }

    public void setPhone(String phone) {

        this.phone = phone;

    }

    @Override

    public String toString() {

        return "Customer [id=" + id + ", username=" + username + ", jobs=" + jobs + ", phone=" + phone + "]";

    }

}
3.2在src目录下创建com.ssm.dao包,并创建接口文件CustomerDao.java和映射文件CustomerDao.xml
CustomerDao.java
package com.ssm.dao;

import com.ssm.po.Customer;

public interface CustomerDao {

    public Customer findCustomerById(Integer id);

}
CustomerDao.xml
<?xml version="1.0" encoding="UTF-8"?>

<!DOCTYPE mapper PUBLIC "-//mybatis.org//DTD Mapper 3.0//EN"

    "http://mybatis.org/dtd/mybatis-3-mapper.dtd">

<mapper namespace = "com.ssm.dao.CustomerDao" >

    <!-- 根据ID查询客户信息 -->

    <select id = "findCustomerById" parameterType = "Integer" resultType = "com.ssm.po.Customer">

        select * from t_customer where id = #{id}

    </select>

</mapper>
注:接口文件和映射文件的名称要保持一致,映射文件namespace名称要符合规范。
接口方法名和映射文件语句id,返回值类型、参数类型要保持一致。
两个文件要在同一包中。
3.3在src目录下创建com.ssm.service包,并创建接口文件CustomerService.java
package com.ssm.service;

import org.springframework.stereotype.Service;

import com.ssm.po.Customer;

@Service

public interface CustomerService {

    public Customer findCustomerById(Integer id);

}
3.4在src目录下创建com.ssm.service.Impl包,并在其中创建CustoemrService接口的实现类CustomerServiceImpl.java
CustomerService.java
package com.ssm.service.Impl;

import org.springframework.beans.factory.annotation.Autowired;

import org.springframework.stereotype.Service;

import org.springframework.transaction.annotation.Transactional;

import com.ssm.dao.CustomerDao;

import com.ssm.po.Customer;

import com.ssm.service.CustomerService;

@Service   //标记当前类,通过扫描注册

@Transactional

public class CustomerServiceImpl implements CustomerService{

    @Autowired //按类型自动装配

    private CustomerDao customerDao;

    @Override

    public Customer findCustomerById(Integer id) {

        return this.customerDao.findCustomerById(id);

    }

}
3.5在src目录下创建com.ssm.controller包,并创建CustomerController类
CustomerController.java
package com.ssm.controller;

import org.springframework.beans.factory.annotation.Autowired;

import org.springframework.stereotype.Controller;

import org.springframework.ui.Model;

import org.springframework.web.bind.annotation.RequestMapping;

import com.ssm.po.Customer;

import com.ssm.service.CustomerService;

@Controller //标注为控制类,自动扫描

public class CustomerController {

    @Autowired //按类型自动装配

    private CustomerService customerService;

    @RequestMapping("/findCustomerById")

    public String findCustomerById(Integer id, Model model) {

        Customer customer = customerService.findCustomerById(id);

        model.addAttribute("customer", customer);

        return "customer";//返回WEB-INF/jsp/customer.jsp

    }

}
3.6在WEB-INF目录下创建文件夹jsp,并在其中创建customer.jsp
<%@ page language="java" contentType="text/html; charset=UTF-8"

    pageEncoding="UTF-8"%>

<!DOCTYPE html>

<html>

<head>

<meta charset="UTF-8">

<title>Insert title here</title>

</head>

<body>

    <table border="1">

        <tr>

            <td>id</td>

            <td>姓名</td>

            <td>职业</td>

            <td>电话</td>

        </tr>

        <tr>

            <td>${customer.id}</td>

            <td>${customer.username}</td>

            <td>${customer.jobs}</td>

            <td>${customer.phone}</td>

        </tr>

    </table>

</body>

</html>
启动服务器,添加项目。
地址栏输入:http://localhost:8080/SSM/findCustomerById?id=1

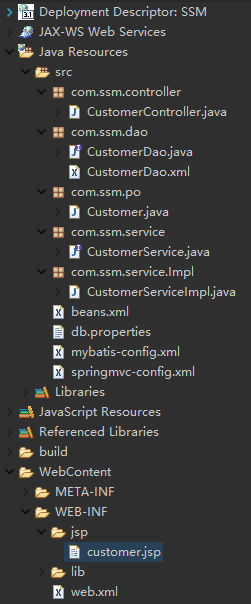
项目结构:
常见错误:
1、配置文件中书写错误,例如classpath拼写错误、文件名拼写错误(beans.xml写错了benas.xml)。
2、com.ssm.service.Impl写成了com.ssm.serviceImpl,
在beans.xml中配置的:
<context:component-scan base-package="com.ssm.service"/>(会扫描com.ssm.service及com.ssm.service.*)
不会扫描com.ssm.serviceImpl.
3、com.ssm.dao中映射文件和接口文件不匹配。
4、注解导入错误:注意导入的注解多是org.springframework中的注解。
5、视图解析器前后缀配置错误,找不到路径。
7、RequestMapping("xxx")中设置路径与地址栏输入路径不一致。
8. 文件中未设置自动扫描,找不到指定类。
Spring+Spring MVC+MyBatis整合的更多相关文章
- spring jpa和mybatis整合
spring jpa和mybatis整合 前一阵子接手了一个使用SpringBoot 和spring-data-jpa开发的项目 后期新加入一个小伙伴,表示jpa相比mybatis太难用,多表联合的查 ...
- ssm整合说明与模板-Spring Spring MVC Mybatis整合开发
ssm整合说明 spring+spring mvc+mybatis 说明 源码下载 由于之前存在ssh框架,spring+struts+hibernate,其中spring负责aop与ioc,所以一般 ...
- Spring4+Spring MVC+MyBatis整合思路
1.Spring框架的搭建 这个很简单,只需要web容器中注册org.springframework.web.context.ContextLoaderListener,并指定spring加载配置文件 ...
- spring, spring mvc, mybatis整合文件配置详解
转自:http://www.cnblogs.com/wxisme/p/4924561.html 使用SSM框架做了几个小项目了,感觉还不错是时候总结一下了.先总结一下SSM整合的文件配置.其实具体的用 ...
- Spring Cloud部署+Mybatis整合
一:架构简介 Spring Cloud是微服务思想的体现.每个项目单独部署,我只需要知道你服务的name就能直接调用你,而不关心你的ip和端口的变化.当接口服务不可用的时候,我能感知到你无法用了,就不 ...
- Spring MVC + MyBatis整合(IntelliJ IDEA环境下)
一些重要的知识: mybais-spring.jar及其提供的API: SqlSessionFactoryBean: SqlSessionFactory是由SqlSessionFactoryBuild ...
- Spring + Spring MVC + MyBatis 整合
1.所需要Jar包 ? <!-- Spring3.0.1包 --> org.springframework.web-3.0.1 系列 <!-- 公共包 --> sl ...
- Spring+MVC+Mybatis整合
本文是对慕课网上"搞定SSM开发"路径的系列课程的总结,详细的项目文档和课程总结放在github上了.点击查看 什么是秒杀业务 网站售卖某产品时,规定在某个日期开始售卖限量的产品, ...
- JAVA 框架 / SSM / SSM SPRING+SPING MVC + MYBATIS 三大框架整合详细步骤
http://how2j.cn/k/ssm/ssm-tutorial/1137.html
随机推荐
- 2017-2018-1 20179205《Linux内核原理与设计》第二周作业
<Linux内核原理与分析>第二周作业 本周视频学习情况: 通过孟老师的视频教程,大致对风诺依曼体系结构有了一个初步的认识,视频从硬件角度和程序员角度对CPU和Main Memory(内存 ...
- java===java基础学习(5)---文件读取,写入操作
文件的写入读取有很多方法,今天学到的是Scanner和PrintWriter 文件读取 Scanner in = new Scanner(Paths.get("file.txt") ...
- 1000: 恶意IP 课程作业
1000: 恶意IP Time Limit: 1 Sec Memory Limit: 16 MB Description Water同学最近好不容易学会了用Tornado建起一个个人的Website ...
- c json实战引擎五 , 优化重构
引言 scjson是一个小巧的纯c跨平台小巧引擎. 适用于替换老的cJSON引擎的场景. 数据结构和代码布局做了大量改进.优势体现在以下几个方面: 1) 跨平台 (window 10 + VS2017 ...
- lnmp的安装--mysql
1.前期准备 创建组:groupadd mysql 创建用户:useradd -r -g mysql mysql 创建mysql文件夹于数据存放文件夹data mkdir -p /usr/www/my ...
- git 查看父分支
// 显示本地分支和服务器分支的映射关系 git branch -vv // 切换分支(和创建分支就差一个-b参数) git checkout {{branch_name}} // 创建新分支,新分支 ...
- 《java并发编程实战》读书笔记13--Java内存模型,重排序,Happens-Before
第16章 Java内存模型 终于看到这本书的最后一章了,嘿嘿,以后把这本书的英文版再翻翻.这本书中尽可能回避了java内存模型(JMM)的底层细节,而将重点放在一些高层设计问题,例如安全发布,同步策略 ...
- hdu 3371(kruskal)
Connect the Cities Time Limit: 2000/1000 MS (Java/Others) Memory Limit: 32768/32768 K (Java/Other ...
- Android----APP性能优化
性能优化的目标 快 如何让 app 在运行过程过不卡顿,运行流畅,速度快,也就是说如何解决卡顿呢?我们先看看那些因素影响卡顿? UI,包括ui的绘制,刷新等 启动,包括冷启动,热启动,温启动等 跳转, ...
- windows 安装tp5 composer方式
1.下载windows composer-setup.exe(我已下载一个Composer-Setup.exe); 2.我电脑使用的是phpstudy2018版 php-7.0.12-NTS 3.然后 ...