Getting Started with ASP.NET Web API 2 (C#)
HTTP is not just for serving up web pages. It is also a powerful platform for building APIs that expose services and data. HTTP is simple, flexible, and ubiquitous. Almost any platform that you can think of has an HTTP library, so HTTP services can reach a broad range of clients, including browsers, mobile devices, and traditional desktop applications.
ASP.NET Web API is a framework for building web APIs on top of the .NET Framework. In this tutorial, you will use ASP.NET Web API to create a web API that returns a list of products.
Software versions used in the tutorial
Create a Web API Project
In this tutorial, you will use ASP.NET Web API to create a web API that returns a list of products. The front-end web page uses jQuery to display the results.
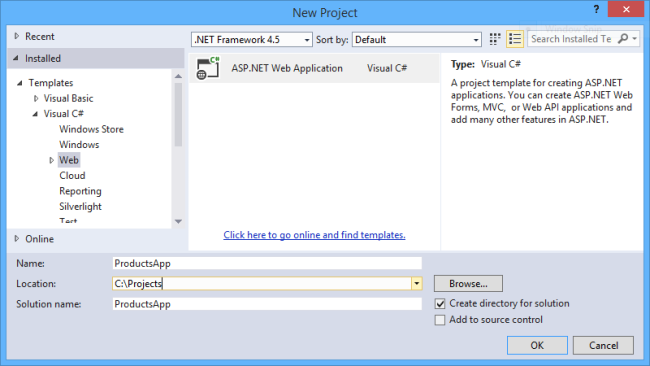
Start Visual Studio and select New Project from the Start page. Or, from the File menu, select New and then Project.
In the Templates pane, select Installed Templates and expand the Visual C# node. Under Visual C#, select Web. In the list of project templates, select ASP.NET Web Application. Name the project "ProductsApp" and click OK.
In the New ASP.NET Project dialog, select the Empty template. Under "Add folders and core references for", check Web API. Click OK.
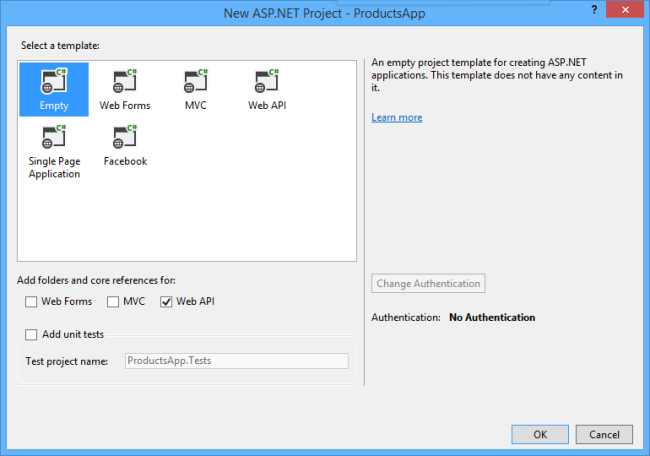
You can also create a Web API project using the "Web API" template. The Web API template uses ASP.NET MVC to provide API help pages. I'm using the Empty template for this tutorial because I want to show Web API without MVC. In general, you don't need to know ASP.NET MVC to use Web API.
Adding a Model
A model is an object that represents the data in your application. ASP.NET Web API can automatically serialize your model to JSON, XML, or some other format, and then write the serialized data into the body of the HTTP response message. As long as a client can read the serialization format, it can deserialize the object. Most clients can parse either XML or JSON. Moreover, the client can indicate which format it wants by setting the Accept header in the HTTP request message.
Let's start by creating a simple model that represents a product.
If Solution Explorer is not already visible, click the View menu and select Solution Explorer. In Solution Explorer, right-click the Models folder. From the context menu, select Add then select Class.
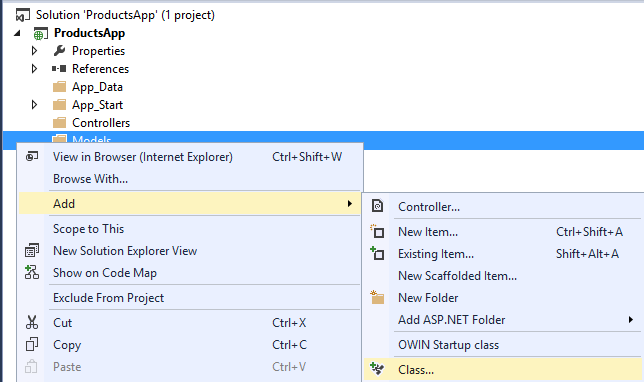
Name the class "Product". Add the following properties to the Product class.
namespace ProductsApp.Models

{

    public class Product

    {

        public int Id { get; set; }

        public string Name { get; set; }

        public string Category { get; set; }

        public decimal Price { get; set; }

    }

}
Adding a Controller
In Web API, a controller is an object that handles HTTP requests. We'll add a controller that can return either a list of products or a single product specified by ID.
Note If you have used ASP.NET MVC, you are already familiar with controllers. Web API controllers are similar to MVC controllers, but inherit the ApiController class instead of the Controller class.
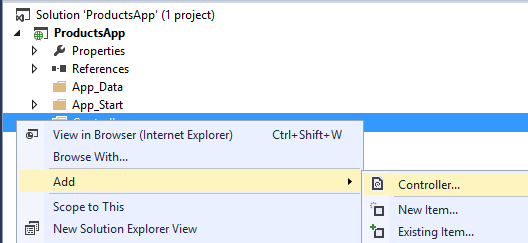
In Solution Explorer, right-click the Controllers folder. Select Add and then select Controller.
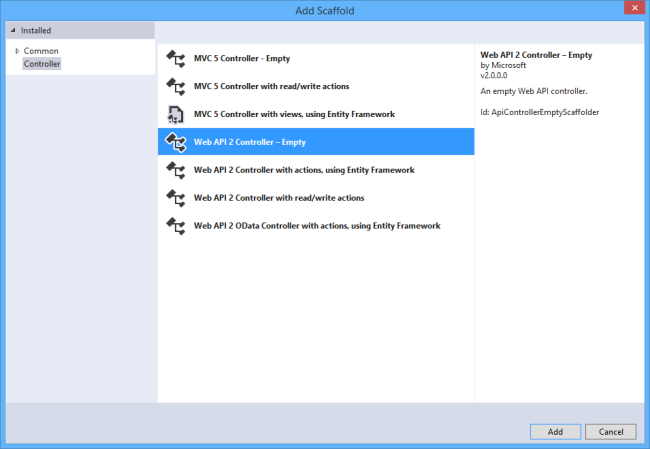
In the Add Scaffold dialog, select Web API Controller - Empty. Click Add.
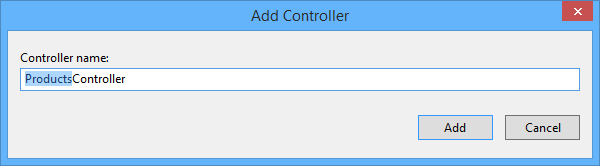
In the Add Controller dialog, name the controller "ProductsController". Click Add.
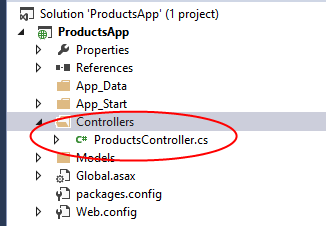
The scaffolding creates a file named ProductsController.cs in the Controllers folder.
You don't need to put your contollers into a folder named Controllers. The folder name is just a convenient way to organize your source files.
If this file is not open already, double-click the file to open it. Replace the code in this file with the following:
using ProductsApp.Models;

using System;

using System.Collections.Generic;

using System.Linq;

using System.Net;

using System.Web.Http;

namespace ProductsApp.Controllers

{

    public class ProductsController : ApiController

    {

        Product[] products = new Product[]

        {

            new Product { Id = 1, Name = "Tomato Soup", Category = "Groceries", Price = 1 },

            new Product { Id = 2, Name = "Yo-yo", Category = "Toys", Price = 3.75M },

            new Product { Id = 3, Name = "Hammer", Category = "Hardware", Price = 16.99M }

        };

        public IEnumerable<Product> GetAllProducts()

        {

            return products;

        }

        public IHttpActionResult GetProduct(int id)

        {

            var product = products.FirstOrDefault((p) => p.Id == id);

            if (product == null)

            {

                return NotFound();

            }

            return Ok(product);

        }

    }

}
To keep the example simple, products are stored in a fixed array inside the controller class. Of course, in a real application, you would query a database or use some other external data source.
The controller defines two methods that return products:
- The
GetAllProductsmethod returns the entire list of products as an IEnumerable<Product> type. - The
GetProductmethod looks up a single product by its ID.
That's it! You have a working web API. Each method on the controller corresponds to one or more URIs:
| Controller Method | URI |
|---|---|
| GetAllProducts | /api/products |
| GetProduct | /api/products/id |
For the GetProduct method, the id in the URI is a placeholder. For example, to get the product with ID of 5, the URI is api/products/5.
For more information about how Web API routes HTTP requests to controller methods, see Routing in ASP.NET Web API.
Calling the Web API with Javascript and jQuery
In this section, we'll add an HTML page that uses AJAX to call the web API. We'll use jQuery to make the AJAX calls and also to update the page with the results.
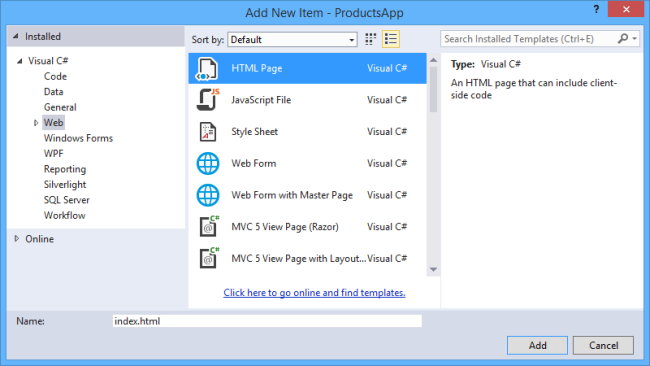
In Solution Explorer, right-click the project and select Add, then select New Item.
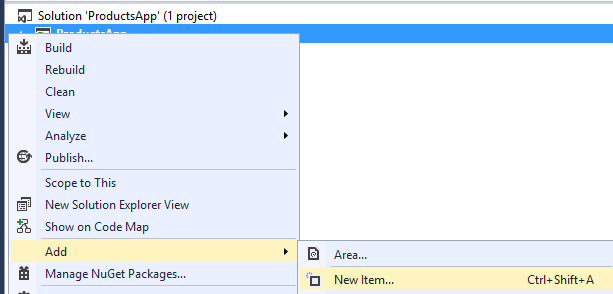
In the Add New Item dialog, select the Web node under Visual C#, and then select the HTML Page item. Name the page "index.html".
Replace everything in this file with the following:
<!DOCTYPE html>

<html xmlns="http://www.w3.org/1999/xhtml">

<head>

  <title>Product App</title>

</head>

<body>

  <div>

    <h2>All Products</h2>

    <ul id="products" />

  </div>

  <div>

    <h2>Search by ID</h2>

    <input type="text" id="prodId" size="5" />

    <input type="button" value="Search" onclick="find();" />

    <p id="product" />

  </div>

  <script src="http://ajax.aspnetcdn.com/ajax/jQuery/jquery-2.0.3.min.js"></script>

  <script>

    var uri = 'api/products';

    $(document).ready(function () {

      // Send an AJAX request

      $.getJSON(uri)

          .done(function (data) {

            // On success, 'data' contains a list of products.

            $.each(data, function (key, item) {

              // Add a list item for the product.

              $('<li>', { text: formatItem(item) }).appendTo($('#products'));

            });

          });

    });

    function formatItem(item) {

      return item.Name + ': $' + item.Price;

    }

    function find() {

      var id = $('#prodId').val();

      $.getJSON(uri + '/' + id)

          .done(function (data) {

            $('#product').text(formatItem(data));

          })

          .fail(function (jqXHR, textStatus, err) {

            $('#product').text('Error: ' + err);

          });

    }

  </script>

</body>

</html>
There are several ways to get jQuery. In this example, I used the Microsoft Ajax CDN. You can also download it from http://jquery.com/, and the ASP.NET "Web API" project template includes jQuery as well.
Getting a List of Products
To get a list of products, send an HTTP GET request to "/api/products".
The jQuery getJSON function sends an AJAX request. For response contains array of JSON objects. The done function specifies a callback that is called if the request succeeds. In the callback, we update the DOM with the product information.
$(document).ready(function () {

    // Send an AJAX request

    $.getJSON(apiUrl)

        .done(function (data) {

            // On success, 'data' contains a list of products.

            $.each(data, function (key, item) {

                // Add a list item for the product.

                $('<li>', { text: formatItem(item) }).appendTo($('#products'));

            });

        });

});
Getting a Product By ID
To get a product by ID, send an HTTP GET request to "/api/products/id", where id is the product ID.
function find() {

    var id = $('#prodId').val();

    $.getJSON(apiUrl + '/' + id)

        .done(function (data) {

            $('#product').text(formatItem(data));

        })

        .fail(function (jqXHR, textStatus, err) {

            $('#product').text('Error: ' + err);

        });

}
We still call getJSON to send the AJAX request, but this time we put the ID in the request URI. The response from this request is a JSON representation of a single product.
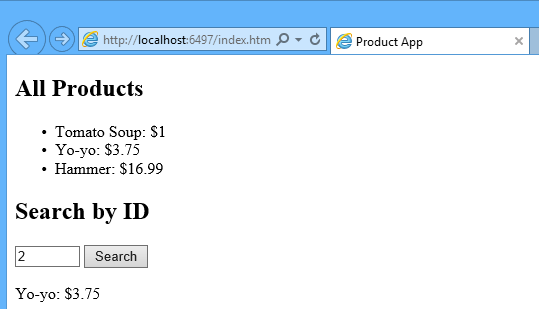
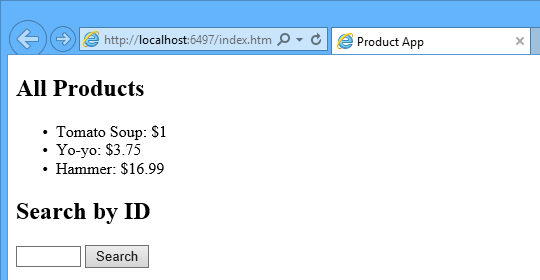
Running the Application
Press F5 to start debugging the application. The web page should look like the following:
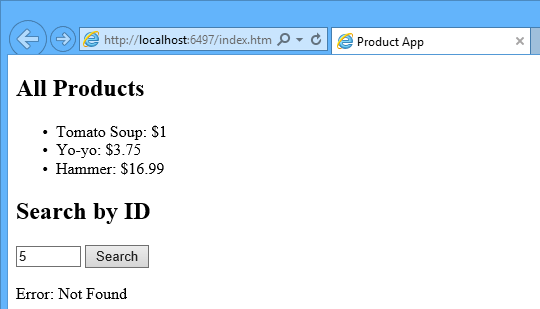
To get a product by ID, enter the ID and click Search:
If you enter an invalid ID, the server returns an HTTP error:
Using F12 to View the HTTP Request and Response
When you are working with an HTTP service, it can be very useful to see the HTTP request and request messages. You can do this by using the F12 developer tools in Internet Explorer 9. From Internet Explorer 9, press F12 to open the tools. Click the Network tab and press Start Capturing. Now go back to the web page and press F5 to reload the web page. Internet Explorer will capture the HTTP traffic between the browser and the web server. The summary view shows all the network traffic for a page:
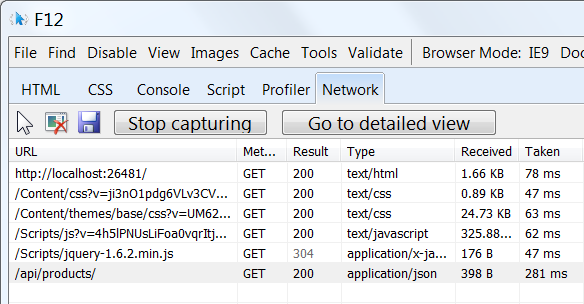
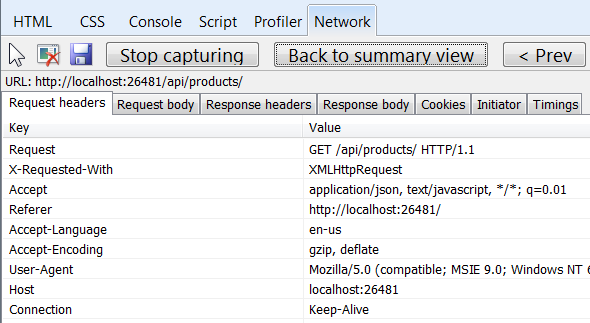
Locate the entry for the relative URI “api/products/”. Select this entry and click Go to detailed view. In the detail view, there are tabs to view the request and response headers and bodies. For example, if you click the Request headers tab, you can see that the client requested "application/json" in the Accept header.
If you click the Response body tab, you can see how the product list was serialized to JSON. Other browsers have similar functionality. Another useful tool is Fiddler, a web debugging proxy. You can use Fiddler to view your HTTP traffic, and also to compose HTTP requests, which gives you full control over the HTTP headers in the request.
See this App Running on Azure
Would you like to see the finished site running as a live web app? You can deploy a complete version of the app to your Azure account by simply clicking the following button.

You need an Azure account to deploy this solution to Azure. If you do not already have an account, you have the following options:
- Open an Azure account for free - You get credits you can use to try out paid Azure services, and even after they're used up you can keep the account and use free Azure services.
- Activate MSDN subscriber benefits - Your MSDN subscription gives you credits every month that you can use for paid Azure services.
Next Steps
- For a more complete example of an HTTP service that supports POST, PUT, and DELETE actions and writes to a database, see Using Web API 2 with Entity Framework 6.
- For more about creating fluid and responsive web applications on top of an HTTP service, see ASP.NET Single Page Application.
- For information about how to deploy a Visual Studio web project to Azure App Service, see Create an ASP.NET web app in Azure App Service.
This article was originally created on January 20, 2014
Author Information

Mike Wasson – Mike Wasson is a programmer-writer at Microsoft.
Getting Started with ASP.NET Web API 2 (C#)的更多相关文章
- 在一个空ASP.NET Web项目上创建一个ASP.NET Web API 2.0应用
由于ASP.NET Web API具有与ASP.NET MVC类似的编程方式,再加上目前市面上专门介绍ASP.NET Web API 的书籍少之又少(我们看到的相关内容往往是某本介绍ASP.NET M ...
- ASP.NET Web API Model-ActionBinding
ASP.NET Web API Model-ActionBinding 前言 前面的几个篇幅把Model部分的知识点划分成一个个的模块来讲解,而在控制器执行过程中分为好多个过程,对于控制器执行过程(一 ...
- ASP.NET Web API Model-ParameterBinding
ASP.NET Web API Model-ParameterBinding 前言 通过上个篇幅的学习了解Model绑定的基础知识,然而在ASP.NET Web API中Model绑定功能模块并不是被 ...
- ASP.NET Web API Model-ModelBinder
ASP.NET Web API Model-ModelBinder 前言 本篇中会为大家介绍在ASP.NET Web API中ModelBinder的绑定原理以及涉及到的一些对象模型,还有简单的Mod ...
- ASP.NET Web API Model-ValueProvider
ASP.NET Web API Model-ValueProvider 前言 前面一篇讲解了Model元数据,Model元数据是在Model绑定中很重要的一部分,只是Model绑定中涉及的知识点比较多 ...
- ASP.NET Web API Model-ModelMetadata
ASP.NET Web API Model-ModelMetadata 前言 前面的几个篇幅主要围绕控制器的执行过程,奈何执行过程中包含的知识点太庞大了,只能一部分一部分的去讲解,在上两篇中我们看到在 ...
- ASP.NET Web API 过滤器创建、执行过程(二)
ASP.NET Web API 过滤器创建.执行过程(二) 前言 前面一篇中讲解了过滤器执行之前的创建,通过实现IFilterProvider注册到当前的HttpConfiguration里的服务容器 ...
- ASP.NET Web API 过滤器创建、执行过程(一)
ASP.NET Web API 过滤器创建.执行过程(一) 前言 在上一篇中我们讲到控制器的执行过程系列,这个系列要搁置一段时间了,因为在控制器执行的过程中包含的信息都是要单独的用一个系列来描述的,就 ...
- ASP.NET Web API 控制器执行过程(一)
ASP.NET Web API 控制器执行过程(一) 前言 前面两篇讲解了控制器的创建过程,只是从框架源码的角度去简单的了解,在控制器创建过后所执行的过程也是尤为重要的,本篇就来简单的说明一下控制器在 ...
- ASP.NET Web API 控制器创建过程(二)
ASP.NET Web API 控制器创建过程(二) 前言 本来这篇随笔应该是在上周就该写出来发布的,由于身体跟不上节奏感冒发烧有心无力,这种天气感冒发烧生不如死,也真正的体会到了什么叫病来如山倒,病 ...
随机推荐
- C# DllImport用法和路径问题
DllImport是System.Runtime.InteropServices命名空间下的一个属性类,其功能是提供从非托管DLL导出的函数的必要调用信息. DllImport属性应用于方法,要 ...
- VS2015如何新建MVC空模版项目
直接看图吧:
- SRC单一职责原则
一.定义 一个类应该只有一个发生变化的原因. 二.为什么要使用SRC 因为每一个职责都是变化的一个轴线.当需求变化时,这种变化就会反映为类的职责的变化.如果一个类承担了多于一个的职责,那么引起它变化的 ...
- 【Java每日一题】20161101
package Nov2016; import java.util.HashMap; import java.util.Map; public class Ques1101 { public stat ...
- Gitblit中采用Ticket模式进行协作开发
Git目前的代码分支管理模型中,比较主要的有Git-Flow.Github Pull Request.大家日常或多或少都在用着. 在不想安装Gitlab这种重量级的环境的情况下,如果是利用git一步步 ...
- springmvc中RequestMapping的解析
在研究源码的时候,我们应该从最高层来看,所以我们先看这个接口的定义: package org.springframework.web.servlet; import javax.servlet.htt ...
- HDU 3328 Flipper 栈 模拟
首先想说,英语太烂这题读了很长时间才读懂......题意是说输入有几张牌,然后输入这些牌的初始状态(是面朝上还是面朝下),然后输入操作方式,R表示翻一下右边的牌堆,L表示翻一下左边的牌堆,直到最后摞成 ...
- Android 亮度调节
最近在做一个App的设置项,亮度调节.真正做时,发现Android亮度调节比预想要复杂一些.其实目前网上已有不少这方面的资料,但有些博文具有一定误导性.在此将这块内容按照自己理解整理一下. 整体上看, ...
- selenium + python自动化测试环境搭建
selenium的在python平台的搭建: 搭建平台windows 准备工具如下: --------------------------------------------------------- ...
- JavaScript对象(Object)
JavaScript的简单数据类型包括数字.字符串.布尔值.null值和undefined值,其他所有的值都是对象.数字.字符串.布尔值“貌似”对象,因为他们拥有方法,但是他们是不可变的. ...