
Android带头像的用户注册页面
详细的图文可以到我的百度经验去查看:http://jingyan.baidu.com/article/cd4c2979eda109756e6e60de.html
首先是注册页面的布局:
<?xml version="1.0" encoding="utf-8"?>

<LinearLayout xmlns:android="http://schemas.android.com/apk/res/android"

    android:layout_width="fill_parent"

    android:layout_height="fill_parent"

    android:paddingTop="20px"

    android:orientation="horizontal" >

    <LinearLayout

        android:id="@+id/linearLayout1"

        android:orientation="vertical"

        android:layout_weight="2"

        android:paddingLeft="20px"

        android:layout_width="wrap_content"

        android:layout_height="wrap_content" >

        <TableLayout

            android:id="@+id/tableLayout1"

            android:layout_width="match_parent"

            android:layout_height="wrap_content" >

            <TableRow

                android:id="@+id/tableRow1"

                android:layout_width="wrap_content"

                android:layout_height="wrap_content" >

                <TextView

                    android:id="@+id/textView1"

                    android:textSize="20px"

                    android:layout_width="wrap_content"

                    android:layout_height="wrap_content"

                    android:text="用户名:" />

                <EditText

                    android:id="@+id/user"

                    android:minWidth="400px"

                    android:layout_width="wrap_content"

                    android:layout_height="wrap_content" />

            </TableRow>

            <TableRow

                android:id="@+id/tableRow2"

                android:layout_width="wrap_content"

                android:layout_height="wrap_content" >

                <TextView

                    android:id="@+id/textView2"

                    android:textSize="20px"

                    android:layout_width="wrap_content"

                    android:layout_height="wrap_content"

                    android:text="密码:" />

                <EditText

                    android:id="@+id/pwd"

                    android:inputType="textPassword"

                    android:layout_width="wrap_content"

                    android:layout_height="wrap_content" />

            </TableRow>

            <TableRow

                android:id="@+id/tableRow3"

                android:layout_width="wrap_content"

                android:layout_height="wrap_content" >

                <TextView

                    android:id="@+id/textView3"

                    android:textSize="20px"

                    android:layout_width="wrap_content"

                    android:layout_height="wrap_content"

                    android:text="确认密码:" />

                <EditText

                    android:id="@+id/repwd"

                    android:inputType="textPassword"

                    android:layout_width="wrap_content"

                    android:layout_height="wrap_content" />

            </TableRow>

            <TableRow

                android:id="@+id/tableRow4"

                android:layout_width="wrap_content"

                android:layout_height="wrap_content" >

                <TextView

                    android:id="@+id/textView4"

                    android:textSize="20px"

                    android:layout_width="wrap_content"

                    android:layout_height="wrap_content"

                    android:text="E-mail地址:" />

                <EditText

                    android:id="@+id/email"

                    android:layout_width="wrap_content"

                    android:layout_height="wrap_content" />

            </TableRow>

        </TableLayout>

    </LinearLayout>

    <LinearLayout

        android:id="@+id/linearLayout2"

        android:orientation="vertical"

        android:gravity="center_horizontal"

        android:layout_width="wrap_content"

        android:layout_weight="1"

        android:layout_height="wrap_content" >

        <ImageView

            android:id="@+id/imageView1"

            android:layout_width="158px"

            android:layout_height="150px"

            android:src="@drawable/ic_launcher" />

        <Button

            android:id="@+id/button1"

            android:layout_width="wrap_content"

            android:layout_height="wrap_content"

            android:text="选择头像" />

    </LinearLayout>

</LinearLayout>
然后是图库的页面布局,由用户去选择图片,这里我就用windows系统里面的几张照片
<?xml version="1.0" encoding="utf-8"?>

<LinearLayout xmlns:android="http://schemas.android.com/apk/res/android"

    android:layout_width="match_parent" android:layout_height="match_parent">

    <GridView

        android:layout_width="wrap_content"

        android:layout_height="match_parent"

        android:id="@+id/gridView"

        android:numColumns="" />

</LinearLayout>
然后我们在注册页面的Activity写入以下代码:
Button button1=(Button)findViewById(R.id.button1);

        button1.setOnClickListener(new View.OnClickListener() {

            @Override

            public void onClick(View v) {

                Intent intent = new Intent(MainActivity.this,HeadActivity.class);

                startActivityForResult(intent,0x11);

            }

        });

@Override onActivityResult方法:

    protected void onActivityResult(int requestCode,int resultCode,Intent data){

        super.onActivityResult(requestCode,resultCode,data);

        if(requestCode==0x11&&requestCode==0x11){

            Bundle bundle=data.getExtras();

            int imageId=bundle.getInt("imageId");

            ImageView imageView=(ImageView)findViewById(R.id.imageView1);

            imageView.setImageResource(imageId);

        }

    }
点击按钮跳转到图库Activity页面中。
在图库Activity里面写入以下代码响应用户点击图片并通过Intent传递给前一个Activity:
GridView gridView=(GridView)findViewById(R.id.gridView);

        BaseAdapter adapter=new BaseAdapter() {

            @Override

            public int getCount() {

                return imageId.length;

            }

            @Override

            public Object getItem(int position) {

                return position;

            }

            @Override

            public long getItemId(int position) {

                return position;

            }

            @Override

            public View getView(int position, View convertView, ViewGroup parent) {

                ImageView imageView;

                if(convertView==null){

                    imageView=new ImageView(HeadActivity.this);

                    imageView.setAdjustViewBounds(true);

                    imageView.setMaxHeight(58);

                    imageView.setMaxWidth(50);

                    imageView.setPadding(5,5,5,5);

                }else{

                    imageView=(ImageView)convertView;

                }

                imageView.setImageResource(imageId[position]);

                return imageView;

            }

        };

        gridView.setAdapter(adapter);

        gridView.setOnItemClickListener(new AdapterView.OnItemClickListener() {

            @Override

            public void onItemClick(AdapterView<?> parent, View view, int position, long id) {

                Intent intent=getIntent();

                Bundle bundle=new Bundle();

                bundle.putInt("imageId",imageId[position]);

                intent.putExtras(bundle);

                setResult(0x11,intent);

                finish();

            }

        });
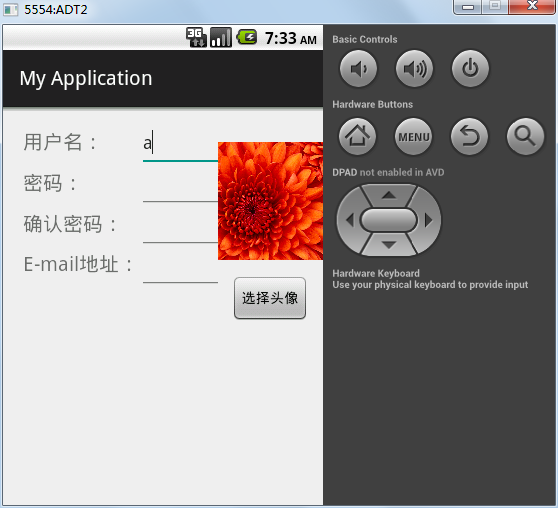
结果如下:
Android带头像的用户注册页面的更多相关文章
- 超详细的php用户注册页面填写信息完整实例(附源码)
这篇文章主要介绍了一个超详细的php用户注册页面填写信息完整实例,内容包括邮箱自动匹配.密码强度验证以及防止表单重复等,小编特别喜欢这篇文章,推荐给大家. 注册页面是大多数网站必备的页面,所以很有必要 ...
- 实现android手机来电拦截系统页面弹出自定义页面特效
如何实现android手机来电拦截系统页面弹出自定义页面特效, 首先: 我们需要注册一个监听来电的广播PhoneStateReceiver 类:其次: 在onReceive里面我们获取an ...
- JavaScript、CSS、JSP 实现用户注册页面与信息校验
参考:http://blog.csdn.net/fightfaith/article/details/50277337 需求:实现用户注册页面并作出逻辑校验.要求: (1)完成注册页面样式如下: (2 ...
- Android 获取浏览器当前分享页面的截屏
Android 获取浏览器当前分享页面的截屏 版权声明:本文为博主原创文章,未经博主允许不得转载. 微博:厉圣杰 源码:AndroidDemo/BrowserScreenShotActivity 文中 ...
- Android -- 带你从源码角度领悟Dagger2入门到放弃
1,以前的博客也写了两篇关于Dagger2,但是感觉自己使用的时候还是云里雾里的,更不谈各位来看博客的同学了,所以今天打算和大家再一次的入坑试试,最后一次了,保证最后一次了. 2,接入项目 在项目的G ...
- Android -- 带你从源码角度领悟Dagger2入门到放弃(二)
1,接着我们上一篇继续介绍,在上一篇我们介绍了简单的@Inject和@Component的结合使用,现在我们继续以老师和学生的例子,我们知道学生上课的时候都会有书籍来辅助听课,先来看看我们之前的Stu ...
- Android - TabHost 与 Fragment 制作页面切换效果
Android - TabHost 与 Fragment 制作页面切换效果 Android API 19 , API 23 三个标签页置于顶端 效果图: 在文件BoardTabHost.java中定义 ...
- Android -- 带你从源码角度领悟Dagger2入门到放弃(一)
1,以前的博客也写了两篇关于Dagger2,但是感觉自己使用的时候还是云里雾里的,更不谈各位来看博客的同学了,所以今天打算和大家再一次的入坑试试,最后一次了,保证最后一次了. 2,接入项目 在项目的G ...
- Gitlab系列九之取消用户注册页面和删除用户
一.取消用户注册页面 Admin Area--->Settings--->Sign-up enabled(取消前面的勾)---save 二.删除用户 Users----Destroy(点他 ...
随机推荐
- algorithm@ O(3/2 n) time to findmaximum and minimum in a array
public static int[] max_min(int[] a){ //res[0] records the minimum value while res[1] records the ma ...
- UIKit: UIResponder(转自南峰子博客)
有问题可以加本人QQ:564702640(验证:博客园) 我们的App与用户进行交互,基本上是依赖于各种各样的事件.例如,用户点击界面上的按钮,我们需要触发一个按钮点击事件,并进行相应的处理,以给用户 ...
- opencv 通过摄像头捕捉头部
code: #include <opencv\cv.h> #include <opencv\highgui.h> #include <opencv\cxcore.h> ...
- Oracle- 表查询
这些都比较基础,还是重温一下. 一.简单的查询语句1.查询表结构sql>desc dept; (使用PL/SQL Developer查询时,必需在命令窗口才能使用该语句) 2.查询所有列sql& ...
- (JAVA版)冒泡排序
核心代码: public void bubbleSort(){ ;i<length-;i++){ ;j<length-i-;j++){ ]) swap(j,j+); } } } publi ...
- 教你50招提升ASP.NET性能(三):使用Microsoft的PDBs调试和分析外部的程序集和库
(3)Use Microsoft’s PDBs to debug or profile external assemblies or libraries 招数3: 使用Microsoft的PDBs调试 ...
- centos yum安装mysql
查看有没有安装包 # yum list mysql 安装mysql客户端 # yum install mysql # yum list mysql-server 安装mysql 服务器端 # yum ...
- BZOJ 1143: [CTSC2008]祭祀river 最长反链
1143: [CTSC2008]祭祀river Time Limit: 1 Sec Memory Limit: 256 MB 题目连接 http://www.lydsy.com/JudgeOnline ...
- git在windows下clone、pull或者push内存溢出的解决办法
发现国内使用git来真正管理源码的人不多,特别是大数据量的源码,今天使用git clone android的源码时突然出现remote out of memery,解决办法: git config - ...
- SAP交货单过账自动生产采购订单、采购订单自动收货入库
公司间需要买卖操作,由于发货和收货都是同一批人在操作,为了减少业务人员的工作量,提高工作效率,特实现以上功能 1.增强实现:增强点为交货单过账成功时触发,在提交前触发,如果遇到不可预知问题,可能造成数 ...