Hibernate详细教程
一、搭建Hibernate环境
1.在src目录下创建hibernate.cfg.xml配置文件
PS:文件的名字不能改!

<?xml version="1.0" encoding="UTF-8"?>

<!DOCTYPE hibernate-configuration PUBLIC

          "-//Hibernate/Hibernate Configuration DTD 3.0//EN"

          "http://hibernate.sourceforge.net/hibernate-configuration-3.0.dtd">

<hibernate-configuration>

    <session-factory>

        <!-- configure the database setting -->

        <property name="connection.username">root</property>

        <property name="connection.password">1234</property>

        <property name="connection.driver_class">com.mysql.jdbc.Driver</property>

        <property name="connection.url">jdbc:mysql://localhost:3306/test</property>

        <!-- configure the hibernate setting -->

        <!-- transaction is supported by org.hibernate.dialect.MySQL5InnoDBDialect -->

        <property name="dialect">org.hibernate.dialect.MySQL5InnoDBDialect</property>
<!-- show sql in the console -->

        <property name="show_sql">true</property>
     <!-- create and update the database automaticlly -->

        <property name="hbm2ddl.auto">update</property>

        <!-- javax.persistence.validation.mode默认情况下是auto的,就是说如果不设置的话它是会自动去你的classpath下面找一个

        bean-validation**包,但是找不到,所以beanvalitionFactory错误 -->

        <property name="javax.persistence.validation.mode">none</property>

    </session-factory>

</hibernate-configuration>
2. 编写实体类,以Person类为例
package test.Hibernate.model;

import java.util.HashSet;

import java.util.Set;

public class Person {

    @Override

    public String toString() {

        return "Person [id=" + id + ", name=" + name + "]";

    }

    public int getId() {

        return id;

    }

    public void setId(int id) {

        this.id = id;

    }

    public String getName() {

        return name;

    }

    public void setName(String name) {

        this.name = name;

    }

    public Set<String> getAddress() {

        return address;

    }

    public void setAddress(Set<String> address) {

        this.address = address;

    }

    private int id;

    private String name;

    private Set<String> address = new HashSet<String>();

}
3.编写Person.hbm.xml实体类配置文件
<?xml version="1.0" encoding="utf-8"?>

<!DOCTYPE hibernate-mapping PUBLIC "-//Hibernate/Hibernate Mapping DTD 3.0//EN"

"http://www.hibernate.org/dtd/hibernate-mapping-3.0.dtd">

<!--

    Mapping file autogenerated by MyEclipse Persistence Tools

-->

<hibernate-mapping package="test.Hibernate.model">

    <class name="Person" table="person">

         <id column="id" name="id" type="int">

             <generator class="native"></generator>

         </id>

         <property name="name" column="name" length="50" type="string"></property>

         <set name="address" table="address">

             <key column="personId"></key>

             <element column="address" type="string" length="50"></element>

         </set>

    </class>

</hibernate-mapping>
4.在hibernate.cfg.xml中加入映射信息
<mapping resource="test/Hibernate/model/Person.hbm.xml" />
5.使用MyEclipse生成SessionFactory
package test.Hibernate.SessionFactory;

import org.hibernate.HibernateException;

import org.hibernate.Session;

import org.hibernate.cfg.Configuration;

import org.hibernate.service.ServiceRegistry;

import org.hibernate.service.ServiceRegistryBuilder;

/**

 * Configures and provides access to Hibernate sessions, tied to the

 * current thread of execution.  Follows the Thread Local Session

 * pattern, see {@link http://hibernate.org/42.html }.

 */

public class SessionFactory {

    /**

     * Location of hibernate.cfg.xml file.

     * Location should be on the classpath as Hibernate uses

     * #resourceAsStream style lookup for its configuration file.

     * The default classpath location of the hibernate config file is

     * in the default package. Use #setConfigFile() to update

     * the location of the configuration file for the current session.

     */

    private static final ThreadLocal<Session> threadLocal = new ThreadLocal<Session>();

    private static org.hibernate.SessionFactory sessionFactory;

    private static Configuration configuration = new Configuration();

    private static ServiceRegistry serviceRegistry;

    static {

        try {

            configuration.configure();

            serviceRegistry = new ServiceRegistryBuilder().applySettings(configuration.getProperties()).buildServiceRegistry();

            sessionFactory = configuration.buildSessionFactory(serviceRegistry);

        } catch (Exception e) {

            System.err.println("%%%% Error Creating SessionFactory %%%%");

            e.printStackTrace();

        }

    }

    private SessionFactory() {

    }

    /**

     * Returns the ThreadLocal Session instance.  Lazy initialize

     * the <code>SessionFactory</code> if needed.

     *

     *  @return Session

     *  @throws HibernateException

     */

    public static Session getSession() throws HibernateException {

        Session session = (Session) threadLocal.get();

        if (session == null || !session.isOpen()) {

            if (sessionFactory == null) {

                rebuildSessionFactory();

            }

            session = (sessionFactory != null) ? sessionFactory.openSession()

                    : null;

            threadLocal.set(session);

        }

        return session;

    }

    /**

     *  Rebuild hibernate session factory

     *

     */

    public static void rebuildSessionFactory() {

        try {

            configuration.configure();

            serviceRegistry = new ServiceRegistryBuilder().applySettings(configuration.getProperties()).buildServiceRegistry();

            sessionFactory = configuration.buildSessionFactory(serviceRegistry);

        } catch (Exception e) {

            System.err.println("%%%% Error Creating SessionFactory %%%%");

            e.printStackTrace();

        }

    }

    /**

     *  Close the single hibernate session instance.

     *

     *  @throws HibernateException

     */

    public static void closeSession() throws HibernateException {

        Session session = (Session) threadLocal.get();

        threadLocal.set(null);

        if (session != null) {

            session.close();

        }

    }

    /**

     *  return session factory

     *

     */

    public static org.hibernate.SessionFactory getSessionFactory() {

        return sessionFactory;

    }

    /**

     *  return hibernate configuration

     *

     */

    public static Configuration getConfiguration() {

        return configuration;

    }

}
6.编写测试类
package test.Hibernate.dao;

import org.hibernate.Session;

import org.hibernate.Transaction;

import org.junit.Test;

import test.Hibernate.SessionFactory.SessionFactory;

import test.Hibernate.model.Person;

public class PersonDao {

    @Test

    public void add(){

        Session session = SessionFactory.getSession();

        Transaction tr = session.beginTransaction();

        //----------------------------------------------

        Person p = new Person();

        p.setName("test");

        p.getAddress().add("firstAddr");

        p.getAddress().add("secondAddr");

        p.getAddress().add("thirdAddr");

        p.getAddress().add("fourthAddr");

        session.save(p);

        //----------------------------------------------

        tr.commit();

        SessionFactory.closeSession();

    }

    @Test

    public void get(){

        Session session = SessionFactory.getSession();

        Transaction tr = session.beginTransaction();

        //----------------------------------------------

        Person p = (Person)session.get(Person.class, 2);

        System.out.println(p);

        //----------------------------------------------

        tr.commit();

        SessionFactory.closeSession();

    }

}
二、主键生成策略
identity:使用数据库的自动增长策略,不是所有数据库都支持,比如oracle就不支持。
sequence:在 DB2,PostgreSQL,Oracle,SAP DB,McKoi 中使用序列(sequence)在使用Oracle数据库时可以使用这一个。
hilo:使用高低位算法生成主键值。只需要一张额外表,所有的数据都支持。
native:根据底层数据库的能力选择 identity、sequence 或者 hilo中的一个。
assigned:手工指定主键值。
uuid:由Hibernate自动生成UUID并指定为主键值。
三、Hibernate映射关系配置
1.一对一映射(以主键关联作为示例)User与IdCard(有外键方)的XML配置:
<?xml version="1.0" encoding="utf-8"?>

<!DOCTYPE hibernate-mapping PUBLIC "-//Hibernate/Hibernate Mapping DTD 3.0//EN"

"http://www.hibernate.org/dtd/hibernate-mapping-3.0.dtd">

<!--

    Mapping file autogenerated by MyEclipse Persistence Tools

-->

<hibernate-mapping package="test.Hibernate.model">

    <class name="User" table="user">

        <id name="id" type="int" column="id">

            <generator class="native"></generator>

        </id>

        <property name="name" type="string" column="name"/>

         <set name="address" table="address">

            <key column="userId"></key>

            <element column="address" type="string"></element>

        </set>

        <one-to-one name="idCard" class="IdCard" cascade="all"></one-to-one>

    </class>

</hibernate-mapping>
<?xml version="1.0" encoding="utf-8"?>

<!DOCTYPE hibernate-mapping PUBLIC "-//Hibernate/Hibernate Mapping DTD 3.0//EN"

"http://www.hibernate.org/dtd/hibernate-mapping-3.0.dtd">

<!--

    Mapping file autogenerated by MyEclipse Persistence Tools

-->

<hibernate-mapping package="test.Hibernate.model">

    <class name="IdCard" table="idCard">

        <id name="id" type="int" column="id">

            <generator class="foreign">

                <param name="property">user</param>

            </generator>

        </id>

        <property name="number" type="string" column="number"/>

        <one-to-one name="user" class="User" constrained="true"></one-to-one>

    </class>

</hibernate-mapping>
2.一对多,多对一(以Father和Children为例)
<?xml version="1.0" encoding="utf-8"?>

<!DOCTYPE hibernate-mapping PUBLIC "-//Hibernate/Hibernate Mapping DTD 3.0//EN"

"http://www.hibernate.org/dtd/hibernate-mapping-3.0.dtd">

<hibernate-mapping package="test.Hibernate.model">

    <class name="Father" table="father">

        <id name="id" type="int" column="id" >

            <generator class="native"></generator>

        </id>

        <property name="name" type="string" column="name"/>

        <set name="children" cascade="all">

              <key column="fatherId"></key>

            <one-to-many class="Children"/>

        </set>

    </class>

</hibernate-mapping>
<?xml version="1.0" encoding="utf-8"?>

<!DOCTYPE hibernate-mapping PUBLIC "-//Hibernate/Hibernate Mapping DTD 3.0//EN"

"http://www.hibernate.org/dtd/hibernate-mapping-3.0.dtd">

<hibernate-mapping package="test.Hibernate.model">

    <class name="Children" table="children">

        <id name="id" type="int" column="id" >

            <generator class="native"></generator>

        </id>

        <property name="name" type="string" column="name"/>

        <many-to-one name="father" class="Father" column="fatherId"></many-to-one>

    </class>

</hibernate-mapping>
3.多对多(以Student和Teacher为例)
PS:有一方的set集合要标明inverse=true(后面会讲)
<?xml version="1.0" encoding="utf-8"?>

<!DOCTYPE hibernate-mapping PUBLIC "-//Hibernate/Hibernate Mapping DTD 3.0//EN"

"http://www.hibernate.org/dtd/hibernate-mapping-3.0.dtd">

<!--

    Mapping file autogenerated by MyEclipse Persistence Tools

-->

<hibernate-mapping package="test.Hibernate.model">

    <class name="Student" table="student">

        <id name="id" type="int" column="id">

            <generator class="native"></generator>

        </id>

        <property name="name" type="string" column="name" length="20"/>

        <set name="teachers" table="student_teacher" inverse="false" >

               <key column="studentId"></key>

               <many-to-many class="Teacher" column="teacherId"></many-to-many>

           </set>

    </class>

</hibernate-mapping>
<?xml version="1.0" encoding="utf-8"?>

<!DOCTYPE hibernate-mapping PUBLIC "-//Hibernate/Hibernate Mapping DTD 3.0//EN"

"http://www.hibernate.org/dtd/hibernate-mapping-3.0.dtd">

<!--

    Mapping file autogenerated by MyEclipse Persistence Tools

-->

<hibernate-mapping package="test.Hibernate.model">

    <class name="Teacher" table="teacher">

        <id name="id" type="int" column="id">

            <generator class="native"></generator>

        </id>

        <property name="name" column="name" type="string" length="20"></property>

       <set name="students" table="student_teacher" inverse="true" cascade="all">

               <key column="teacherId"></key>

               <many-to-many class="Student" column="studentId"></many-to-many>

       </set>

    </class>

</hibernate-mapping>
四、inverse和cascade的区别(个人总结,有不对还望指正)
1.inverse=false在一对多删除时是把孩子的外键设置为null,然后删除父亲,孩子不删除,而casecade=all在一对多删除时是把孩子的外键设置为null,然后删除父亲,然后再删除孩子
2.many to many的时候由一方维护,所以一方要设置inverse=false,但是inverse=true的另一方直接删除会出错,这个时候可以用casecade完成级联删除
3.inverse=false只用于set等集合属性,在one to one关系中可以用casecade完成级联删除
五、使用C3P0连接池
1.需要额外导入3个jar包

2.在hibernate.cfg.xml中加入C3P0配置信息
        <!-- C3P0连接池设定-->

        <!-- 使用c3p0连接池  配置连接池提供的供应商-->

        <property name="connection.provider_class">org.hibernate.connection.C3P0ConnectionProvider</property>

        <!--在连接池中可用的数据库连接的最少数目 -->

        <property name="c3p0.min_size">5</property>

        <!--在连接池中所有数据库连接的最大数目  -->

        <property name="c3p0.max_size">20</property>

        <!--设定数据库连接的过期时间,以秒为单位,

        如果连接池中的某个数据库连接处于空闲状态的时间超过了timeout时间,就会从连接池中清除 -->

        <property name="c3p0.timeout">120</property>

         <!--每3000秒检查所有连接池中的空闲连接 以秒为单位-->

        <property name="c3p0.idle_test_period">3000</property>
六、HQL语句
@Test

    public void HQLSearch(){

        Session session = SessionFactory.getSession();

        Transaction tr = session.beginTransaction();

        //-----------------------------------------

        //common search with where

//        String hql= "select e.id,e.name from User e where e.id>=5 and e.id<=9";

//        Query query = session.createQuery(hql);

//        List list = query.list();

//        for(Object o : list){

//            System.out.println(Arrays.toString((Object[])o));

//        }

        //paging search

//        String hql= "select e.id,e.name from User e";

//        Query query = session.createQuery(hql);

//        query.setFirstResult(0);

//        query.setMaxResults(10);

//        List list = query.list();

//        for(Object o : list){

//            System.out.println(Arrays.toString((Object[])o));

//        }

        //search with parameters

//        String hql= "select e.id,e.name from User e where id>=? and id<=?";

//        Query query = session.createQuery(hql)

//                .setParameter(0, 1)

//                .setParameter(1, 3);

//        List list = query.list();

//        for(Object o : list){

//            System.out.println(Arrays.toString((Object[])o));

//        }

        //search with parameters whose type is collection

//        String hql= "select e.id,e.name from User e where id in (:ids)";

//        Query query = session.createQuery(hql)

//                .setParameterList("ids",new Object[]{1,2,3,8} );

//        List list = query.list();

//        for(Object o : list){

//            System.out.println(Arrays.toString((Object[])o));

//        }

        //-----------------------------------------

        tr.commit();

        SessionFactory.closeSession();

    }
七、DML语句
@Test

    public void DML(){

        Session session = SessionFactory.getSession();

        Transaction tr = session.beginTransaction();

        //-----------------------------------------

        User u = (User)session.get(User.class, 11);

        String sql = "update User set name=? where id>?";

        int result = session.createQuery(sql)

                .setParameter(0, "updated")

                .setParameter(1, 10)

                .executeUpdate();

        System.out.println("count of update:"+result);

        //the object's status in session was not updated when the object in database have been changed,so if you want

        //to get the updated object in session,you should use method "refresh".

        session.refresh(u);

        System.out.println(u);

        //-----------------------------------------

        tr.commit();

        SessionFactory.closeSession();

    }
八、开启二级缓存
1. 需要导入以下jar包
2.在hibernate.cfg.xml中加入以下配置
        <!-- 使用二级缓存,默认是未打开的。 -->

        <!-- 指定要使用的缓存的提供商,这也就打开了二级缓存-->

        <property name="hibernate.cache.use_second_level_cache">true</property>

        <property name="hibernate.cache.region.factory_class">org.hibernate.cache.ehcache.EhCacheRegionFactory</property>

        <!-- 开启使用查询缓存 -->

        <property name="cache.use_query_cache">true</property>

        <!-- 指定要使用二级缓存的实体类 -->

        <class-cache usage="read-write" class="test.Hibernate.model.Person" />
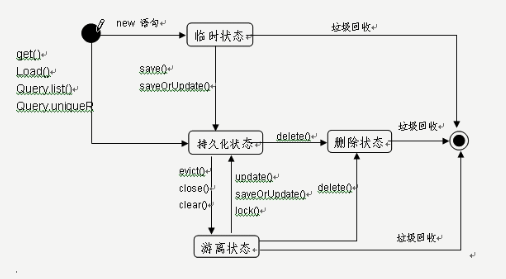
九、Hibernate对象状态及转化
Hibernate详细教程
Hibernate详细教程的更多相关文章
- Struts2+Spring4+Hibernate4整合超详细教程
Struts2.Spring4.Hibernate4整合 超详细教程 Struts2.Spring4.Hibernate4整合实例-下载 项目目的: 整合使用最新版本的三大框架(即Struts2.Sp ...
- spring入门详细教程(五)
前言 本篇紧接着spring入门详细教程(三),建议阅读本篇前,先阅读第一篇,第二篇以及第三篇.链接如下: Spring入门详细教程(一) https://www.cnblogs.com/jichi/ ...
- Spring Data JPA系列2:SpringBoot集成JPA详细教程,快速在项目中熟练使用JPA
大家好,又见面了. 这是Spring Data JPA系列的第2篇,在上一篇<Spring Data JPA系列1:JDBC.ORM.JPA.Spring Data JPA,傻傻分不清楚?给你个 ...
- SASS教程sass超详细教程
SASS安装及使用(sass教程.详细教程) 采用SASS开发CSS,可以提高开发效率. SASS建立在Ruby的基础之上,所以得先安装Ruby. Ruby的安装: 安装 rubyinstaller- ...
- Git使用详细教程(一)
很久不发博客,最近有兴趣想写点东西,但 Live Writer 不支持从Word复制图片,疯狂吐槽下 Git使用详细教程(一) Git使用详细教程(二) 该教程主要是Git与IntelliJ IDEA ...
- Win7 U盘安装Ubuntu16.04 双系统详细教程
Win7 U盘安装Ubuntu16.04 双系统详细教程 安装主要分为以下几步: 一. 下载Ubuntu 16.04镜像软件: 二. 制作U盘启动盘使用ultraISO: 三. 安装Ubuntu系统: ...
- Windows7 64位系统搭建Cocos2d-x-2.2.1最新版以及Android交叉编译环境(详细教程)
Windows7 64位系统搭建Cocos2d-x-2.2.1最新版以及Android交叉编译环境(详细教程) 声明:本教程在参考了以下博文,并经过自己的摸索后实际操作得出,本教程系本人原创,由于升级 ...
- Ubuntu 16.04安装QQ国际版图文详细教程
因工作需要,我安装了Ubuntu 16.04,但是工作上的很多事情需要QQ联系,然而在Ubuntu上的WebQQ很是不好用,于是在网上搜索了好多个Linux版本的QQ,然而不是功能不全 ...
- Ubuntu-安装-theano+caffe-超详细教程
一.说明 本文是继<Ubuntu-安装-cuda7.0-单显卡-超详细教程> 之后的续篇.theano和caffe是深度学习库,对运算能力需求很大,最好使用cuda进行加速.所以,请先阅读 ...
随机推荐
- Cacti安装详细步骤(转)
一.cacti概述 1. cacti是用php语言实现的一个软件,它的主要功能是用snmp服务获取数据,然后用rrdtool储存和更新数据,当用户需要查看数据的时候用rrdtool生成图表呈现给用户. ...
- TIdTCPClient 详解
转发地址:http://blog.csdn.net/cowcga/article/details/6198382 关于TIdTCPClient的几种方法 收藏 其实Indy比较简单,但是可以提供的方法 ...
- Java socket通信
首先抛开语言层面,简单介绍一下socket通信过程: 1.服务器端开启监听端口,阻塞进程 等待客户端连接 2.客户端连接,这时就产生了一个socket socket就相当于一个传递消息的通道,一般都 ...
- call_create_syn.sql
promptprompt ================================================================================prompt ...
- 2016大连网络赛 Different GCD Subarray Query
Different GCD Subarray Query Time Limit: 6000/3000 MS (Java/Others) Memory Limit: 65536/65536 K ( ...
- Eclipse和PyDev搭建完美Python开发环境 Windows篇
1,安装Python Python是一个跨平台语言,Python从3.0的版本的语法很多不兼容2版本,官网找到最新的版本并下载:http://www.python.org, 因为之前的一个项目是2版本 ...
- Quartz定时调度
测试类 import static org.quartz.JobBuilder.newJob; import static org.quartz.TriggerBuilder.newTrigger; ...
- 请教<context:component-scan/>和<mvc:annotation-driven/>的区别20
http://www.iteye.com/problems/66133 FileSystemXmlApplicationContext
- 在Ubuntu 14.04 64bit上安装StarUML 2.5版本
1,在“http://staruml.io/”下载: 2,sudo dpkg -i StarUML-v2.5.0-64-bit.deb安装. 3,注册 .在help中输入.name:maxiongyi ...
- winutils spark windows installation
http://stackoverflow.com/questions/37305001/winutils-spark-windows-installation