
android app 集成 信鸽推送
推送其实挺中意小米推送的,并经用户群占比还是比较大的,奈何拗不过php后端哥们的选型,就只好用信鸽推送了,期间接入过程中也是遇到不少问题,所以记录下来,以后如果还是用信鸽推送的话,估计看看以前的博客,也能少踩点坑。
因为最新版本是2.43,所以按照2.43的引入为准
1,导入jar包和so文件:

文件夹为信鸽推送必须的so文件:

2,针对so文件,gradle文件进行配置,生成第一张图里面的native_libs2的jar文件:

3,AndroidManifest.xml文件的配置,这个基本按照官网demo文件里面写的就行:
<!--(信鸽推送相关)-->

        <!-- 【必须】 (2.30及以上版新增)展示通知的activity -->

        <activity

            android:name="com.tencent.android.tpush.XGPushActivity"

            android:theme="@android:style/Theme.Translucent"

            android:exported="false">

            <intent-filter>

                <!-- 若使用AndroidStudio,请设置android:name="android.intent.action"-->

                <action android:name="android.intent.action"/>

            </intent-filter>

        </activity>

        <!-- 【必须】 信鸽receiver广播接收 -->

        <receiver

            android:name="com.tencent.android.tpush.XGPushReceiver"

            android:process=":xg_service_v2">

            <intent-filter android:priority="0x7fffffff">

                <!-- 【必须】 信鸽SDK的内部广播 -->

                <action android:name="com.tencent.android.tpush.action.SDK"/>

                <action android:name="com.tencent.android.tpush.action.INTERNAL_PUSH_MESSAGE"/>

                <!-- 【必须】 系统广播:网络切换 -->

                <action android:name="android.net.conn.CONNECTIVITY_CHANGE"/>

                <!-- 【可选】 系统广播:开屏 -->

                <action android:name="android.intent.action.USER_PRESENT"/>

                <!-- 【可选】 一些常用的系统广播,增强信鸽service的复活机会,请根据需要选择。当然,你也可以添加APP自定义的一些广播让启动service -->

                <action android:name="android.bluetooth.adapter.action.STATE_CHANGED"/>

                <action android:name="android.intent.action.ACTION_POWER_CONNECTED"/>

                <action android:name="android.intent.action.ACTION_POWER_DISCONNECTED"/>

            </intent-filter>

            <!-- 【可选】 usb相关的系统广播,增强信鸽service的复活机会,请根据需要添加 -->

            <intent-filter android:priority="0x7fffffff">

                <action android:name="android.intent.action.MEDIA_UNMOUNTED"/>

                <action android:name="android.intent.action.MEDIA_REMOVED"/>

                <action android:name="android.intent.action.MEDIA_CHECKING"/>

                <action android:name="android.intent.action.MEDIA_EJECT"/>

                <data android:scheme="file"/>

            </intent-filter>

        </receiver>

        <!-- 【必须】 信鸽service -->

        <service

            android:name="com.tencent.android.tpush.service.XGPushService"

            android:exported="true"

            android:persistent="true"

            android:process=":xg_service_v2"/>

        <!-- 【必须】 通知service,其中android:name部分要改为当前包名 -->

        <service

            android:name="com.tencent.android.tpush.rpc.XGRemoteService"

            android:exported="true">

            <intent-filter>

                <!-- 【必须】 请修改为当前APP名包.PUSH_ACTION,如demo的包名为:com.qq.xgdemo -->

                <action android:name="你的包名.PUSH_ACTION"/>

            </intent-filter>

        </service>

        <!-- 【可选】APP实现的Receiver,用于接收消息透传和操作结果的回调,请根据需要添加 -->

        <!-- YOUR_PACKAGE_PATH.CustomPushReceiver需要改为自己的Receiver: -->

        <receiver

            android:name=".push.MessageReceiver"

            android:exported="false">

            <intent-filter>

                <!-- 接收消息透传 -->

                <action android:name="com.tencent.android.tpush.action.PUSH_MESSAGE"/>

                <!-- 监听注册、反注册、设置/删除标签、通知被点击等处理结果 -->

                <action android:name="com.tencent.android.tpush.action.FEEDBACK"/>

            </intent-filter>

        </receiver>

        <!-- 【必须】 请修改为APP的AccessId,“21”开头的10位数字,中间没空格 -->

        <meta-data

            android:name="XG_V2_ACCESS_ID"

            android:value="你的AccessId"/>

        <!-- 【必须】 请修改为APP的AccessKey,“A”开头的12位字符串,中间没空格 -->

        <meta-data

            android:name="XG_V2_ACCESS_KEY"

            android:value="你的AccessKey"/>
还有就是相关权限:
<!-- 【必须】 信鸽SDK所需权限 -->

<uses-permission android:name="android.permission.INTERNET" />

<uses-permission android:name="android.permission.READ_PHONE_STATE" />

<uses-permission android:name="android.permission.ACCESS_WIFI_STATE" />

<uses-permission android:name="android.permission.ACCESS_NETWORK_STATE" />

<uses-permission android:name="android.permission.RECEIVE_BOOT_COMPLETED" />

<uses-permission android:name="android.permission.RESTART_PACKAGES" />

<uses-permission android:name="android.permission.BROADCAST_STICKY" />

<uses-permission android:name="android.permission.WRITE_SETTINGS" />

<uses-permission android:name="android.permission.RECEIVE_USER_PRESENT" />

<uses-permission android:name="android.permission.WRITE_EXTERNAL_STORAGE" />

<uses-permission android:name="android.permission.WAKE_LOCK" />

<uses-permission android:name="android.permission.KILL_BACKGROUND_PROCESSES" />

<uses-permission android:name="android.permission.GET_TASKS" />

<uses-permission android:name="android.permission.READ_LOGS" />

<uses-permission android:name="android.permission.VIBRATE" />

<!-- 【可选】 信鸽SDK所需权限 -->

<uses-permission android:name="android.permission.BLUETOOTH" />

<uses-permission android:name="android.permission.BATTERY_STATS" />
虽然很多,但是没办法,毕竟是中国特色,推送只能这样,才能勉强能够保证推送到达率。
4,相关代码的集成:
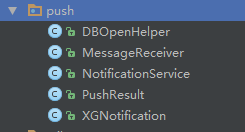
如上其实都是可以从demo文件里面拷贝出来的,其中messageReceiver是最重要的类,因为主要的推送信息是从这个类里面获取的。
public class MessageReceiver extends XGPushBaseReceiver {

    private             Intent intent = new Intent(

            "com.qq.xgdemo.activity.UPDATE_LISTVIEW");

    public static final String LogTag = "TPushReceiver";

    //private void show(Context context, String text) {

    //    Toast.makeText(context, text, Toast.LENGTH_SHORT).show();

    //}

    // 通知展示,主要控制推送来的信息在状态栏的展示,当然如果想自定义可以修改这个方法

    @Override

    public void onNotifactionShowedResult(Context context, XGPushShowedResult notifiShowedRlt) {

        if (context == null || notifiShowedRlt == null) {

            return;

        }

        XGNotification notific = new XGNotification();

        notific.setMsg_id(notifiShowedRlt.getMsgId());

        notific.setTitle(notifiShowedRlt.getTitle());

        notific.setContent(notifiShowedRlt.getContent());

        // notificationActionType==1为Activity,2为url,3为intent

        notific.setNotificationActionType(

                notifiShowedRlt.getNotificationActionType());

        // Activity,url,intent都可以通过getActivity()获得

        notific.setActivity(notifiShowedRlt.getActivity());

        notific.setUpdate_time(

                new SimpleDateFormat("yyyy-MM-dd HH:mm:ss").format(

                        Calendar.getInstance().getTime()));

        NotificationService.getInstance(context).save(notific);

        context.sendBroadcast(intent);

        String customContent = notifiShowedRlt.getCustomContent();

        KLog.json(customContent);

    }

  //反注册,注意在你用的activity里面的ondestory里面反注册

    @Override public void onUnregisterResult(Context context, int errorCode) {

        KLog.i("onUnregisterResult");

        if (context == null) {

            return;

        }

        String text = "";

        if (errorCode == XGPushBaseReceiver.SUCCESS) {

            text = "反注册成功";

        }

        else {

            text = "反注册失败" + errorCode;

        }

        KLog.i(LogTag, text);

        //show(context, text);

    }

    @Override

    public void onSetTagResult(Context context, int errorCode, String tagName) {

        KLog.i("onSetTagResult");

        if (context == null) {

            return;

        }

        String text = "";

        if (errorCode == XGPushBaseReceiver.SUCCESS) {

            text = "\"" + tagName + "\"设置成功";

        }

        else {

            text = "\"" + tagName + "\"设置失败,错误码:" + errorCode;

        }

        Log.d(LogTag, text);

        //show(context, text);

    }

    @Override

    public void onDeleteTagResult(Context context, int errorCode, String tagName) {

        KLog.i("onDeleteTagResult");

        if (context == null) {

            return;

        }

        String text = "";

        if (errorCode == XGPushBaseReceiver.SUCCESS) {

            text = "\"" + tagName + "\"删除成功";

        }

        else {

            text = "\"" + tagName + "\"删除失败,错误码:" + errorCode;

        }

        Log.d(LogTag, text);

        //show(context, text);

    }

    // 通知点击回调 actionType=1为该消息被清除,actionType=0为该消息被点击

    @Override

    public void onNotifactionClickedResult(Context context, XGPushClickedResult message) {

        KLog.i("onNotifactionClickedResult");

        if (context == null || message == null) {

            return;

        }

        String text = "";

        if (message.getActionType() ==

                XGPushClickedResult.NOTIFACTION_CLICKED_TYPE) {

            // 通知在通知栏被点击啦。。。。。

            // APP自己处理点击的相关动作

            // 这个动作可以在activity的onResume也能监听,请看第3点相关内容

            text = "通知被打开 :" + message;

            KLog.i(text);

            KLog.i(message.getActivityName());

            // 获取自定义key-value,我们的app主要的根据这块的内容进行控制的,所以主要处理这块的代码

            String customContent = message.getCustomContent();

            if (!StringUtil.isEmpty(customContent)) {

                KLog.i("customContent", customContent);

                PushResult pushResult = Json.get()

                                            .toObject(customContent,

                                                    PushResult.class);

                switch (pushResult.getIndex()) {

                    //......你的业务处理代码default:

                        break;

                }

            }

        }

        else if (message.getActionType() ==

                XGPushClickedResult.NOTIFACTION_DELETED_TYPE) {

            // 通知被清除啦。。。。

            // APP自己处理通知被清除后的相关动作

            text = "通知被清除 :" + message;

            KLog.i(text);

        }

    }

    @Override

    public void onRegisterResult(Context context, int errorCode, XGPushRegisterResult message) {

        KLog.i("onRegisterResult");

        // TODO Auto-generated method stub

        if (context == null || message == null) {

            return;

        }

        String text = "";

        if (errorCode == XGPushBaseReceiver.SUCCESS) {

            text = message + "注册成功";

            // 在这里拿token

            String token = message.getToken();

        }

        else {

            text = message + "注册失败,错误码:" + errorCode;

        }

        Log.d(LogTag, text);

        //show(context, text);

    }

    // 消息透传

    @Override

    public void onTextMessage(Context context, XGPushTextMessage message) {

        KLog.json(Json.get().toJson(message));

        // TODO Auto-generated method stub

        String text = "收到消息:" + message.toString();

        // 获取自定义key-value

        String customContent = message.getCustomContent();

        if (customContent != null && customContent.length() != 0) {

            try {

                JSONObject obj = new JSONObject(customContent);

                // key1为前台配置的key

                if (!obj.isNull("key")) {

                    String value = obj.getString("key");

                    Log.d(LogTag, "get custom value:" + value);

                }

                // ...

            } catch (JSONException e) {

                e.printStackTrace();

            }

        }

        // APP自主处理消息的过程...

        Log.d(LogTag, text);

        //show(context, text);

    }

}
android app 集成 信鸽推送的更多相关文章
- QtAndroid具体解释(6):集成信鸽推送
推送是我们开发移动应用经经常使用到的功能,Qt on Android 应用也会用到,之前也有朋友问过,这次我们来看看怎么在 Qt on Android 应用中来集成来自腾讯的信鸽推送. 有关信鸽的 S ...
- 1、Android Studio集成极光推送(Jpush) 报错 java.lang.UnsatisfiedLinkError: cn.jpush.android.service.PushProtoco
Android studio 集成极光推送(Jpush) (华为手机)报错, E/JPush: [JPushGlobal] Get sdk version fail![获取sdk版本失败!] W/Sy ...
- App集成极光推送步骤
一.准备: 1.1注册极光开发者账号 1.2添加应用,获取AppKey 1.3下载提供的demo,demo中的AppKey已自动生成为你自己的AppKey 二.集成: 2.1第一种方式:自动集成 Mo ...
- App集成极光推送开发流程[关键步骤]
1.客户端集成SDK 1.1初始化 JPushInterface.setDebugMode(true); // 设置开启日志,发布时请关闭日志 JPushInterface.init(this); / ...
- Android开发 集成极光推送中的问题
AndroidManifest.xml清单文件报错: cn.jpush.android.service.DataProvider@exported value=(true)报错,解决如下: 根据报错行 ...
- Xamarin.Forms学习系列之Android集成极光推送
一般App都会有消息推送的功能,如果是原生安卓或者IOS集成消息推送很容易,各大推送平台都有相关的Sample,但是关于Xamarin.Forms的消息推送集成的资料非常少,下面就说下Xamarin. ...
- Android 信鸽推送通知栏不显示推送的通知
使用信鸽推送,却怎么也没反应.经过查看log发现确实是收到了推送过来的消息了,其中有这么一行: W/dalvikvm(23255): VFY: unable to resolve virtual me ...
- react-native 信鸽推送集成
目录 一. git链接: react-native-xinge-push 1.1 安装 1.2. link 二. android配置 2.1. android/settings.gradle 2.2. ...
- Android集成极光推送
要说学习极光推送,个人感觉官方文档就非常好啦,但是没法,人太懒啦,为了下次能够快速的将极光推送集成到项目中,故结合之前开发的项目和官方文档记录下简单的Android集成极光推送,在这之前,先上一张简单 ...
随机推荐
- C#中的文件操作2
1. 读取文件的方法: 1. 声明一个文件流: 目的是为了内存与文件之间的桥梁,可以进行数据的往来. FileStream fs = new FileStream(filename,FileMode ...
- OGG学习笔记02-单向复制配置实例
OGG学习笔记02-单向复制配置实例 实验环境: 源端:192.168.1.30,Oracle 10.2.0.5 单实例 目标端:192.168.1.31,Oracle 10.2.0.5 单实例 1. ...
- About大数据插码
大数据插码主要用于在用户浏览网页和填写信息后抓取对应数据,这样就可以清晰的知道每个页面有多少用户浏览过,跳出率是多少以及用户的相应信息等. 大数据插码其实很简单,主要有以下注意事项: 1.引入相应的j ...
- bzoj1180,2843
1180: [CROATIAN2009]OTOCI Time Limit: 50 Sec Memory Limit: 162 MBSubmit: 967 Solved: 597[Submit][S ...
- 中兴电信光纤猫F450获取管理员密码方法
初衷:为了完成端口映射,一开始以为电信光猫不支持自定义路由,因为通过useradmin登录进去后没有找到对应的选项.一番了解之后,原来光猫有超级密码,电信装机时是不会告诉你的,电信客服一般也不会告诉你 ...
- 【css2、css3】css改变select选择框的样式
效果: 代码: <!DOCTYPE html> <html lang="en"> <head> <meta charset="U ...
- LeetCode 476. Number Complement
Given a positive integer, output its complement number. The complement strategy is to flip the bits ...
- moodle其他搜集
1.将面包屑的符号换成">>",找到皮肤包里的config.php文件,在最后加入 $THEME->rarrow=">>"; ...
- WebForm 分页与组合查询
1.封装实体类 2.写查询方法 //SubjectData类 public List<Subject> Select(string name) { List<Subject> ...
- 简单的python协同过滤程序
博主是自然语言处理方向的,不是推荐系统领域的,这个程序完全是为了应付大数据分析与计算的课程作业所写的一个小程序,先上程序,一共55行.不在意细节的话,55行的程序已经表现出了协同过滤的特性了.就是对每 ...