
react-native 信鸽推送集成
一. git链接: react-native-xinge-push
1.1 安装
npm install --save react-native-xinge-push
1.2. link
react-native link react-native-xinge-push
二. android配置
2.1. android/settings.gradle
include ':react-native-xinge-push'

project(':react-native-xinge-push').projectDir = new File(rootProject.projectDir, '../node_modules/react-native-xinge-push/android')
2.2. android/app/build.gradle
defaultConfig: {

  ...

  manifestPlaceholders = [

    XG_ACCESS_ID: "xxx", // 此处需要替换

    XG_ACCESS_KEY: "xxx", // 此处需要替换

    HW_APPID: "",

    PACKAGE_NAME: "xxx" // 此处需要替换

  ]

}

...

dependencies {

  ...

  compile project(':react-native-xinge-push')

  ...

}
2.3. android/app/src/main/java/com/nativeboilerplate/MainApplication.java
import com.jeepeng.react.xgpush.PushPackage;

...

@Override

    protected List<ReactPackage> getPackages() {

      return Arrays.<ReactPackage>asList(

        ...

        new PushPackage(),

        ...

      );

    }

...
2.4. android/app/src/main/AndroidManifest.xml
<application

  ...>

  ...

  <receiver android:name="com.jeepeng.react.xgpush.receiver.MessageReceiver"

    android:exported="true" >

    <intent-filter>

        <!-- 接收消息透传 -->

        <action android:name="com.tencent.android.tpush.action.PUSH_MESSAGE" />

        <!-- 监听注册、反注册、设置/删除标签、通知被点击等处理结果 -->

        <action android:name="com.tencent.android.tpush.action.FEEDBACK" />

    </intent-filter>

  </receiver>

  ...

</application>
三. ios配置
3.1 ios/项目名.xcodeproj/project.pbxproj
参考: example/ios/example.xcodeproj/project.pbxproj
3.2 ios/项目名/AppDelegate.m
#import <XGPush/XGPushManager.h>

#import <XGPush.h>

- (BOOL)application:(UIApplication *)application didFinishLaunchingWithOptions:(NSDictionary *)launchOptions

{

  ...

  [[XGPush defaultManager] reportXGNotificationInfo:launchOptions];

  return YES;

}

}

- (BOOL)application:(UIApplication *)application openURL:(NSURL *)url

  sourceApplication:(NSString *)sourceApplication annotation:(id)annotation

{

  return [RCTLinkingManager application:application openURL:url

                      sourceApplication:sourceApplication annotation:annotation];

}

// Required to register for notifications

- (void)application:(UIApplication *)application didRegisterUserNotificationSettings:(UIUserNotificationSettings *)notificationSettings

{

  [XGPushManager didRegisterUserNotificationSettings:notificationSettings];

}

- (void)application:(UIApplication *)application didRegisterForRemoteNotificationsWithDeviceToken:(NSData *)deviceToken {

    [XGPushManager didRegisterForRemoteNotificationsWithDeviceToken:deviceToken];

}

// Required for the registrationError event.

- (void)application:(UIApplication *)application didFailToRegisterForRemoteNotificationsWithError:(NSError *)error {

	NSLog(@"[XGPush] register APNS fail.\n[XGPush] reason : %@", error);

  [XGPushManager didFailToRegisterForRemoteNotificationsWithError:error];

}

// Required for the localNotification event.

- (void)application:(UIApplication *)application didReceiveLocalNotification:(UILocalNotification *)notification

{

  [XGPushManager didReceiveLocalNotification:notification];

}

/**

 收到通知消息的回调,通常此消息意味着有新数据可以读取(iOS 7.0+)

 @param application  UIApplication 实例

 @param userInfo 推送时指定的参数

 @param completionHandler 完成回调

 */

- (void)application:(UIApplication *)application didReceiveRemoteNotification:(NSDictionary *)userInfo fetchCompletionHandler:(void (^)(UIBackgroundFetchResult))completionHandler {

  NSLog(@"[XGPush] receive slient Notification");

  NSLog(@"[XGPush] userinfo %@", userInfo);

  UIApplicationState state = [application applicationState];

  BOOL isClicked = (state != UIApplicationStateActive);

  NSMutableDictionary *remoteNotification = [NSMutableDictionary dictionaryWithDictionary:userInfo];

  if(isClicked) {

    remoteNotification[@"clicked"] = @YES;

    remoteNotification[@"background"] = @YES;

  }

  [[XGPush defaultManager] reportXGNotificationInfo:remoteNotification];

  [XGPushManager didReceiveRemoteNotification:userInfo fetchCompletionHandler:completionHandler];

}

// iOS 10 新增 API

// iOS 10 会走新 API, iOS 10 以前会走到老 API

#if __IPHONE_OS_VERSION_MAX_ALLOWED >= __IPHONE_10_0

// App 用户点击通知

// App 用户选择通知中的行为

// App 用户在通知中心清除消息

// 无论本地推送还是远程推送都会走这个回调

- (void)xgPushUserNotificationCenter:(UNUserNotificationCenter *)center didReceiveNotificationResponse:(UNNotificationResponse *)response withCompletionHandler:(void (^)(void))completionHandler {

	NSLog(@"[XGPush] click notification");

	if ([response.actionIdentifier isEqualToString:@"xgaction001"]) {

		NSLog(@"click from Action1");

	} else if ([response.actionIdentifier isEqualToString:@"xgaction002"]) {

		NSLog(@"click from Action2");

	}

	[[XGPush defaultManager] reportXGNotificationResponse:response];

	completionHandler();

}

// App 在前台弹通知需要调用这个接口

- (void)xgPushUserNotificationCenter:(UNUserNotificationCenter *)center willPresentNotification:(UNNotification *)notification withCompletionHandler:(void (^)(UNNotificationPresentationOptions))completionHandler {

	[[XGPush defaultManager] reportXGNotificationInfo:notification.request.content.userInfo];

	completionHandler(UNNotificationPresentationOptionBadge | UNNotificationPresentationOptionSound | UNNotificationPresentationOptionAlert);

}

#endif

@end
3.3 修改ios capabilities

3.3.1 remote nitifications
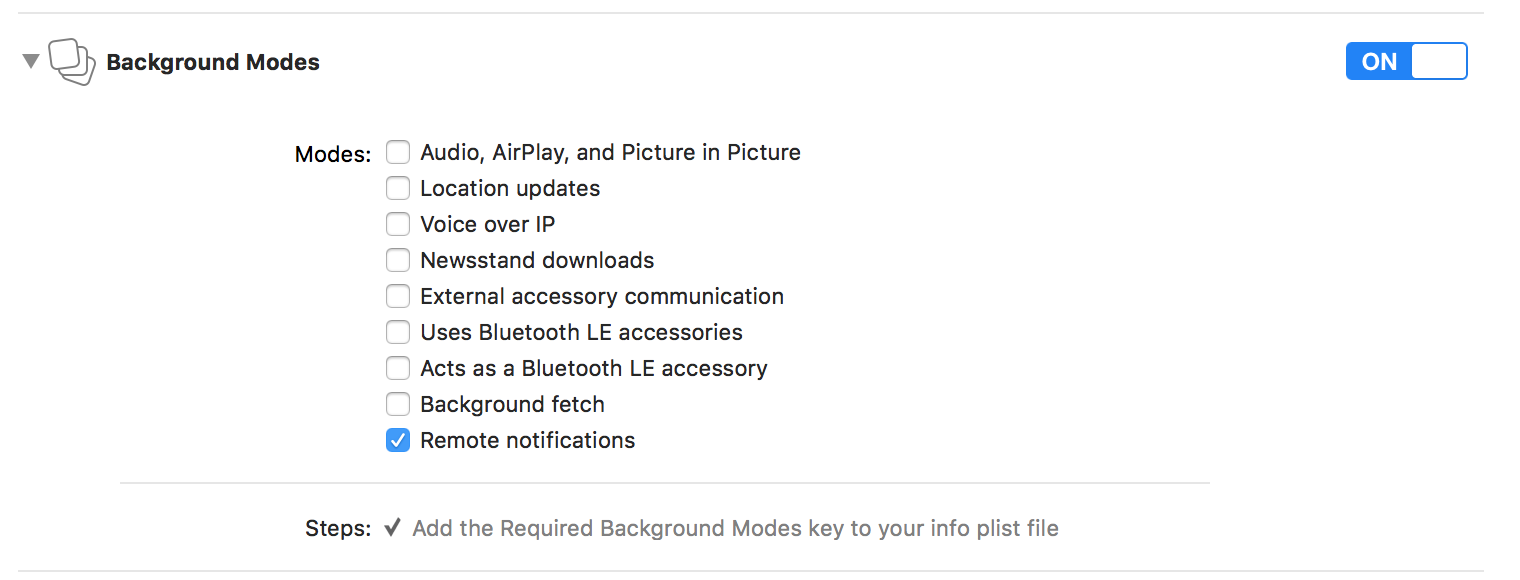
3.3.2 push notifications

3.4 ios证书(开发/生产)
openssl pkcs12 -in 项目名-Development-Certificates.p12 -out 项目名-Development-Certificates.pem -nodes

openssl pkcs12 -in 项目名-Prod-Certificates.p12 -out 项目名-Prod-Certificates.pem -nodes
注:证书运用场景
1. 开发证书

    xcode run debug

    xcode run release

2. 生产证书

    TestFlight

    Appstore
四. index.js中配置
import React from 'react';

import XGPush from 'react-native-xinge-push';

import { Platform } from 'react-native';

import { Actions } from 'react-native-router-flux';

class AppRouter extends React.Component {

  constructor(props) {

    super(props);

    this.initPush();

  }

  componentDidMount() {

    this.onXGAddEvent();

  }

  componentWillUnmount() {

    this.onXGRemoveEvent();

  }

  // 信鸽通知跳转

  async onLinkToSceneKeyPath(notification) {

    const accessToken = await auth.getToken();

    if (!accessToken) return;//非登陆用户

    const customContent = isIOS ? notification.custom

      : JSON.parse(notification.custom_content);

    if (!customContent) return;//没有跳转参数

    // 根据信鸽push中的定制参数,进行链接跳转

    const { sceneKeyPath, notificationId } = customContent;

    if (!sceneKeyPath) return;

    const funcName = Actions.currentScene === sceneKeyPath ? 'replace' : 'push';

    Actions[funcName](sceneKeyPath, { notificationId });

  }

  // 信鸽增加事件

  onXGAddEvent() {

    XGPush.addEventListener('register', this.onRegister);

    XGPush.addEventListener('notification', this.onNotification);

  }

  // 信鸽移除事件

  onXGRemoveEvent() {

    XGPush.removeEventListener('register', this.onRegister);

    XGPush.removeEventListener('notification', this.onNotification);

  }

  // 初始化推送

  initPush = () => {

    if (Platform.OS === 'android') {

      XGPush.init(ACCESS_ID, ACCESS_KEY); //此处需要替换

    } else {

      XGPush.init(ACCESS_ID, ACCESS_KEY); //此处需要替换

    }

    this.initXGRegister();

  }

  // 注册

  initXGRegister = () => {

    XGPush.register('packageName')

      .then((result) => result)

      .catch((err) => {

        console.warn('xinge registration fail', err);

      });

  }

  // 注册成功

  onRegister = (deviceToken) => {

    console.log(`onRegister: ${deviceToken}`);

  }

  // 通知到达

  onNotification = (notification) => {

    if (notification.clicked === true) {

      this.onLinkToSceneKeyPath(notification);

      console.log(`app处于后台时收到通知${JSON.stringify(notification)}`);

    } else {

      console.log(`app处于前台时收到通知${JSON.stringify(notification)}`);

    }

  }

  render() {

      ...

  }

}
注
1、信鸽推送需要在app 打开,才能收到通知
react-native 信鸽推送集成的更多相关文章
- React Native(三)——推送jpush-react-native
瞬间,有种满血复活的赶脚…… 原因呢,就是熟悉了rn项目的套路:当老大问道,“推送功能看了还是没看呢?”的时候,虽然一直没有调试通,但还是不怯场的回答,“看了,按照网上说的也配了,但是还是用不了,不知 ...
- android app 集成 信鸽推送
推送其实挺中意小米推送的,并经用户群占比还是比较大的,奈何拗不过php后端哥们的选型,就只好用信鸽推送了,期间接入过程中也是遇到不少问题,所以记录下来,以后如果还是用信鸽推送的话,估计看看以前的博客, ...
- QtAndroid具体解释(6):集成信鸽推送
推送是我们开发移动应用经经常使用到的功能,Qt on Android 应用也会用到,之前也有朋友问过,这次我们来看看怎么在 Qt on Android 应用中来集成来自腾讯的信鸽推送. 有关信鸽的 S ...
- QQ信鸽推送
闲来无事,看看腾讯的信鸽推送! 优点: 1.毕竟大腿出的东西,不会太差 2.集成快 3.推送效率高,功能强,APP后台被杀的情况下同样能接受到推送. 废话少说,直接上代码: 源代码.zip
- 信鸽推送 10004,os文件配置出错,解决办法
信鸽推送注册失败 返回码 10004 是 os 配置出现问题 经过询问客服,得到以下解决办法 将SDK中的so文件复制下来 新建文件夹jniLibs,并将 so 配置文件粘贴进去 便可完成注册
- 信鸽推送 .NET (C#) 服务端 SDK rest api 调用库(v1.2)
信鸽推送 .NET 服务端 SDK rest api 调用库-介绍 该版本是基于信鸽推送v2版本的时候封装的,先拿出来与大家分享,封装还还凑合,不依赖其他http调用件,唯一依赖json序列化dll ...
- 信鸽推送.NET SDK 开源
github 地址 https://github.com/yeanzhi/XinGePushSDK.NET 传送门如何安装 建议使用nuget安装包,搜索"信鸽"即可 ...
- Android 信鸽推送通知栏不显示推送的通知
使用信鸽推送,却怎么也没反应.经过查看log发现确实是收到了推送过来的消息了,其中有这么一行: W/dalvikvm(23255): VFY: unable to resolve virtual me ...
- iOS 关于信鸽推送点击推送通知的处理
最近的项目中使用了推送模块,使用的是企鹅帝国的信鸽推送服务,关于具体怎么推送的,证书如何设置,我不再赘述,一来开发文档中已经讲的非常清楚,二来在网上一搜的话也能搜到一大堆:在这里主要写下关于推送的通知 ...
随机推荐
- 使用AForge录制视频
使用AForge录制视频,基于Winform开发 (一)首先导入AForge包 需要先导入 using AForge.Video;using AForge.Video.FFMPEG; 两个工具包 (二 ...
- vue之注册自定义的全局js方法
前端开发的时候,总会需要写一些js方法,在vue框架中为了方便使用,可以考虑注册一个全局的js方法,下面是注册步骤: 1.0 可以在assets文件中的js文件下面新建一个js文件,如:yun.js- ...
- Web微信开发工具无法输入中文?官方bug
Ctrl+shift+w 重启工具就OK啦
- docker——harbor
为什么要用harbor? 在实际生产运维中,往往需要把镜像发布到几十.上百台或更多的节点上.这时单台Docker主机上镜像已无法满足,项目越来越多,镜像就越来越多,都放到一台Docker主机上是不行的 ...
- python机器学习——逻辑回归
我们知道感知器算法对于不能完全线性分割的数据是无能为力的,在这一篇将会介绍另一种非常有效的二分类模型--逻辑回归.在分类任务中,它被广泛使用 逻辑回归是一个分类模型,在实现之前我们先介绍几个概念: 几 ...
- My First Cloud Application's Design
Structure Diagram as following: Questions list: 1. Skydrive Integration > Based on the MSDN commu ...
- 物联网安全himqtt防火墙数据结构之红黑树源码分析
物联网安全himqtt防火墙数据结构之红黑树源码分析 随着5G的发展,物联网安全显得特别重要,himqtt是首款完整源码的高性能MQTT物联网防火墙 - MQTT Application FireWa ...
- 【python测试开发栈】带你彻底搞明白python3编码原理
在之前的文章中,我们介绍过编码格式的发展史:[文章传送门-todo].今天我们通过几个例子,来彻底搞清楚python3中的编码格式原理,这样你之后写python脚本时碰到编码问题,才能有章可循. 我们 ...
- python中的__call__方法
在Python中,函数其实是一个对象: >>> f = abs >>> f.__name__ 'abs' >>> f(-) 由于 f 可以被调用, ...
- WebSocket网络通信协议
WebSocket 协议在2008年诞生,2011年成为国际标准.所有浏览器都已经支持了. HTTP 协议有一个缺陷:通信只能由客户端发起.这种单向请求的特点,注定了如果服务器有连续的状态变化,客户端 ...