jumpserver篇--安装(高可用性 mariadb+haproxy)
1. 需求
为了解决目前登陆方式多种多样,防火墙配置复杂,历史操作无记录,用户权限混乱等等
2. Jumpserver测试环境搭建
2.1. 环境
os:CentOS release 6.8 mini版本
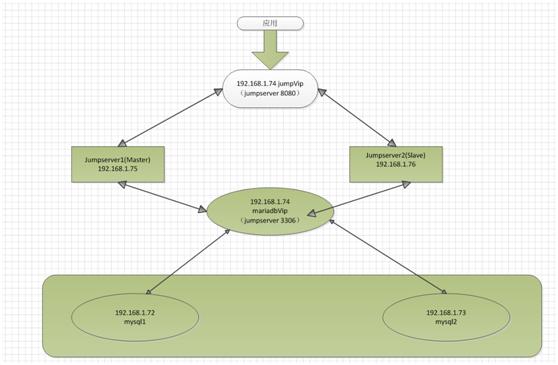
JMS_Master 192.168.1.75 Centos-6.8-x86_64 mini
JMS_Slave 192.168.1.76 Centos-6.8-x86_64 mini
MySQL_Master 192.168.1.72 Centos-6.8-x86_64 mini
MySQL_Master 192.168.1.73 Centos-6.8-x86_64 mini
keepalive_VIP 192.168.1.74
haproxy vip: 192.168.1。74
2.2. 架构图
3. 相关软件安装
3.1. JDK 1.7安装
yum -y install java-1.7.0-openjdk java-1.7.0-openjdk-devel
vim /etc/profile
最后增加两行
#JAVA_HOME根据不同的机器选择不同的路径即可
export JAVA_HOME=/usr/lib/jvm/java-1.7.0-openjdk.x86_64
export PATH=$PATH:$JAVA_HOME/bin
立即生效:source /etc/profile
javac命令确保可用
JAVA_HOME一定要配置好!!!用 echo $JAVA_HOME 命令验证!
3.2. mariadb Galera Cluster 安装
新增虚拟机具体配置配置MariaDByum
vim /etc/yum.repos.d/mariadb.repo
[mariadb]
name = MariaDB
baseurl = http://yum.mariadb.org/10.0/centos6-amd64
gpgkey=https://yum.mariadb.org/RPM-GPG-KEY-MariaDB
gpgcheck=1
yum install -y epel-release
yum update -y
yum -y install http://dl.fedoraproject.org/pub/epel/6/x86_64/socat-1.7.2.3-1.el6.x86_64.rpm
yum -y install MariaDB-Galera-server MariaDB-client rsync galerasystemctl enable mariadb
---修改mariadb存储目录(不修改可忽略)
http://lddyw.blog.51cto.com/4151746/1684364
mkdir /home/data
cp -r /var/lib/mysql/ /home/data/
chown -R mysql:mysql /home/data/
vim /etc/my.cnf.d/server.cnf
[mariadb-10.0]
binlog_format=ROW
default-storage-engine=innodb
innodb_autoinc_lock_mode=2
innodb_locks_unsafe_for_binlog=1
query_cache_size=0
query_cache_type=0
bind-address=0.0.0.0
max_allowed_packet = 16M
datadir=/home/data/mysql
service mysql start
/usr/bin/mysql_secure_installation --root 允许远程登陆 密码:jumpserverDb
[root@maria-server1 mysql]# mysql -u root -pjumpserverDb
Welcome to the MariaDB monitor. Commands end with ; or \g.
Your MariaDB connection id is 5
Server version: 5.5.40-MariaDB-wsrep MariaDB Server, wsrep_25.11.r4026
Copyright (c) 2000, 2015, Oracle, MariaDB Corporation Ab and others.
Type 'help;' or '\h' for help. Type '\c' to clear the current input statement.
MariaDB [(none)]> grant all privileges on *.* to 'root'@'%' identified by 'jumpserverDb' with grant option;
flush privileges;
MariaDB [(none)]> select host, user from mysql.user;
+---------------+------+
| host | user |
+---------------+------+
| % | root |
| 127.0.0.1 | root |
| ::1 | root |
| localhost | |
| localhost | root |
| maria-server1 | |
| maria-server1 | root |
+---------------+------+
7 rows in set (0.00 sec)
3.3. 配置 MariaDB Galera Cluster
http://blog.sina.com.cn/s/blog_6de3aa8a0102w00d.html
---192.168.1.72
vim /etc/my.cnf.d/server.cnf
#
# * Galera-related settings
#
[galera]
# Mandatory settings
#wsrep_provider=
#wsrep_cluster_address=
#
# These groups are read by MariaDB server.
# Use it for options that only the server (but not clients) should see
#
# See the examples of server my.cnf files in /usr/share/mysql/
#
# this is read by the standalone daemon and embedded servers
[server]
# this is only for the mysqld standalone daemon
[mysqld]
#
# * Galera-related settings
#
[galera]
# Mandatory settings
#wsrep_provider=
#wsrep_cluster_address=
#binlog_format=row
#default_storage_engine=InnoDB
#innodb_autoinc_lock_mode=2
#bind-address=0.0.0.0
#
# Optional setting
#wsrep_slave_threads=1
#innodb_flush_log_at_trx_commit=0
# this is only for embedded server
[embedded]
# This group is only read by MariaDB servers, not by MySQL.
# If you use the same .cnf file for MySQL and MariaDB,
# you can put MariaDB-only options here
[mariadb]
# This group is only read by MariaDB-10.0 servers.
# If you use the same .cnf file for MariaDB of different versions,
# use this group for options that older servers don't understand
[mariadb-10.0]
binlog_format=ROW
default-storage-engine=innodb
innodb_autoinc_lock_mode=2
innodb_locks_unsafe_for_binlog=1
query_cache_size=0
query_cache_type=0
bind-address=0.0.0.0
datadir=/var/lib/mysql
innodb_log_file_size=100M
innodb_file_per_table
innodb_flush_log_at_trx_commit=2
wsrep_provider=/usr/lib64/galera/libgalera_smm.so
wsrep_cluster_address="gcomm:// 192.168.1.72, 192.168.1.73"
#wsrep_cluster_address="gcomm://"
wsrep_cluster_name='dbcluster'
wsrep_node_address='192.168.1.72'
wsrep_node_name='dbserver1'
wsrep_sst_method=rsync
#wsrep_sst_auth=sst_user:dbpass
#
[mysqld_safe]
log-error=/var/log/mysqld.log
---192.168.1.73
vim /etc/my.cnf.d/server.cnf
[server]
# this is only for the mysqld standalone daemon
[mysqld]
#
# * Galera-related settings
#
[galera]
# Mandatory settings
#wsrep_provider=
#wsrep_cluster_address=
#binlog_format=row
#default_storage_engine=InnoDB
#innodb_autoinc_lock_mode=2
#bind-address=0.0.0.0
#
# Optional setting
#wsrep_slave_threads=1
#innodb_flush_log_at_trx_commit=0
# this is only for embedded server
[embedded]
# This group is only read by MariaDB servers, not by MySQL.
# If you use the same .cnf file for MySQL and MariaDB,
# you can put MariaDB-only options here
[mariadb]
# This group is only read by MariaDB-10.0 servers.
# If you use the same .cnf file for MariaDB of different versions,
# use this group for options that older servers don't understand
[mariadb-10.0]
binlog_format=ROW
default-storage-engine=innodb
innodb_autoinc_lock_mode=2
innodb_locks_unsafe_for_binlog=1
query_cache_size=0
query_cache_type=0
bind-address=0.0.0.0
datadir=/var/lib/mysql
innodb_log_file_size=100M
innodb_file_per_table
innodb_flush_log_at_trx_commit=2
wsrep_provider=/usr/lib64/galera/libgalera_smm.so
wsrep_cluster_address="gcomm:// 192.168.1.72, 192.168.1.73"
wsrep_cluster_name='dbcluster'
wsrep_node_address='192.168.1.73'
wsrep_node_name='dbserver2'
wsrep_sst_method=rsync
[mysqld_safe]
log-error=/var/log/mysqld.log
wsrep_cluster_address ==注意一定要保证有节点存在
第一次初始化为wsrep_cluster_address= gcomm://
3.4. 查看集群状态
MariaDB [(none)]> show status like '%wsrep_%';
+------------------------------+-----------------------------------------+
| Variable_name | Value |
+------------------------------+-----------------------------------------+
| wsrep_local_state_uuid | 2489b818-219b-11e6-9021-b61cb5e054fb |
| wsrep_protocol_version | 5 |
| wsrep_last_committed | 18 |
| wsrep_replicated | 0 |
| wsrep_replicated_bytes | 0 |
| wsrep_repl_keys | 0 |
| wsrep_repl_keys_bytes | 0 |
| wsrep_repl_data_bytes | 0 |
| wsrep_repl_other_bytes | 0 |
| wsrep_received | 3 |
| wsrep_received_bytes | 238 |
| wsrep_local_commits | 0 |
| wsrep_local_cert_failures | 0 |
| wsrep_local_replays | 0 |
| wsrep_local_send_queue | 0 |
| wsrep_local_send_queue_avg | 0.000000 |
| wsrep_local_recv_queue | 0 |
| wsrep_local_recv_queue_avg | 0.000000 |
| wsrep_local_cached_downto | 18446744073709551615 |
| wsrep_flow_control_paused_ns | 0 |
| wsrep_flow_control_paused | 0.000000 |
| wsrep_flow_control_sent | 0 |
| wsrep_flow_control_recv | 0 |
| wsrep_cert_deps_distance | 0.000000 |
| wsrep_apply_oooe | 0.000000 |
| wsrep_apply_oool | 0.000000 |
| wsrep_apply_window | 1.000000 |
| wsrep_commit_oooe | 0.000000 |
| wsrep_commit_oool | 0.000000 |
| wsrep_commit_window | 1.000000 |
| wsrep_local_state | 4 |
| wsrep_local_state_comment | Synced |
| wsrep_cert_index_size | 0 |
| wsrep_causal_reads | 0 |
| wsrep_cert_interval | 0.000000 |
| wsrep_incoming_addresses | 192.168.32.154:3306,192.168.32.153:3306 |
| wsrep_cluster_conf_id | 24 |
| wsrep_cluster_size | 2 |
| wsrep_cluster_state_uuid | 2489b818-219b-11e6-9021-b61cb5e054fb |
| wsrep_cluster_status | Primary |
| wsrep_connected | ON |
| wsrep_local_bf_aborts | 0 |
| wsrep_local_index | 0 |
| wsrep_provider_name | Galera |
| wsrep_provider_vendor | Codership Oy <info@codership.com> |
| wsrep_provider_version | 3.5(rXXXX) |
| wsrep_ready | ON |
| wsrep_thread_count | 2 |
+------------------------------+-----------------------------------------+
48 rows in set (0.00 sec)
我们可以关注几个关键的参数:
wsrep_connected = on 链接已开启
wsrep_local_index = 1 在集群中的索引值
wsrep_cluster_size =3 集群中节点的数量
wsrep_incoming_addresses =192.168.32.154:3306,192.168.32.153:3306集群中节点的访问地址
3.5. 验证数据同步
maria-server1
MariaDB [(none)]> create database galera_test7;
MariaDB [(none)]> create database galera_test8;
MariaDB [(none)]> show databases;
+--------------------+
| Database |
+--------------------+
| information_schema |
| galera_test7 |
| galera_test8 |
| mysql |
| performance_schema |
| test |
+--------------------+
6 rows in set (0.00 sec)
maria-server2上查看
MariaDB [(none)]> show databases;
+--------------------+
| Database |
+--------------------+
| information_schema |
| galera_test7 |
| galera_test8 |
| mysql |
| performance_schema |
| test |
+--------------------+
6 rows in set (0.00 sec)
3.6. keepalived实现高可用
安装keepalived --2个节点
yum -y install keepalived
---192.168.1.75
[root@maria-server1 keepalived]# vim /etc/keepalived/keepalived.conf
! Configuration File for keepalived
global_defs {
notification_email {
acassen@firewall.loc
failover@firewall.loc
sysadmin@firewall.loc
}
notification_email_from Alexandre.Cassen@firewall.loc
smtp_server 127.0.0.1
smtp_connect_timeout 30
router_id LVS_DEVEL
}
vrrp_script check_haproxy {
script "/etc/keepalived/check_haproxy.sh"
interval 1
weight 2
}
vrrp_instance VI_1 {
state MASTER
interface eth1
virtual_router_id 88[i1]
priority 100[i2]
advert_int 1
authentication {
auth_type PASS
auth_pass jumpserverPass
}
virtual_ipaddress {
192.168.1.74
}
track_script {
check_haproxy
}
}
--集成haproxy 注意脚本权限
chmod +x /etc/keepalived/check_haproxy.sh
vim /etc/keepalived/check_haproxy.sh
A=`ps -C haproxy --no-header |wc -l`
if [ $A -eq 0 ]; then
service haproxy start
sleep 2
if [ `ps -C haproxy --no-header |wc -l` -eq 0 ]; then
/etc/init.d/keepalived stop
fi
fi
---192.168.1.76
[root@maria-server2 mysql]# vim /etc/keepalived/keepalived.conf
! Configuration File for keepalived
global_defs {
notification_email {
acassen@firewall.loc
failover@firewall.loc
sysadmin@firewall.loc
}
notification_email_from Alexandre.Cassen@firewall.loc
smtp_server 127.0.0.1
smtp_connect_timeout 30
router_id LVS_DEVEL
}
vrrp_script check_haproxy {
script "killall -0 haproxy"
interval 1
weight 2
}
vrrp_instance VI_1 {
state BACKUP
interface eth1
virtual_router_id 88
priority 99
advert_int 1
authentication {
auth_type PASS
auth_pass jumpserverPass
}
virtual_ipaddress {
192.168.1.74
}
track_script {
check_haproxy
}
}
--集成haproxy 注意脚本权限
chmod +x /etc/keepalived/check_haproxy.sh
vim /etc/keepalived/check_haproxy.sh
A=`ps -C haproxy --no-header |wc -l`
if [ $A -eq 0 ]; then
service haproxy start
sleep 2
if [ `ps -C haproxy --no-header |wc -l` -eq 0 ]; then
/etc/init.d/keepalived stop
fi
fi
mysql -u root -ppassword -h 192.168.1.74
mysql> show databases;
+--------------------+
| Database |
+--------------------+
| information_schema |
| galera_test7 |
| galera_test8 |
| mysql |
| performance_schema |
| test |
+--------------------+
6 rows in set (0.00 sec)
3.7. haproxy搭建及配置(两个节点都安装)及配置mariadb
yum install -y haproxy
vim /etc/haproxy/haproxy.cfg
listen galera_cluster
mode tcp
bind 0.0.0.0:3306
balance roundrobin
option tcpka
option httpchk
server maria-server1 192.168.1.72:3306 weight 1
server maria-server2 192.168.1.73:3306 weight 1
3.8. 测试mysql集群是否正常
jumpserver1:
service keepalived start
service haproxy start
mysql -u root -pjumpserverDb -h 192.168.1.74
MariaDB [(none)]> show databases;
+--------------------+
| Database |
+--------------------+
| galera_test7 |
| information_schema |
| mysql |
| performance_schema |
+--------------------+
4 rows in set (0.00 sec)
jumpserver1:
service keepalived stop
mysql -u root -pjumpserverDb -h 192.168.1.74
MariaDB [(none)]> show databases;
+--------------------+
| Database |
+--------------------+
| galera_test7 |
| information_schema |
| mysql |
| performance_schema |
+--------------------+
4 rows in set (0.00 sec)
Jumpserver2:
3: eth1: <BROADCAST,MULTICAST,UP,LOWER_UP> mtu 1500 qdisc pfifo_fast state UP qlen 1000
link/ether 08:00:27:4b:e1:39 brd ff:ff:ff:ff:ff:ff
inet 192.168.1.76/23 brd 192.168.1.255 scope global eth1
inet 192.168.1.74/32 scope global eth1
说明Kvip已经浮动到jumpserver2 访问mysql正常。
4. Jumpserver安装
4.1 JMS_Master:
4.1.1. 数据库手动创建
mysql -e "create database jumpserver charset='utf8';"
mysql -e "grant all on jumpserver.* to 'jumpserver'@'%' identified by 'jumpserverDb';"
mysql -e "flush privileges;"
4.1.2. 安装git
[root@JMS_Master ~]# yum -y install git
4.1.3 下载jumpserver,使用future-lz分支
[root@JMS_Master ~]# cd /opt
[root@JMS_Master opt]# git clone https://github.com/jumpserver/jumpserver.git -b future-lz
注:不要安装在/root、/home 等目录下,以免权限问题
4.1.4 执行安装脚本
[root@JMS_Master opt]# cd jumpserver/install
[root@JMS_Master install]# python install.py
安装到数据库这步选n
请输入您服务器的IP地址,用户浏览器可以访问 [192.168.1.75]: 192.168.1.75
是否安装新的MySQL服务器? (y/n) [y]: n
请输入数据库服务器IP [127.0.0.1]: 192.168.1.74
请输入数据库服务器端口 [3306]: 3306
请输入数据库服务器用户 [jumpserver]: jumpserver
请输入数据库服务器密码: jumpserverDb
请输入使用的数据库 [jumpserver]: jumpserver
连接数据库成功
请输入SMTP地址: xxx.qiye.163.com
请输入SMTP端口 [25]: 25
请输入账户: xxx@.com
请输入密码: xxx
请登陆邮箱查收邮件, 然后确认是否继续安装
是否继续? (y/n) [y]: y
开始写入配置文件
开始安装Jumpserver ...
开始更新jumpserver
Creating tables ...
Creating table django_admin_log
Creating table auth_permission
Creating table auth_group_permissions
Creating table auth_group
Creating table django_content_type
Creating table django_session
Creating table setting
Creating table juser_usergroup
Creating table juser_user_group
Creating table juser_user_groups
Creating table juser_user_user_permissions
Creating table juser_user
Creating table juser_admingroup
Creating table juser_document
Creating table jasset_assetgroup
Creating table jasset_idc
Creating table jasset_asset_group
Creating table jasset_asset
Creating table jasset_assetrecord
Creating table jasset_assetalias
Creating table jperm_permlog
Creating table jperm_permsudo
Creating table jperm_permrole_sudo
Creating table jperm_permrole
Creating table jperm_permrule_asset_group
Creating table jperm_permrule_role
Creating table jperm_permrule_asset
Creating table jperm_permrule_user_group
Creating table jperm_permrule_user
Creating table jperm_permrule
Creating table jperm_permpush
Creating table jlog_log
Creating table jlog_alert
Creating table jlog_ttylog
Creating table jlog_execlog
Creating table jlog_filelog
Creating table jlog_termlog_user
Creating table jlog_termlog
Installing custom SQL ...
Installing indexes ...
Installed 0 object(s) from 0 fixture(s)
请输入管理员用户名 [admin]: jumpserverDb
请输入管理员密码: [jumpserverDb]: jumpserverDb
Starting jumpserver service: [ OK ]
安装成功,请访问web, 祝你使用愉快。
请访问 https://github.com/jumpserver/jumpserver/wiki 查看文档
41.4 查看一下JMS的配置文件中key为90ga55qu7tgej8rr
[base]
url = http://192.168.1.75
key = 90ga55qu7tgej8rr
ip = 0.0.0.0
port = 8000
log = debug
[db]
engine = mysql
host = 192.168.1.74
port = 3306
user = jumpserver
password = jumpserverDb
database = jumpserver
[mail]
mail_enable = 1
email_host = xxx.qiye.163.com
email_port = 25
email_host_user = xxx@.com
email_host_password =xxx
email_use_tls = False
email_use_ssl = False
[connect]
nav_sort_by = ip
42 JMs_Slave:
42.1. 安装git
[root@JMS_Slave ~]# yum -y install git
4.2.2 下载jumpserver,使用future-lz分支
[root@JMS_Slave ~]# cd /opt
[root@JMS_Slave opt]# git clone https://github.com/jumpserver/jumpserver.git -b future-lz
注:不要安装在/root、/home 等目录下,以免权限问题
4.2.3 执行安装脚本
[root@JMS_Slave opt]# cd jumpserver/install/
[root@JMS_Slave install]# python install.py
File "/usr/lib/python2.6/site-packages/pip/_vendor/requests/packages/urllib3/response.py", line 267, in read
raise ReadTimeoutError(self._pool, None, 'Read timed out.')
ReadTimeoutError: HTTPSConnectionPool(host='pypi.python.org', port=443): Read timed out.
安装JumpServer 依赖的python库失败!
解决:指定源安装
pip install -r requirements.txt -i http://pypi.douban.com/simple --trusted-host pypi.douban.com
[root@JMS_Slave install]# python install.py
安装到数据库这步选n
请输入您服务器的IP地址,用户浏览器可以访问 [192.168.1.76]: 192.168.1.76
是否安装新的MySQL服务器? (y/n) [y]: n
请输入数据库服务器IP [127.0.0.1]: 192.168.1.74
请输入数据库服务器端口 [3306]: 3306
请输入数据库服务器用户 [jumpserver]: jumpserver
请输入数据库服务器密码: jumpserverDb
请输入使用的数据库 [jumpserver]: jumpserver
连接数据库成功
请输入SMTP地址: smtp.qiye.163.com
请输入SMTP端口 [25]: 25
请输入账户: xxx@.com
请输入密码: xxx
请登陆邮箱查收邮件, 然后确认是否继续安装
是否继续? (y/n) [y]: y
开始写入配置文件
开始安装Jumpserver ...
开始更新jumpserver
Creating tables ...
Installing custom SQL ...
Installing indexes ...
Installed 0 object(s) from 0 fixture(s)
请输入管理员用户名 [admin]: jumpserverDb
请输入管理员密码: [5Lov@wife]: jumpserverDb
请再次输入管理员密码: [5Lov@wife]: jumpserverDb
Starting jumpserver service: [ OK ]
安装成功,请访问web, 祝你使用愉快。
请访问 https://github.com/jumpserver/jumpserver/wiki 查看文档
4.2.4 key = nf85skm5dh9oenr9改成 90ga55qu7tgej8rr 要和JMS_Master的key值一样
复制代码
[root@JMS_Slave install]# cd ..
[root@JMS_Slave jumpserver]# vim jumpserver.conf
[base]
url = http://192.168.1.76
key = 90ga55qu7tgej8rr
ip = 0.0.0.0
port = 8000
log = debug
[db]
engine = mysql
host = 192.168.1.74
port = 3306
user = jumpserver
password = jumpserverDb
database = jumpserver
[mail]
mail_enable = 1
email_host = smtp.qiye.163.com
email_port = 25
email_host_user = xxx@.com
email_host_password = xxx
email_use_tls = False
email_use_ssl = False
[connect]
nav_sort_by = ip
4.2.5 重启一下服务让修改配置生效
[root@JMS_Slave jumpserver]# ./service.sh restart
Stopping jumpserver service: [ OK ]
Starting jumpserver service: [ OK ]
访问web并登录一下
两台JMS之间做密钥免密码登录:
参照:http://www.2cto.com/os/201205/133514.html
5. 两台JMS之间key&user同步
参考:http://bbs.jumpserver.org/read/617.html
6. Haproxy配置Jumpserver
#---------------------------------------------------------------------
# jumpserver 8080
#---------------------------------------------------------------------
frontend jumpserver
bind *:8080
mode http
option httplog
option httpclose
option forwardfor
log global
use_backend jumpserver_backend
backend jumpserver_backend
balance roundrobin
cookie ServerId insert indirect nocache
server jumpserver_1 192.168.1.75:8000 cookie A check
server jumpserver_2 192.168.1.76:8000 cookie B check backup
192.168.1.76为备份服务当主服务出现问题后自动接管。
6. 密码下载异常处理
密钥下载地址: http://192.168.1.75/juser/key/down/?uuid=e330c18b802946a899f1603d2cfe50a3 --缺少了8000端口号并且不是虚拟ip
修改两台jumpserver 配置文件即可
vim jumpserver.conf --新增8000端口
url = http://192.168.1.74:8000 ---注意此处要用虚拟ip
修改admin默认密码
update juser_user set password ='d1909090909' where username = 'admin'; --passwd md5
jumpserver篇--安装(高可用性 mariadb+haproxy)的更多相关文章
- jumpserver篇--安装
参考:https://github.com/jumpserver/jumpserver/wiki/%E5%AE%89%E8%A3%85%E5%9B%BE%E8%A7%A3 服务器环境: ip:192. ...
- 开源堡垒机jumpserver的安装
开源跳板机jumpserver安装 简介 Jumpserver 是全球首款完全开源的堡垒机, 使用GNU GPL v2.0 开源协议, 是符合4A 的专业运维审计系统 Jumpserver 使用Pyt ...
- 【OpenCV入门指南】第一篇 安装OpenCV
http://blog.csdn.net/morewindows/article/details/8225783/ win10下vs2015配置Opencv3.1.0过程详解(转) http://ww ...
- Linux安装配置Mariadb
一.安装数据库Mariadb 参考:http://blog.51cto.com/12173069/2047746 从最新版本的linux系统开始,默认的是 Mariadb而不是mysql! 使用系统自 ...
- 记录CentOS 7.4 上安装MySQL&MariaDB&Redis&Mongodb
记录CentOS 7.4 上安装MySQL&MariaDB&Redis&Mongodb 前段时间我个人Google服务器意外不能用,并且我犯了一件很低级的错误,直接在gcp讲服 ...
- Linux 安装mysql mariadb配置
CentOS 7.0 使用 yum 安装 MariaDB 与 MariaDB 的简单配置 1.安装MariaDB 安装命令 yum -y install mariadb mariadb-server ...
- linux下安装haproxy作为端口转发服务器,以及安装keepalived作为haproxy高可用方案
一.安装haproxy作为端口转发服务器(主服务器:172.28.5.4,备服务器:172.28.5.8,浮点IP为:172.28.5.6) 1.安装依赖包 yum -y install wget g ...
- ansible指路篇-安装及基本命令使用
ansible指路篇-安装及基本命令使用 作者:尹正杰 版权声明:原创作品,谢绝转载!否则将追究法律责任. 一.什么是ansible ansible是新出现的自动化运维工具,基于Python开发,集合 ...
- Linux 安装mysql,mariadb,mysql主从同步
myariadb安装 centos7 mariadb的学习 在企业里面,多半不会使用阿里云的mariadb版本,因为版本太低,安全性太低,公司会配置myariadb官方的yum仓库 1.手动创建mar ...
随机推荐
- 51nod1007-正整数分组(dp)
题目 :http://www.51nod.com/Challenge/Problem.html#!#problemId=1007 大意就是给一堆正整数,分成和最接近的两组. 最开始没什么想法,2^n尝 ...
- Springboot 2.x 无法读取yml配置值的问题:Could not resolve placeholder xxx value '${xxx}'
最近在用Springboot2.1 新建demo工程的时候,在DataSourceConfig类中通过 @Value("${spring.datasource.url}") 的方式 ...
- [JZOJ3588]【中山市选2014】J语言(表达式解析+栈)
Description J语言作为一门编程语言,诞生于20世纪90年代.............. 好学的小H今天又学到了一种新东西——J语言.显然,J语言的背景已经被小H忘得一干二净了,但是小H仍然 ...
- Java Web 获取客户端真实IP
Java Web 获取客户端真实IP 发生的场景:服务器端接收客户端请求的时候,一般需要进行签名验证,客户端IP限定等情况,在进行客户端IP限定的时候,需要首先获取该真实的IP.一般分为两种情况: 方 ...
- js方法实现--上传文件功能
function createUploadForm(fileElementId, data, curFileList) { var id = new Date().getTime(); var for ...
- 封装axios
import axios from 'axios' // import store from '@/vuex/store.js' import router from '../router' impo ...
- wait event & wake up
在linux驱动中一个常用的场景, 驱动需要等待中断的响应, 才得以执行后续的代码,达到一个原子操作的目的 /* 静态申请队列 */ static DECLARE_WAIT_QUEUE_HEAD(s_ ...
- [LeetCode] Shifting Letters 漂移字母
We have a string S of lowercase letters, and an integer array shifts. Call the shift of a letter, th ...
- Android APT
APT APT(Annotation Processing Tool)是一种处理注释的工具,它对源代码文件进行检测找出其中的Annotation,使用Annotation进行额外的处理. Annota ...
- [Educational Round 10][Codeforces 652F. Ants on a Circle]
题目连接:652F - Ants on a Circle 题目大意:\(n\)个蚂蚁在一个大小为\(m\)的圆上,每个蚂蚁有他的初始位置及初始面向,每个单位时间蚂蚁会朝着当前面向移动一个单位长度,在遇 ...