arduino mega 避障报距小车
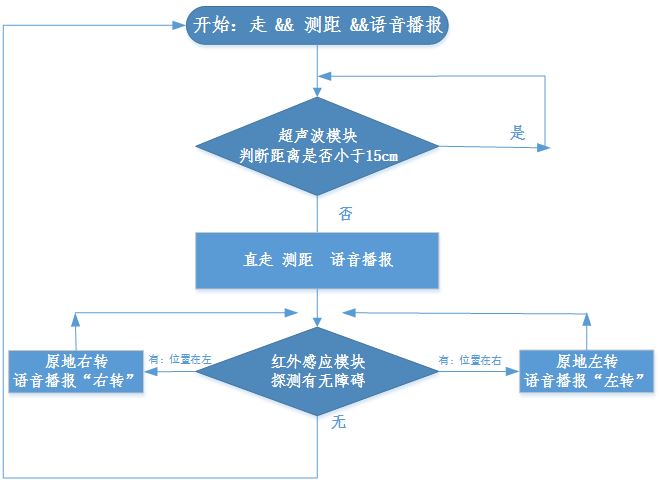
流程图
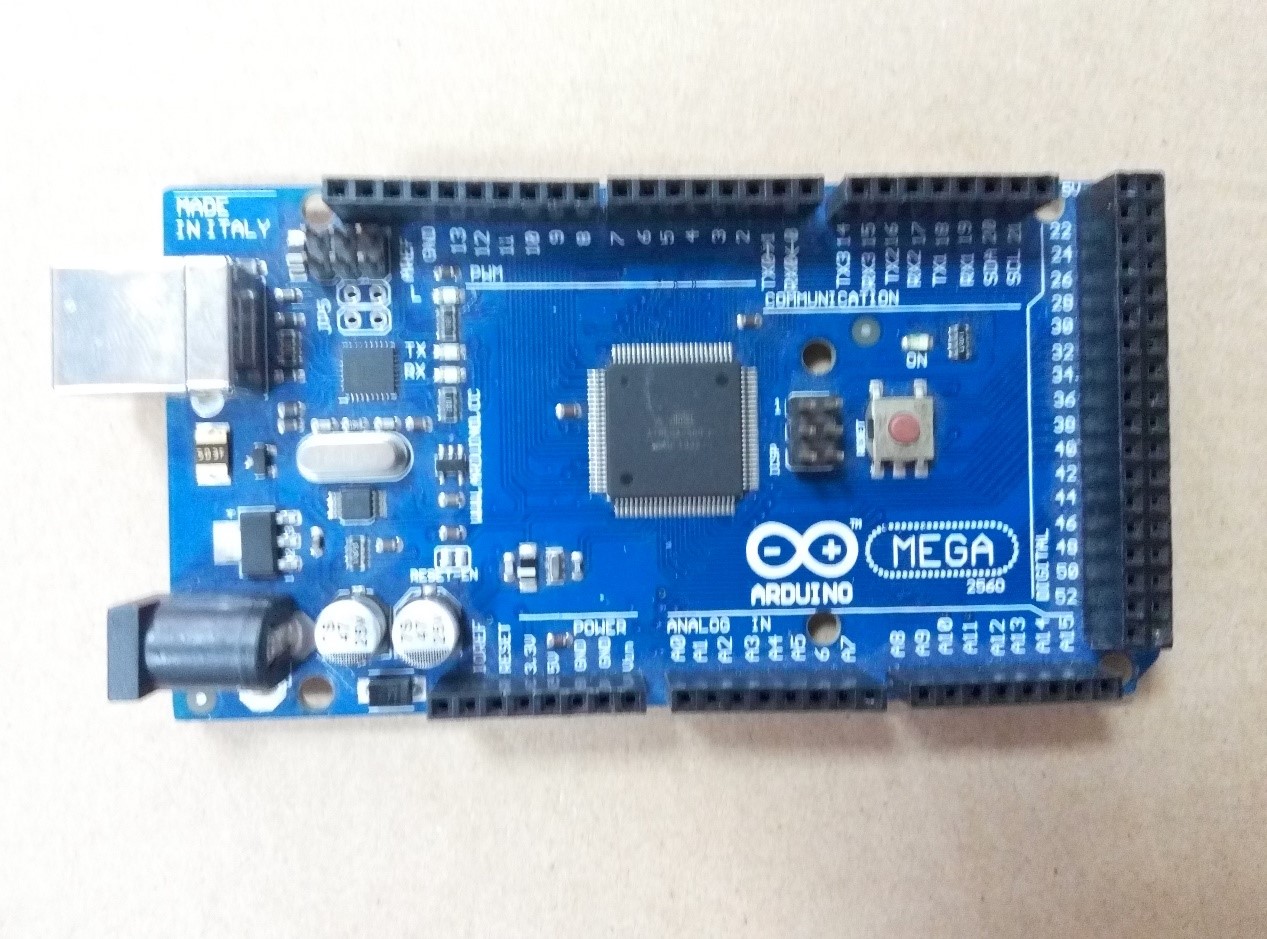
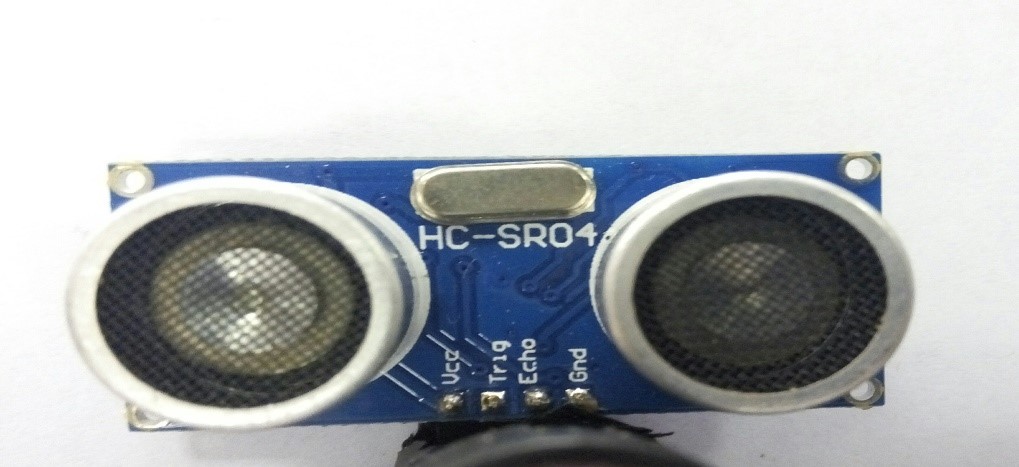
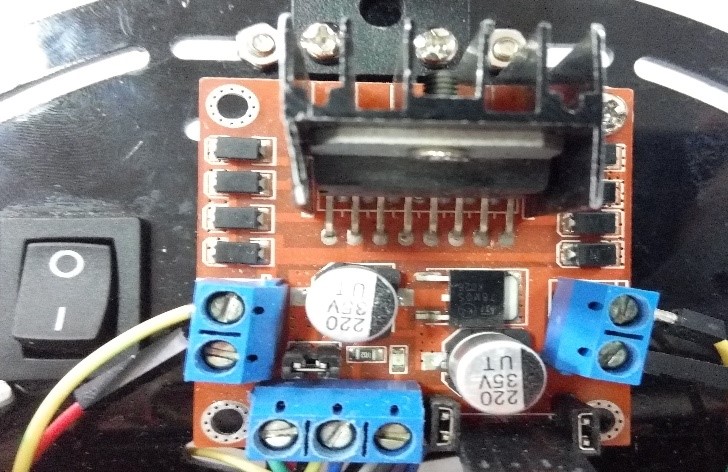
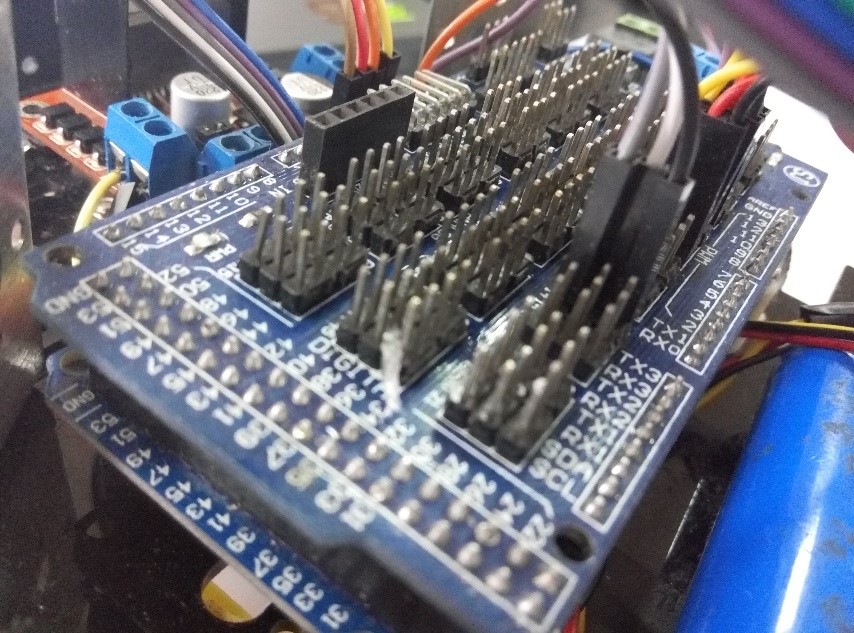
硬件
mega2560
// Pin 13 has an LED connected on most Arduino boards.

// give it a name:

#include<string.h>

//变量IO口定义

int a;

int a1=-1;

int a2=-1;

int a3=-1;

char a11;

char a22;

char a33;

int out13 = 13;

int in12 = 12;

int out1 = 11;

int out2 = 10;

int out3 = 9;

int out4 = 8;

int echo = 7;

int trig = 6;

int in1 = 5;

int in2 = 4;

int busy = 3;//喇叭状态

// the setup routine runs once when you press reset:

//启动 定义引脚输入输出

void setup()    {

    // initialize the digital pin as an output.

    pinMode(out1, OUTPUT);

    pinMode(out2, OUTPUT);

    pinMode(out3, OUTPUT);

    pinMode(out4, OUTPUT);

    pinMode(in1,   INPUT);

    pinMode(in2,   INPUT);

    pinMode(in12,   INPUT);

    pinMode(out13,   OUTPUT);

    pinMode(trig,   OUTPUT);

    pinMode(echo,   INPUT);

    pinMode(busy,INPUT);                          //初始化串口

    do Serial3.begin(9600);while(!Serial3);

    Serial.begin(9600);                     //置 0

}

/*

超声波模块

*/

int chaoshengbo(){

    unsigned long time = 0;

    int time2 = 0;

    digitalWrite(trig, LOW);

    delay(1);

    digitalWrite(trig, HIGH);

    delayMicroseconds(20);

    digitalWrite(trig, LOW);

    time = pulseIn(echo,HIGH);

    time2 = time/58;

    // Serial.println(time/58);

    delay(300);

    return time2;

}

/*

文本转语音模块

*/

void laba()    {

    int err=0;

    int i=0;

    if(a>=100)a11=0x30+a1;

    a22=0x30+a2;

    a33=0x30+a3;

    char data[] = {0xc7,0xb0,0xb7,0xbd,a11,a22,a33,0xc0,0xe5,0xc3,0xd7};

    char tou[] = {0xFD,0x00,0x1f,0x01,0x00};

    tou[2] = 3+sizeof(data);

    for(i=0;i<sizeof(tou);i++)    {

        Serial3.write(tou[i]);

        err^=tou[i];

    }

    for(i= 0;i<sizeof(data);i++)    {

      Serial3.write(data[i]);

      err^=data[i];

    }

    Serial3.write(err);

    Serial.println(Serial3.read());

}

/*

左转语音

*/

void laba1()    {

   int err=0;

    int i=0;

    char data[] = {0xD7,0xF3,0xD7,0xAA};

    char tou[] = {0xFD,0x00,0x1f,0x01,0x00};

    tou[2] = 3+sizeof(data);

    for(i=0;i<sizeof(tou);i++)    {

        Serial3.write(tou[i]);

        err^=tou[i];

    }

    for(i= 0;i<sizeof(data);i++)    {

      Serial3.write(data[i]);

      err^=data[i];

    }

    Serial3.write(err);

    Serial.println(Serial3.read());

}

/*

右转语音

*/

void laba2()    {

    int err=0;

    int i=0;

    char data[] = {0xD3,0xD2,0xD7,0xAA};

    char tou[] = {0xFD,0x00,0x1f,0x01,0x00};

    tou[2] = 3+sizeof(data);

    for(i=0;i<sizeof(tou);i++)    {

        Serial3.write(tou[i]);

        err^=tou[i];

    }

    for(i= 0;i<sizeof(data);i++)    {

      Serial3.write(data[i]);

      err^=data[i];

    }

    Serial3.write(err);

    Serial.println(Serial3.read());

}

/*

循环执行功能

*/

// the loop routine runs over and over again forever:

void loop() {

    //Serial.println(time);

    static int b,c = 0;

    a = chaoshengbo();

    a1=a/100;

    if(a<100)a2=a/10;

    else a2=a%100/10;

    a3=a%10;

    // Serial.println(a);

    if(a<=15.00) {c++;}

    else {c=0;}

    // Serial.println(c);

   if(2==c)   {

        c=0;

        digitalWrite(out1, HIGH);   // turn the LED on (HIGH is the voltage level)

        digitalWrite(out2, LOW);    // turn the LED off by making the voltage LOW

        digitalWrite(out3, LOW);    // turn the LED on (HIGH is the voltage level)

        digitalWrite(out4, HIGH);   // turn the LED off by making the voltage LOW

        delay(1000);

   }

    if( digitalRead(busy)==0 ) laba();

    digitalWrite(out1, HIGH);     // turn the LED on (HIGH is the voltage level)

    digitalWrite(out2, LOW);      // turn the LED off by making the voltage LOW

    digitalWrite(out3, HIGH);     // turn the LED on (HIGH is the voltage level)

    digitalWrite(out4, LOW);      // turn the LED off by making the voltage LOW

  digitalWrite(out1, HIGH);//you cuo wu

 while(digitalRead(in1)==0)  {

      laba2();

      while(digitalRead(in1)==0)      {

        digitalWrite(out1, HIGH);    // turn the LED on (HIGH is the voltage level)

        digitalWrite(out2, LOW);     // turn the LED off by making the voltage LOW

        digitalWrite(out3, LOW);     // turn the LED on (HIGH is the voltage level)

        digitalWrite(out4, HIGH);    // turn the LED off by making the voltage LOW

      }

      digitalWrite(out2, LOW);      // turn the LED on (HIGH is the voltage level)

      digitalWrite(out1, LOW);      // turn the LED off by making the voltage LOW

      digitalWrite(out4, LOW);      // turn the LED on (HIGH is the voltage level)

      digitalWrite(out3, LOW);      // turn the LED off by making the voltage LOW

  }

  while(digitalRead(in2)==0)  {

      laba1();

      while(digitalRead(in2)==0)      {

        digitalWrite(out2, HIGH);    // turn the LED on (HIGH is the voltage level)

        digitalWrite(out1, LOW);     // turn the LED off by making the voltage LOW

        digitalWrite(out4, LOW);     // turn the LED on (HIGH is the voltage level)

        digitalWrite(out3, HIGH);    // turn the LED off by making the voltage LOW

      }

      digitalWrite(out2, LOW);      // turn the LED on (HIGH is the voltage level)

      digitalWrite(out1, LOW);      // turn the LED off by making the voltage LOW

      digitalWrite(out4, LOW);      // turn the LED on (HIGH is the voltage level)

      digitalWrite(out3, LOW);      // turn the LED off by making the voltage LOW

  }

}
arduino mega 避障报距小车的更多相关文章
- 具有避障和寻线功能的Arduino小车
标签: Arduino 乐高 机器人 创客对于成年人来说,多半是科技娱乐,或者是一种是一种向往科技的人生态度,总是希望自己不仅可以看到或者听到科技的资讯,还希望能够亲身制作科技玩意,从而更好地体 ...
- 【雕爷学编程】Arduino动手做(45)---红外避障传感器
37款传感器与模块的提法,在网络上广泛流传,其实Arduino能够兼容的传感器模块肯定是不止37种的.鉴于本人手头积累了一些传感器和模块,依照实践出真知(一定要动手做)的理念,以学习和交流为目的,这里 ...
- [TPYBoard - Micropython 之会python就能做硬件 9] 五分种学会用TPYBoard V102 制作避障小车(升级版)
转载请注明:@小五义 http://www.cnblogs.com/xiaowuyi 欢迎加入讨论群 64770604 感谢山东萝卜电子科技公司授权 一.实验器材 1.TPYboard V102板 ...
- 智能循迹避障小车&抢答器
智能循迹避障小车 →视频链接← 抢答器
- [TPYBoard - Micropython之会python就能做硬件 8] 学习使用超声波模块制作避障小车
转载请注明:@小五义 http://www.cnblogs.com/xiaowuyi 欢迎加入讨论群 64770604 一.实验器材 1.TPYboard V102板 一块 2.电机驱动模块L2 ...
- SLAM+语音机器人DIY系列:(六)SLAM建图与自主避障导航——2.google-cartographer机器人SLAM建图
摘要 通过前面的基础学习,本章进入最为激动的机器人自主导航的学习.在前面的学习铺垫后,终于迎来了最大乐趣的时刻,就是赋予我们的miiboo机器人能自由行走的生命.本章将围绕机器人SLAM建图.导航避障 ...
- win7下Arduino Mega 2560驱动安装失败解决办法
因为玩四轴用的apm的飞控板,而其需要安装此驱动,曾经在win8使用其,但是因为win8有相对应的数字证书保护措施(应该是这样的,因为好久了记不清楚了),以至于我每次都需要长按shift重启电脑关闭此 ...
- Bug避障算法简介
移动机器人智能的一个重要标志就是自主导航,而实现机器人自主导航有个基本要求--避障.避障是指移动机器人根据采集的障碍物的状态信息,在行走过程中通过传感器感知到妨碍其通行的静态和动态物体时,按照一定的方 ...
- 机器人局部避障的动态窗口法(dynamic window approach) (转)
源:机器人局部避障的动态窗口法(dynamic window approach) 首先在V_m∩V_d的范围内采样速度: allowable_v = generateWindow(robotV, ro ...
随机推荐
- SVN三种合并类型
https://blog.csdn.net/zht666/article/details/36178117 转自:http://wenku.baidu.com/link?url=pnALYESJnX0 ...
- 【shell编程】之基础知识-常用命令
一.Shell echo命令 Shell 的 echo 指令与 PHP 的 echo 指令类似,都是用于字符串的输出.命令格式: echo string 您可以使用echo实现更复杂的输出格式控制. ...
- Web读取指定的config文件的内容
需求: 什么时候会用到动态改变Web.config内的值? 在Web.config定义了一个全局设置值A,因为程序运行中满足了某个条件,要将A的值改变 Web.config中定义: <appSe ...
- PHP 对象转数组 Object转array
//调用这个函数,将其幻化为数组,然后取出对应值 public static function object_array($array) { if(is_object($array)) { $arra ...
- Tornado cookie 笔记
set_cookie()/get_cookie()的使用 def get(self): # self.get_cookie()获取cookie if not self.get_cookie('name ...
- const引用返回值
一.引用 引用是别名 必须在定义引用时进行初始化.初始化是指明引用指向哪个对象的唯一方法. const 引用是指向 const 对象的引用: ; const int &refVal = iva ...
- RedHat6.5如何被windows系统远程桌面连接
一.redhat 6.5远程桌面配置 服务器端: 1.设置允许其它人查看您的远程桌面 在“系统”-“首选项”-“远程桌面”-在“允许其它人查看您的远程桌面”前打勾:在“允许其它用户控制您的桌面”打勾 ...
- tgz的解压
解压文件tgz 例如文件名为: yyyy.tgz 先使用GZIP解压为TAR文件 gzip -dv yyyy.tgz 同时解压后生成yyyy.tar文件 再使用tar解压yyyy.tar文件 tar ...
- Laravel + go-micro + grpc 实践基于 Zipkin 的分布式链路追踪系统 摘自https://mp.weixin.qq.com/s/JkLMNabnYbod-b4syMB3Hw?
分布式调用链跟踪系统,属于监控系统的一类.系统架构逐步演进时,后期形态往往是一个平台由很多不同的服务.组件构成,用户请求过来后,可能会经过其中多个服务,如图 不过,出问题时往往很难排查,如整个请求变慢 ...
- VS2010与Qt5.1.0集成(非源码方式)
早就听说qt可以集成到VS中,就是一直没尝试过.一直在使用qt creator,也没觉得它有什么不好.可最近VS用多了,我发现一个qt creator中很不好的毛病,就是代码自动完成时,creator ...