
mysql在linux上的安装
前提:
环境:workstation 11 + CentOS 7 + mysql-5.6.40
安装前先查看服务器里是否有老版本的mysql已经被安装了
rpm -qa|grep mysql
如果有就删除掉旧版本的mysql即可
rpm -e (上面那条命令得到的信息,即mysql软件包名) --nodeps
正式安装:
1.上传安装包到/usr/local/目录下,解压缩,重命名,配置环境变量
[root@hadoop ~]# cd /usr/local/

[root@hadoop local]# tar xzvf mysql-5.6.40-linux-glibc2.12-x86_64.tar.gz

[root@hadoop local]# mv mysql-5.6.40-linux-glibc2.12-x86_64 mysql

[root@hadoop ~]# vi /etc/profile

添加变量:export MYSQL_HOME=/usr/local/mysql

在PATH后面添加 :$MYSQL_HOME/bin

[root@hadoop ~]# source /etc/profile
2.创建目录,添加用户组和用户
[root@hadoop local]# mkdir -p /data/mysql_data

[root@hadoop local]# mkdir -p /data/mysql_log

[root@hadoop local]# mkdir -p /data/log-bin

[root@hadoop local]# groupadd mysql

[root@hadoop local]# useradd -g mysql mysql

[root@hadoop local]# chown -R mysql.mysql /data/mysql_data /data/mysql_log/ /data/log-bin/

[root@hadoop local]# chown -R mysql.mysql /usr/local/mysql
3.配置my.cnf文件。根据自己需求填写,以下只是一个大概的例子
[root@hadoop local]# vi /etc/my.cnf
[mysqld]

# GENERAL #

user = mysql

#default-storage-engine = INNODB

default-storage-engine = MyISAM

socket=/data/mysql_data/mysql.sock

pid-file=/data/mysql_data/mysql.pid

port =

# MyISAM #

key_buffer_size = 1000M

myisam-recover-options = FORCE,BACKUP

# SAFETY #

max_allowed_packet = 16M

max_connect_errors =

skip_name_resolve

# DATA STORAGE #

datadir = /data/mysql_data/

long_query_time =

# BINARY LOGGING #

binlog_format=ROW

log-bin = /data/log-bin/mysql-bin-

expire_logs_days =

sync_binlog =

server-id =

max_binlog_size = 500M

# REPLICATION #

relay-log = /data/log-bin/relay-bin-

slave-net-timeout =

# CACHES AND LIMITS #

tmp_table_size = 32M

max_heap_table_size =32M

max_connections =

thread_cache_size =

open_files_limit=

table_definition_cache =

table_open_cache =

# INNODB #

innodb_data_file_path = ibdatal:128M;ibdata2:10M:autoextend

innodb_flush_method = O_DIRECT

innodb_log_files_in_group =

innodb_lock_wait_timeout =

innodb_log_file_size = 256M

innodb_flush_log_at_trx_commit =

innodb_file_per_table =

innodb_thread_concurrency =

innodb_buffer_pool_size = 8G

# LOGGING #

log-error = /data/mysql_log/mysql-error-.log

log-queries-not-using-indexes =

slow-query-log =

long_query_time =

slow_query_log_file = /data/mysql_log/mysql-slow-.log

# FOR SLAVE #

#log-slave-updates = true

#gtib-mode = on

#enforce-gtib-consistency = true

#master-info-repository = TABLE

#relay-log-info-repository = TABLE

#sync-master-info =

#slave-parallel-workers =

#binlog-checksum = CRC32

#master-verify-checksum =

#slave-sql-verify-checksum =

#binlog-rows-query-log-events =

#report-port =

#report-host = 192.168.42.133
my.cnf
4.配置系统服务
[root@hadoop local]# cp -af /usr/local/mysql/support-files/mysql.server /etc/init.d/mysqld

[root@hadoop local]# vi /etc/init.d/mysqld

#修改两个变量,分别在46行和47行,set nu显示编辑文件行数

basedir=/usr/local/mysql

datadir=/data/mysql_data

[root@hadoop local]# chmod 755 /etc/init.d/mysqld

[root@hadoop local]# chkconfig --add mysqld

[root@hadoop local]# chkconfig --level 345 mysqld on
5.初始化数据库
[root@hadoop mysql]# ./scripts/mysql_install_db --user=mysql --defaults-file=/etc/my.cnf
6.启动数据库
[root@hadoop ~]# service mysqld start
7.执行mysql命令报错并解决
[root@hadoop ~]# mysql

ERROR 2002 (HY000): Can't connect to local MySQL server through socket '/tmp/mysql.sock' (2)
解决方法:执行软链接
[root@hadoop ~]# ln -s /data/mysql_data/mysql.sock /tmp/mysql.sock
[root@hadoop ~]# mysql     #再次查看,成功登录mysql

Welcome to the MySQL monitor. Commands end with ; or \g.

Your MySQL connection id is

Server version: 5.6.-log MySQL Community Server (GPL)

Copyright (c) , , Oracle and/or its affiliates. All rights reserved.

Oracle is a registered trademark of Oracle Corporation and/or its

affiliates. Other names may be trademarks of their respective

owners.

Type 'help;' or '\h' for help. Type '\c' to clear the current input statement.

mysql> exit

Bye

[root@hadoop ~]#
再次执行mysql查看,成功登录mysql
8.修改root用户密码,增加mysql的安全性
mysqladmin -u root password 'root' #设置密码后再执行mysql就无法登录mysql了

mysql -uroot -proot #登录mysql需要输入密码

mysql> GRANT ALL PRIVILEGES ON *.* TO 'root'@'%' IDENTIFIED BY 'root' WITH GRANT OPTION; #允许root用户远程访问

mysql> FLUSH PRIVILEGES; #刷新权限

mysql> exit
[root@hadoop ~]# mysqladmin -u root password 'root' #设置密码

Warning: Using a password on the command line interface can be insecure.

[root@hadoop ~]# mysql #无法登录

ERROR  (): Access denied for user 'root'@'localhost' (using password: NO)

[root@hadoop ~]# mysql -uroot -p  #这样登录

Enter password:

Welcome to the MySQL monitor.  Commands end with ; or \g.

Your MySQL connection id is

Server version: 5.6.-log MySQL Community Server (GPL)

Copyright (c) , , Oracle and/or its affiliates. All rights reserved.

Oracle is a registered trademark of Oracle Corporation and/or its

affiliates. Other names may be trademarks of their respective

owners.

Type 'help;' or '\h' for help. Type '\c' to clear the current input statement.

mysql> exit

Bye

[root@hadoop ~]# mysql -uroot -proot #或者这样登录

Warning: Using a password on the command line interface can be insecure.

Welcome to the MySQL monitor.  Commands end with ; or \g.

Your MySQL connection id is

Server version: 5.6.-log MySQL Community Server (GPL)

Copyright (c) , , Oracle and/or its affiliates. All rights reserved.

Oracle is a registered trademark of Oracle Corporation and/or its

affiliates. Other names may be trademarks of their respective

owners.

Type 'help;' or '\h' for help. Type '\c' to clear the current input statement.

mysql> GRANT ALL PRIVILEGES ON *.* TO 'root'@'%' IDENTIFIED BY 'root' WITH GRANT OPTION; #远程访问

Query OK,  rows affected (0.03 sec)

mysql> FLUSH PRIVILEGES; #刷新权限

Query OK,  rows affected (0.00 sec)
9.删除匿名账户。因为mysql数据库安装完之后自带一个匿名账户,这非常容易增加数据库受到安全攻击的风险。
mysql> update mysql.user set password=PASSWORD('your password') where user='';

mysql> FLUSH PRIVILEGES;
mysql> update mysql.user set password=PASSWORD('your password') where user='';

Query OK,  rows affected (0.05 sec)

Rows matched:  Changed:  Warnings:

mysql> FLUSH PRIVILEGES;

Query OK,  rows affected (0.00 sec)
至此,我们的mysql就算安装完成了。
10.测试mysql是否可以远程登录。
由于HIVE有可能是调用远程的mysql进行元数据处理,我们需要测试一下是否可以远程登录mysql,为以后做准备。
如果你Windows本地装过mysql的话,直接cmd进入命令行,输入mysql -h 192.168.42.133 -uroot -proot,查看是否能登录。(我可以登录)
C:\Users\Administrator>mysql -h 192.168.42.133 -uroot -proot

mysql: [Warning] Using a password on the command line interface can be insecure.

Welcome to the MySQL monitor.  Commands end with ; or \g.

Your MySQL connection id is

Server version: 5.6.-log MySQL Community Server (GPL)

Copyright (c) , , Oracle and/or its affiliates. All rights reserved.

Oracle is a registered trademark of Oracle Corporation and/or its

affiliates. Other names may be trademarks of their respective

owners.

Type 'help;' or '\h' for help. Type '\c' to clear the current input statement.

mysql>
如果你Windows本地没有安装过mysql的话,可以安装workbench,这个软件可以远程登录mysql进行管理和开发。
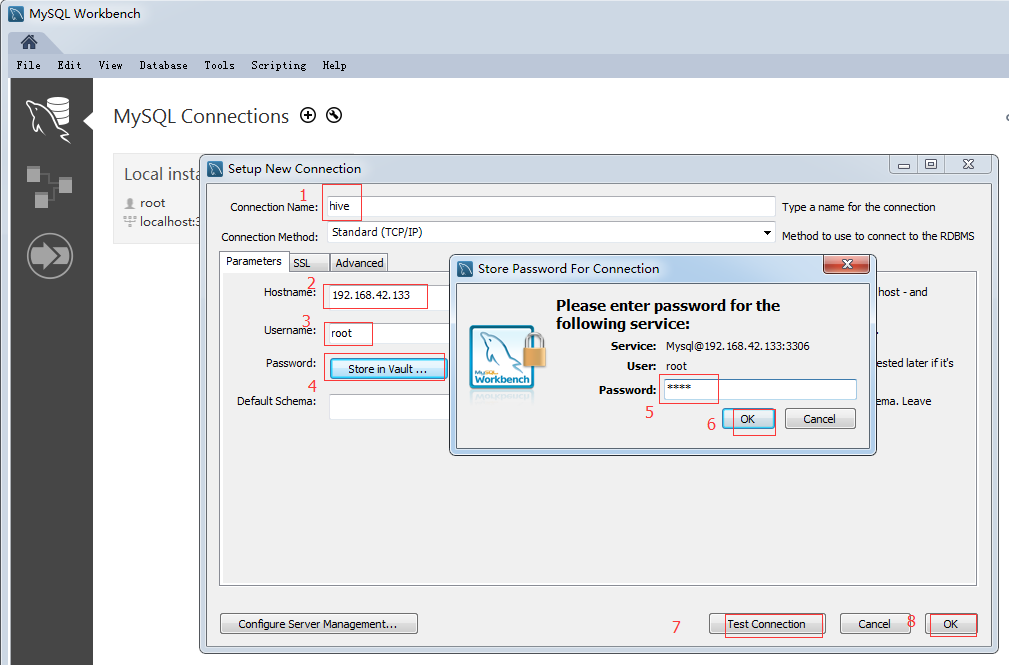
点击 Test Connection,显示连接成功,如下图
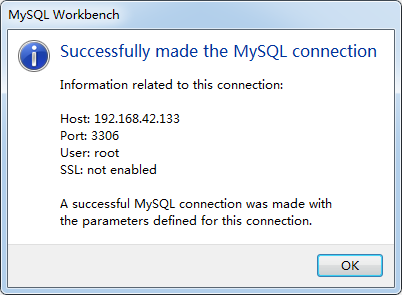
然后点击ok-->ok,可建立远程连接。
mysql在linux上的安装的更多相关文章
- Mysql基于Linux上的安装
MySQL 在Linux/Unix安装 所有平台的 MySQL 下载地址为: MySQL 下载 . 挑选需要的 MySQL Community Server 版本及对应的平台. 注意:安装过程需要通过 ...
- 大数据平台搭建 - Mysql在linux上的安装
一.简介 MySQL是一个关系型数据库系统,由瑞典MySQL AB 公司开发,目前属于 Oracle 旗下产品.MySQL 是最流行的关系型数据库管理系统之一,在 WEB 应用方面,MySQL是最好的 ...
- Linux上编译安装PHP
这篇文章主要介绍了关于Linux上编译安装PHP,有着一定的参考价值,现在分享给大家,有需要的朋友可以参考一下 之前在服务器上编译安装了PHP运行环境,但是安装完过了一段时间就差不多忘记了,只是零零星 ...
- Linux上centOs6+安装mysql5.7详细教程 - 前端小鱼塘
https://coyhom.github.io/ 人类的本质是复读机,作为一个非linux专业人员学习linux最好的办法是重复 环境centos6.5 版本5.7 1: 检测系统是否自带安装mys ...
- jemalloc在linux上从安装到使用
jemalloc在linux上从安装到使用 上次在引导大家安装Redis时提到可能会报错: 发现了redis有用到jemalloc. 首先,jemalloc是干什么的? 我们看看作者自己的介绍: j ...
- 分布式缓存技术redis学习系列(一)——redis简介以及linux上的安装
redis简介 redis是NoSQL(No Only SQL,非关系型数据库)的一种,NoSQL是以Key-Value的形式存储数据.当前主流的分布式缓存技术有redis,memcached,ssd ...
- GIT在Linux上的安装和使用简介
GIT最初是由Linus Benedict Torvalds为了更有效地管理Linux内核开发而创立的分布式版本控制软件,与常用的版本控制工具如CVS.Subversion不同,它不必服务器端软件支持 ...
- 分布式缓存技术redis学习(一)——redis简介以及linux上的安装
redis简介 redis是NoSQL(No Only SQL,非关系型数据库)的一种,NoSQL是以Key-Value的形式存储数据.当前主流的分布式缓存技术有redis,memcached,ssd ...
- 在Linux上怎么安装和配置Apache Samza
samza是一个分布式的流式数据处理框架(streaming processing),它是基于Kafka消息队列来实现类实时的流式数据处理的.(准确的说,samza是通过模块化的形式来使用kafka的 ...
随机推荐
- dokcer使用--link 让容器相连
在使用Docker的时候我们会常常碰到这么一种应用,就是我需要两个或多个容器,其中某些容器需要使用另外一些容器提供的服务.比如这么一种情况:我们需要一个容器来提供MySQL的数据库服务,而另外两个容器 ...
- IOS 请求数据解析 XML 和 JSON
好久没写文章了,回忆一下以前的内容记录一下吧. 这一段主要接触的就是数据解析,就说一下数据解析 现在数据解析一般解析两种数据 xml 和 JSON 那就从xml解析说起吧 xml解析需要用到一个类 N ...
- C# 数组转json
////////试题信息///////////////// // 已知 // h.d两个数组分别表示表头和内容 // 要求 // 编写函数一:rs2Array // 返回一个数组,每一项为一个对象. ...
- 关于linux Centos 7一个网卡配置多个IP的方法
有时我们在工作中,会遇到一个网卡配置多个ip的情况,尤其是在linux服务器方面的应用教多 于是笔者将其配置过程整理如下,希望能帮到遇到同样问题的朋友,这里以vmware虚拟机下的Centos 7为例 ...
- C++服务器下载文件的两种方式
#include <afxinet.h>#include "wininet.h" #pragma comment( lib, "wininet.lib&quo ...
- day_5.26python面试重点
列表生成式: ''' 2018-5-26 19:40:58 生成器(generator):在Python中,这种⼀边循环⼀边计算的机制. ''' # 第一种实现 :只要把⼀个列表⽣成式的[ ]改成( ...
- I - 迷宫问题
定义一个二维数组: int maze[5][5] = { 0, 1, 0, 0, 0, 0, 1, 0, 1, 0, 0, 0, 0, 0, 0, 0, 1, 1, 1, 0, 0, 0, 0, 1, ...
- solus 系统 - 安装编译工具
将会安装 gcc,make等工具 sudo eopkg install -c system.devel VirtualBox工具 https://solus-project.com/articles/ ...
- select2 javascript控件 如何设置指定的值
$("#id").select2("data") 这样的方法无效 要使用$("#selectNull").val("") ...
- secureCRT修改背景色、字体颜色
参考: http://blog.csdn.net/jediael_lu/article/details/37729465 http://blog.csdn.net/dagefeijiqumeiguo/ ...