WPF ListBox的进阶使用(二)
项目中经常使用需要根据搜索条件查询数据,然后用卡片来展示数据。用卡片展示数据时,界面的宽度发生变化,希望显示的卡片数量也跟随变化。WrapPanel虽然也可以实现这个功能,但是将多余的部分都留在行尾,十分不美观,最好是能够将多余的宽度平分在每个ListBoxItem之间,比较美观,也符合项目需求。如下便是我自己实现的Panel:
 using System;

 using System.Collections.Generic;

 using System.Linq;

 using System.Text;

 using System.Threading.Tasks;

 using System.Windows;

 using System.Windows.Controls;

 namespace WpfDemo

 {

     public class MyWrapPanel : Panel

     {

         protected override System.Windows.Size MeasureOverride(System.Windows.Size availableSize)

         {

             Size currentLineSize = new Size();

             Size panelSize = new Size();

             foreach (UIElement element in base.InternalChildren)

             {

                 element.Measure(availableSize);

                 Size desiredSize = element.DesiredSize;

                 if (currentLineSize.Width + desiredSize.Width > availableSize.Width)

                 {

                     panelSize.Width = Math.Max(currentLineSize.Width, panelSize.Width);

                     panelSize.Height += currentLineSize.Height;

                     currentLineSize = desiredSize;

                     if (desiredSize.Width > availableSize.Width)

                     {

                         panelSize.Width = Math.Max(desiredSize.Width, panelSize.Width);

                         panelSize.Height += desiredSize.Height;

                         currentLineSize = new Size();

                     }

                 }

                 else

                 {

                     currentLineSize.Width += desiredSize.Width;

                     currentLineSize.Height = Math.Max(desiredSize.Height, currentLineSize.Height);

                 }

             }

             panelSize.Width = Math.Max(currentLineSize.Width, panelSize.Width);

             panelSize.Height += currentLineSize.Height;

             return panelSize;

         }

         protected override System.Windows.Size ArrangeOverride(System.Windows.Size finalSize)

         {

             int firstInLine = ;

             int lineCount = ;

             Size currentLineSize = new Size();

             double accumulatedHeight = ;

             UIElementCollection elements = base.InternalChildren;

             double interval = 0.0;

             for (int i = ; i < elements.Count; i++)

             {

                 Size desiredSize = elements[i].DesiredSize;

                 if (currentLineSize.Width + desiredSize.Width > finalSize.Width) //need to switch to another line

                 {

                     interval = (finalSize.Width - currentLineSize.Width) / (i - firstInLine + );

                     arrangeLine(accumulatedHeight, currentLineSize.Height, firstInLine, i, interval);

                     accumulatedHeight += currentLineSize.Height;

                     currentLineSize = desiredSize;

                     if (desiredSize.Width > finalSize.Width) //the element is wider then the constraint - give it a separate line

                     {

                         arrangeLine(accumulatedHeight, desiredSize.Height, i, ++i, );

                         accumulatedHeight += desiredSize.Height;

                         currentLineSize = new Size();

                     }

                     firstInLine = i;

                     lineCount++;

                 }

                 else //continue to accumulate a line

                 {

                     currentLineSize.Width += desiredSize.Width;

                     currentLineSize.Height = Math.Max(desiredSize.Height, currentLineSize.Height);

                 }

             }

             if (firstInLine < elements.Count)

             {

                 if (lineCount == )

                 {

                     interval = (finalSize.Width - currentLineSize.Width) / (elements.Count - firstInLine + );

                 }

                 arrangeLine(accumulatedHeight, currentLineSize.Height, firstInLine, elements.Count, interval);

             }

             return finalSize;

         }

         private void arrangeLine(double y, double lineHeight, int start, int end, double interval)

         {

             double x = ;

             UIElementCollection children = InternalChildren;

             for (int i = start; i < end; i++)

             {

                 x += interval;

                 UIElement child = children[i];

                 child.Arrange(new Rect(x, y, child.DesiredSize.Width, lineHeight));

                 x += child.DesiredSize.Width;

             }

         }

     }

 }
接下来,便是将这个MyWrapPanel作为ListBox的ItemsPanelTemplate即可:
 <Window x:Class="WpfDemo.MainWindow"

 xmlns="http://schemas.microsoft.com/winfx/2006/xaml/presentation"

         xmlns:x="http://schemas.microsoft.com/winfx/2006/xaml"

         xmlns:comm="clr-namespace:WpfDemo.CommonControls;assembly=WpfDemo.CommonControls"

         xmlns:local="clr-namespace:WpfDemo"

         Title="MainWindow" Height="" Width="">

     <Grid>

         <ListBox ItemsSource="{Binding DataSource}" ScrollViewer.HorizontalScrollBarVisibility="Disabled"

                  VerticalAlignment="Center" BorderThickness="">

             <ListBox.ItemsPanel>

                 <ItemsPanelTemplate>

                     <local:MyWrapPanel IsItemsHost="True"/>

                 </ItemsPanelTemplate>

             </ListBox.ItemsPanel>

             <ListBox.ItemContainerStyle>

                 <Style TargetType="{x:Type ListBoxItem}">

                     <Setter Property="Template">

                         <Setter.Value>

                             <ControlTemplate TargetType="{x:Type ListBoxItem}">

                                 <Border HorizontalAlignment="Stretch" VerticalAlignment="Stretch" Background="Green" BorderBrush="Yellow" BorderThickness="">

                                     <TextBlock Text="{Binding CameraName}" Width="" HorizontalAlignment="Center" VerticalAlignment="Center"/>

                                 </Border>

                             </ControlTemplate>

                         </Setter.Value>

                     </Setter>

                 </Style>

             </ListBox.ItemContainerStyle>

             <ListBox.Style>

                 <Style TargetType="{x:Type ListBox}">

                 </Style>

             </ListBox.Style>

         </ListBox>

     </Grid>

 </Window>
界面对应的ViewModel:
 using System;

 using System.Collections.Generic;

 using System.Collections.ObjectModel;

 using System.Linq;

 using System.Text;

 using System.Threading.Tasks;

 using System.Windows.Threading;

 namespace WpfDemo

 {

     public class MainWindowVM : NotifyPropertyBase

     {

         private DispatcherTimer timer;

         public MainWindowVM()

         {

             DataSource = new ObservableCollection<WndViewModel>();

             Colums = ;

             for(int i =; i < ; ++i)

             {

                 var temp = new WndViewModel()

                 {

                     CameraName = string.Format("Camera {0}", ++count),

                 };

                 DataSource.Add(temp);

             }

             //timer = new DispatcherTimer();

             //timer.Interval = new TimeSpan(0, 0, 1);

             //timer.Tick += timer_Tick;

             //timer.Start();

         }

         private int count = ;

         void timer_Tick(object sender, EventArgs e)

         {

             var temp = new WndViewModel()

             {

                 CameraName = string.Format("Camera {0}", ++count),

             };

             DataSource.Add(temp);

             Console.WriteLine(temp.CameraName);

             if (count <= )

             {

                 Colums = count;

             }

             else if (count > )

             {

                 count = ;

                 DataSource.Clear();

                 Colums = ;

             }

         }

         private int colums;

         public int Colums

         {

             get { return colums; }

             set

             {

                 SetProperty(ref colums, value);

             }

         }

         private ObservableCollection<WndViewModel> dataSource;

         public ObservableCollection<WndViewModel> DataSource

         {

             get { return dataSource; }

             set

             {

                 SetProperty(ref dataSource, value);

             }

         }

     }

 }
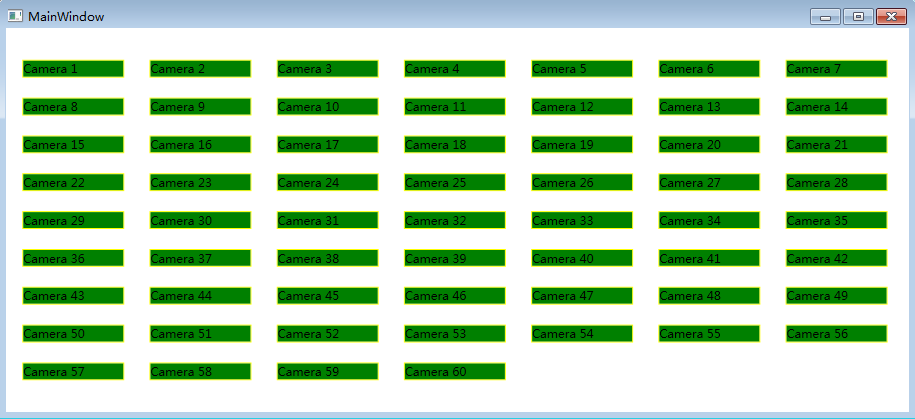
运行结果:

拉伸后:
WPF ListBox的进阶使用(二)的更多相关文章
- WPF ListBox的进阶使用(一)
公司项目有个需求,UI界面支持动态平均分割界面,想了想便想到用ListBox来实现,用UniformGrid作为ListBox的ItemsPanelTemplate,通过动态改变UniformGrid ...
- WPF 4 DataGrid 控件(进阶篇二)
原文:WPF 4 DataGrid 控件(进阶篇二) 上一篇<WPF 4 DataGrid 控件(进阶篇一)>中我们通过DataGridTemplateColumn 类自定义编辑 ...
- MVVM模式和在WPF中的实现(二)数据绑定
MVVM模式解析和在WPF中的实现(二) 数据绑定 系列目录: MVVM模式解析和在WPF中的实现(一)MVVM模式简介 MVVM模式解析和在WPF中的实现(二)数据绑定 MVVM模式解析和在WPF中 ...
- 自定义WPF ListBox的选中项样式
首先介绍一种简单地方法:就是通过自定义SystemColors类的参数来自定义WPF ListBox选择颜色的,SystemColors的HighlightBrushKey和HighlightText ...
- Android高手进阶教程(二十八)之---Android ViewPager控件的使用(基于ViewPager的横向相册)!!!
分类: Android高手进阶 Android基础教程 2012-09-14 18:10 29759人阅读 评论(35) 收藏 举报 android相册layoutobjectclassloade ...
- Wireshark入门与进阶系列(二)
摘自http://blog.csdn.net/howeverpf/article/details/40743705 Wireshark入门与进阶系列(二) “君子生非异也,善假于物也”---荀子 本文 ...
- WPF ListBox数据绑定
本文来源 http://wshoufeng1989.blog.163.com/blog/static/202047033201282911633670/ 风随影动的博客 使用数据库AllData , ...
- WPF的消息机制(二)- WPF内部的5个窗口之隐藏消息窗口
目录 WPF的消息机制(一)-让应用程序动起来 WPF的消息机制(二)-WPF内部的5个窗口 (1)隐藏消息窗口 (2)处理激活和关闭的消息的窗口和系统资源通知窗口 (3)用于用户交互的可见窗口 (4 ...
- SpringBoot进阶教程(二十九)整合Redis 发布订阅
SUBSCRIBE, UNSUBSCRIBE 和 PUBLISH 实现了 发布/订阅消息范例,发送者 (publishers) 不用编程就可以向特定的接受者发送消息 (subscribers). Ra ...
随机推荐
- 跟我学Spring Boot(二)Hello World
1.打开DemoApplication添加如下代码 package com.example; import org.springframework.boot.SpringApplication; im ...
- activiti5.22整合modeler时出错TypeError: Cannot read property 'split' of undefined
activiti5.22.0整合modeler时,打开的流程页面不显示工具栏和左边的控件栏,产生如下的错误: TypeError: Cannot read property 'split' of un ...
- GO介绍,环境的配置和安装 简单使用
1. 介绍与安装 Golang 是什么 Go 亦称为 Golang(按照 Rob Pike 说法,语言叫做 Go,Golang 只是官方网站的网址),是由谷歌开发的一个开源的编译型的静态语言. Gol ...
- Mac osx 启用和关闭root用户
设置->群组和用户->点击小
- ubuntu安装rubyOnRails
https://gorails.com/setup/ubuntu/16.04#ruby-rbenv 文章很详细
- 前端之javascript的数据类型1和BOM对象
一 js对象 BOM对象:browser object model浏览器模型对象 window对象:定时器 DOM对象:文档对象模型 js对象:字符串对象,数组对象,日期对象,math对象 new关键 ...
- 数据分析报告格式zz
分析报告的输出是是你整个分析过程的成果,是评定一个产品.一个运营事件的定性结论,很可能是产品决策的参考依据,既然这么重要那当然要写好它了. 我认为一份好的分析报告,有以下一些要点: 首先,要有一个好的 ...
- 如何将spring boot项目打包成war包
一.修改打包形式 在pom.xml里设置 <packaging>war</packaging> 二.移除嵌入式tomcat插件 在pom.xml里找到spring-boot-s ...
- 2018.10.24 bzoj2064: 分裂(状压dp)
传送门 状压dp好题. 考虑对于两个给出的集合. 如果没有两个元素和相等的子集,那么只能全部拼起来之后再拆开,一共需要n1+n2−2n1+n2-2n1+n2−2. 如果有呢? 那么对于没有的就是子问题 ...
- JAVA遇上HTML-----JSP 篇基本概念
Java Web简介 1.什么是WEB应用程序: Web应用程序是一种可以通过Web访问的应用程序.Web应用程序的一个最大好处是用户很容易访问应用程序.用户只需要有浏览器即可,不需要再安装其他软件. ...