2003031118—李伟—Python数据分析第七周作业—MySQL的安装以及使用
| 项目 | MySQL的安装以及使用 |
| 课程班级博客链接 | 20级数据班(本) |
| 这个作业要求链接 | 作业要求 |
| 博客名称 | 2003031118—李伟—Python数据分析第七周作业—MySQL的安装以及使用 |
| 要求 | 每道题要有题目,代码(使用插入代码,不会插入代码的自己查资料解决,不要直接截图代码!!),截图(只截运行结果)。 |
1.安装好MySQL,连接上Navicat。
*扩展阅读:小白必看!超详细MySQL下载安装教程
*扩展阅读:MySQL教程
- *扩展阅读:MySQL卸载
2.完成课本练习(代码4-1~3/4-9~31)。(4-1至4-3是一个,4-9至4-11是一个,4-12至4-31是一个)说明:4-12至4-31分开运行,最后有总的
代码4-1至代码4-3
 1 from sqlalchemy import create_engine

 2 engine=create_engine("mysql+pymysql://root:root@127.0.0.1:3306/testdb?charset=utf8")

 3 print(engine)

 4

 5 import pandas as pd

 6 #使用read_sql_query查看testdb中的数据表书目

 7 formlist=pd.read_sql_query('show tables',con=engine)

 8 print('testdb数据表清单为:","\n ',formlist)

 9

10 detail1=pd.read_sql_table('meal_order_detail1',con=engine)

11 print("使用read_sql_query读取清单的长度为:",len(detail1))

12

13 detail2=pd.read_sql('select*from meal_order_detail2',con=engine)

14 print("使用read_sql函数+SQL语句读取的订单详情表长度为:",len(detail2))

15

16 detail3=pd.read_sql('meal_order_detail3',con=engine)

17 print('使用read_sql函数+SQL语句读取的订单详情表长度为:',len(detail3))

18

19 detail1.to_sql('test1',con=engine,index=False,if_exists='replace')

20 formlist1=pd.read_sql_query('show tables',con=engine)

21 print('新增一个表格后,testdb数据表清单为:“,”\n',formlist1)

代码4-9至代码4-11
 1 from sqlalchemy import create_engine

 2 engine=create_engine("mysql+pymysql://root:root@127.0.0.1:3306/testdb?charset=utf8")

 3 import pandas as pd

 4 order1=pd.read_sql_table('meal_order_detail1',con=engine)

 5 print("订单详情表1的长度为:",len(order1))

 6 order2=pd.read_sql_table('meal_order_detail2',con=engine)

 7 print("订单详情表2的长度为:",len(order2))

 8 order3=pd.read_sql_table('meal_order_detail3',con=engine)

 9 print("订单详情表3的长度为:",len(order3))

10 order4=pd.read_table('D:/桌面/第四章/meal_order_info.csv',sep=",",encoding='gbk')

11 print('订单信息表的长度为:',len(order4))

12 user=pd.read_excel('D:/桌面/第四章/users.xlsx')

13 print('客户信息表的长度为:',len(user))

代码4-12至4-14
1 from sqlalchemy import create_engine
2 engine=create_engine("mysql+pymysql://root:root@127.0.0.1:3306/testdb?charset=utf8")
3 print(engine)
4
5 import pandas as pd
6 #使用read_sql_query查看testdb中的数据表书目
7 detail=pd.read_sql_table('meal_order_detail1',con=engine)
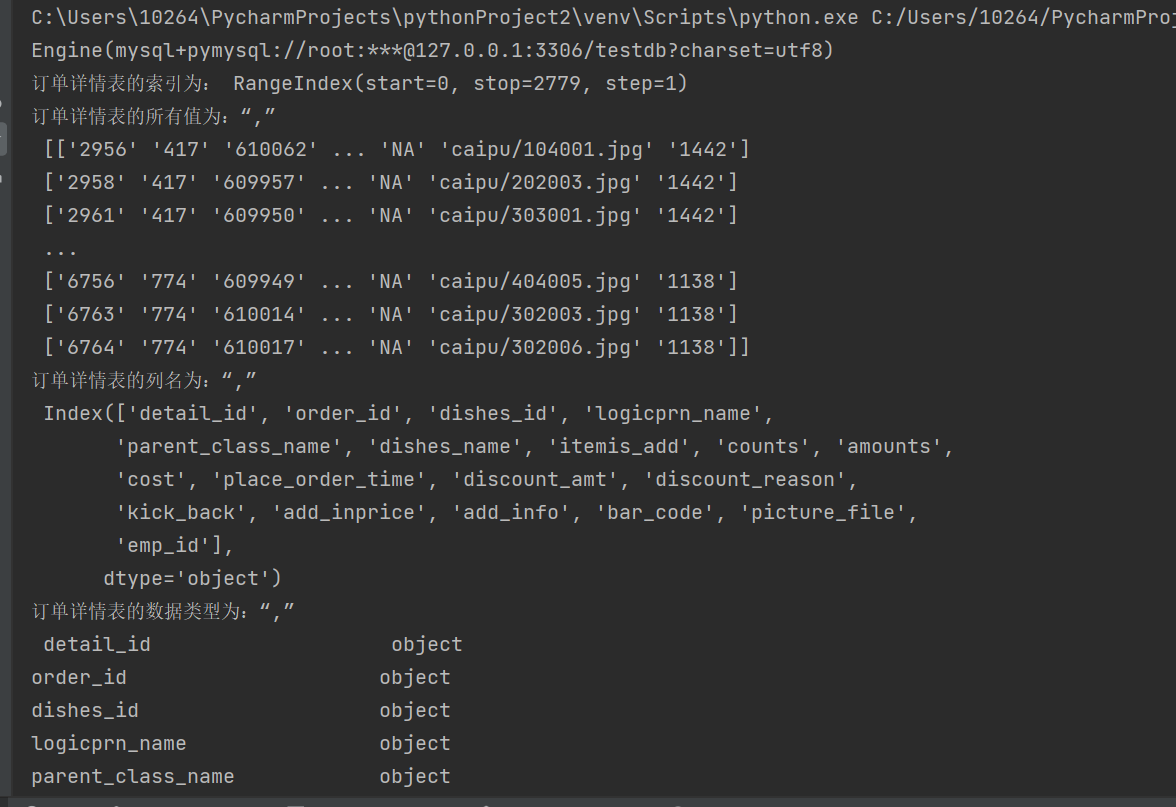
8 print('订单详情表的索引为:',detail.index)
9 print('订单详情表的所有值为:“,”\n',detail.values)
10 print('订单详情表的列名为:“,”\n',detail.columns)
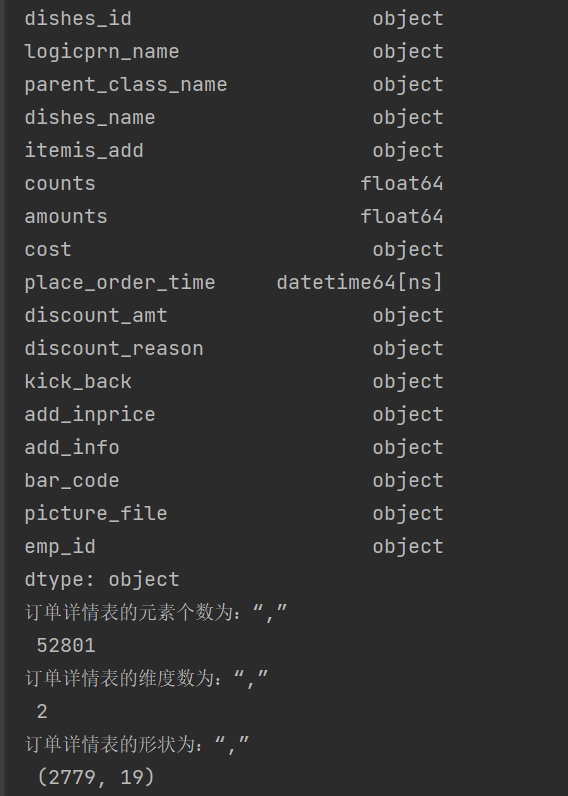
11 print('订单详情表的数据类型为:“,”\n',detail.dtypes)
12 print('订单详情表的元素个数为:“,”\n',detail.size)
13 print('订单详情表的维度数为:“,”\n',detail.ndim)
14 print('订单详情表的形状为:“,”\n',detail.shape)
15 print('订单详情表转置前形状为:“,”\n',detail.shape)
16 print('订单详情表转置后形状为:“,”\n',detail.T.shape)

代码4-15至4-19
 1 from sqlalchemy import create_engine

 2 engine=create_engine("mysql+pymysql://root:root@127.0.0.1:3306/testdb?charset=utf8")

 3 print(engine)

 4

 5 import pandas as pd

 6 #使用read_sql_query查看testdb中的数据表书目

 7 detail=pd.read_sql_table('meal_order_detail1',con=engine)

 8

 9 order_id=detail['order_id']

10 print("订单详情表中的order_id的形状为:','\n",order_id.shape)

11 dishes_name=detail.dishes_name

12 print('订单详情表中的dishes_name的形状为:',dishes_name.shape)

13 dishes_name5=detail['dishes_name'][:5]

14 print('订单详情表中的dishes_name前5个的元素为:',dishes_name5)

15 orderDish=detail[['order_id','dishes_name']][:5]

16 print("订单详情表中的order_id和dishes_name前5个的元素为:","\n",orderDish)

17 order5=detail[:][1:6]

18 print('订单详情表的1——6行元素为:","\n',order5)

代码4-20至4-23
1 from sqlalchemy import create_engine
2 engine=create_engine("mysql+pymysql://root:root@127.0.0.1:3306/testdb?charset=utf8")
3 print(engine)
4
5 import pandas as pd
6 #使用read_sql_query查看testdb中的数据表书目
7 detail=pd.read_sql_table('meal_order_detail1',con=engine)
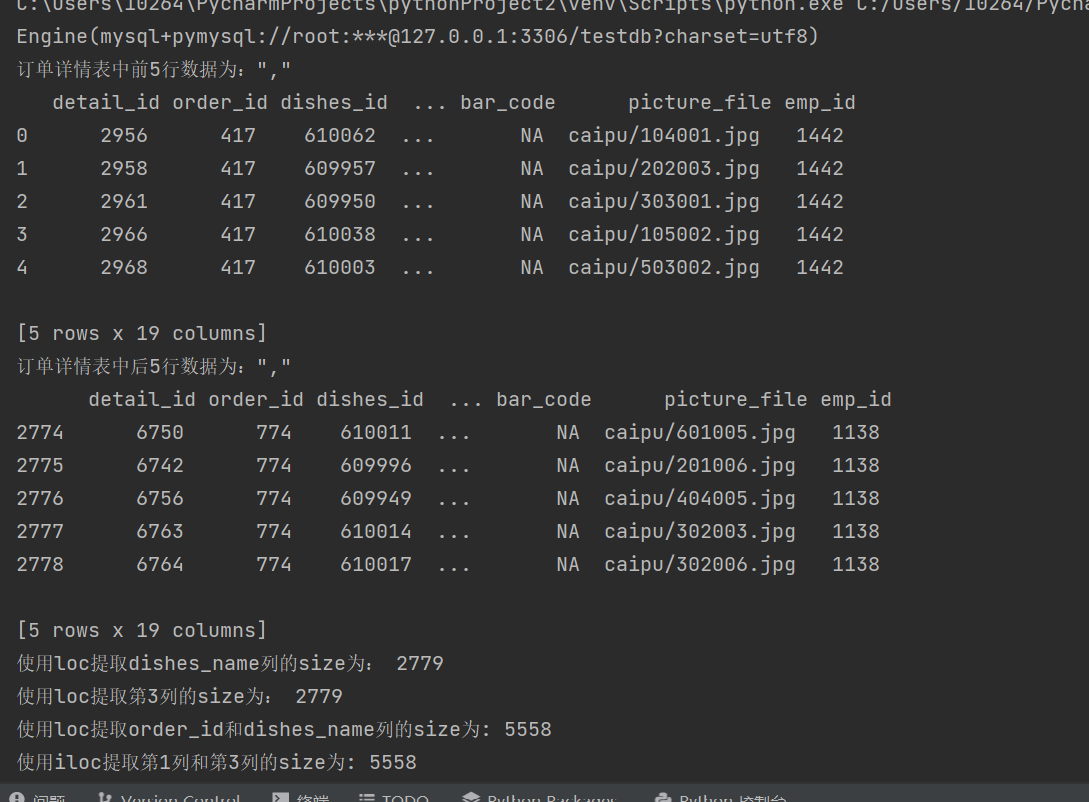
8 print('订单详情表中前5行数据为:","\n',detail.head())
9 print('订单详情表中后5行数据为:","\n',detail.tail())
10
11 dishes_name1=detail.loc[:,'dishes_name']
12 print('使用loc提取dishes_name列的size为:',dishes_name1.size)
13 dishes_name2=detail.iloc[:,3]
14 print('使用loc提取第3列的size为:',dishes_name2.size)
15
16 orderDish1=detail.loc[:,['order_id','dishes_name']]
17 print('使用loc提取order_id和dishes_name列的size为:',orderDish1.size)
18 orderDish2=detail.iloc[:,[1,3]]
19 print('使用iloc提取第1列和第3列的size为:',orderDish2.size)
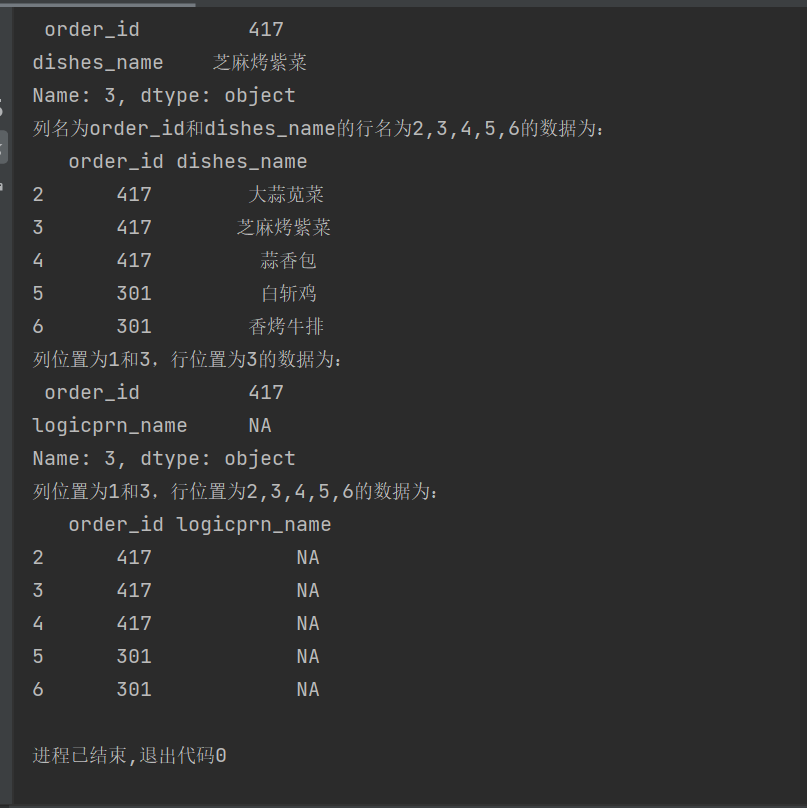
20 print('列名为order_id和dishes_name的行名为3的数据为:\n',detail.loc[3,['order_id','dishes_name']])
21 print('列名为order_id和dishes_name的行名为2,3,4,5,6的数据为:\n',detail.loc[2:6,['order_id','dishes_name']])
22 print('列位置为1和3,行位置为3的数据为:\n',detail.iloc[3,[1,3]])
23 print('列位置为1和3,行位置为2,3,4,5,6的数据为:\n',detail.iloc[2:7,[1,3]])
代码4-24至4-27
 1 from sqlalchemy import create_engine

 2 engine=create_engine("mysql+pymysql://root:root@127.0.0.1:3306/testdb?charset=utf8")

 3 print(engine)

 4

 5 import pandas as pd

 6 #使用read_sql_query查看testdb中的数据表书目

 7 detail=pd.read_sql_table('meal_order_detail1',con=engine)

 8

 9 print('detail中order为458的dishes_name为;\n',detail.loc[detail['order_id']=='458',['order_id','dishes_name']])

10 print('detail中order_id为458的1、5列数据为:\n',detail.iloc[(detail['order_id']=='458').values,[1,5]])

11 print('列名为dishes_name行名为2,3,4,5,6的数据为:\n',detail.loc[2:6,'dishes_name'])

12 print('列位置为5,行位置为2-6的数据为:\n',detail.iloc[2:6,5])

13 #print('列位置为5,行名为2-6的数据为:","\n',detail.ix[2:6,5])

14 detail.loc[detail['order_id']=='458','order_id']='45800'

15 print('更改后detail中order_id为458的order_id为:\n',detail.loc[detail['order_id']=='458','order_id'])

16 print('更改后detail中order_id为45800的order_id为:\n',detail.loc[detail['order_id']=='45800','order_id'])


代码4-28至4-31
 1 from sqlalchemy import create_engine

 2 engine=create_engine("mysql+pymysql://root:root@127.0.0.1:3306/testdb?charset=utf8")

 3 print(engine)

 4

 5 import pandas as pd

 6 #使用read_sql_query查看testdb中的数据表书目

 7 detail=pd.read_sql_table('meal_order_detail1',con=engine)

 8

 9 detail['payment']=detail['counts']*detail['amounts']

10 print('detail新增列payment的前5行为:","\n',detail['payment'].head())

11 detail['pay_way']='现金支付'

12 print('detail新增列pay-way的前5行为;","\n',detail['pay_way'].head())

13 print('删除pay_way前detail的列索引为;","\n',detail.columns)

14 detail.drop(labels='pay_way',axis=1,inplace=True)

15 print('删除pay_way后detail的列索引为:","\n',detail.columns)

16 print('删除1-10行前detail的长度为:',len(detail))

17 detail.drop(labels=range(1,11),axis=0,inplace=True)

18 print('删除1-10行后detail的长度为:',len(detail))


代码 4-12至4-31
 1 from sqlalchemy import create_engine

 2 engine=create_engine("mysql+pymysql://root:root@127.0.0.1:3306/testdb?charset=utf8")

 3 print(engine)

 4

 5 import pandas as pd

 6 #使用read_sql_query查看testdb中的数据表书目

 7 detail=pd.read_sql_table('meal_order_detail1',con=engine)

 8 print('订单详情表的索引为:',detail.index)

 9 print('订单详情表的所有值为:“,”\n',detail.values)

10 print('订单详情表的列名为:“,”\n',detail.columns)

11 print('订单详情表的数据类型为:“,”\n',detail.dtypes)

12 print('订单详情表的元素个数为:“,”\n',detail.size)

13 print('订单详情表的维度数为:“,”\n',detail.ndim)

14 print('订单详情表的形状为:“,”\n',detail.shape)

15 print('订单详情表转置前形状为:“,”\n',detail.shape)

16 print('订单详情表转置后形状为:“,”\n',detail.T.shape)

17

18 order_id=detail['order_id']

19 print("订单详情表中的order_id的形状为:','\n",order_id.shape)

20 dishes_name=detail.dishes_name

21 print('订单详情表中的dishes_name的形状为:',dishes_name.shape)

22 dishes_name5=detail['dishes_name'][:5]

23 print('订单详情表中的dishes_name前5个的元素为:',dishes_name5)

24 orderDish=detail[['order_id','dishes_name']][:5]

25 print("订单详情表中的order_id和dishes_name前5个的元素为:","\n",orderDish)

26 order5=detail[:][1:6]

27 print('订单详情表的1——6行元素为:","\n',order5)

28

29 print('订单详情表中前5行数据为:","\n',detail.head())

30 print('订单详情表中后5行数据为:","\n',detail.tail())

31

32 dishes_name1=detail.loc[:,'dishes_name']

33 print('使用loc提取dishes_name列的size为:',dishes_name1.size)

34 dishes_name2=detail.iloc[:,3]

35 print('使用loc提取第3列的size为:',dishes_name2.size)

36

37 orderDish1=detail.loc[:,['order_id','dishes_name']]

38 print('使用loc提取order_id和dishes_name列的size为:',orderDish1.size)

39 orderDish2=detail.iloc[:,[1,3]]

40 print('使用iloc提取第1列和第3列的size为:',orderDish2.size)

41 print('列名为order_id和dishes_name的行名为3的数据为:\n',detail.loc[3,['order_id','dishes_name']])

42 print('列名为order_id和dishes_name的行名为2,3,4,5,6的数据为:\n',detail.loc[2:6,['order_id','dishes_name']])

43 print('列位置为1和3,行位置为3的数据为:\n',detail.iloc[3,[1,3]])

44 print('列位置为1和3,行位置为2,3,4,5,6的数据为:\n',detail.iloc[2:7,[1,3]])

45

46 print('detail中order为458的dishes_name为;\n',detail.loc[detail['order_id']=='458',['order_id','dishes_name']])

47 print('detail中order_id为458的1、5列数据为:\n',detail.iloc[(detail['order_id']=='458').values,[1,5]])

48 print('列名为dishes_name行名为2,3,4,5,6的数据为:\n',detail.loc[2:6,'dishes_name'])

49 print('列位置为5,行位置为2-6的数据为:\n',detail.iloc[2:6,5])

50 #print('列位置为5,行名为2-6的数据为:","\n',detail.ix[2:6,5])

51 detail.loc[detail['order_id']=='458','order_id']='45800'

52 print('更改后detail中order_id为458的order_id为:\n',detail.loc[detail['order_id']=='458','order_id'])

53 print('更改后detail中order_id为45800的order_id为:\n',detail.loc[detail['order_id']=='45800','order_id'])

54

55 detail['payment']=detail['counts']*detail['amounts']

56 print('detail新增列payment的前5行为:","\n',detail['payment'].head())

57 detail['pay_way']='现金支付'

58 print('detail新增列pay-way的前5行为;","\n',detail['pay_way'].head())

59 print('删除pay_way前detail的列索引为;","\n',detail.columns)

60 detail.drop(labels='pay_way',axis=1,inplace=True)

61 print('删除pay_way后detail的列索引为:","\n',detail.columns)

62 print('删除1-10行前detail的长度为:',len(detail))

63 detail.drop(labels=range(1,11),axis=0,inplace=True)

64 print('删除1-10行后detail的长度为:',len(detail))
2003031118—李伟—Python数据分析第七周作业—MySQL的安装以及使用的更多相关文章
- 2003031121——浦娟——Python数据分析第七周作业——MySQL的安装及使用
项目 要求 课程班级博客链接 20级数据班(本) 作业要求链接 Python第七周作业 博客名称 2003031121--浦娟--Python数据分析第七周作业--MySQL的安装及使用 要求 每道题 ...
- 2003031121-浦娟-python数据分析第三周作业-第一次作业
项目 内容 课程班级博客链接 https://edu.cnblogs.com/campus/pexy/20sj 作业链接 https://edu.cnblogs.com/campus/pexy/20s ...
- 2017-2018-1 我爱学Java 第六七周 作业
团队六七周作业 完善版需求规格说明书 制定团队编码规范 数据库设计 后端架构设计 TODOList 参考资料 完善版需求规格说明书 <需求规格说明书>初稿不足之处: 1.开发工具写错 2. ...
- 2018-2019-1 20189221 《Linux内核原理与分析》第七周作业
2018-2019-1 20189221 <Linux内核原理与分析>第七周作业 实验六 分析Linux内核创建一个新进程的过程 代码分析 task_struct: struct task ...
- 2017-2018-1 JAVA实验站 第六、七周作业
2017-2018-1 JAVA实验站 第六.七周作业 详情请见团队博客
- 2017-2018-1 JaWorld 第六、七周作业
2017-2018-1 JaWorld 第六.七周作业 修改需求规格说明书 上次的<需求规格说明书>初稿有哪些不足? 王译潇同学回答: 1. 引言和目的性考虑的不是很周全. 2. ...
- 2017-2018-1 20179205《Linux内核原理与设计》第七周作业
<Linux内核原理与设计>第七周作业 视频学习及操作分析 创建一个新进程在内核中的执行过程 fork.vfork和clone三个系统调用都可以创建一个新进程,而且都是通过调用do_for ...
- 2019-2020-1 20199325《Linux内核原理与分析》第七周作业
第七周作业 1.进程描述符task_struct数据结构(一) 为了管理进程,内核必须对每个进程进行清晰的描述,进程描述符提供了内核所需了解的进程信息. struct task_struct数据结构很 ...
- 2019-2020-1 20199329《Linux内核原理与分析》第七周作业
<Linux内核原理与分析>第七周作业 一.本周内容概述: 对Linux系统如何创建一个新进程进行追踪 分析Linux内核创建一个新进程的过程 二.本周学习内容: 1.学习进程的描述 操作 ...
- 2020-2021-1 20209307《Linux内核原理与分析》第七周作业
这个作业属于哪个课程 <2020-2021-1Linux内核原理与分析)> 这个作业要求在哪里 <2020-2021-1Linux内核原理与分析第七周作业> 这个作业的目标 & ...
随机推荐
- 常用的Shell实用脚本
1.检测两台服务器指定目录下的文件的一致性 #!/bin/bash######################################检测两台服务器指定目录下的文件一致性########### ...
- csr_matrix与ndarray类型互转
ndarry 转 csr_matrix>>> import numpy as np>>> import scipy.sparse >>> my_m ...
- wmi和wmic
https://baike.baidu.com/item/Windows%20Management%20Instrumentation/572501?fromtitle=WMI&fromid= ...
- Android 内存优化浅析
一:内存占用几大要点 1,Object Cache:Image cache,single instance obj(重量级别,例如数据库连接obj,bitmap ref),Thread过多, 2,Vi ...
- kubectl 补全报错:-bash: _get_comp_words_by_ref: command not found
1.kubectl自动补全设置 yum -y install bash-completion source <(kubectl completion bash) # 在 bash 中设置当前 s ...
- 【C学习随笔】day1-4 写一篇博客
1>写一个自我介绍 大家好 我是一名普普通通的单片机CODER,懒懒散散的度过了四年大学时光,等到工作时才发现自己缺失了很多的技术.打算在一年内恶补大学时的知识,争取早日成为一名合格的码农.2& ...
- rdlc 中文在win10中显示异常,在非win10中显示正常
RDLC中的默认字体Arial. 在win10中,RDLC为Arial时,显示中文会异常,这个时候,只需要将Font修改为中文字体就可以了,例如修改为宋体.
- 创建一个本地CocoaPods库 并在项目中使用该库
1.新建一个项目如下 2.往TestLib中添加两个文件 3.终端进入TestLib 生成git文件 然后提交到本地 git init git add . git commit -m '添加perso ...
- python_print 函数 (99乘法表)
print 函数末尾自带换行: i = 1 while i <= 5: print("*") i += 1 执行结果: * * * * * 如果想实现不换行,可以使用拼接,或 ...
- html让容器居中,css让容器水平垂直居中的7种方式
这篇文章主要为大家详细介绍了css让容器水平垂直居中的7种方式,具有一定的参考价值,感兴趣的小伙伴们可以参考一下 这种css布局平时用的比较多,也是面试题常出的一个题,网上一搜一大丢,不过还是想自己总 ...