
Ansible介绍以及基于角色搭建LNMP和zabbix
1 ansible 常用指令总结,并附有相关示例。
/usr/bin/ansible主程序,临时命令执行工具/usr/bin/ansible-doc查看配置文档,模块功能查看工具,相当于man/usr/bin/ansible-playbook定制自动化任务,编排剧本工具,相当于脚本/usr/bin/ansible-pull远程执行命令的工具/usr/bin/ansible-vault文件加密工具/usr/bin/ansible-console基于Console界面与用户交互的执行工具/usr/bin/ansible-galaxy下载/上传优秀代码或Roles模块的官网平台
利用ansible实现管理的主要方式:
Ansible Ad-Hoc即利用ansible命令,主要用于临时命令使用场景Ansible playbook主要用于长期规划好的,大型项目的场景,需要有前期的规划过程
ansible 使用前准备
ansible 相关工具大多数是通过ssh协议,实现对远程主机的配置管理、应用部署、任务执行等功能
建议:使用此工具前,先配置ansible主控端能基于密钥认证的方式联系各个被管理节点
1.1 ansible-doc
此工具用来显示模块帮助,相当于man
格式
ansible-doc [options] [module...]

-l, --list #列出可用模块

-s, --snippet #显示指定模块的playbook片段
范例:
#列出所有模块

ansible-doc -l

#查看指定模块帮助用法

ansible-doc ping

#查看指定模块帮助用法

ansible-doc -s ping
范例: 查看指定的插件
[13:38:40 root@ansible-rocky ~]$ ansible-doc -t connection -l

[13:39:08 root@ansible-rocky ~]$ ansible-doc -t lookup -l
1.2 ansible
1.2.1 Ansible Ad-Hoc 介绍
Ansible Ad-Hoc 的执行方式的主要工具就是 ansible
特点: 一次性的执行,不会保存执行命令信息,只适合临时性或测试性的任务
1.2.2 ansible 命令用法
格式:
ansible <host-pattern> [-m module_name] [-a args]
选项说明:
--version                               #显示版本

-m module                               #指定模块,默认为command

-v                                      #详细过程 -vv -vvv更详细

--list-hosts                            #显示主机列表,可简写 --list

-C, --check                             #检查,并不执行

-T, --timeout=TIMEOUT                   #执行命令的超时时间,默认10s

-k, --ask-pass                          #提示输入ssh连接密码,默认Key验证

-u, --user=REMOTE_USER                  #执行远程执行的用户,默认root

-b, --become                            #代替旧版的sudo实现通过sudo机制实现提升权限

--become-user=USERNAME                  #指定sudo的run as用户,默认为root

-K, --ask-become-pass                   #提示输入sudo时的口令

-f FORKS, --forks FORKS                 #指定并发同时执行ansible任务的主机数

-i INVENTORY, --inventory INVENTORY     #指定主机清单文件
范例:
#先打通基于key验证

#以yanlinux用户执行ping存活检测

[14:28:30 yanlinux@ansible-rocky ~]$ ansible all -m ping -u yanlinux

10.0.0.18 | SUCCESS => {

    "ansible_facts": {

        "discovered_interpreter_python": "/usr/libexec/platform-python"

    },

    "changed": false,

    "ping": "pong"

}

10.0.0.102 | SUCCESS => {

    "ansible_facts": {

        "discovered_interpreter_python": "/usr/bin/python3"

    },

    "changed": false,

    "ping": "pong"

}

10.0.0.7 | SUCCESS => {

    "ansible_facts": {

        "discovered_interpreter_python": "/usr/bin/python"

    },

    "changed": false,

    "ping": "pong"

}

#以yanlinux sudo至root执行命令

##没有添加sudo授权之前

[14:36:46 yanlinux@ansible-rocky ~]$ ansible all -a 'ls /root'

10.0.0.18 | FAILED | rc=2 >>

ls: cannot open directory '/root': Permission deniednon-zero return code

10.0.0.102 | FAILED | rc=2 >>

ls: cannot open directory '/root': Permission deniednon-zero return code

10.0.0.7 | FAILED | rc=2 >>

ls: cannot open directory /root: Permission deniednon-zero return code

##在所有被控制主机上都加上suod授权

[14:30:46 root@ansible-rocky ~]$ echo "yanlinux    ALL=(ALL)   NOPASSWD: ALL" >> /etc/sudoers

[14:37:01 yanlinux@ansible-rocky ~]$ ansible all -a 'ls /root' -b

10.0.0.102 | CHANGED | rc=0 >>

init_os.sh

snap

10.0.0.7 | CHANGED | rc=0 >>

anaconda-ks.cfg

init_os.sh

10.0.0.18 | CHANGED | rc=0 >>

anaconda-ks.cfg

init_os.sh

##所有被管理主机上创建用户magedu

[14:37:05 yanlinux@ansible-rocky ~]$ ansible all -a 'useradd magedu' -b

10.0.0.102 | CHANGED | rc=0 >>

10.0.0.18 | CHANGED | rc=0 >>

10.0.0.7 | CHANGED | rc=0 >>

[14:39:46 yanlinux@ansible-rocky ~]$ ansible all -a 'getent passwd magedu' -b

10.0.0.7 | CHANGED | rc=0 >>

magedu:x:1002:1002::/home/magedu:/bin/bash

10.0.0.102 | CHANGED | rc=0 >>

magedu:x:1001:1001::/home/magedu:/bin/sh

10.0.0.18 | CHANGED | rc=0 >>

magedu:x:1001:1001::/home/magedu:/bin/bash
范例: 并发执行控制
#并发是1一个主机一个主机的执行,一条条返回结果

[14:42:47 root@ansible-rocky ~]$ ansible all -a 'sleep 5' -f1

#并发是10,同时10个主机执行命令,返回结果

[14:42:47 root@ansible-rocky ~]$ ansible all -a 'sleep 5' -f10
范例: 使用普通用户连接远程主机执行代替另一个用户身份执行操作
#在被管理主机上创建用户并sudo授权

[14:34:00 root@ubuntu2004 ~]$ useradd magedu

[14:34:29 root@ubuntu2004 ~]$ echo magedu:centos1 |chpasswd

#以yanlinux的用户连接用户并利用sudo代表magedu执行whoami命令

[14:58:37 yanlinux@ansible-rocky ~]$ ansible all -a 'whoami' -b --become-user=magedu

10.0.0.18 | CHANGED | rc=0 >>

magedu

10.0.0.7 | CHANGED | rc=0 >>

magedu
1.3 ansible-console
此工具可交互执行命令,支持tab,ansible 2.0+新增
提示符格式:
执行用户@当前操作的主机组 (当前组的主机数量)[f:并发数]$
常用子命令:
- 设置并发数:
forks n例如:forks 10 - 切换组:
cd主机组 例如:cd web - 列出当前组主机列表:
list - 列出所有的内置命令:
?或help
范例
[15:24:28 root@ansible-rocky ~]$ ansible-console

Welcome to the ansible console. Type help or ? to list commands.

root@all (3)[f:5]$ ping

10.0.0.18 | SUCCESS => {

    "ansible_facts": {

        "discovered_interpreter_python": "/usr/libexec/platform-python"

    },

    "changed": false,

    "ping": "pong"

}

10.0.0.102 | SUCCESS => {

    "ansible_facts": {

        "discovered_interpreter_python": "/usr/bin/python3"

    },

    "changed": false,

    "ping": "pong"

}

10.0.0.7 | SUCCESS => {

    "ansible_facts": {

        "discovered_interpreter_python": "/usr/bin/python"

    },

    "changed": false,

    "ping": "pong"

}

root@all (3)[f:5]$ list

10.0.0.18

10.0.0.7

10.0.0.102

root@all (3)[f:5]$ cd websrvs

root@websrvs (2)[f:5]$ list

10.0.0.18

10.0.0.7

root@websrvs (2)[f:5]$ forks 10

root@websrvs (2)[f:10]$ cd appsrvs

root@appsrvs (2)[f:10]$ list

10.0.0.102

10.0.0.18
1.4 ansible-playbook
此工具用于执行编写好的 playbook 任务
范例:
[15:27:57 root@ansible-rocky ~]$ vi hello.yml

---

#hello world yml file

- hosts: websrvs

  remote_user: root

  gather_facts: no

  tasks:

    - name: hello world

      command: /usr/bin/wall hello world

[15:30:12 root@ansible-rocky ~]$ ansible-playbook hello.yml

PLAY [websrvs] ****************************************************************************************

TASK [hello world] ************************************************************************************

changed: [10.0.0.18]

changed: [10.0.0.7]

PLAY RECAP ********************************************************************************************

10.0.0.18                  : ok=1    changed=1    unreachable=0    failed=0    skipped=0    rescued=0    ignored=0

10.0.0.7                   : ok=1    changed=1    unreachable=0    failed=0    skipped=0    rescued=0    ignored=0


1.5 ansible-vault
此工具可以用于加密解密yml文件
格式:
ansible-vault [create|decrypt|edit|encrypt|rekey|view]
范例:
#1 加密

[15:31:01 root@ansible-rocky ~]$ ansible-vault encrypt hello.yml

New Vault password:

Confirm New Vault password:

Encryption successful

##查看文件内容

[15:38:15 root@ansible-rocky ~]$ cat hello.yml

$ANSIBLE_VAULT;1.1;AES256

65323766623831636563636132623333623932633461396563383764333037396563633766363231

3335646336346136626231353133623566626166626336380a306630643338353031353739353538

62373930306636633430653537363534376231323839643131376335653366656634616365663063

6236663364343461610a383365643534646564316261326166316233393039386134363436313138

63323939663537666462646233613262646637306130626336336239323737623833393735666364

36336334316666326265356166326163373039616533353564353964396266376637363037353338

37623639656262303966363766356630376466666463363338353535623635633137616335383333

65333263643762353264326563326362393663316538666530616664643438666435373162616164

30313761323030343165666330326537653430333764363834326566333666316133386465663334

63353035616266396366366662643839353431653736353465626261623433343735663534663831

32636632653730323465366531353531633761623930303138643337613162613062333237633566

39663562393535343165

#2 解密

[15:38:18 root@ansible-rocky ~]$ ansible-vault decrypt hello.yml

Vault password:

Decryption successful

[15:39:50 root@ansible-rocky ~]$ cat hello.yml

---

#hello world yml file

- hosts: websrvs

  remote_user: root

  gather_facts: no

  tasks:

    - name: hello world

      command: /usr/bin/wall hello world

#3 查看加密后的yml文件内容

[15:41:44 root@ansible-rocky ~]$ ansible-vault view hello.yml

Vault password:

---

#hello world yml file

- hosts: websrvs

  remote_user: root

  gather_facts: no

  tasks:

    - name: hello world

      command: /usr/bin/wall hello world

#4 编辑加密文件

[15:41:50 root@ansible-rocky ~]$ ansible-vault edit hello.yml

Vault password:             #输入密码后进入vim编辑器进行编辑

#5 修改口令

[15:44:53 root@ansible-rocky ~]$ ansible-vault rekey hello.yml

Vault password:    #先前的口令

New Vault password:  #修改为的口令

Confirm New Vault password:  #再确认一遍

Rekey successful

#6 创建加密新文件

[15:46:31 root@ansible-rocky ~]$ ansible-vault create new.yml

New Vault password:

Confirm New Vault password:

#7 交互式输入密码来执行加密文件

[15:46:46 root@ansible-rocky ~]$ ansible-playbook --ask-vault-pass hello.yml

Vault password:

PLAY [websrvs] ****************************************************************************************

TASK [hello world] ************************************************************************************

changed: [10.0.0.18]

changed: [10.0.0.7]

PLAY RECAP ********************************************************************************************

10.0.0.18                  : ok=1    changed=1    unreachable=0    failed=0    skipped=0    rescued=0    ignored=0

10.0.0.7                   : ok=1    changed=1    unreachable=0    failed=0    skipped=0    rescued=0    ignored=0

#8 从文件中读取密码

[15:52:56 root@ansible-rocky ~]$ ansible-playbook --vault-password-file pass.txt hello.yml

PLAY [websrvs] ****************************************************************************************

TASK [hello world] ************************************************************************************

changed: [10.0.0.18]

changed: [10.0.0.7]

PLAY RECAP ********************************************************************************************

10.0.0.18                  : ok=1    changed=1    unreachable=0    failed=0    skipped=0    rescued=0    ignored=0

10.0.0.7                   : ok=1    changed=1    unreachable=0    failed=0    skipped=0    rescued=0    ignored=0

#9 从配置文件中添加密码文件

[15:53:33 root@ansible-rocky ~]$ vi /etc/ansible/ansible.cfg

#添加以下一行信息

ault-password-file=pass.txt

[15:58:58 root@ansible-rocky ~]$ ansible-playbook hello.yml

PLAY [websrvs] ****************************************************************************************

TASK [hello world] ************************************************************************************

changed: [10.0.0.18]

changed: [10.0.0.7]

PLAY RECAP ********************************************************************************************

10.0.0.18                  : ok=1    changed=1    unreachable=0    failed=0    skipped=0    rescued=0    ignored=0

10.0.0.7                   : ok=1    changed=1    unreachable=0    failed=0    skipped=0    rescued=0    ignored=0
1.6 ansible-galaxy
Galaxy 是一个免费网站, 类似于github网站, 网站上发布了很多的共享的roles角色。
Ansible 提供了ansible-galaxy命令行工具连接 https://galaxy.ansible.com 网站下载相应的roles, 进行init(初始化、search( 查拘、install(安装、 remove(移除)等操作。
范例
#搜索项目

[16:05:04 root@ansible-rocky ~]$ ansible-galaxy search lamp

Found 100 roles matching your search:

 Name                                      Description

 ----                                      -----------

 abhiarun_94.apache_lamp                   your role description

 adelaidearnauld.galaxy-lamp               your description

 adelaidearnauld.lamp_compose              your description

 ajish_antony.ansible_lamp                 your role description

 AlexanderAllen.Liara                      The sexiest toolkit for LAMP hackers.

 alphinaugustine.ansible_role              your description

 amtega.horde                              Setup horde

 ......

#2 列出所有已安装的galaxy

[16:06:32 root@ansible-rocky ~]$ ansible-galaxy list

# /usr/share/ansible/roles

# /etc/ansible/roles

#3 安装galaxy,默认下载到~/.ansible/roles

[16:14:06 root@ansible-rocky ~]$ ansible-galaxy install 想要安装的galaxy

#删除

ansible-galaxy remove
2 总结ansible role目录结构及文件用途。
roles目录结构:
├── playbook1.yml

├── playbook2.yml

├── roles/

│   ├── project1/

│   │	├── tasks/

│   │	├── files/

│   │	├── vars/

│   │	├── templates/

│   │	├── handlers/

│   │	├── default/

│   │	└── meta/

│   ├── project2/

│   │	├── tasks/

│   │	├── files/

│   │	├── vars/

│   │	├── templates/

│   │	├── handlers/

│   │	├── default/

│   │	└── meta/
Roles各目录作用
roles/project/ :项目名称,有以下子目录
files/:存放由copy或script模块等调用的文件templates/:template模块查找所需要模板文件的目录tasks/:定义task,role的基本元素,至少应该包含一个名为main.yml的文件;其它的文件需要在此文件中通过include进行包含handlers/:至少应该包含一个名为main.yml的文件;此目录下的其它的文件需要在此文件中通过include进行包含vars/:定义变量,至少应该包含一个名为main.yml的文件;此目录下的其它的变量文件需要在此文件中通过include进行包含,也可以通过项目目录中的group_vars/all定义变量,从而实现角色通用代码和项目数据的分离meta/:定义当前角色的特殊设定及其依赖关系,至少应该包含一个名为main.yml的文件,其它文件需在此文件中通过include进行包含default/:设定默认变量时使用此目录中的main.yml文件,比vars的优先级低
3 使用ansible playbook实现一个mysql角色。
#mysql角色目录

[18:16:16 root@ansible-rocky opt]$ tree

.

├── ansible.cfg

├── hosts

├── mysql_role.yml

└── roles

    └── mysql

        ├── files

        │   └── mysql-8.0.31-linux-glibc2.12-x86_64.tar.xz

        ├── tasks

        │   └── main.yml

        └── templates

            └── my.cnf.j2


#定义主机及变量

[18:22:50 root@ansible-rocky opt]$ tail -n9 hosts

[dbsrvs:vars]

db_group=mysql

db_gid=306

db_user=mysql

db_uid=306

db_version=8.0.31

db_file="mysql-{{db_version}}-linux-glibc2.12-x86_64.tar.xz"

db_data_dir="/data/mysql"

db_root_passwd="lgq123456**"

#下载准备mysql源文件包

[18:22:54 root@ansible-rocky opt]$ ls roles/mysql/files/

mysql-8.0.31-linux-glibc2.12-x86_64.tar.xz

#创建task文件

[18:24:40 root@ansible-rocky opt]$ cat roles/mysql/tasks/main.yml

- name: install dependent package

  yum:

    name: "{{ item }}"

  loop:

    - libaio

    - numactl-libs

- name: create mysql group

  group: name={{db_group}} gid={{db_gid}}

- name: create mysql user

  user: name={{db_user}} uid={{db_uid}} system=yes shell="/sbin/nologin" create_home=no group={{db_group}}

- name: copy tar to remote host and file mode

  unarchive:

    src: "{{ db_file }}"

    dest: "/usr/local/"

    owner: root

    group: root

- name: create lingfile /usr/local/mysql

  file:

    src: "/usr/local/mysql-{{ db_version }}-linux-glibc2.12-x86_64"

    dest: "/usr/local/mysql"

    state: link

- name: path file

  copy:

    content: "PATH=/usr/local/mysql/bin:$PATH"

    dest: "/etc/profile.d/mysql.sh"

- name: config file

  template:

    src: my.cnf.j2

    dest: "/etc/my.cnf"

- name: create directory

  file:

    name: "/data"

    state: directory

- name: init mysql data

  shell:

    cmd: "/usr/local/mysql/bin/mysqld --initialize-insecure --user={{ db_user }} --datadir={{ db_data_dir }}"

  tags:

    - init

- name: service script

  copy:

    src: "/usr/local/mysql/support-files/mysql.server"

    dest: "/etc/init.d/mysqld"

    remote_src: yes

    mode: '+x'

- name: start service

  shell:

    cmd: chkconfig --add mysqld;chkconfig mysqld on;service mysqld start

- name: change root password

  shell:

    cmd: "/usr/local/mysql/bin/mysqladmin -uroot password {{ db_root_passwd }}"

#准备MySQL 配置文件模板

[18:25:25 root@ansible-rocky opt]$ cat roles/mysql/templates/my.cnf.j2

[mysqld]

server-id=1

log-bin

datadir={{ db_data_dir }}

socket={{ db_data_dir }}/mysql.sock

log-error={{ db_data_dir }}/mysql.log

pid-file={{ db_data_dir }}/mysql.pid

[client]

socket={{ db_data_dir }}/mysql.sock

#准备MySQL角色playbook文件

[18:25:38 root@ansible-rocky opt]$ cat mysql_role.yml

- hosts: dbsrvs

  remote_user: root

  gather_facts: no

  roles:

    - mysql

#部署MySQL

[18:26:34 root@ansible-rocky opt]$ ansible-playbook -i hosts mysql_role.yml

PLAY [dbsrvs] *****************************************************************************************

TASK [mysql : install dependent package] **************************************************************

ok: [10.0.0.38] => (item=libaio)

ok: [10.0.0.38] => (item=numactl-libs)

TASK [mysql : create mysql group] *********************************************************************

changed: [10.0.0.38]

TASK [mysql : create mysql user] **********************************************************************

changed: [10.0.0.38]

TASK [mysql : copy tar to remote host and file mode] **************************************************

changed: [10.0.0.38]

TASK [mysql : create lingfile /usr/local/mysql] *******************************************************

changed: [10.0.0.38]

TASK [mysql : path file] ******************************************************************************

changed: [10.0.0.38]

TASK [mysql : config file] ****************************************************************************

changed: [10.0.0.38]

TASK [mysql : create directory] ***********************************************************************

ok: [10.0.0.38]

TASK [mysql : init mysql data] ************************************************************************

changed: [10.0.0.38]

TASK [mysql : service script] *************************************************************************

changed: [10.0.0.38]

TASK [mysql : start service] **************************************************************************

changed: [10.0.0.38]

TASK [mysql : change root password] *******************************************************************

changed: [10.0.0.38]

PLAY RECAP ********************************************************************************************

10.0.0.38                  : ok=12   changed=10   unreachable=0    failed=0    skipped=0    rescued=0    ignored=0
4 基于角色完成部署LNMP架构,并支持一键发布,回滚应用。同时基于zabbix角色批量部署zabbix。
4.1 部署LNMP架构
4.1.1 目录结构
[18:57:47 root@ansible-rocky opt]$ tree /opt/

/opt/

├── ansible.cfg

├── hosts

├── lnmp_role.yml

├── mysql_role.yml

├── nginx_role.yml

├── php-fpm_role.yml

├── roles

│   ├── mysql

│   │   ├── files

│   │   │   └── mysql-8.0.31-linux-glibc2.12-x86_64.tar.xz

│   │   ├── tasks

│   │   │   └── main.yml

│   │   └── templates

│   │       └── my.cnf.j2

│   ├── nginx

│   │   ├── handlers

│   │   │   └── main.yml

│   │   ├── tasks

│   │   │   └── main.yml

│   │   └── templates

│   │       ├── nginx.conf.j2

│   │       └── nginx.service.j2

│   ├── php-fpm

│   │   ├── files

│   │   │   ├── test.php

│   │   │   └── www.conf

│   │   ├── handlers

│   │   │   └── main.yml

│   │   ├── tasks

│   │   │   └── main.yml

│   │   └── templates

│   │       ├── php-fpm.conf.j2

│   │       └── php.ini.j2

│   └── wordpress

│       ├── files

│       │   └── wordpress-6.1.1-zh_CN.zip

│       └── tasks

│           └── main.yml

└── wordpress_role.yml

17 directories, 22 files
4.1.2 LNMP架构所需主机清单以及变量设置
[18:58:15 root@ansible-rocky opt]$ cat hosts

[websrvs]

10.0.0.18

10.0.0.28

[websrvs:vars]

version="1.20.2"

url="http://nginx.org/download/nginx-{{ version }}.tar.gz"

install_dir="/apps/nginx"

fqdn="www.yanlinux.org"

root_path="/data/wordpress"

app="wordpress-6.1.1-zh_CN"

[dbsrvs]

10.0.0.38

[dbsrvs:vars]

db_group=mysql

db_gid=306

db_user=mysql

db_uid=306

db_version=8.0.31

db_file="mysql-{{db_version}}-linux-glibc2.12-x86_64.tar.xz"

db_data_dir="/data/mysql"

db_root_passwd="lgq123456**"
4.1.2 实现编译安装nginx角色
#task文件

[17:55:17 root@ansible-rocky roles]$ cat nginx/tasks/main.yml

- name: add group nginx

  group: name=nginx system=yes gid=80

- name: add user nginx

  user: name=nginx group=nginx uid=80 system=yes shell="/sbin/nologin" create_home=no

- name: install dependent package

  yum: name={{item}} state=latest

  loop:

    - gcc

    - make

    - pcre-devel

    - openssl-devel

    - zlib-devel

    - perl-ExtUtils-Embed

- name: get nginx source

  unarchive:

    src: "{{ url }}"

    dest: "/usr/local/src"

    remote_src: yes

- name: compile and install

  shell:

    cmd: "./configure --prefix={{install_dir}} --user=nginx --group=nginx --with-http_ssl_module --with-http_v2_module --with-http_realip_module --with-http_stub_status_module --with-http_gzip_static_module --with-pcre --with-stream --with-stream_ssl_module --with-stream_realip_module && make && make install"

    chdir: "/usr/local/src/nginx-{{ version }}"

    creates: "{{install_dir}}/sbin/nginx"

- name: config file

  template:

    src: nginx.conf.j2

    dest: "{{install_dir}}/conf/nginx.conf"

    owner: nginx

    group: nginx

  notify: restart service

  tags:

    - config

- name: create directory

  file:

    path: "{{install_dir}}/conf/conf.d"

    state: directory

    owner: nginx

    group: nginx

- name: change install directory owner

  file:

    path: "{{install_dir}}"

    owner: nginx

    group: nginx

    recurse: yes

- name: copy service file

  template:

    src: nginx.service.j2

    dest: "/lib/systemd/system/nginx.service"

- name: check config

  shell:

    cmd: "{{install_dir}}/sbin/nginx -t"

  register: check_nginx_config

  changed_when:

    - check_nginx_config.stdout.find('successful')

    - false

- name: start service

  systemd:

    daemon_reload: yes

    name: nginx.service

    state: started

    enabled: yes

#创建handler文件

[17:59:27 root@ansible-rocky roles]$ cat nginx/handlers/main.yml

- name: restart service

  service:

    name: nginx

    state: restarted

#准备两个template文件

[17:59:51 root@ansible-rocky roles]$ cat nginx/templates/nginx.conf.j2

#user  nobody;

user nginx;

worker_processes  {{ ansible_processor_vcpus*2 }};

events {

    worker_connections  1024;

}

http {

    include       mime.types;

    default_type  application/octet-stream;

    log_format  access_json '{"@timestamp":"$time_iso8601",'

        '"host":"$server_addr",'

        '"clientip":"$remote_addr",'

        '"size":$body_bytes_sent,'

        '"responsetime":$request_time,'

        '"upstreamtime":"$upstream_response_time",'

        '"upstreamhost":"$upstream_addr",'

        '"http_host":"$host",'

        '"uri":"$uri",'

        '"xff":"$http_x_forwarded_for",'

        '"referer":"$http_referer",'

        '"tcp_xff":"$proxy_protocol_addr",'

        '"http_user_agent":"$http_user_agent",'

        '"status":"$status"}';

    # logging

    access_log {{install_dir}}/logs/access-json.log access_json;

    error_log {{install_dir}}/logs/error.log warn;

    keepalive_timeout  65;

    include {{install_dir}}/conf/conf.d/*.conf;

}

[18:00:28 root@ansible-rocky roles]$ cat nginx/templates/nginx.service.j2

[Unit]

Description=The nginx HTTP and reverse proxy server

After=network.target remote-fs.target nss-lookup.target

[Service]

Type=forking

PIDFile={{install_dir}}/logs/nginx.pid

ExecStartPre=/bin/rm -f {{install_dir}}/logs/nginx.pid

ExecStartPre={{install_dir}}/sbin/nginx -t

ExecStart={{install_dir}}/sbin/nginx

ExecReload=/bin/kill -s HUP \$MAINPID

KillSignal=SIGQUIT

TimeoutStopSec=5

KillMode=process

PrivateTmp=true

LimitNOFILE=100000

[Install]

WantedBy=multi-user.target

#总入口playbook文件

[18:09:50 root@ansible-rocky opt]$ cat /opt/nginx_role.yml

- hosts: websrvs

  remote_user: root

  roles:

    - nginx
4.1.4 实现php-fpm角色
#首先准备php.ini.j2和www.conf文件

#修改php上传限制配置

[17:04:11 root@ansible-rocky ~]$ vi /opt/roles/php-fpm/templates/php.ini.j2

post_max_size = 100M #将次行从8M修改为100M

upload_max_filesize = 100M #将此行从2M改为100M

#修改配置文件

[17:14:03 root@proxy ~]$ vi /opt/roles/php-fpm/files/www.conf

user = nginx #修改为nginx

group = nginx #修改为nginx

;listen = /run/php-fpm/www.sock #注释此行

listen = 127.0.0.1:9000 #添加此行,监控本机的9000端口

#准备网页配置文件

[19:51:32 root@ansible-rocky opt]$ cat /opt/roles/php-fpm/templates/php-fpm.conf.j2

server {

    listen 80;

    server_name {{ fqdn }};

    location / {

        root           {{ root_path  }};

        fastcgi_pass   127.0.0.1:9000;

        fastcgi_index  index.php;

        fastcgi_param  SCRIPT_FILENAME $document_root$fastcgi_script_name;

        include        fastcgi_params;

    }

}

#准备tasks文件

[19:40:32 root@ansible-rocky opt]$ cat /opt/roles/php-fpm/tasks/main.yml

- name: install package

  yum:

    name: "{{ item }}"

  loop:

    - php-fpm

    - php-mysqlnd

    - php-json

    - php-xml

    - php-gd

    - php-pecl-zip

- name: php path permissions

  file:

    path: /var/lib/php/

    owner: nginx

    group: nginx

    recurse: yes

- name: config php.ini

  template:

    src: php.ini.j2

    dest: /etc/php.ini

- name: config www.conf

  copy:

    src: www.conf

    dest: /etc/php-fpm.d/www.conf

- name: website config

  template:

    src: php-fpm.conf.j2

    dest: "{{ install_dir }}/conf/conf.d/php-fpm.conf"

    owner: nginx

    group: nginx

  notify: restart nginx

- name: start service

  service:

    name: php-fpm

    state: started

    enabled: yes

#准备handler文件

[19:53:47 root@ansible-rocky opt]$ cat /opt/roles/php-fpm/handlers/main.yml

- name: restart nginx

  service:

    name: nginx

    state: restarted

#准备总入口playbook文件

[19:54:48 root@ansible-rocky opt]$ cat /opt/php-fpm_role.yml

- hosts: websrvs

  remote_user: root

  roles:

    - php-fpm
4.1.5 实现MySQL角色
注意:ansible playbook调用mysql系列模块需要依赖python3-mysql包和利用pip安装pymysql
#下载准备mysql源文件包

[18:22:54 root@ansible-rocky opt]$ ls roles/mysql/files/

mysql-8.0.31-linux-glibc2.12-x86_64.tar.xz

#创建task文件

[18:24:40 root@ansible-rocky opt]$ cat roles/mysql/tasks/main.yml

- name: install dependent package

  yum:

    name: "{{ item }}"

  loop:

    - libaio

    - numactl-libs

    - python39

    - python3-mysql

- name: install pymysql

  pip:

    name: pymysql

    state: present

- name: create mysql group

  group: name={{db_group}} gid={{db_gid}}

- name: create mysql user

  user: name={{db_user}} uid={{db_uid}} system=yes shell="/sbin/nologin" create_home=no group={{db_group}}

- name: copy tar to remote host and file mode

  unarchive:

    src: "{{ db_file }}"

    dest: "/usr/local/"

    owner: root

    group: root

- name: create lingfile /usr/local/mysql

  file:

    src: "/usr/local/mysql-{{ db_version }}-linux-glibc2.12-x86_64"

    dest: "/usr/local/mysql"

    state: link

- name: path file

  copy:

    content: "PATH=/usr/local/mysql/bin:$PATH"

    dest: "/etc/profile.d/mysql.sh"

- name: config file

  template:

    src: my.cnf.j2

    dest: "/etc/my.cnf"

- name: create directory

  file:

    name: "/data"

    state: directory

- name: init mysql data

  shell:

    cmd: "/usr/local/mysql/bin/mysqld --initialize-insecure --user={{ db_user }} --datadir={{ db_data_dir }}"

  tags:

    - init

- name: service script

  copy:

    src: "/usr/local/mysql/support-files/mysql.server"

    dest: "/etc/init.d/mysqld"

    remote_src: yes

    mode: '+x'

- name: start service

  shell:

    cmd: chkconfig --add mysqld;chkconfig mysqld on;service mysqld start

- name: change root password

  shell:

    cmd: "/usr/local/mysql/bin/mysqladmin -uroot password {{ db_root_passwd }}"

- name: create {{ wp_db_name }} database

  mysql_db:

    login_host: "localhost"

    login_user: "root"

    login_password: "{{ db_root_passwd }}"

    login_port: 3306

    login_unix_socket: "{{ db_data_dir }}/mysql.sock"

    name: "{{ wp_db_name }}"

    state: present

  when: "{{ wp_db_name }} is defined"

- name: create {{ wp_db_user }}

  mysql_user:

    login_host: "localhost"

    login_user: "root"

    login_password: "{{ db_root_passwd }}"

    login_port: 3306

    login_unix_socket: "{{ db_data_dir }}/mysql.sock"

    name: "{{ wp_db_user}}"

    password: "{{ wp_db_passwd }}"

    priv: "{{ wp_db_name }}.*:ALL"

    host: "10.0.0.%"

    state: present

  when: "{{ wp_db_user }} is defined"

#准备MySQL 配置文件模板

[18:25:25 root@ansible-rocky opt]$ cat roles/mysql/templates/my.cnf.j2

[mysqld]

server-id=1

log-bin

datadir={{ db_data_dir }}

socket={{ db_data_dir }}/mysql.sock

log-error={{ db_data_dir }}/mysql.log

pid-file={{ db_data_dir }}/mysql.pid

[client]

socket={{ db_data_dir }}/mysql.sock

#准备总入口playbook文件

[18:25:38 root@ansible-rocky opt]$ cat mysql_role.yml

- hosts: dbsrvs

  remote_user: root

  gather_facts: no

  roles:

    - mysql
4.2 基于zabbix角色批量部署zabbix
依赖上面搭建好的LNMP架构实现
4.2.1 部署zabbix-server
#总体目录结构

[20:27:58 root@ansible-rocky opt]$ tree

.

├── ansible.cfg

├── hosts

├── hosts_zabbix

├── roles

│   ├── mysql

│   │   ├── files

│   │   │   ├── create.sql.gz

│   │   │   └── mysql-8.0.31-linux-glibc2.12-x86_64.tar.xz

│   │   ├── tasks

│   │   │   └── main.yml

│   │   └── templates

│   │       └── my.cnf.j2

│   ├── nginx

│   │   ├── files

│   │   ├── handlers

│   │   │   └── main.yml

│   │   ├── tasks

│   │   │   └── main.yml

│   │   └── templates

│   │       ├── nginx.conf.j2

│   │       └── nginx.service.j2

│   ├── php-fpm

│   │   ├── files

│   │   │   ├── test.php

│   │   │   └── www.conf

│   │   ├── handlers

│   │   │   └── main.yml

│   │   ├── tasks

│   │   │   └── main.yml

│   │   └── templates

│   │       ├── php-fpm.conf.j2

│   │       └── php.ini.j2

│   └── zabbix_server

│       ├── handlers

│       │   └── main.yml

│       ├── tasks

│       │   └── main.yml

│       └── templates

│           ├── zabbix.conf.j2

│           ├── zabbix_server.conf.j2

│           └── zabbix-server-ngx.conf.j2

└── zabbix_server.yml

29 directories, 26 files

#主入口playbook

[20:24:45 root@ansible-rocky opt]$ cat zabbix_server.yml

- hosts: websrvs

  remote_user: root

  roles:

    - nginx

    - php-fpm

- hosts: dbsrvs

  remote_user: root

  roles:

    - mysql

- hosts: websrvs

  remote_user: root

  roles:

    - zabbix_server

#tasks文件

[20:30:01 root@ansible-rocky zabbix_server]$ cat /opt/roles/zabbix_server/tasks/main.yml

- name: config zabbix yum repo

  yum_repository:

    name: "ansible_zabbix"

    description: "zabbix repo"

    baseurl: "https://mirrors.aliyun.com/zabbix/zabbix/{{ zabbix_version }}/rhel/{{ ansible_distribution_major_version }}/{{ ansible_architecture }}/"

    gpgcheck: yes

    gpgkey: "https://mirrors.aliyun.com/zabbix/zabbix-official-repo.key"

- name: install zabbix-server

  yum:

    name: "{{ item }}"

  loop:

    - zabbix-server-mysql

    - zabbix-agent2

    - zabbix-get

    - zabbix-web-mysql

- name: copy zabbix_server.conf

  template:

    src: zabbix_server.conf.j2

    dest: /etc/zabbix/zabbix_server.conf

    mode: 0600

  notify:

    - restart zabbix-server

  tags: restart zabbix-server

- name: chown  zabbix-web

  file:

    path:  /etc/zabbix/web

    state: directory

    owner: nginx

    group: nginx

    recurse: yes

- name: copy zabbix-server web conf

  template:

    src: zabbix-server-ngx.conf.j2

    dest: "{{ install_dir }}/conf/conf.d/zabbix_server_ngx.conf"

    owner: nginx

    group: nginx

  notify:

    - restart nginx

- name: copy zabbix.conf into php-fpm.d

  template:

    src: zabbix.conf.j2

    dest: "/etc/php-fpm.d/zabbix.conf"

  notify:

    - restart php-fpm

- name: start zabbix-server

  service:

    name: zabbix-server

    state: restarted

    enabled: yes

#查看handler

[20:34:11 root@ansible-rocky zabbix_server]$ cat /opt/roles/zabbix_server/handlers/main.yml

- name: restart zabbix-server

  service:

    name: zabbix-server

    state: restarted

- name: restart nginx

  service:

    name: nginx

    state: restarted

- name: restart php-fpm

  service:

    name: php-fpm

    state: restarted

#查看template文件

[20:34:15 root@ansible-rocky zabbix_server]$ cat /opt/roles/zabbix_server/templates/zabbix.conf.j2

[zabbix]

user = nginx

group = nginx

listen = /run/php-fpm/zabbix.sock

listen.acl_users = apache,nginx

listen.allowed_clients = 127.0.0.1

pm = dynamic

pm.max_children = 50

pm.start_servers = 5

pm.min_spare_servers = 5

pm.max_spare_servers = 35

pm.max_requests = 200

php_value[session.save_handler] = files

php_value[session.save_path]    = /var/lib/php/session

php_value[max_execution_time] = 300

php_value[memory_limit] = 128M

php_value[post_max_size] = 80M

php_value[upload_max_filesize] = 80M

php_value[max_input_time] = 300

php_value[max_input_vars] = 10000

php_value[date.timezone] = Asia/Shanghai

[20:38:05 root@ansible-rocky zabbix_server]$ grep -Ev '^$|#' /opt/roles/zabbix_server/templates/zabbix_server.conf.j2

LogFile=/var/log/zabbix/zabbix_server.log

LogFileSize=0

PidFile=/var/run/zabbix/zabbix_server.pid

SocketDir=/var/run/zabbix

DBHost=10.0.0.58

DBName=zabbix

DBUser=zabbix

DBPassword=lgq123456

SNMPTrapperFile=/var/log/snmptrap/snmptrap.log

Timeout=4

AlertScriptsPath=/usr/lib/zabbix/alertscripts

ExternalScripts=/usr/lib/zabbix/externalscripts

LogSlowQueries=3000

StatsAllowedIP=127.0.0.1

##zabbix网页配置文件

[20:39:05 root@ansible-rocky zabbix_server]$ cat /opt/roles/zabbix_server/templates/zabbix-server-ngx.conf.j2

server {

    listen 80;

    server_name {{ zabbix_fqdn }};

    root /usr/share/zabbix;

    index index.php;

    location = /favicon.ico {

        log_not_found   off;

    }

    location / {

        try_files       $uri $uri/ =404;

    }

    location /assets {

         access_log      off;

         expires         10d;

    }

    location ~ /\.ht {

         deny            all;

    }

    location ~ /(api\/|conf[^\.]|include|locale|vendor) {

         deny            all;

         return          404;

    }

    location ~ [^/]\.php(/|$) {

        fastcgi_pass   127.0.0.1:9000;

        #fastcgi_pass    unix:/run/php-fpm/zabbix.sock;

        fastcgi_split_path_info ^(.+\.php)(/.+)$;

        fastcgi_index   index.php;

        fastcgi_param   DOCUMENT_ROOT   /usr/share/zabbix;

        fastcgi_param   SCRIPT_FILENAME /usr/share/zabbix$fastcgi_script_name;

        fastcgi_param   PATH_TRANSLATED /usr/share/zabbix$fastcgi_script_name;

        include fastcgi_params;

        fastcgi_param   QUERY_STRING    $query_string;

        fastcgi_param   REQUEST_METHOD  $request_method;

        fastcgi_param   CONTENT_TYPE    $content_type;

        fastcgi_param   CONTENT_LENGTH  $content_length;

        fastcgi_intercept_errors        on;

        fastcgi_ignore_client_abort     off;

        fastcgi_connect_timeout         60;

        fastcgi_send_timeout            180;

        fastcgi_read_timeout            180;

        fastcgi_buffer_size             128k;

        fastcgi_buffers                 4 256k;

        fastcgi_busy_buffers_size       256k;

        fastcgi_temp_file_write_size    256k;

    }

}
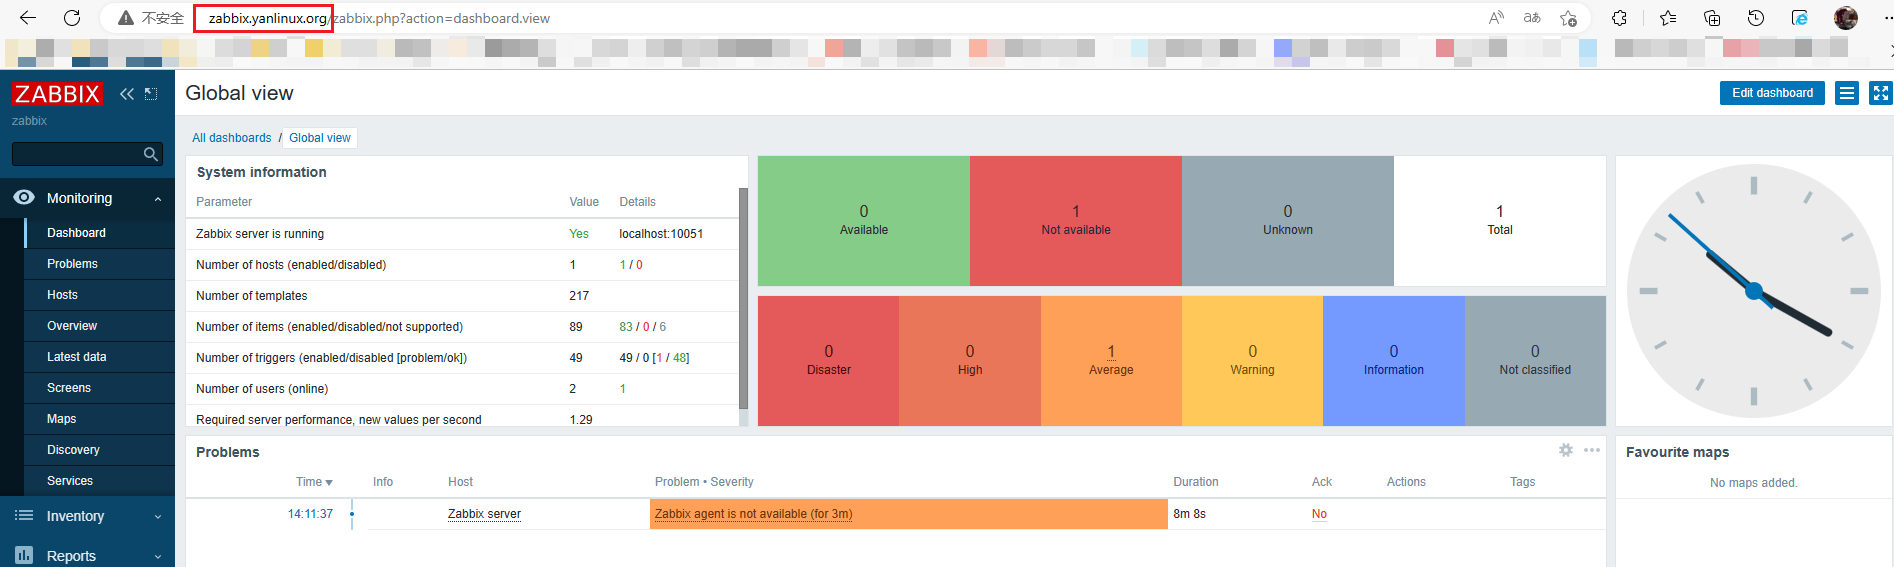
4.2.2 部署zabbix-agent
#目录结构

[22:59:31 root@ansible-rocky zabbix_agent2]$ tree

.

├── files

│   └── zabbix_agnet2.d

│       ├── login.conf

│       ├── mem.conf

│       ├── mysql.conf

│       ├── mysql_repl_status.sh

│       ├── mysql.sh

│       ├── nginx_status.conf

│       ├── nginx_status.sh

│       └── tcp_state.conf

├── handlers

│   └── main.yml

├── tasks

│   └── main.yml

└── templates

    └── zabbix_agent2.conf.j2

5 directories, 11 files

#task文件

[23:14:12 root@ansible-rocky opt]$ cat /opt/roles/zabbix_agent2/tasks/main.yml

- name: install repo

  yum_repository:

    name: "ansible_zabbix"

    description: "zabbix repo"

    baseurl: "https://mirrors.aliyun.com/zabbix/zabbix/{{ zabbix_version }}/rhel/{{ ansible_distribution_major_version }}/{{ ansible_architecture }}/"

    gpgcheck: yes

    gpgkey: "https://mirrors.aliyun.com/zabbix/zabbix-official-repo.key"

- name: install agent2 for centos or rocky

  yum:

    name: zabbix-agent2

  when:

    - ansible_distribution == "Rocky" or ansible_distribution == "Centos"

- name: install agent2 for centos or ubuntu

  apt:

    name: zabbix-agent2

    update_cache: yes

  when:

    - ansible_distribution == "Ubuntu"

- name: config file

  template:

    src: zabbix_agent2.conf.j2

    dest: "/etc/zabbix/zabbix_agent2.conf"

    mode: 0644

  notify:

    - restart zabbix-agent2

- name: copy zabbix-agent2.d content

  copy:

    src: zabbix_agent2.d

    dest: "/etc/zabbix"

  notify:

    - restart zabbix-agent2

  tags: zabbix_agent2.d

- name: start zabbix-agent2

  service:

    name: zabbix-agent2

    state: started

    enabled: yes

#handler文件

[23:14:14 root@ansible-rocky opt]$ cat /opt/roles/zabbix_agent2/handlers/main.yml

- name: restart zabbix_agent2

  service:

    name: zabbix-agent2

    state: restarted

#template文件

[23:14:43 root@ansible-rocky opt]$ cat /opt/roles/zabbix_agent2/templates/zabbix_agent2.conf.j2

PidFile=/var/run/zabbix/zabbix_agent2.pid

LogFile=/var/log/zabbix/zabbix_agent2.log

LogFileSize=0

Server={{ zabbix_server_ip }}

ServerActive={{ zabbix_server_ip }}

Hostname={{ ansible_default_ipv4.address }}

Include=/etc/zabbix/zabbix_agent2.d/*.conf

ControlSocket=/tmp/agent.sock
4.2.3 测试
[23:15:29 root@rocky8 /etc/zabbix]$ zabbix_get -s 10.0.0.18 -k mem_use_percent

20.1886

[23:16:51 root@rocky8 /etc/zabbix]$ zabbix_get -s 10.0.0.18 -k tcp_state[ESTABLISHED]

32

[23:17:30 root@rocky8 /etc/zabbix]$ zabbix_get -s 10.0.0.28 -k tcp_state[ESTABLISHED]

28

[23:17:35 root@rocky8 /etc/zabbix]$ zabbix_get -s 10.0.0.58 -k tcp_state[ESTABLISHED]

55
Ansible介绍以及基于角色搭建LNMP和zabbix的更多相关文章
- 基于Docker搭建LNMP环境(转)
关于什么是docker,建议大家先上网查查有关的用法.如果您不了解,在这篇文章中,您可以简单的理解为他是一个轻量级的虚拟机. 一.docker安装mysql 首先,我们从仓库拉取一个MySql的镜像 ...
- 基于Eclipse搭建Hadoop源码环境
Hadoop使用ant+ivy组织工程,无法直接导入Eclipse中.本文将介绍如何基于Eclipse搭建Hadoop源码环境. 准备工作 本文使用的操作系统为CentOS.需要的软件版本:hadoo ...
- docker搭建lnmp环境(问题,资料,命令)
入门参考 http://www.runoob.com/docker/docker-install-nginx.html 十大常用命令玩转docker 1. #从官网拉取镜像 docker pull & ...
- 基于ECS搭建云上博客
场景介绍 本文为您介绍如何基于ECS搭建云上博客. 背景知识 本场景主要涉及以下云产品和服务: 云服务器ECS 云服务器(Elastic Compute Service,简称ECS)是阿里云提供的性能 ...
- webapi框架搭建-安全机制(三)-简单的基于角色的权限控制
webapi框架搭建系列博客 上一篇已经完成了“身份验证”,如果只是想简单的实现基于角色的权限管理,我们基本上不用写代码,微软已经提供了authorize特性,直接用就行. Authorize特性的使 ...
- webapi框架搭建-安全机制(四)-可配置的基于角色的权限控制
webapi框架搭建系列博客 在上一篇的webapi框架搭建-安全机制(三)-简单的基于角色的权限控制,某个角色拥有哪些接口的权限是用硬编码的方式写在接口上的,如RBAuthorize(Roles = ...
- SpringBoot整合Shiro实现基于角色的权限访问控制(RBAC)系统简单设计从零搭建
SpringBoot整合Shiro实现基于角色的权限访问控制(RBAC)系统简单设计从零搭建 技术栈 : SpringBoot + shiro + jpa + freemark ,因为篇幅原因,这里只 ...
- ansible+playbook 搭建lnmp环境
用三台机器 做ansible+playbook 搭建lnmp环境 IP分配 ansible 主机192.168.202.132 lnmp第一台主机 192.168.202.131 lnmp第一台主机 ...
- Linux centosVMware 自动化运维Ansible介绍、Ansible安装、远程执行命令、拷贝文件或者目录、远程执行脚本、管理任务计划、安装rpm包/管理服务、 playbook的使用、 playbook中的循环、 playbook中的条件判断、 playbook中的handlers、playbook实战-nginx安装、管理配置文件
一.Ansible介绍 不需要安装客户端,通过sshd去通信 基于模块工作,模块可以由任何语言开发 不仅支持命令行使用模块,也支持编写yaml格式的playbook,易于编写和阅读 安装十分简单,ce ...
- 自动化运维工具之 Ansible 介绍及安装使用
一.初识Ansible 介绍: Absible 使用 模块(Modules)来定义配置任务.模块可以用标准脚本语言(Python,Bash,Ruby,等等)编写,这是一个很好的做法,使每个模块幂等.A ...
随机推荐
- Doris安装部署
下载安装 Doris运行在Linux环境中,推荐 CentOS 7.x 或者 Ubuntu 16.04 以上版本,同时你需要安装 Java 运行环境(JDK最低版本要求是8) 1.下载安装包 下载地址 ...
- SQL一文入门助记
什么是SQL SQL(Structured Query Language)是用于操作数据库的语言.一个博客有许多网站,一个游戏要储存许多游戏的账号密码,这些都离不开数据库操作. 关系型数据库与NoSQ ...
- JavaSE流程学习图
- 软件开发目录规范、python常用内置模块
编程思想的转变 1.面条版阶段 所有的代码全部堆叠在一起.可以看成是直接将所有的数据放在C盘 视频.音频.文本.图片 2.函数版阶段 根据功能的不同封装不同的函数.可以看成是将C盘下的数 ...
- hashlib模块、subprocess模块、loggin日志模块及实战
hashlib加密模块 目录 hashlib加密模块 加密补充说明 subprocess模块 logging日志模块 日志的组成 日志配置字典 配置参数 1.何为加密 将明文数据处理成密文数据 让人无 ...
- Surp Suite入门
BurpSuite代理工具是以拦截代理的方式,拦截所有通过代理的网络流量,如客户端的请求数据.服务器端的返回信息等.Burp Suite主要拦截HTTP和HTTPS 协议的流量,通过拦截,Burp S ...
- (admin.E108) The value of 'list_display[0]' refers to 'productname', which is not a callable, an attribute of 'ProductAdmin', or an attribute or method on 'product.Product'.
models.py # 创建产品表 class Product(models.Model): productName = models.CharField('产品名称', max_length=64) ...
- [OpenCV实战]52 在OpenCV中使用颜色直方图
颜色直方图是一种常见的图像特征,顾名思义颜色直方图就是用来反映图像颜色组成分布的直方图.颜色直方图的横轴表示像素值或像素值范围,纵轴表示该像素值范围内像素点的个数或出现频率.颜色直方图属于计算机视觉中 ...
- pycharm下载安装与基本配置
pycharm下载安装与基本配置 1.简介 PyCharm是一种Python IDE(Integrated Development Environment,集成开发环境),带有一整套可以帮助用户在使用 ...
- 跟我学Python丨图像增强及运算:局部直方图均衡化和自动色彩均衡化处理
摘要:本文主要讲解图像局部直方图均衡化和自动色彩均衡化处理.这些算法可以广泛应用于图像增强.图像去噪.图像去雾等领域. 本文分享自华为云社区<[Python从零到壹] 五十四.图像增强及运算篇之 ...