ElasticSearch 全文检索— ElasticSearch 安装部署
ElasticSearch 规划-集群规划
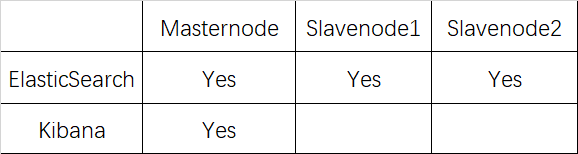
ElasticSearch 规划-集群规划
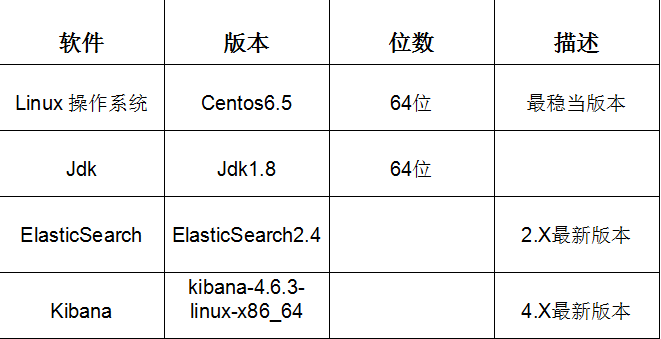
ElasticSearch 规划-用户规划

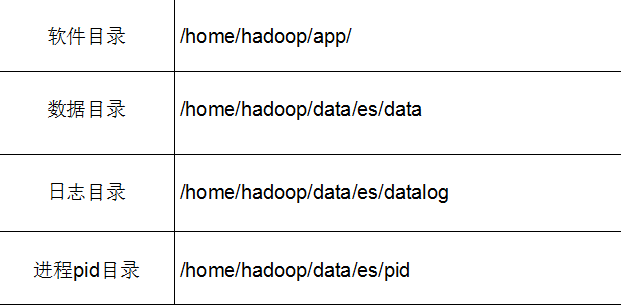
ElasticSearch 规划-目录规划
ElasticSearch 集群环境检查-时钟同步
1.设置本地时间
cp /usr/share/zoneinfo/Asia/Shanghai /etc/localtime
2.集群时间日期同步NTP
  yum install ntp

 ntpdate pool.ntp.org
ElasticSearch 集群环境检查-hosts文件检查
1.配置ElasticSearch集群ip与hostname之间的对应关系
 vi /etc/hosts

  192.168.86.135 masternode

  192.168.86.136 slavenode1

  192.168.86.137 slavenode2
2.ElasticSearch 集群环境检查-禁用防火墙
查看防火墙状态
service iptables status
关闭防火墙
chkconfig iptables off //永久关闭防火墙

service iptables stop //临时关闭防火墙
ElasticSearch 集群安装
1.下载
https://www.elastic.co/
2.上传并解压
[hadoop@masternode es]$ cd /home/hadoop/app/

[hadoop@masternode app]$ ls

hadoop  jdk1..0_60  zookeeper

[hadoop@masternode app]$ rz

[hadoop@masternode app]$ rz

[hadoop@masternode app]$ ls

elasticsearch-2.4..tar.gz  hadoop  jdk1..0_60  kibana-4.6.-linux-x86_64.tar.gz  zookeeper

[hadoop@masternode app]$ tar -xvf elasticsearch-2.4..tar.gz

[hadoop@masternode app]$ rm -rf elasticsearch-2.4..tar.gz
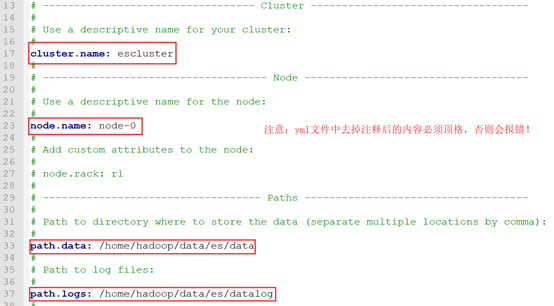
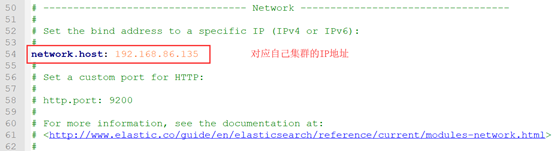
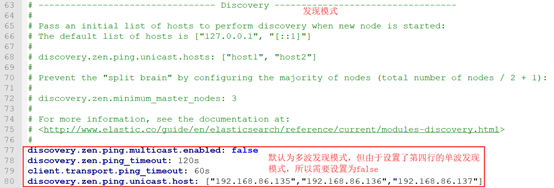
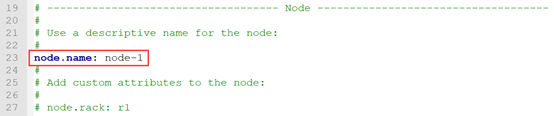
3.修改config/elasticsearch.yml配置文件
[hadoop@masternode app]$ cd elasticsearch-2.4./

[hadoop@masternode elasticsearch-2.4.]$ ls

bin  config  lib  LICENSE.txt  modules  NOTICE.txt  README.textile

[hadoop@masternode elasticsearch-2.4.]$ cd config/

[hadoop@masternode config]$ ls

elasticsearch.yml  logging.yml

[hadoop@masternode config]$ vim elasticsearch.yml
4.路径创建
[hadoop@masternode data]$ mkdir es/

[hadoop@masternode data]$ cd es

[hadoop@masternode es]$ mkdir data

[hadoop@masternode es]$ mkdir datalog

[hadoop@masternode es]$ mkdir pid

[hadoop@masternode es]$ ls

data  datalog  pid

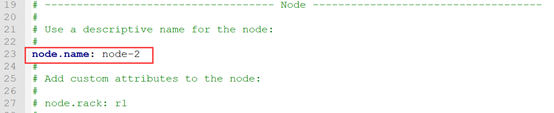
5.分发到其他节点并修改以下配置
[hadoop@masternode app]$ scp -r elasticsearch-2.4./ slavenode1:/home/hadoop/app/

[hadoop@masternode app]$ scp -r elasticsearch-2.4./ slavenode2:/home/hadoop/app/
Slavenode1:

Slavenode2:

其它配置不变。
ElasticSearch 插件安装
1.安装marvel插件(所有节点都需要安装)
[hadoop@masternode app]$ cd elasticsearch-2.4.

[hadoop@masternode elasticsearch-2.4.]$ su

Password:

[root@masternode elasticsearch-2.4.]# bin/plugin install license

-> Installing license...

Plugins directory [/home/hadoop/app/elasticsearch-2.4./plugins] does not exist. Creating...

Trying https://download.elastic.co/elasticsearch/release/org/elasticsearch/plugin/license/2.4.0/license-2.4.0.zip ...

Downloading .......DONE

Verifying https://download.elastic.co/elasticsearch/release/org/elasticsearch/plugin/license/2.4.0/license-2.4.0.zip checksums if available ...

Downloading .DONE

Installed license into /home/hadoop/app/elasticsearch-2.4./plugins/license

[root@masternode elasticsearch-2.4.]# bin/plugin install marvel-agent

-> Installing marvel-agent...

Trying https://download.elastic.co/elasticsearch/release/org/elasticsearch/plugin/marvel-agent/2.4.0/marvel-agent-2.4.0.zip ...

Downloading ..........DONE

Verifying https://download.elastic.co/elasticsearch/release/org/elasticsearch/plugin/marvel-agent/2.4.0/marvel-agent-2.4.0.zip checksums if available ...

Downloading .DONE

@@@@@@@@@@@@@@@@@@@@@@@@@@@@@@@@@@@@@@@@@@@@@@@@@@@@@@@@@@@

@     WARNING: plugin requires additional permissions     @

@@@@@@@@@@@@@@@@@@@@@@@@@@@@@@@@@@@@@@@@@@@@@@@@@@@@@@@@@@@

* java.lang.RuntimePermission setFactory

* javax.net.ssl.SSLPermission setHostnameVerifier

See http://docs.oracle.com/javase/8/docs/technotes/guides/security/permissions.html

for descriptions of what these permissions allow and the associated risks.

Continue with installation? [y/N]y

Installed marvel-agent into /home/hadoop/app/elasticsearch-2.4./plugins/marvel-agent
2.安装head插件(选择一个节点安装即可)
[root@masternode elasticsearch-2.4.]# bin/plugin install mobz/elasticsearch-head

-> Installing mobz/elasticsearch-head...

Trying https://github.com/mobz/elasticsearch-head/archive/master.zip ...

Downloading ...................................................................................................................................................................................................................................................................................................................................................................................................................................................................................................................................................................................................................................................................................................DONE

Verifying https://github.com/mobz/elasticsearch-head/archive/master.zip checksums if available ...

NOTE: Unable to verify checksum for downloaded plugin (unable to find .sha1 or .md5 file to verify)

Installed head into /home/hadoop/app/elasticsearch-2.4./plugins/head

[root@masternode elasticsearch-2.4.]# ls

bin  config  lib  LICENSE.txt  modules  NOTICE.txt  plugins  README.textile

[root@masternode elasticsearch-2.4.]# cd plugins/

[root@masternode plugins]# ls

head  license  marvel-agent
Kibana 安装
1.下载
https://www.elastic.co/
2.解压
[root@masternode plugins]# cd ..

[root@masternode elasticsearch-2.4.]# cd ..

[root@masternode app]# tar –xvf kibana-4.6.-linux-x86_64.tar.gz

[root@masternode app]# rm -rf kibana-4.6.-linux-x86_64.tar.gz

[root@masternode app]# ls

elasticsearch-2.4.  hadoop  jdk1..0_60  kibana-4.6.-linux-x86_64  zookeeper
3.修改kibana.yml配置文件
[root@masternode app]# cd kibana-4.6.-linux-x86_64/

[root@masternode kibana-4.6.-linux-x86_64]# ls

bin  config  data  installedPlugins  LICENSE.txt  node  node_modules  optimize  package.json  README.txt  src  webpackShims

[root@masternode kibana-4.6.-linux-x86_64]# cd config/

[root@masternode config]# ls

kibana.yml

[root@masternode config]# vim kibana.yml

4.安装marvel插件
[root@masternode config]# cd ..

[root@masternode kibana-4.6.-linux-x86_64]# bin/kibana plugin --install elasticsearch/marvel/latest

Installing marvel

Attempting to transfer from https://download.elastic.co/elasticsearch/marvel/marvel-latest.tar.gz

Transferring  bytes....................

Transfer complete

Extracting plugin archive

Extraction complete

Optimizing and caching browser bundles...

Plugin installation complete

[root@masternode kibana-4.6.-linux-x86_64]# ls

bin  config  data  installedPlugins  LICENSE.txt  node  node_modules  optimize  package.json  README.txt  src  webpackShims

[root@masternode kibana-4.6.-linux-x86_64]# cd installedPlugins/

[root@masternode installedPlugins]# ls

Marvel
ElasticSearch、Kibana 启动
前台启动
1.启动ElasticSearch
[root@masternode kibana-4.6.-linux-x86_64]# su Hadoop

[hadoop@masternode elasticsearch-2.4.]$ bin/elasticsearch         //在三个节点执行相同的操作

[-- ::,][WARN ][bootstrap                ] unable to install syscall filter: seccomp unavailable: requires kernel 3.5+ with CONFIG_SECCOMP and CONFIG_SECCOMP_FILTER compiled in

[-- ::,][INFO ][node                     ] [node-] version[2.4.], pid[], build[ce9f0c7/--29T09::17Z]

[-- ::,][INFO ][node                     ] [node-] initializing ...

[-- ::,][INFO ][plugins                  ] [node-] modules [reindex, lang-expression, lang-groovy], plugins [head, license, marvel-agent], sites [head]

[-- ::,][INFO ][env                      ] [node-] using [] data paths, mounts [[/home (/dev/sda2)]], net usable_space [.7gb], net total_space [.8gb], spins? [possibly], types [ext4]

[-- ::,][INFO ][env                      ] [node-] heap size [.6mb], compressed ordinary object pointers [true]

[-- ::,][WARN ][env                      ] [node-] max file descriptors [] for elasticsearch process likely too low, consider increasing to at least []

[-- ::,][INFO ][node                     ] [node-] initialized

[-- ::,][INFO ][node                     ] [node-] starting ...

[-- ::,][INFO ][transport                ] [node-] publish_address {192.168.86.135:}, bound_addresses {192.168.86.135:}

[-- ::,][INFO ][discovery                ] [node-] escluster/pT7mHJglTw6euS87IbvMGg

[-- ::,][INFO ][marvel.agent.exporter    ] [node-] skipping exporter [default_local] as it isn't ready yet

[-- ::,][INFO ][marvel.agent.exporter    ] [node-] skipping exporter [default_local] as it isn't ready yet

[-- ::,][INFO ][marvel.agent.exporter    ] [node-] skipping exporter [default_local] as it isn't ready yet

[-- ::,][WARN ][discovery                ] [node-] waited for 30s and no initial state was set by the discovery

[-- ::,][INFO ][http                     ] [node-] publish_address {192.168.86.135:}, bound_addresses {192.168.86.135:}

[-- ::,][INFO ][node                     ] [node-] started
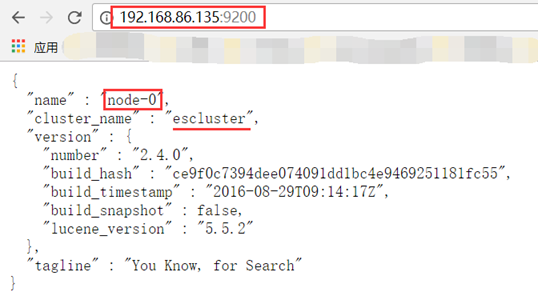
启动之后打开网页可以查看其状态:
2.启动kibana
[hadoop@masternode kibana-4.6.-linux-x86_64]$ bin/kibana
log [::07.744] [info][status][plugin:kibana@1.0.] Status changed from uninitialized to green - Ready
log [::07.792] [info][status][plugin:elasticsearch@1.0.] Status changed from uninitialized to yellow - Waiting for Elasticsearch
log [::07.816] [info][status][plugin:marvel@2.4.] Status changed from uninitialized to yellow - Waiting for Elasticsearch
log [::07.856] [info][status][plugin:kbn_vislib_vis_types@1.0.] Status changed from uninitialized to green - Ready
log [::09.699] [info][status][plugin:markdown_vis@1.0.] Status changed from uninitialized to green - Ready
log [::09.713] [info][status][plugin:metric_vis@1.0.] Status changed from uninitialized to green - Ready
log [::09.719] [info][status][plugin:spyModes@1.0.] Status changed from uninitialized to green - Ready
log [::09.723] [info][status][plugin:statusPage@1.0.] Status changed from uninitialized to green - Ready
log [::09.727] [info][status][plugin:table_vis@1.0.] Status changed from uninitialized to green - Ready
log [::09.736] [info][listening] Server running at http://0.0.0.0:5601
log [::14.719] [info][status][plugin:elasticsearch@1.0.] Status changed from yellow to yellow - No existing Kibana index found
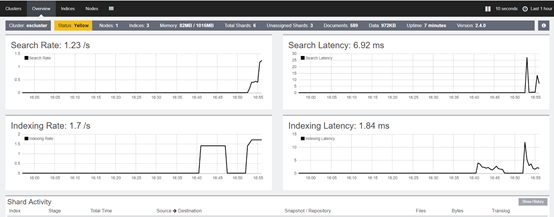
log [::17.640] [info][status][plugin:marvel@2.4.] Status changed from yellow to green - Marvel ready
log [::17.644] [info][status][plugin:elasticsearch@1.0.] Status changed from yellow to green - Kibana index ready


后台启动
bin/elasticsearch  -d  -p /home/hadoop/data/es/pid    //三个节点都执行

nohup /home/ybxiang/kibana/kibana-4.5.-linux-x64/bin/kibana & exit     //主节点执行
以上就是博主为大家介绍的这一板块的主要内容,这都是博主自己的学习过程,希望能给大家带来一定的指导作用,有用的还望大家点个支持,如果对你没用也望包涵,有错误烦请指出。如有期待可关注博主以第一时间获取更新哦,谢谢!
ElasticSearch 全文检索— ElasticSearch 安装部署的更多相关文章
- elasticsearch+kibana+metricbeat安装部署方法
elasticsearch+kibana+metricbeat安装部署方法 本文是elasticsearch + kibana + metricbeat,没有涉及到logstash部分.通过beat收 ...
- Elasticsearch介绍及安装部署
本节内容: Elasticsearch介绍 Elasticsearch集群安装部署 Elasticsearch优化 安装插件:中文分词器ik 一.Elasticsearch介绍 Elasticsear ...
- elasticsearch kibana的安装部署与简单使用(一)
1.先说说es 我早两年使用过es5.x的版本,记得当时部署还是很麻烦,因为es是java写的,要先在机器上部署java环境jvm之类的一堆东西,然后才能安装es 但是现在我使用的是目前最新的7.6版 ...
- ElasticSearch 全文检索— ElasticSearch概述
ElasticSearch 产生背景 1.海量数据组合条件查询 2.毫秒级或者秒级返回数据 Lucene 定义 lucene是一个开放源代码的全文检索引擎工具包,但它不是一个完整的全文检索引擎,而是一 ...
- elasticsearch kibana的安装部署与简单使用(二)
介绍一下elasticsearch和kibana的简单使用 es其实我理解为一个数据库,一个数据库无非就是增删改查, Delete PUT GET POST 这些接口关键字完美对应 比如,我想查一张 ...
- ElasticSearch 全文检索— ElasticSearch 核心概念
ElasticSearch核心概念-Cluster 1)代表一个集群,集群中有多个节点,其中有一个为主节点,这个主节点是可以通过选举产生的,主从节点是对于集群内部来说的.es的一个概念就是去中心化,字 ...
- ElasticSearch 全文检索— ElasticSearch 基本操作
REST 简介-定义 REST (REpresentation State Transfer)描述了一个架构样式的网络系统,比如 web 应用程序.它首次出现在 2000 年 Roy Fielding ...
- ELK日志监控平台安装部署简介--Elasticsearch安装部署
最近由于工作需要,需要搭建一个ELK日志监控平台,本次采用Filebeat(采集数据)+Elasticsearch(建立索引)+Kibana(展示)架构,实现日志搜索展示功能. 一.安装环境描述: 1 ...
- Elasticsearch学习之ElasticSearch 5.0.0 安装部署常见错误或问题
ElasticSearch 5.0.0 安装部署常见错误或问题 问题一: [--06T16::,][WARN ][o.e.b.JNANatives ] unable to install syscal ...
随机推荐
- Python:collections的deque()方法
转于:https://www.cnblogs.com/zhenwei66/p/6598996.html 博主:http://www.cnblogs.com/zhenwei66/(渐晨) python3 ...
- winfrom实现控件全屏效果
用常规方法实现全屏显示时,由于采用的三方控件导致界面顶端一直有一条半透明的类似标题栏的东西无法去除,原因一直没找到. 下面综合整理下网上两位博主的用WindowsAPI实现全屏的方法: 控件全屏显示: ...
- (cdh)hive 基础知识 名词详解及架构
过程 启动 hive 之后出现的 CLI 是查询任务的入口,CLI 提交任务给 Driver Driver 接收到任务后调用 Compiler,Executor,Optimizer 将 SQL 语句转 ...
- JS中数组方法小总结
1.array.concat(item……) 返回:一个新数组 该方法产生一个新数组,它包含一份array的浅复制,并把一个或多个参数item附加在其后.如果参数item是一个数组,那么它的每个元素会 ...
- Hander----使用
public class MainActivity extends Activity { private EditText UITxt; private Button updateUIBtn; pri ...
- C++中的对象的赋值和复制
对象的赋值 如果对一个类定义了两个或多个对象,则这些同类的对象之间可以互相赋值,或者说,一个对象的值可以赋给另一个同类的对象.这里所指的对象的值是指对象中所有数据成员的值. 对象之间的赋值也是通过赋值 ...
- Ubuntu14跑DSO
按照https://github.com/JakobEngel/dso上的说明,make -j4的时候出现一下错误: /home/zhao/dso/src/FullSystem/CoarseIniti ...
- SQL笔记:中级篇
1.LIMIT 查询前多少条数据 例如:查询user表前三条数据 SELECT * FROM user LIMIT 3 ORACLE: SELECT name FROM user WHERE RO ...
- Spring 属性配置
此文已由作者尧飘海授权网易云社区发布. 欢迎访问网易云社区,了解更多网易技术产品运营经验. 随着Spring的不断发展与完善,早期它的功能可能只看做是IOC(反转控制)的容器,或者其最大的亮点为DI( ...
- Elasticsearch+Logstash+Kibana搭建分布式日志平台
一.前言 编译安装 1.ELK简介 下载相关安装包地址:https://www.elastic.co/cn/downloads ELK是Elasticsearch+Logstash+Kibana的简称 ...