TensorFlow车辆检测
1、先在UIUC Image Database for Car Detection下载训练数据集。
下载地址:http://cogcomp.org/Data/Car/
下载解压之后文件目录如图所示,这里我们所需的是TrainImages这个文件夹和TestImages文件夹。

2、输入是一幅40*100*1的灰度图片,采用的是CNN网络,经过多次卷积和池化之后得到1*1*1的结果,各层参数如下所示。
我的文件目录组织结构:

    -CarDetect

          --CarDetect.py

          --datas

              ---CarData

          --models
input : [None, 40, 100, 1]

conv-pool1 :

    f : 5*5

    strides : 1

    nc : 6

    padding : VALID

    maxpool : 2

conv-pool2:

    f : 5*5

    strides : 1

    nc : 16

    padding : VALID

    maxpool : 2

conv3:

    f : 5*5

    strides : 1

    nc : 32

    padding : VALID

conv4:

    f : 3*18

    strides : 1

    nc : 64

    padding : VALID

conv5:

    f : 1*1

    strides : 1

    nc : 1

    padding : VALID

output : [None, 1, 1, 1]
import tensorflow as tf
import numpy as np
import matplotlib.pyplot as plt #定义加载数据的函数,注意训练数据的存储位置
def load_carDats():
import cv2
import os
file_path = './datas/CarData/TrainImages/'
files = os.listdir(file_path)
samples = []
for file_name in files:
data = cv2.imread(file_path + file_name, 0).reshape(-1) / 255
label = 0 if file_name.split('-')[0] == 'neg' else 1
samples.append((data, label))
return samples
#加载数据
datas = load_carDats()
#随机打乱数据
np.random.shuffle(datas)
#划分数据,xs、ys 用来训练网络,x_test、y_test 用来测试网络训练效果
xs = [i[0] for i in datas[:1000]]
ys = np.reshape([i[1] for i in datas[:1000]], newshape=(-1,1))
x_test = [i[0] for i in datas[1000:]]
y_test = np.reshape([i[1] for i in datas[1000:]], newshape=(-1,1)) #----------------定义网络中频繁使用的函数,将其重构-----------------#
#权重变量
def weight_variables(shape):
weights = tf.truncated_normal(shape, stddev=0.1, dtype=tf.float32)
return tf.Variable(weights) #偏置变量
def biase_variables(shape):
biases = tf.constant(value=1.0, shape=shape)
return tf.Variable(biases) #卷积
def conv2d(x, W):
'''计算卷积,x为输入层(shape=[-1,width,height,channel]),
W为f*f的共享权重矩阵shape=[f,f,in_layers_num, out_layers_num],
水平和垂直方向上的步长都为1'''
return tf.nn.conv2d(x, W, strides=[1,1,1,1], padding="VALID") #最大值池化
def max_pooling(x):
'''计算最大值混合,x为输入层(一般是卷积结果)shape=[-1,width,height,channels]
ksize为混合pooling的核大小2*2,水平和垂直方向上的步长都为2'''
return tf.nn.max_pool(x, ksize=[1,2,2,1], strides=[1,2,2,1], padding="VALID") #---------------------网络前向传播部分------------------#
def deepnn(x, keep_prop):
'''定义深层卷积网络,包含了两个卷积-混合层和三个卷积层'''
#step1:将原始一维得得数据转换成2维, 第一个表示样本数,第二三个是行列,最后一个是通道数
# x = tf.reshape(x, shape=[-1, 40, 100, 1])
#step2:定义第一的卷积-混合层
with tf.name_scope("conv-pooling1"):
W_conv1 = weight_variables([5,5,1,6])
b_conv1 = biase_variables([6])
ret_conv1 = tf.nn.relu(conv2d(x,W_conv1) + b_conv1) #计算卷积,并使用修正单元对卷积结果进一步处理
ret_pooling1 = max_pooling(ret_conv1) #执行混合操作 #step3:定义第二个卷积-混合层
with tf.name_scope("conv-pooling2"):
W_conv2 = weight_variables([5,5,6,16])
b_conv2 = biase_variables([16])
ret_conv2 = tf.nn.relu(conv2d(ret_pooling1, W_conv2) + b_conv2)
ret_pooling2 = max_pooling(ret_conv2) #step4:定义第三个卷积层
with tf.name_scope("conv-pooling3"):
W_conv3 = weight_variables([5,5,16,32])
b_conv3 = biase_variables([32])
ret_conv3 = tf.nn.relu(conv2d(ret_pooling2, W_conv3) + b_conv3) #step5:定义第四个卷积层
with tf.name_scope("conv4"):
W_conv4 = weight_variables([3,18,32,64])
b_conv4 = biase_variables([64])
ret_conv4 = tf.nn.relu(conv2d(ret_conv3, W_conv4) + b_conv4) #step6:定义第五个卷积层
with tf.name_scope("conv5"):
W_conv5 = weight_variables([1,1,64,1])
b_conv5 = biase_variables([1])
ret_conv5 = conv2d(ret_conv4, W_conv5) + b_conv5 return ret_conv5 #---------------------训练网络前的准备-----------------------#
#申明输入数据和标签的占位符
x = tf.placeholder(dtype=tf.float32, shape=[None,None, None, 1], name="x-input")
labels = tf.placeholder(dtype=tf.float32, shape=[None, 1], name="y-output") #申明弃权的占位符
keep_prop = tf.placeholder(dtype=tf.float32, name="kprob") #创建分类模型
ret = deepnn(x, keep_prop)
#此时的返回值是 -1*1*1*1的, 为了得到方便运算的结果,这里将reshape
y = tf.reshape(ret, shape=[-1,1]) #定义损失函数
with tf.name_scope("loss_function"):
loss = tf.nn.sigmoid_cross_entropy_with_logits(logits=y, labels=labels)
cost = tf.reduce_mean(loss)
#定义训练模型(优化模型)
with tf.name_scope("optimizor"):
train = tf.train.AdamOptimizer(0.0005).minimize(cost) #定义验证模型精度的方法
with tf.name_scope("accuracy"):
y_hat = tf.nn.sigmoid(y)
accuracy_rate = tf.abs(y_hat - labels) < 0.5
accuracy_rate = tf.cast(accuracy_rate, dtype=tf.float32)
accuracy = tf.reduce_mean(accuracy_rate) #--------------开始训练网络,并将训练结果保存到文件中---------------#
saver = tf.train.Saver()
sess = tf.Session()
sess.run(tf.global_variables_initializer()) #初始化变量 for i in range(10):
skip = 10
for k in range(0,1000,skip):
x_train = np.reshape(xs[k:k+skip], newshape=(-1, 40, 100, 1))
sess.run(train, feed_dict={x:x_train, labels:ys[k:k+skip], keep_prop:0.5}) # 训练模型
# if (i+1) % 10 == 0:
train_accuracy = sess.run(accuracy, feed_dict = {x: np.reshape(xs, (-1,40,100,1)), labels: ys, keep_prop:1.0})
print('step %d, train accuracy %g' % (i, train_accuracy))
saver.save(sess, "./models/carDetect_model.ckpt", global_step=i) 这是我的训练结果:
step 0, train accuracy 0.859
step 1, train accuracy 0.934
step 2, train accuracy 0.965
step 3, train accuracy 0.971
step 4, train accuracy 0.985
step 5, train accuracy 0.991
step 6, train accuracy 0.995
step 7, train accuracy 0.994
step 8, train accuracy 0.995
step 9, train accuracy 0.997 #--------------------------开始在新图片中检测-------------------#
import cv2
#导入图片
pic = cv2.imread("../../datas/CarData/TestImages/test-100.pgm", 0)
size = pic.shape img = np.reshape(pic, (-1,size[0], size[1], 1))
#利用上面训练好的网络,开始在新的图片中检测
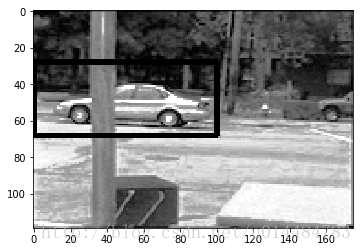
result = sess.run(ret, feed_dict={x:img}) #将检测结果显示
pt1 = np.array([result.argmax()//result.shape[2], result.argmax()%result.shape[2]]) * 4
pt2 = pt1 + np.array([40, 100]) pic_2 = cv2.rectangle(pic, (pt1[1], pt1[0]), (pt2[1], pt2[0]), 0, 2) plt.imshow(pic_2, "gray")
plt.show()
3、结果
源码获取方式,关注公总号RaoRao1994,查看往期精彩-所有文章,即可获取资源下载链接

更多资源获取,请关注公总号RaoRao1994
TensorFlow车辆检测的更多相关文章
- 学习笔记TF052:卷积网络,神经网络发展,AlexNet的TensorFlow实现
卷积神经网络(convolutional neural network,CNN),权值共享(weight sharing)网络结构降低模型复杂度,减少权值数量,是语音分析.图像识别热点.无须人工特征提 ...
- Linux服务器配置GPU版本的pytorch Torchvision TensorFlow
最近在Linux服务器上配置项目,项目需要使用GPU版本的pytorch和TensorFlow,而且该项目内会同时使用TensorFlow的GPU和CPU. 在服务器上装环境,如果重新开始,就需要下载 ...
- 盘它!基于CANN的辅助驾驶AI实战案例,轻松搞定车辆检测和车距计算!
摘要:基于昇腾AI异构计算架构CANN(Compute Architecture for Neural Networks)的简易版辅助驾驶AI应用,具备车辆检测.车距计算等基本功能,作为辅助驾驶入门级 ...
- 基于OpenCV的车辆检测与追踪的实现
最近老师布置了一个作业,是做一个基于视频的车辆检测与追踪,用了大概两周的时间做了一个简单的,效果不是很理想,但抑制不住想把自己的一些认识写下来,这里就把一些网络上的博客整理一下分享给大家,希望帮助到大 ...
- Tensorflow 官方版教程中文版
2015年11月9日,Google发布人工智能系统TensorFlow并宣布开源,同日,极客学院组织在线TensorFlow中文文档翻译.一个月后,30章文档全部翻译校对完成,上线并提供电子书下载,该 ...
- tensorflow学习笔记二:入门基础
TensorFlow用张量这种数据结构来表示所有的数据.用一阶张量来表示向量,如:v = [1.2, 2.3, 3.5] ,如二阶张量表示矩阵,如:m = [[1, 2, 3], [4, 5, 6], ...
- 用Tensorflow让神经网络自动创造音乐
#————————————————————————本文禁止转载,禁止用于各类讲座及ppt中,违者必究————————————————————————# 前几天看到一个有意思的分享,大意是讲如何用Ten ...
- tensorflow 一些好的blog链接和tensorflow gpu版本安装
pading :SAME,VALID 区别 http://blog.csdn.net/mao_xiao_feng/article/details/53444333 tensorflow实现的各种算法 ...
- tensorflow中的基本概念
本文是在阅读官方文档后的一些个人理解. 官方文档地址:https://www.tensorflow.org/versions/r0.12/get_started/basic_usage.html#ba ...
随机推荐
- 关于RandomizedSearchCV 和GridSearchCV(区别:参数个数的选择方式)
# -*- coding: utf-8 -*- """ Created on Tue Aug 09 22:38:37 2016 @author: Administrato ...
- NSFileManager和NSFileHandle使用
一.NSFileManager: 1.1.获取NSFileManager NSFileManager *manager = [NSFileManager defaultManager]; NS ...
- render tree与css解析
浏览器在构造DOM树的同时也在构造着另一棵树-Render Tree,与DOM树相对应暂且叫它Render树吧,我们知道DOM树为javascript提供了一些列的访问接口(DOM API),但这棵树 ...
- B和strong以及i和em的区别(转)
B和strong以及i和em的区别 (2013-12-31 13:58:35) 标签: b strong i em 搜索引擎 分类: 网页制作 一直以来都以为B和strong以及i和em是相同的效果, ...
- Struts2框架01【如果使用struts框架】【利用struts框架写一个 hello world】
1 什么是Struts2框架 基于MVC设计模式的web应用框架 Struts2框架是一个轻量级的MVC流程框架 轻量级是指程序的代码不是很多,运行时占用的资源不是很多,MVC流程框架就是说它是支持分 ...
- fibnacci数列的两种实现(递归实现和循环实现)
//一切尽在规律中,认真观察,你会明白更多... using System;using System.Collections.Generic;using System.Linq;using Syste ...
- SDUT 1488 数据结构实验:连通分量个数
数据结构实验:连通分量个数 Time Limit: 1000MS Memory Limit: 65536KB Submit Statistic Problem Description 在无向图中,如 ...
- Netty的Channel
Channel是一个网络端口连接,或者是可以进行读,写,链接,绑定端口的组件的连接. Channel就是一个链接,它提供了如下的功能. 1:获取当前链接的状态 2:配置当前链接参数 3:进行read ...
- android 应用间共享数据,调用其他app数据资源
在Android里面每个app都有一个唯一的linux user ID,则这样权限就被设置成该应用程序的文件只对该用户可见,只对该应用程序自身可见:而我们可以使他们对其他的应用程序可见,可以通过Sha ...
- MVC要点
1.绑定一个DropDownList @Html.DropDownListFor(m => m.MobileType, new List<SelectListItem>() { ne ...