openfire插件开发环境
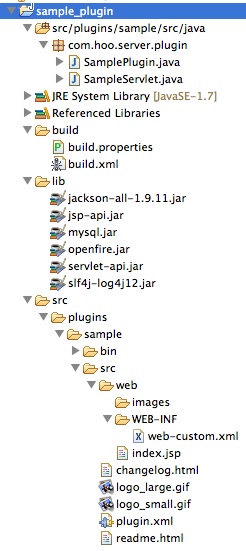
创建java工程
SamplePlugin:
package com.hoo.server.plugin;

import java.io.File;

import org.jivesoftware.openfire.XMPPServer;

import org.jivesoftware.openfire.container.Plugin;

import org.jivesoftware.openfire.container.PluginManager;

public class SamplePlugin implements Plugin {

    private XMPPServer server;

    @Override

    public void initializePlugin(PluginManager manager, File pluginDirectory) {

        server = XMPPServer.getInstance();

        System.out.println("初始化…… 安装插件!");

        System.out.println(server.getServerInfo());

    }

    @Override

    public void destroyPlugin() {

        System.out.println("服务器停止,销毁插件!");

    }

}
web-custom.xml 为空
plugin.xml
<?xml version="1.0" encoding="UTF-8"?>

<plugin>

<!-- Main plugin class  这里是最重要滴,就是你的插件的全路径-->

<class>com.hoo.server.plugin.SamplePlugin</class>

<!-- Plugin meta-data -->

<name>SimplePlugin</name>

<description>This is the my sample plugin.</description>

<author></author>

<version>1.0</version>

<date>28/03/2014</date>

<url>http://127.0.0.1:9090/openfire/plugins.jsp</url>

<minServerVersion>3.9.1</minServerVersion>

<licenseType>gpl</licenseType>

<adminconsole>

    </adminconsole>

</plugin>
build.properties:
java.home=/Library/Java/JavaVirtualMachines/jdk1.7.0_21.jdk/Contents/Home

tomcat.home=/Users/hujihong/Desktop/java_tools/apache-tomcat-6.0.39

# If you want to build a plugin, please set the value to the plugin name.

# Note:The plugin name must is the same as the plugins folder.

plugin.name=sample
build.xml
<project name="Webapp Precompilation" default="openfire-plugins" basedir=".">

    <!-- 全局变量设置 -->

    <property file="build.properties" />

    <!-- 插件源码位置 -->

    <property name="plugin.path" value="../src/plugins/${plugin.name}/src" />

    <!-- web应用输出目录 -->

    <property name="webapp.output.path" value="../src/plugins/${plugin.name}/bin" />

    <!-- java servlet相关文件编译jar存放位置 -->

    <property name="java.jar.dir" value="${webapp.output.path}/java-dist"/>

    <!-- jsp servlet编译后jar存放位置 -->

    <property name="jsp.jar.dir" value="${webapp.output.path}/jsp-dist/lib"/>

    <!-- 定义java servlet编译打包的Jar包名称 -->

    <property name="java.jar" value="${java.jar.dir}/plugin-${plugin.name}.jar"/>

    <!-- 定义jsp servlet编译打包的Jar包名称 -->

    <property name="jsp.jar" value="${jsp.jar.dir}/plugin-${plugin.name}-jsp.jar"/>

    <!-- jsp servlet配置到web.xml中 -->

    <property name="plugin.web.xml" value="${webapp.output.path}/jsp-dist/web.xml"/>

    <!-- 编译jsp 并生成相关jar、xml文件 -->

    <target name="jspc">

        <taskdef classname="org.apache.jasper.JspC" name="jasper2">

            <classpath id="jspc.classpath">

                <pathelement location="${java.home}/../lib/tools.jar" />

                <fileset dir="${tomcat.home}/bin">

                    <include name="*.jar" />

                </fileset>

                <fileset dir="${tomcat.home}/lib">

                    <include name="*.jar" />

                </fileset>

                <!--

                <fileset dir="D:/Workspace/openfire/build/lib">

                    <include name="**/*.jar" />

                </fileset-->

            </classpath>

        </taskdef>

        <!-- 编译jsp -> servlet class validateXml="false"-->

        <jasper2 javaEncoding="UTF-8"

            uriroot="${plugin.path}/web"

            outputDir="${webapp.output.path}/jsp-dist/src"

            package="com.hoo.server.plugin" />

        <!-- 编译后的servlet class 配置到web.xml文件中 validateXml="false"-->

        <jasper2

            uriroot="${plugin.path}/web"

            outputDir="${webapp.output.path}/jsp-dist/src"

            package="com.hoo.server.plugin"

            webXml="${plugin.web.xml}"/>

    </target>

    <!-- 编译jsp 并将其打jar包 -->

    <target name="compile">

        <mkdir dir="${webapp.output.path}/jsp-dist/classes" />

        <mkdir dir="${webapp.output.path}/jsp-dist/lib" />

        <mkdir dir="${webapp.output.path}/jsp-dist/src" />

        <javac destdir="${webapp.output.path}/jsp-dist/classes" optimize="off"

            encoding="UTF-8" debug="on" failonerror="false"

            srcdir="${webapp.output.path}/jsp-dist/src" excludes="**/*.smap">

            <classpath>

                <pathelement location="${webapp.output.path}/jsp-dist/classes" />

                <fileset dir="${webapp.output.path}/jsp-dist/lib">

                    <include name="*.jar" />

                </fileset>

                <fileset dir="${tomcat.home}/lib">

                    <include name="*.jar" />

                </fileset>

                <!--

                <pathelement location="${tomcat.home}/common/classes" />

                <pathelement location="${tomcat.home}/shared/classes" />

                <fileset dir="${tomcat.home}/shared/lib">

                    <include name="*.jar" />

                </fileset>

                -->

                <fileset dir="${tomcat.home}/bin">

                    <include name="*.jar" />

                </fileset>

            </classpath>

            <include name="**" />

            <exclude name="tags/**" />

        </javac>

        <jar jarfile="${jsp.jar}" basedir="${webapp.output.path}/jsp-dist/classes" />

    </target>

    <!-- 将java servlet打包成jar -->

    <target name="java-jar">

        <mkdir dir="${java.jar.dir}"/>

        <jar jarfile="${java.jar}">

            <fileset dir="../bin" includes="**/*.class"/>

        </jar>

    </target>

    <!-- 生成可部署的插件包 -->

    <target name="plug-jar">

        <!-- 插件插件包相关lib、 web目录 -->

        <mkdir dir="${webapp.output.path}/${plugin.name}/lib"/>

        <mkdir dir="${webapp.output.path}/${plugin.name}/web/WEB-INF"/>

        <!-- 复制jsp servlet的jar和java servlet的相关jar包到插件包的lib目录下 -->

        <copy file="${java.jar}" todir="${webapp.output.path}/${plugin.name}/lib"/>

        <copy file="${jsp.jar}" todir="${webapp.output.path}/${plugin.name}/lib"/>

        <!-- 将相关的图片、帮助文档、修改日志等文件复制到插件目录下 -->

        <copy todir="${webapp.output.path}/${plugin.name}">

            <fileset dir="${plugin.path}" includes="*.*"/>

        </copy>

        <copy todir="${webapp.output.path}/${plugin.name}/web">

            <fileset dir="${plugin.path}/web">

                <include name="*"/>

                <include name="**/*.*"/>

                <exclude name="**/*.xml"/>

                <exclude name="**/*.jsp"/>

            </fileset>

        </copy>

        <!-- jsp servlet的web复制到插件目录下 -->

        <copy file="${plugin.web.xml}" todir="${webapp.output.path}/${plugin.name}/web/WEB-INF"/>

        <copy todir="${webapp.output.path}/${plugin.name}/web">

            <fileset dir="${plugin.path}/web" includes="**/*.xml"/>

        </copy>

        <!-- 将国际化相关资源文件复制到插件目录下

        <copy file="${webapp.output.path}/bin/i18n" todir="${webapp.output.path}/${plugin.name}"/>

        -->

        <!-- 产生可部署插件包 -->

        <jar jarfile="${webapp.output.path}/${plugin.name}.jar">

            <fileset dir="${webapp.output.path}/${plugin.name}" includes="**/**"/>

        </jar>

    </target>

    <!-- 生成没有Web资源的可部署插件包 -->

    <target name="java-plug-jar">

        <!-- 插件插件包相关lib、 web目录 -->

        <mkdir dir="${webapp.output.path}/${plugin.name}/lib"/>

        <!-- 复制java servlet的相关jar包到插件包的lib目录下 -->

        <copy file="${java.jar}" todir="${webapp.output.path}/${plugin.name}/lib"/>

        <!-- 将相关的图片、帮助文档、修改日志等文件复制到插件目录下 -->

        <copy todir="${webapp.output.path}/${plugin.name}">

            <fileset dir="${plugin.path}" includes="*.*"/>

        </copy>

        <!-- 产生可部署插件包 -->

        <jar jarfile="${webapp.output.path}/${plugin.name}.jar">

            <fileset dir="${webapp.output.path}/${plugin.name}" includes="**/**"/>

        </jar>

    </target>

    <!-- 清理生成的文件 -->

    <target name="clean">

        <delete file="${webapp.output.path}/${plugin.name}.jar"/>

        <delete dir="${webapp.output.path}/${plugin.name}"/>

        <delete dir="${webapp.output.path}/jsp-dist"/>

        <delete dir="${webapp.output.path}/java-dist"/>

    </target>

    <target name="all" depends="clean,jspc,compile"/>

    <target name="openfire-plugin" depends="jspc,java-jar"/>

    <target name="openfire-plugins" depends="all,java-jar,plug-jar"/>

    <target name="openfire-plugin-java" depends="clean,java-jar,java-plug-jar"/>

</project>
增加servlet
package com.hoo.server.plugin;

import java.io.IOException;

import java.io.PrintWriter;

import javax.servlet.ServletException;

import javax.servlet.http.HttpServlet;

import javax.servlet.http.HttpServletRequest;

import javax.servlet.http.HttpServletResponse;

public class SampleServlet extends HttpServlet {

    private static final long serialVersionUID = -5404916983906926869L;

    @Override

    public void init() throws ServletException {

        super.init();

    }

    @Override

    protected void doGet(HttpServletRequest request, HttpServletResponse response) throws ServletException, IOException {

        response.setContentType("text/plain");

        PrintWriter out = response.getWriter();

        System.out.println("请求SampleServlet GET Method");

        out.print("请求SampleServlet GET Method");

        out.flush();

        out.close();

    }

    @Override

    protected void doPost(HttpServletRequest request, HttpServletResponse response) throws ServletException, IOException {

        response.setContentType("text/plain");

        PrintWriter out = response.getWriter();

        System.out.println("请求SampleServlet GET Method");

        out.print("请求SampleServlet POST Method");

        out.flush();

        out.close();

    }

    @Override

    public void destroy() {

        super.destroy();

    }

}
在web-custom.xml中增加:
<?xml version="1.0" encoding="UTF-8"?>

<!DOCTYPE web-app PUBLIC "-//Sun Microsystems, Inc.//DTD Web Application 2.3//EN" "http://java.sun.com/dtd/web-app_2_3.dtd">

<web-app>

    <servlet>

        <servlet-name>SampleServlet</servlet-name>

        <servlet-class>com.hoo.server.plugin.SampleServlet</servlet-class>

    </servlet>

    <servlet-mapping>

        <servlet-name>SampleServlet</servlet-name>

        <url-pattern>/servlet</url-pattern>

    </servlet-mapping>

</web-app>
打包发布后:http://127.0.0.1:9090/plugins/sample/servlet 可以访问 (http://127.0.0.1:9090/plugins/sample 也可以访问)
增加jsp
在 web目录下增加sample-service.jsp
<%@ page language="java" import="java.util.*" pageEncoding="UTF-8"%>
<!DOCTYPE HTML PUBLIC "-//W3C//DTD HTML 4.01 Transitional//EN">
<html>
<head>
<title>hello world: 你好openfire</title>
<meta http-equiv="Content-Type" content="text/html; charset=UTF-8">
<!--pageID固定 content与plugin.xml中的id相对应 -->
<meta name="pageID" content="sample-service"/>
</head> <body>
<h3>hello world jsp!! <a href="/plugins/sample/servlet">SampleServlet</a></h3>
<div class="jive-contentBoxHeader">jive-contentBoxHeader</div>
<div class="jive-contentBox">jive-contentBox</div> <div class="jive-table">
<table cellpadding="0" cellspacing="0" border="0" width="100%">
<thead>
<tr>
<th> sss</th>
<th nowrap>a</th>
<th nowrap>b</th>
</tr>
</thead>
<tbody>
<tr>
<td align="center">asdf</td>
<td align="center">asdf</td>
<td align="center">asdf</td>
</tr>
<tr class="jive-even">
<td align="center">asdf</td>
<td align="center">asdf</td>
<td align="center">asdf</td>
</tr>
<tr class="jive-odd">
<td align="center">asdf</td>
<td align="center">asdf</td>
<td align="center">asdf</td>
</tr>
</tbody>
</table>
</div>
</body>
</html>
在plugin.xml中增加:
<adminconsole>

        <tabid="tab-server">

            <sidebarid="sidebar-server-settings">

                <item id="sample-service" name="Sample Service" url="sample-service.jsp"

      description="Click is trigger sample plugin"/>

            </sidebar>

        </tab>

</adminconsole>
打包发布运行效果:
openfire插件开发环境的更多相关文章
- Hudson(Jenkins)持续集成插件开发环境搭建
Hudson持续集成插件开发环境搭建 第一步安装java jdk,至于版本的话推荐1.6以上吧.安装好jdk设置环境变量,确保你在cmd中输入java -version有提示你jdk的版本信息等,也就 ...
- openfire插件开发之完美开发
http://redhacker.iteye.com/blog/1919329 一.说在前面 在继上篇Openfire3.8.2在eclipse中Debug方式启动最简单的方式后,我研究了openfi ...
- Openfire插件开发图解
概述 Openfire插件开发是Openfire的精髓之一,支持插件热插拔,还可以方便的在web端进行管理插件.插件分为两种,一种是以服务为主的控制台插件,一种是包括页面或对外开放Servlet接口. ...
- (转)openfire插件开发(二) 基于web的插件开发
转:http://blog.csdn.net/lovexieyuan520/article/details/38935137 在前面的博客中,我介绍了openfire插件开发,在那篇博客中我详细的说明 ...
- x64dbg 插件开发环境配置
x64dbg 是一款开源的应用层反汇编调试器,旨在对没有源代码的可执行文件进行恶意软件分析和逆向工程,同时 x64dbg 还允许用户开发插件来扩展功能,插件开发环境的配置非常简单,如下将简单介绍x64 ...
- openfire插件开发入门1
.案例插件的功能 这个插件很简单,就是在openfire Server启动时,和关闭时,在控制台打印出消息. 3.插件开发的目录结构设计 先来看一下当前openfire在eclipse中的目录结构: ...
- openfire插件开发的几点说明
1.关于插件的目录结构 这个网上的资料很多,但是我觉得要看懂也不太容易,我这里上一个包括了jsp和servlet的图,希望大家能马上看懂: ME的Navigator视图下的截图: build path ...
- iOS xmpp Openfire+spark环境搭建
配置这个遇到太多问题了,写下来分享 首先到官网下载openfire+spark 下载地址:http://www.igniterealtime.org/downloads/index.jsp
- openfire开发环境(3.9.1)
1.解压源码 2.把build/eclipse中的文件cp到源码跟目录,并修改文件名,前面增加"."号,变成eclipse工程. 3.导入eclipse, 把build/lib/, ...
随机推荐
- vue.js+koa2项目实战(二)创建 HeadBar 组件
elementUI界面布局 1.创建 HeadBar 组件 HeadBar.vue <template> <el-row> <el-col :span="2&q ...
- HTTP学习笔记(一)报文和连接管理
对TCP/IP协议簇有些了解的同学们应该都知道.TCP/IP协议通过精简ISO网络7层协议(事实上了解历史渊源的话,TCP/IP协议本来目的并非简化ISO的7层协议.仅仅是因为ISO协议簇制定速度慢于 ...
- sql join相关
JOIN: 如果表中有至少一个匹配,则返回行 LEFT JOIN: 即使右表中没有匹配,也从左表返回所有的行,返回左表所有行 RIGHT JOIN: 即使左表中没有匹配,也从右表返回所有的行,返回右表 ...
- c语言中结构体指针
1.指向结构体的指针变量: C 语言中->是一个总体,它是用于指向结构体,如果我们在程序中定义了一个结构体,然后声明一个指针变量指向这个结构体.那么我们要用指针取出结构体中的数据.就要用到指向运 ...
- css 使表格随着内容自动适应宽度
所谓难而不会,会儿不难.这个问题让我纠结了很长时间,一句css解决了,仅仅靠一个属性 td { white-space: nowrap; }
- Django--网页管理实例解析
此篇为代码流程的注释以及自己写的小项目的思路: 首先是项目的路由配置: urlpatterns = [ # url(r'^admin/', admin.site.urls), url(r'^yemia ...
- jquery插件函数传参错误
1.jquery传参通过json,可能的错误是,参数中的结束符写成了;
- Linux内核源码分析方法_转
Linux内核源码分析方法 转自:http://www.cnblogs.com/fanzhidongyzby/archive/2013/03/20/2970624.html 一.内核源码之我见 Lin ...
- Boost.Asio c++ 网络编程翻译(11)
*_at方法 这些方法在一个流上面做随机存取操作.你来指定read和write操作从什么地方開始(offset): async_read_at(stream, offset, buffer [, co ...
- maven项目The superclass "javax.servlet.http.HttpServlet" was not found on the Java Build Path
用Eclipse创建了一个maven web程序,使用tomcat8.5作为服务器,可以正常启动,但是却报如下错误 The superclass "javax.servlet.http.Ht ...