Camera | 10.linux驱动 led架构-基于rk3568
前面文章我们简单给大家介绍了如何移植闪光灯芯片sgm3141,该驱动依赖了led子系统和v4l2子系统。
V4L2可以参考前面camera系列文章,本文主要讲述led子系统。
一、LED子系统框架
Linux内核的 led 子系统主要功能:
- 为每个设备在/sys/class/leds下创建不同的文件节点,用于操作led
- 抽象出所有的灯基本操作,设置亮、灭,光强、闪烁等
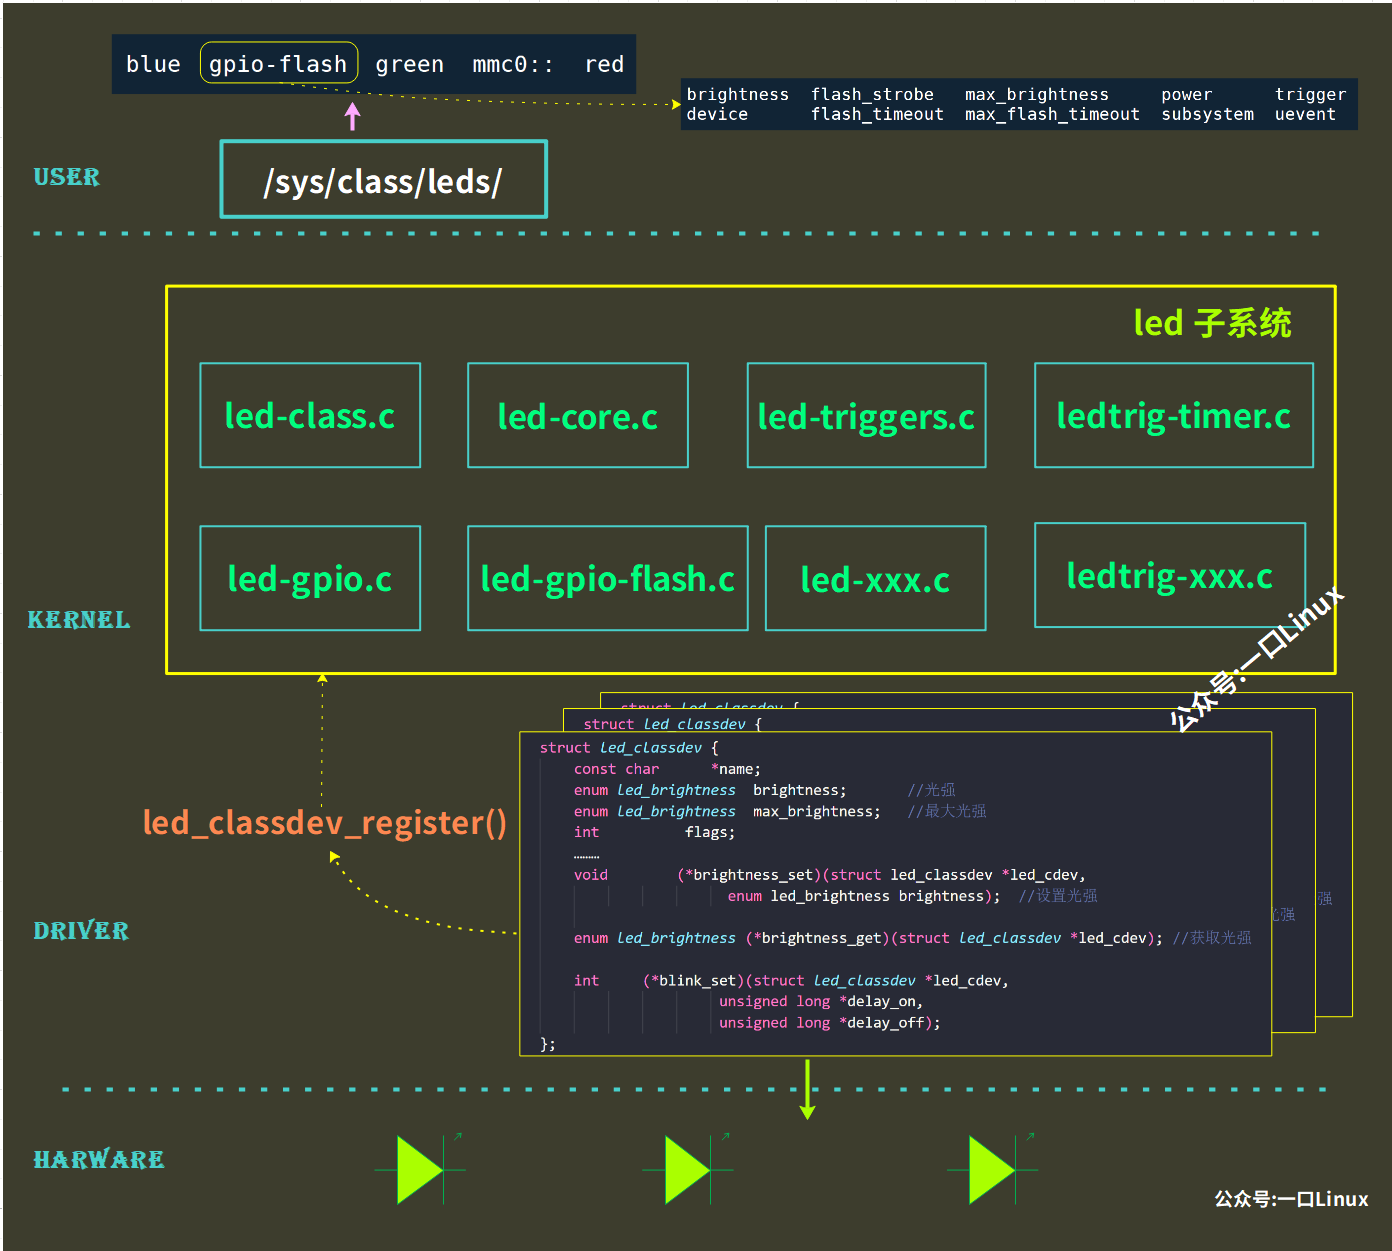
框架所处的位置,正如上图所示,由下往上看:
Hardware:
硬件设备,指的是LED,可以是各种设备上的led灯硬件驱动层:
是直接操作硬件的实现,用于驱动硬件,实现相应的功能,并且将硬件设备注册进框架之中。核心层:
将LED进行统一管理,向下提供注册接口,向上提供统一访问接口,方便用户访问用户层:
用户通过指定的文件节点,能够直接控制LED的亮灭。
不同的led位于不同的外设上,有的可能通过gpio控制,也可能由其他的芯片控制,
有的led只需要控制亮灭,有的需要设置为闪烁,只需要基于架构设置对应的回调函数即可。
二、LED子系统驱动文件
了解完LED子系统框架之后,我们来分析一下其相关的目录结构!
kernel

│   └── driver

│   │   └── leds

│   │   │   ├──Makefile

│   │   │   ├──led-core.c            *

│   │   │   ├──led-gpio.c

│   │   │   ├──led-class.c           *

│   │   │   ├──led-class-flash.c  *

│   │   │   ├──led-triggers.c       *

│   │   │   ├──......

│   │   │   └── trigger

│   │   │   │   ├── ledtrig-cpu.c

│   │   │   │   ├── ledtrig-heartbeat.c

│   │   │   │   ├── .......

include

│   └── linux

│   │  ├──leds.h    *

【*表示核心文件】
上面即为LED子系统的目录结构,其主要核心文件有:
- led-core.c:核心层实现,抽象软件实现的相关功能,如闪烁,亮度设置等等,并管理LED设备
- led-gpio.c:直接控制硬件设备,并且将其硬件设备注册进入LED驱动框架
- led-class.c:定义用户访问的相关接口
- led-class-flash.c:灯闪烁相关功能函数实现
- led-triggers.c:LED出发功能的抽象
- ledtrig-cpu.c:将LED作为CPU灯
- ledtrig-heartbeat.c:将LED作为心跳灯
打开了LED子系统目录下的kernel/drivers/leds/Makefile,我们看到
# SPDX-License-Identifier: GPL-2.0

# LED Core

obj-$(CONFIG_NEW_LEDS)+= led-core.o

obj-$(CONFIG_LEDS_CLASS)+= led-class.o

obj-$(CONFIG_LEDS_CLASS_FLASH)+= led-class-flash.o

obj-$(CONFIG_LEDS_TRIGGERS)+= led-triggers.o
我们必须在内核的配置中,通过 make menuconfig打开LED的相关配置,才支持LED相关功能。
三、查看sysfs文件结构
1. sys/class/leds/
我们在开发板中输入ls /sys/class/leds/,可以查看LED子系统生成的文件信息。
rk3568_r:/ # ls /sys/class/leds

blue  gpio-flash  green  mmc0::  red
- blue:板子的RGB灯的蓝色
- green:板子的RGB灯的绿色
- red: 板子的RGB灯的红色
- gpio-flash:camera gpio闪光灯
- mmc0:: :SD卡指示灯
2. red等子目录
根据打开配置的不同,生成不同的文件节点,比如red目录下信息:
rk3568_r:/sys/class/leds # ls red

brightness  max_brightness  red_bri_reg  subsystem  uevent

device      power           red_delay    trigger
相关属性文件有:brightness、max_brightness、trigger等
- max_brightness:表示LED灯的最大亮度值。
- brightness:表示当前LED灯的亮度值,它的可取 值范围为[0~max_brightness],一些LED设备不支持多级亮度,直接以非0值来 表示LED为点亮状态,0值表示灭状态。
@kernel/include/linux/leds.h

enum led_brightness {

 LED_OFF  = 0,    //全暗

 LED_HALF = 127,  //一半亮度

 LED_FULL = 255,  //最大亮度

};
- delay_off、delay_on:trigger为timer时,LED亮灭的时间,单位ms
- trigger:则指示了LED灯的触发方式,查看该文件的内容时,该文件会 列出它的所有可用触方式,而当前使用的触发方式会以“[]”符号括起。
常见的触 发方式如下表所示:
| 触发方式 | 说明 |
|---|---|
| none | 无触发方式 |
| disk-activity | 硬盘活动 |
| nand-disk | nand flash活动 |
| mtd | mtd设备活动 |
| timer | 定时器 |
| heartbeat | 系统心跳 |
1)点亮 LED
echo 255 > /sys/class/leds/red/brightness

cat /sys/class/leds/red/brightness

cat /sys/class/leds/red/max_brightness
2)关闭led
echo 0 > /sys/class/leds/red/delay_on

或

echo 0 > /sys/class/leds/red/brightness
3)这几个文件节点由下面宏表示,
@drivers/leds/led-class.c

static DEVICE_ATTR_RO(max_brightness);

#ifdef CONFIG_LEDS_TRIGGERS

static DEVICE_ATTR(trigger, 0644, led_trigger_show, led_trigger_store);

static struct attribute *led_trigger_attrs[] = {

	&dev_attr_trigger.attr,

	NULL,

};

static const struct attribute_group led_trigger_group = {

	.attrs = led_trigger_attrs,

};

#endif

static struct attribute *led_class_attrs[] = {

	&dev_attr_brightness.attr,

	&dev_attr_max_brightness.attr,

	NULL,

};

static const struct attribute_group led_group = {

	.attrs = led_class_attrs,

};

static const struct attribute_group *led_groups[] = {

	&led_group,

#ifdef CONFIG_LEDS_TRIGGERS

	&led_trigger_group,

#endif

	NULL,

};
创建位置:
int of_led_classdev_register(struct device *parent, struct device_node *np,

			    struct led_classdev *led_cdev)

{

	……

	led_cdev->dev = device_create_with_groups(leds_class, parent, 0,

				led_cdev, led_cdev->groups, "%s", name);

    ……

}
3. gpio-flash闪光灯目录
rk3568_r:/sys/class/leds/gpio-flash # ls

brightness  flash_strobe   max_brightness     power      trigger

device      flash_timeout  max_flash_timeout  subsystem  uevent
创建代码:
@drivers/leds/led-class-flash.c

static struct attribute *led_flash_strobe_attrs[] = {

	&dev_attr_flash_strobe.attr,

	NULL,

};

static struct attribute *led_flash_timeout_attrs[] = {

	&dev_attr_flash_timeout.attr,

	&dev_attr_max_flash_timeout.attr,

	NULL,

};

static struct attribute *led_flash_brightness_attrs[] = {

	&dev_attr_flash_brightness.attr,

	&dev_attr_max_flash_brightness.attr,

	NULL,

};

static struct attribute *led_flash_fault_attrs[] = {

	&dev_attr_flash_fault.attr,

	NULL,

};

static const struct attribute_group led_flash_strobe_group = {

	.attrs = led_flash_strobe_attrs,

};

static const struct attribute_group led_flash_timeout_group = {

	.attrs = led_flash_timeout_attrs,

};

static const struct attribute_group led_flash_brightness_group = {

	.attrs = led_flash_brightness_attrs,

};

static const struct attribute_group led_flash_fault_group = {

	.attrs = led_flash_fault_attrs,

};
注册代码
int led_classdev_flash_register(struct device *parent,

				struct led_classdev_flash *fled_cdev)

{

	……

	if (led_cdev->flags & LED_DEV_CAP_FLASH) {

		……

		/* Select the sysfs attributes to be created for the device */

		led_flash_init_sysfs_groups(fled_cdev);

	}

	/* Register led class device */

	ret = led_classdev_register(parent, led_cdev);

	……

}
测试gpio闪光灯
echo 1 > /sys/class/leds/gpio-flash/flash_strobe
注意,实际操作摄像头闪光灯,并不是通过sysfs下的文件节点操作,而是通过v4l2架构下发ioctl的命令来实现的
四、驱动解析
1. 结构体和注册函数
下面介绍led相关的重要的结构体
struct led_classdev {

	const char		*name;

	enum led_brightness	 brightness;       //光强

	enum led_brightness	 max_brightness;   //最大光强

	int			 flags;

	…………

	/* set_brightness_work / blink_timer flags, atomic, private. */

	unsigned long		work_flags;

     …………

	/* Set LED brightness level

	 * Must not sleep. Use brightness_set_blocking for drivers

	 * that can sleep while setting brightness.

	 */

	void		(*brightness_set)(struct led_classdev *led_cdev,

					  enum led_brightness brightness);  //设置光强

	/*

	 * Set LED brightness level immediately - it can block the caller for

	 * the time required for accessing a LED device register.

	 */

	int (*brightness_set_blocking)(struct led_classdev *led_cdev,

				       enum led_brightness brightness);

	/* Get LED brightness level */

	enum led_brightness (*brightness_get)(struct led_classdev *led_cdev); //获取光强

	/*

	 * Activate hardware accelerated blink, delays are in milliseconds

	 * and if both are zero then a sensible default should be chosen.

	 * The call should adjust the timings in that case and if it can't

	 * match the values specified exactly.

	 * Deactivate blinking again when the brightness is set to LED_OFF

	 * via the brightness_set() callback.

	 */

	int		(*blink_set)(struct led_classdev *led_cdev,

				     unsigned long *delay_on,

				     unsigned long *delay_off);

	struct device		*dev;

	const struct attribute_group	**groups;

	struct list_head	 node;			/* LED Device list */

	const char		*default_trigger;	/* Trigger to use */

	unsigned long		 blink_delay_on, blink_delay_off;

	struct timer_list	 blink_timer;

	int			 blink_brightness;

	int			 new_blink_brightness;

	void			(*flash_resume)(struct led_classdev *led_cdev);

	struct work_struct	set_brightness_work;

	int			delayed_set_value;

#ifdef CONFIG_LEDS_TRIGGERS

	/* Protects the trigger data below */

	struct rw_semaphore	 trigger_lock;

	struct led_trigger	*trigger;

	struct list_head	 trig_list;

	void			*trigger_data;

	/* true if activated - deactivate routine uses it to do cleanup */

	bool			activated;

#endif

#ifdef CONFIG_LEDS_BRIGHTNESS_HW_CHANGED

	int			 brightness_hw_changed;

	struct kernfs_node	*brightness_hw_changed_kn;

#endif

	/* Ensures consistent access to the LED Flash Class device */

	struct mutex		led_access;

};
该结构体包括led操作的所有信息,和回调函数
注册struct led_classdev结构图变量:
#define led_classdev_register(parent, led_cdev)				\

	of_led_classdev_register(parent, NULL, led_cdev)
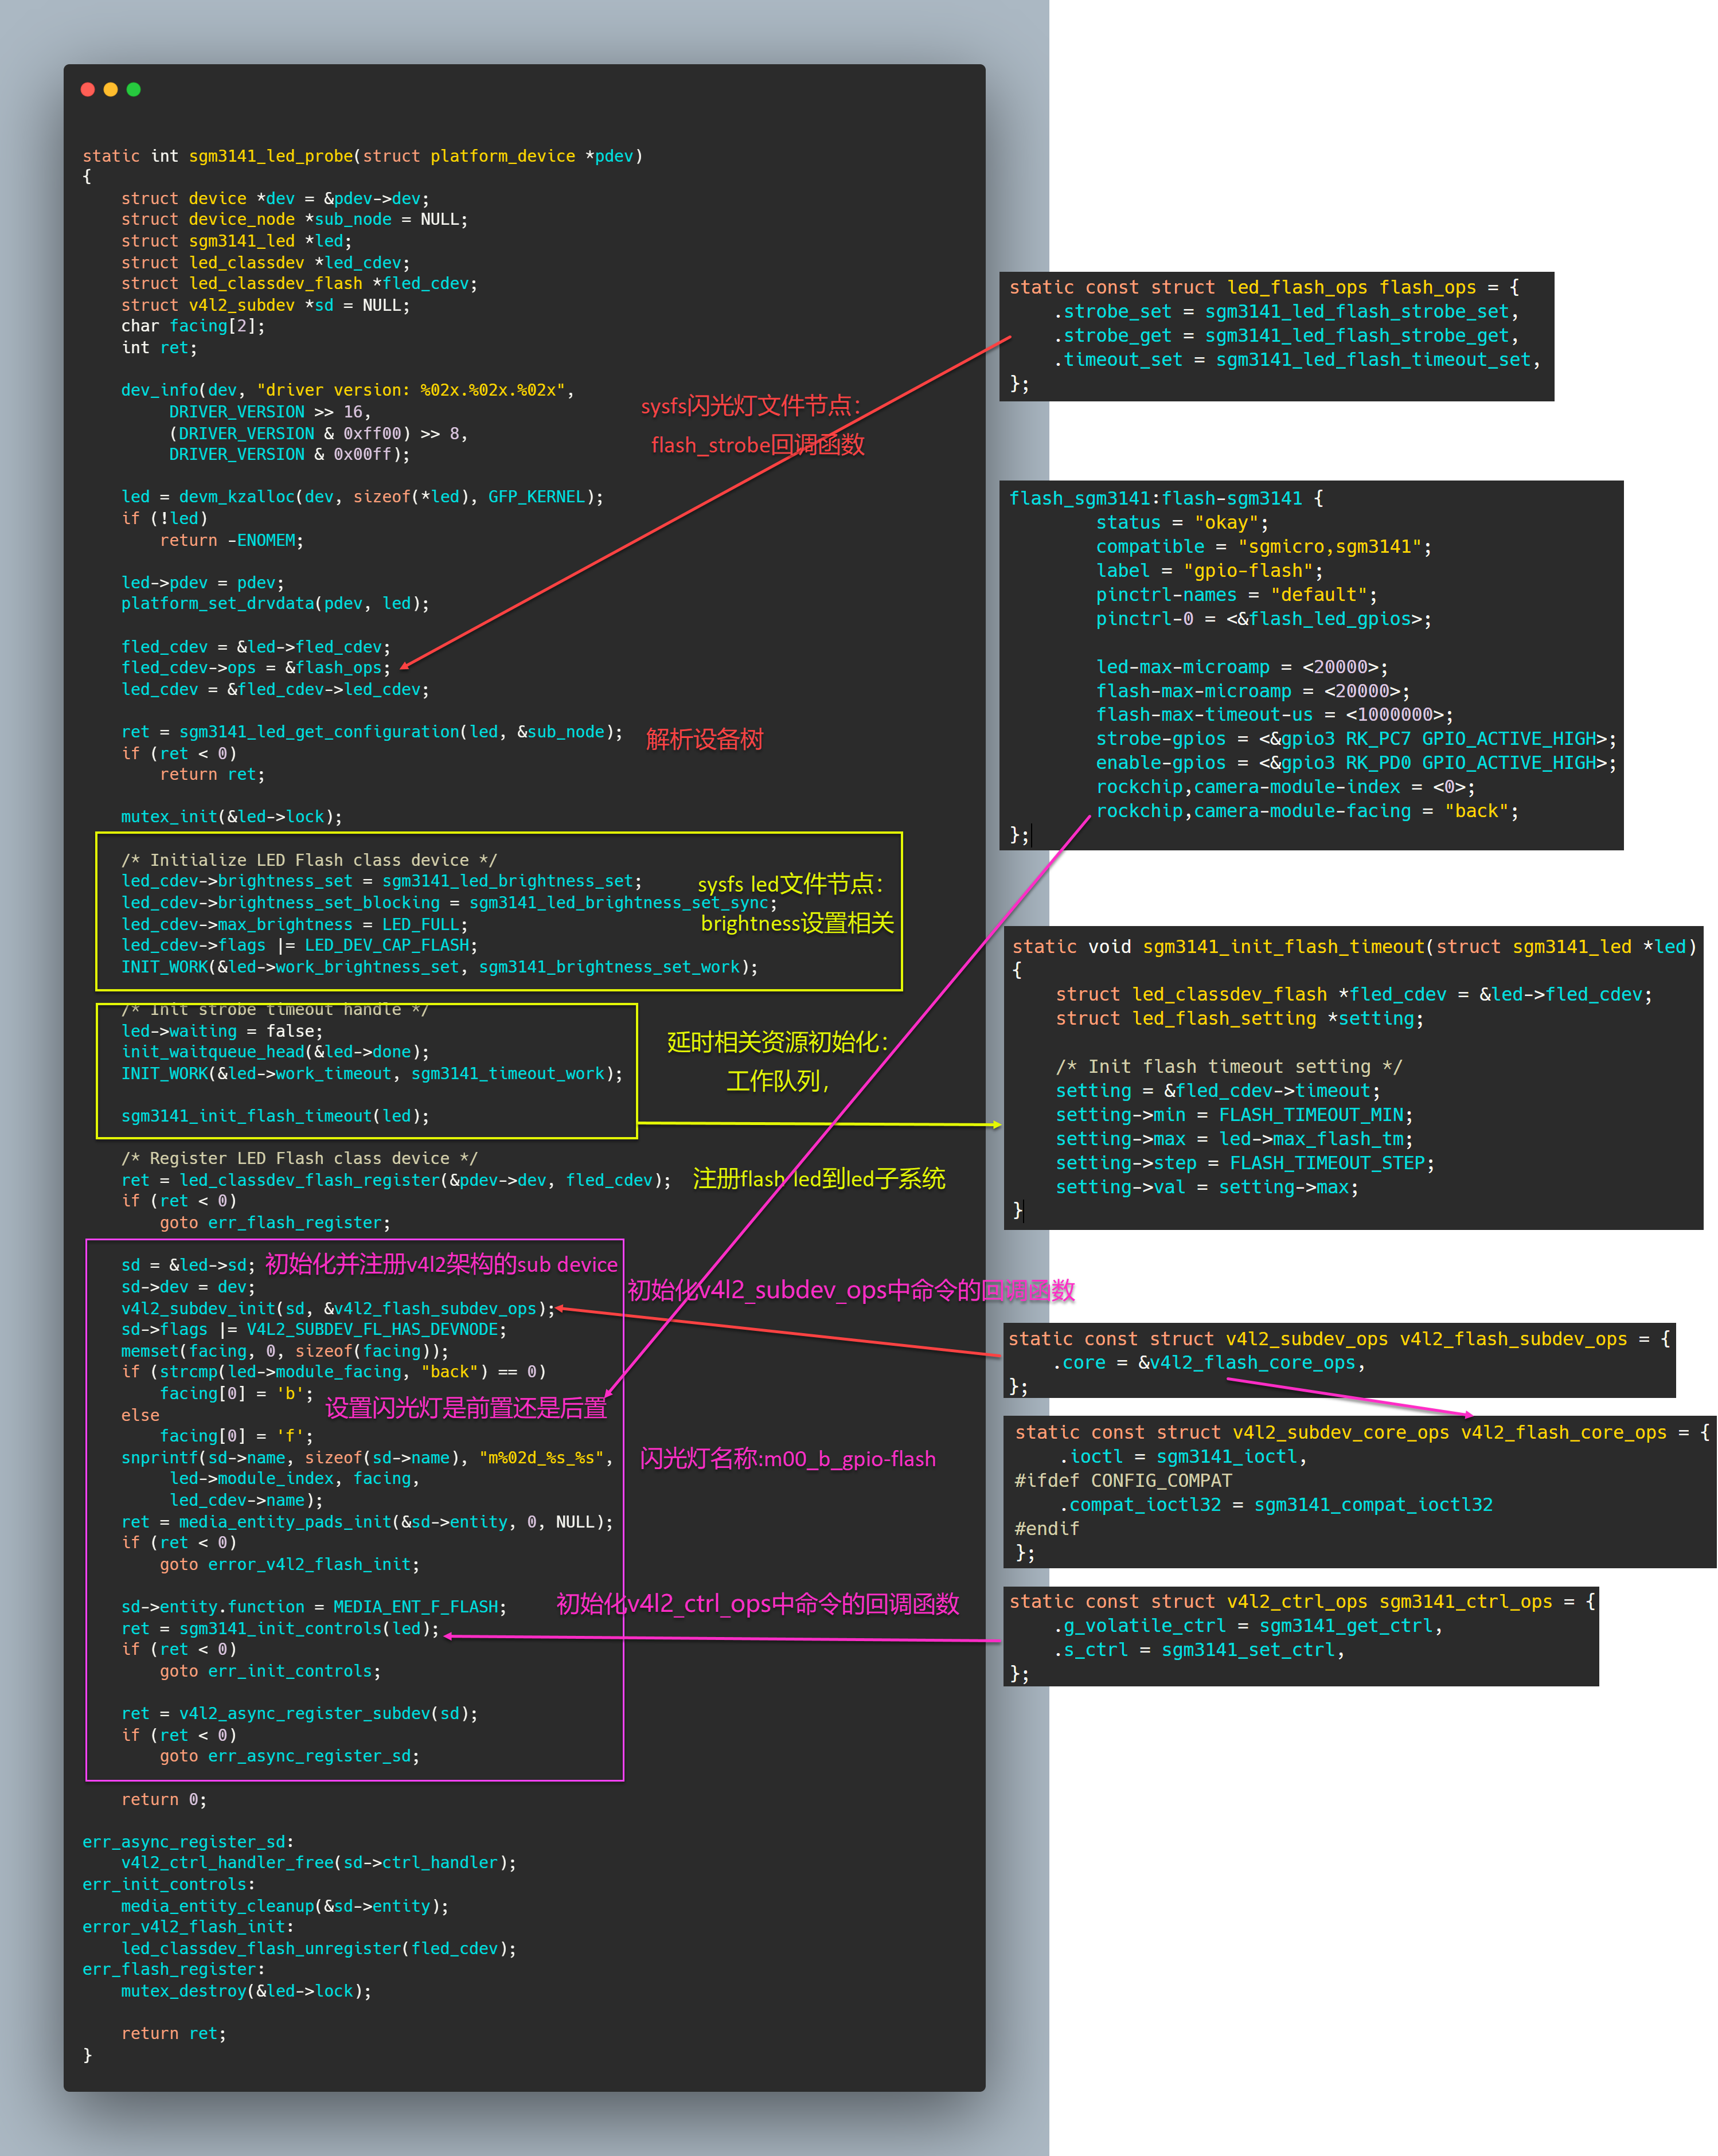
对于gpio闪光灯,则需要填充一下结构体:
struct led_classdev_flash {

	/* led class device */

	struct led_classdev led_cdev;

	/* flash led specific ops */

	const struct led_flash_ops *ops;

	/* flash brightness value in microamperes along with its constraints */

	struct led_flash_setting brightness;

	/* flash timeout value in microseconds along with its constraints */

	struct led_flash_setting timeout;

	/* LED Flash class sysfs groups */

	const struct attribute_group *sysfs_groups[LED_FLASH_SYSFS_GROUPS_SIZE];

};
gpio闪光灯注册函数:
int led_classdev_flash_register(struct device *parent,

				struct led_classdev_flash *fled_cdev)
2. gpio闪光灯sgm3141驱动详解
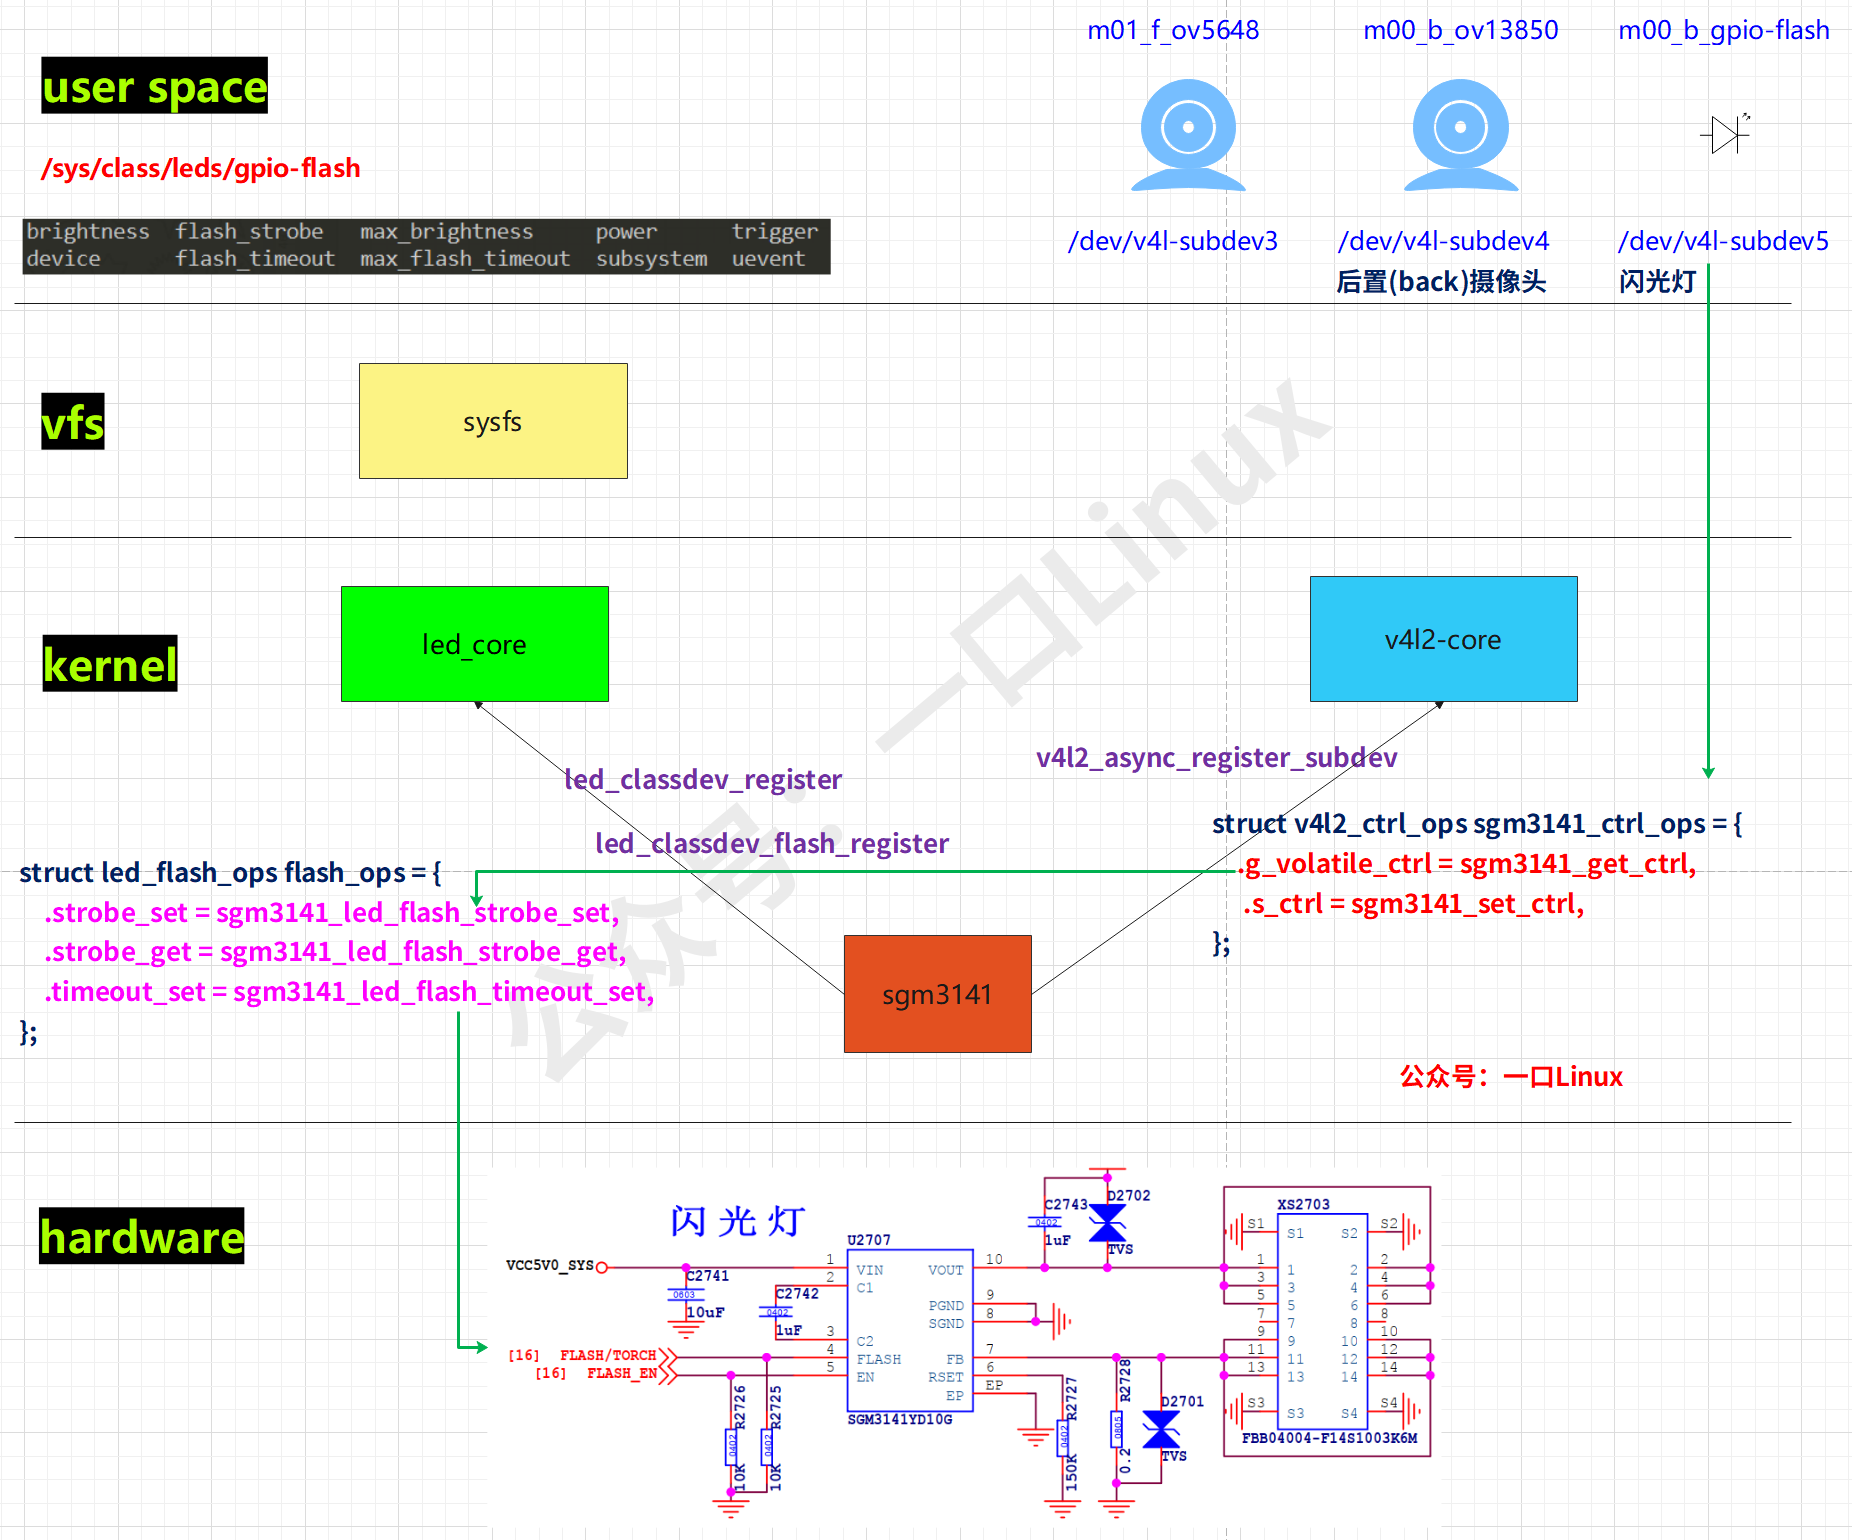
看上图:
- sgm3141驱动通过函数led_classdev_flash_register()->led_classdev_register()向led子系统注册该设备
- sgm3141驱动通过函数v4l2_async_register_subdev()向v4l2子系统注册该设备
- 如果用户直接通过/sys/class/leds/gpio-flash/flash_strobe文件操作led灯,则会直接调用struct led_flash_ops flash_ops的 .strobe_set方法,即sgm3141_led_flash_strobe_set()
操作log:
[  492.026391] sgm3141_led_flash_strobe_set+0x24/0x78

[  492.026453] flash_strobe_store+0x88/0xd8

[  492.026517] dev_attr_store+0x18/0x28

[  492.026571] sysfs_kf_write+0x48/0x58

[  492.026620] kernfs_fop_write+0xf4/0x220

[  492.026683] __vfs_write+0x34/0x158

[  492.026733] vfs_write+0xb0/0x1d0

[  492.026784] ksys_write+0x64/0xe0

[  492.026833] __arm64_sys_write+0x14/0x20

[  492.026867] el0_svc_common.constprop.0+0x64/0x178

[  492.026912] el0_svc_handler+0x28/0x78

[  492.026966] el0_svc+0x8/0xc
- 如果用户的app拍照时操作闪光灯,则是通过v4l2子系统调用下发ioctl命令
命令序列:
V4L2_CID_FLASH_LED_MODE :设置led mod为 V4L2_FLASH_LED_MODE_TORCH(2),并点灯

V4L2_CID_FLASH_LED_MODE:到达指定超时时间(2.7秒),设置led mod为 V4L2_FLASH_LED_MODE_NONE 0

V4L2_CID_FLASH_LED_MODE:在此设置led mod为V4L2_FLASH_LED_MODE_FLASH(1)

V4L2_CID_FLASH_STROBE_STOP:停止闪光
操作log:
[   90.246203] sgm3141 V4L2_CID_FLASH_LED_MODE 2

[   90.246251] sgm3141_set_ctrl(),376

[   90.246262] sgm3141_set_output(),78 0

[   90.246277] sgm3141_set_output(),78 1

[   92.902746] sgm3141 V4L2_CID_FLASH_LED_MODE 0

[   92.902775] sgm3141_set_ctrl(),376

[   92.902781] sgm3141_set_output(),78 0

[   93.034903] sgm3141 V4L2_CID_FLASH_LED_MODE 1

[   93.034929] sgm3141_set_ctrl(),376

[   93.034934] sgm3141_set_output(),78 0

[   93.034943] sgm3141_led_flash_strobe_set(),166 state=1

[   93.034959] sgm3141_set_output(),78 1

[   93.034977] sgm3141 V4L2_CID_FLASH_STROBE_STOP 1

[   93.034988] sgm3141_set_ctrl(),406

[   93.034993] sgm3141_led_flash_strobe_set(),166 state=0

[   93.035002] sgm3141_set_output(),78 0

[   93.035058] sgm3141_timeout_work(),117
- sgm驱动注册流程分析
驱动架构基于platform总线,platform_driver 结构体如下:
static const struct of_device_id sgm3141_led_dt_match[] = {

	{ .compatible = "sgmicro,sgm3141" },

	{},

};

MODULE_DEVICE_TABLE(of, sgm3141_led_dt_match);

static struct platform_driver sgm3141_led_driver = {

	.probe		= sgm3141_led_probe,

	.remove		= sgm3141_led_remove,

	.driver		= {

		.name	= "sgm3141-flash",

		.of_match_table = sgm3141_led_dt_match,

	},

};
Camera | 10.linux驱动 led架构-基于rk3568的更多相关文章
- Camera | 5.Linux v4l2架构(基于rk3568)
上一篇我们讲解了如何编写基于V4L2的应用程序编写,本文主要讲解内核中V4L2架构,以及一些最重要的结构体.注册函数. 厂家在实现自己的摄像头控制器驱动时,总体上都遵循这个架构来实现,但是不同厂家.不 ...
- Linux 驱动——Led驱动2
led_drv.c驱动文件: #include <linux/module.h>#include <linux/kernel.h>#include <linux/init ...
- Java开发架构篇:领域驱动设计架构基于SpringCloud搭建微服务
作者:小傅哥 博客:https://bugstack.cn 沉淀.分享.成长,让自己和他人都能有所收获! 一.前言介绍 微服务不是泥球小单体,而是具备更加清晰职责边界的完整一体的业务功能服务.领域驱动 ...
- Linux 驱动——LED(驱动分离分层)
led_dev.c文件: #include <linux/module.h>#include <linux/version.h> #include <linux/init ...
- Linux 驱动——Led驱动1
led_drv.c驱动文件: #include <linux/module.h>#include <linux/kernel.h>#include <linux/init ...
- arm Linux 驱动LED子系统 测试
Linux内核在3.0以上引入了设备树概念(具体哪个版本不清楚)在编译内核后需要将与之对应的dtb文件也下载人板子上才能使内核与硬件关联起来. dtb文件是有dts文件编译后生成的:例如 /* * C ...
- Linux系统启动那些事—基于Linux 3.10内核【转】
转自:https://blog.csdn.net/shichaog/article/details/40218763 Linux系统启动那些事—基于Linux 3.10内核 csdn 我的空间的下载地 ...
- 驱动编程思想之初体验 --------------- 嵌入式linux驱动开发之点亮LED
这节我们就开始开始进行实战啦!这里顺便说一下啊,出来做开发的基础很重要啊,基础不好,迟早是要恶补的.个人深刻觉得像这种嵌入式的开发对C语言和微机接口与原理是非常依赖的,必须要有深厚的基础才能hold的 ...
- (笔记)linux设备驱动--LED驱动
linux设备驱动--LED驱动 最近正在学习设备驱动开发,因此打算写一个系列博客,即是对自己学习的一个总结,也是对自己的一个督促,有不对,不足,需要改正的地方还望大家指出,而且希望结识志同道合的朋友 ...
- 超简单易用的 “在 pcduino 开发板上写 Linux 驱动控制板载 LED 的闪烁”
版权声明:本文为博主原创文章,未经博主同意不得转载.转载联系 QQ 30952589,加好友请注明来意. https://blog.csdn.net/sleks/article/details/251 ...
随机推荐
- readhat8搭建SFTP双机高可用并配置Rsync数据实时同步
环境准备: 主机 host-61-118 : 192.168.61.118 host-61-119:192.168.61.119 vip:192.168.61.220 检测openssh版本,版本必须 ...
- SDL3 入门(3):三角形
SDL3 提供了 SDL_RenderGeometry 函数绘制几何图形,用法和 OpenGL 差不多,先定义顶点数据,然后根据顶点数据绘制几何图形. 绘制三角形的代码如下: std::array&l ...
- HunggingFace的镜像加速站
方法一:使用huggingface 官方提供的 **huggingface-cli** 命令行工具.(1) 安装依赖pip install -U huggingface_hub (2) 基本命令示例: ...
- Linux内核中的各种文件系统:proc、tmpfs、devfs、sysfs
Linux内核中的各种文件系统:proc.tmpfs.devfs.sysfs 背景 刚学完proc文件系统在内核驱动 中的使用,就看到另外的sysfs的有关接口.很好奇proc文件系统和sysfs文件 ...
- 通过 hexo 生成静态博客
通过 hexo 生成静态博客 背景 在对比了很多博客网站以后,我决定开始慢慢迁移我的文章,以后有时间的话还会搭建自己的网站,目前主流的静态博客生成器有三个: jekyll, hexo, hugo. 静 ...
- Python使用Argparse读取命令参数
python编写的脚本需要通过命令参数来做一些参数配置.本文将介绍如何使用argparse来解析命令行参数.这种方法相对于sys.args的方式会简单很多. 通过以下的脚本来构建一个简单的配置解析器, ...
- TI AM64x工业核心板规格书(双核ARM Cortex-A53 + 单/四核Cortex-R5F + 单核Cortex-M4F,主频1GHz)
1 核心板简介 创龙科技SOM-TL64x是一款基于TI Sitara系列AM64x双核ARM Cortex-A53 + 单/四核Cortex-R5F + 单核Cortex-M4F设计的多核工业级核心 ...
- joig2022_e 题解
设计 \(f_i\) 表示以第 \(i\) 个数结尾的选择的最大值. 有 \(f_i = f_j + a_i\)(\(type_i \not = type_j\)). 发现可以选择的种类其实构成两段连 ...
- Simple WPF: WPF实现一个MINIO等S3兼容对象存储上传文件的小工具
最新内容优先发布于个人博客:小虎技术分享站,随后逐步搬运到博客园. 创作不易,如果觉得有用请在Github上为博主点亮一颗小星星吧! 目的 之前在阿里云ECS 99元/年的活动实例上搭建了一个测试用的 ...
- CF717E
这道题属于是那种看上去很有思路,然后无从下手,写了个dfs感觉实在是不行. 后面仔细看了一下,这个题是用的构造dfs,基本是树上dfs,时间复杂度是O(V+E) 新构造的一个参数作为根,整个dfs表示 ...