
IdentityServer4同时使用多个GrantType进行授权和IdentityModel.Client部分源码解析
首先,介绍一下问题。
由于项目中用户分了三个角色:管理员、代理、会员。其中,代理又分为一级代理、二级代理等,会员也可以相互之间进行推荐。
将用户表分为了两个,管理员和代理都属于后台,在同一张表,会员单独属于一张表。(别问我为什么不在同一张表按类型区分,俺不知道,俺也不敢问。我只是进去用新架构进行重新开发,基于原有的数据库。。)
同时后台账户不能请求会员的接口,会员也不能请求后台的接口。 他们是相互独立的两个服务。
因为要做成前后端分离,所以采用IdentityServer4进行接口授权。
oauth2 有四种授权模式:
- 密码模式(resource owner password credentials)
- 授权码模式(authorization code)
- 简化模式(implicit)
- 客户端模式(client credentials)
这篇重点不是介绍四种模式差异,有不清楚的请自行看相关资料。
我想到的有两种方案可以解决;
1.后台登陆和前台登陆都采用authorization code模式进行登陆,只是传参时加一个loginType来区分是会员还是后台账户,
在scopes里面定义所有的apiResource,当然因为登陆统一了,所以登陆时请求的scope也要根据loginType来区分(当然你也可以根据loginType来生成role角色权限,在不同的服务里面带上相应的role权限即可);
不然会员账户的access_token也可以请求后台,后台同时也可以请求会员的功能了。
这样在登陆的就能根据类型来判断应该查询哪张表。
但是这种一听就很绕,代码可读性差、后期维护难,假如突然又增加一个角色或者一张表呢。
不符合开放闭合原则。
2.就是增加新的授权模式,在IdentityServer4里面;
可以让我们使用自定义的授权码。这里我们可以好好利用了,
services.AddIdentityServer()

                .AddDeveloperSigningCredential()

                .AddInMemoryClients(MemoryConfigs.GetClients())

                .AddInMemoryIdentityResources(MemoryConfigs.GetIdentityResources())

                .AddInMemoryApiResources(MemoryConfigs.GetApiResources())

                .AddResourceOwnerValidator<CustomPasswordOwnerUserServices>()//后台账户登录

                .AddExtensionGrantValidator<CustomUserService>()//会员账户登录

                //.AddAppAuthRedirectUriValidator<AuthorizationCodeService>()

                .AddProfileService<CustomProfileService>();
使用不同的模式,不同的clientId,在请求时会自动进行相应的模式验证;下面是会员自定义的模式验证
public class CustomUserService : IExtensionGrantValidator

    {

        private readonly IHttpClientFactory _httpClientFactory;

        public CustomUserService(IHttpClientFactory httpClientFactory)

        {

            _httpClientFactory = httpClientFactory;

        }

        public string GrantType => "customuserservice";

        public async Task ValidateAsync(ExtensionGrantValidationContext context)

        {

            var model = new userLoginDto

            {

                phoneNumber = context.Request.Raw["Phone"],

                passWord = context.Request.Raw["PassWord"]

            };

            var client = _httpClientFactory.CreateClient("userApi");

            var response = await client.PostAsJsonAsync("/api/userLogin/login", model);//调用服务接口进行密码验证

            response.EnsureSuccessStatusCode();

            if (response.IsSuccessStatusCode)

            {

                string operatorT = await response.Content.ReadAsStringAsync();

                var result = JsonConvert.DeserializeObject<OperatorResult>(operatorT);

                if (result.Result == ResultType.Success)

                {

                    var user = JsonConvert.DeserializeObject<UserInfo>(result.Data.ToString());

                    List<Claim> list = new List<Claim>();

                    list.Add(new Claim("username", user.UserName ?? ""));

                    list.Add(new Claim("role", string.IsNullOrEmpty(user.Role) ? "" : user.Role));

                    list.Add(new Claim("realname", string.IsNullOrEmpty(user.RealName) ? "" : user.RealName));

                    list.Add(new Claim("company", string.IsNullOrEmpty(user.Company) ? "" : user.Company));

                    list.Add(new Claim("roleid", string.IsNullOrEmpty(user.RoleId) ? "" : user.RoleId));

                    context.Result = new GrantValidationResult(subject: user.Id.ToString(), authenticationMethod: GrantType, claims: list);

                }

                else

                {

                    context.Result = new GrantValidationResult(TokenRequestErrors.InvalidGrant, result.Message);

                }

            }

            else

                context.Result = new GrantValidationResult(TokenRequestErrors.InvalidGrant, "用户名密码错误");

            await Task.CompletedTask;

        }

    }
下面是client配置
new Client(){

                    ClientId="userservices",

                    ClientName="用户服务",

                    ClientSecrets=new List<Secret> {

                        new Secret("secret".Sha256())

                    },

                    AllowedGrantTypes= new List<string>{

                        "customuserservice"

                    },

                    AccessTokenType= AccessTokenType.Jwt,

                    RequireConsent=false,

                    AccessTokenLifetime=,

                    AllowOfflineAccess=true,

                    AlwaysIncludeUserClaimsInIdToken=true,

                    AbsoluteRefreshTokenLifetime=,

                    AllowedScopes={

                       IdentityServerConstants.StandardScopes.Profile,

                        IdentityServerConstants.StandardScopes.OpenId,

                        IdentityServerConstants.StandardScopes.OfflineAccess,

                       "userservicesapi"

                    },

                }
当然ApiResource也要添加
new ApiResource("userservicesapi","用户服务")
接下来,就是登录了
var client = _httpClientFactory.CreateClient();

            var disco = await client.GetDiscoveryDocumentAsync(new DiscoveryDocumentRequest { Address = Configuration["AuthorityConfig"], Policy = new DiscoveryPolicy { RequireHttps = false } });

            if (disco.IsError)

            {

                result.Message = disco.Error;

                return Ok(result);

            }

            var formvalues = new Dictionary<string, string>();

            formvalues.Add("scope", "profile openid offline_access userservicesapi");

            formvalues.Add("Phone", loginDto.phoneNumber);

            formvalues.Add("PassWord", loginDto.passWord);var content = new FormUrlEncodedContent(formvalues);

            TokenRequest tokenRequest = new TokenRequest

            {

                GrantType = "customuserservice",

                Address = disco.TokenEndpoint,

                ClientId = "userservices",

                ClientSecret = "secret",

                Parameters = formvalues

            };

            var tokenResponse = await client.RequestTokenAsync(tokenRequest);//自定义的授权模式请求
这样基本就完成了。登录接口就不展示了,都是一些逻辑判断。
这只是会员的登陆,后台账户的登陆跟会员的类似。修改请求的clientId和scope就行了
可以发现全程没有loginType参数,即使后面要加,完全不需要修改源代码,只需要按需扩展即可。
后面,我们看看IdentityModel基于httpclient的扩展源码,以前的TokenClient已经被舍弃了。网上能找到完整的自定义grantType授权太少了。
拿密码模式举例
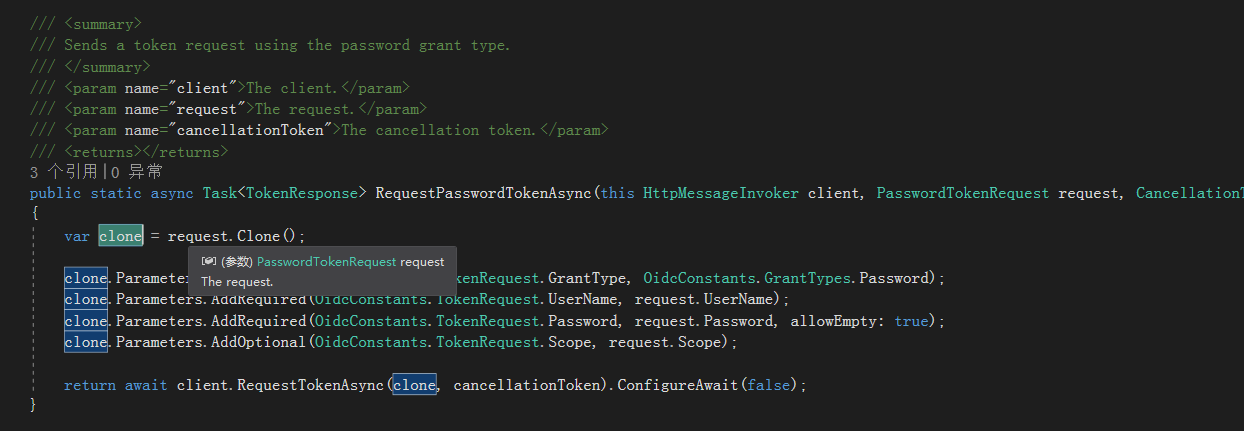
第一句的clone可以先不管,就是将参数重新组装;
中间4行代码增加的一些参数,就常见的GrantType,Scope和密码模式必须的UserName和Password;
然后调用client.RequestTokenAsync方法发起请求,
接下来看RequestTokenAsync方法;说明已经加在注释里面了
internal static async Task<TokenResponse> RequestTokenAsync(this HttpMessageInvoker client, Request request, CancellationToken cancellationToken = default)

        {

            if (!request.Parameters.TryGetValue(OidcConstants.TokenRequest.ClientId, out _))

            {

                if (request.ClientId.IsMissing())

                {

                    throw new InvalidOperationException("client_id is missing");

                }

            }

            var httpRequest = new HttpRequestMessage(HttpMethod.Post, request.Address);//初始化post请求

            httpRequest.Headers.Accept.Clear();

            httpRequest.Headers.Accept.Add(new MediaTypeWithQualityHeaderValue("application/json"));

            //根据style判断是在header里面添加client_id client_secret等参数 还是在body里面添加;默认是在body里面添加

            ClientCredentialsHelper.PopulateClientCredentials(request, httpRequest);

            //下面的就是常见的httpClient post请求

            httpRequest.Content = new FormUrlEncodedContent(request.Parameters);

            HttpResponseMessage response;

            try

            {

                response = await client.SendAsync(httpRequest, cancellationToken).ConfigureAwait(false);

            }

            catch (Exception ex)

            {

                return new TokenResponse(ex);

            }

            string content = null;

            if (response.Content != null)

            {

                content = await response.Content.ReadAsStringAsync().ConfigureAwait(false);

            }

            //直接通过JObject转化的json实例化成TokenResponse类

            if (response.StatusCode == HttpStatusCode.OK || response.StatusCode == HttpStatusCode.BadRequest)

            {

                return new TokenResponse(content);

            }

            else

            {

                return new TokenResponse(response.StatusCode, response.ReasonPhrase, content);

            }

        }
可以发现其实就是简单的post请求,只是封装了参数而已。
然后看我们的自定义RequestTokenAsync源码
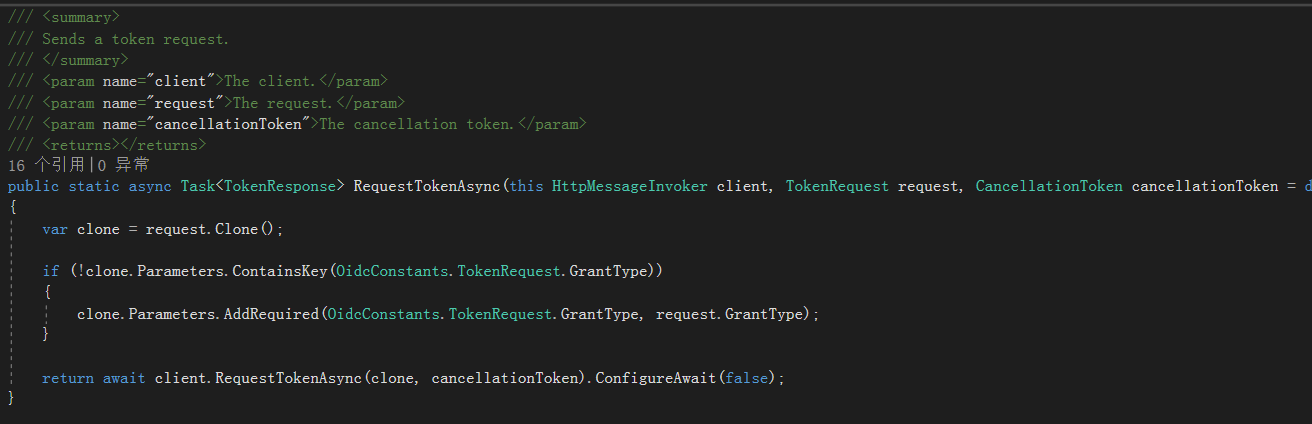
可以发现只加了一个grantType,当然client_id和client_secret都在TokenReques继承的基类Request里面了。
如果有scope的话,自定义的模式请求就需要自己添加参数
formvalues.Add("scope", "profile openid offline_access userservicesapi");
自此就完成了。
IdentityServer4同时使用多个GrantType进行授权和IdentityModel.Client部分源码解析的更多相关文章
- identityserver4源码解析_2_元数据接口
目录 identityserver4源码解析_1_项目结构 identityserver4源码解析_2_元数据接口 identityserver4源码解析_3_认证接口 identityserver4 ...
- identityserver4源码解析_3_认证接口
目录 identityserver4源码解析_1_项目结构 identityserver4源码解析_2_元数据接口 identityserver4源码解析_3_认证接口 identityserver4 ...
- IdentityServer4源码解析_4_令牌发放接口
目录 identityserver4源码解析_1_项目结构 identityserver4源码解析_2_元数据接口 identityserver4源码解析_3_认证接口 identityserver4 ...
- 简单理解 OAuth 2.0 及资料收集,IdentityServer4 部分源码解析
简单理解 OAuth 2.0 及资料收集,IdentityServer4 部分源码解析 虽然经常用 OAuth 2.0,但是原理却不曾了解,印象里觉得很简单,请求跳来跳去,今天看完相关介绍,就来捋一捋 ...
- IdentityServer4源码解析_1_项目结构
目录 IdentityServer4源码解析_1_项目结构 IdentityServer4源码解析_2_元数据接口 IdentityServer4源码解析_3_认证接口 IdentityServer4 ...
- IdentityServer4源码解析_5_查询用户信息接口
协议简析 UserInfo接口是OAuth2.0中规定的需要认证访问的接口,可以返回认证用户的声明信息.请求UserInfo接口需要使用通行令牌.响应报文通常是json数据格式,包含了一组claim键 ...
- 【.NET Core项目实战-统一认证平台】第八章 授权篇-IdentityServer4源码分析
[.NET Core项目实战-统一认证平台]开篇及目录索引 上篇文章我介绍了如何在网关上实现客户端自定义限流功能,基本完成了关于网关的一些自定义扩展需求,后面几篇将介绍基于IdentityServer ...
- OAuth2.0授权和SSO授权
一. OAuth2.0授权和SSO授 1. OAuth2.0 --> 网页 --> 当前程序内授权 --> 输入账号密码 --> (自己需要获取到令牌, 自己处理逻辑) 授权成 ...
- ASP.NET MVC - 安全、身份认证、角色授权和ASP.NET Identity
ASP.NET MVC - 安全.身份认证.角色授权和ASP.NET Identity ASP.NET MVC内置的认证特性 AuthorizeAttribute特性(System.Web.Mvc)( ...
随机推荐
- Nginx配置信息损毁又无备份时如何恢复
worker_processes *; 本文介绍在Nginx配置信息出现问题后,在没有备份的情况下,如何利用Nginx进程的虚拟内存恢复配置信息. 问题背景 假设 /etc/nginx/site-av ...
- Java设计模式:代理模式(转)
代理(Proxy)是一种设计模式,提供了对目标对象另外的访问方式;即通过代理对象访问目标对象.这样做的好处是:可以在目标对象实现的基础上,增强额外的功能操作,即扩展目标对象的功能.这里使用到编程中的一 ...
- VSCode 设置 Tab 空格
Windows 点击左下角的 Setting 按钮 输入 tabSize 进行查找
- python 适合的才是最好的
群里老有人问最新的破解码最新的包,最新的就是最好的吗? 今天说一下这些新手的坑: numpy 最好使用的版本是1.13.3 而非新的1.17.0 pandas最好使用的版本是0.18.0 而非新的0 ...
- java说明文档制作
A:对工具类加入文档注释 B:通过javadoc命令生成说明书 * @author(提取作者内容) * @version(提取版本内容) * javadoc -d 指定的文件目录 -author -v ...
- osg 线程模型
void ViewerBase::frame(double simulationTime) { if (_done) return; // OSG_NOTICE<<std::endl< ...
- ElasticSearch——路由(_routing)机制
前言 一条数据是如何落地到对应的shard上的? 当索引一个文档的时候,文档会被存储到一个主分片中. Elasticsearch 如何知道一个文档应该存放到哪个分片中呢? 首先这肯定不会是随机的,否则 ...
- MariaDB集群配置(主从和多主)
1.mariadb主从 主从多用于网站架构,因为主从的同步机制是异步的,数据的同步有一定延迟,也就是说有可能会造成数据的丢失,但是性能比较好,因此网站大多数用的是主从架构的数据库,读写分离必须基于主从 ...
- CentOS 7启动与切换图形界面
安装图形界面 默认情况下是不会安装图形界面的,所以需要自己手动安装,步骤如下: 1.开启系统,以root身份进入 安装X(X Window System),命令如下: yum groupinstall ...
- bootstrap基础学习【导航条、分页导航】(五)
<!DOCTYPE html> <html> <head> <meta charset="UTF-8"> <title> ...