
CentOS7 GitLab 安装
1.安装依赖
$ yum -y install policycoreutils openssh-server openssh-clients postfix

$ yum install policycoreutils-python
2.设置postfix开机自启并启动
$ systemctl enable postfix

$ systemctl start postfix
3.下载
$ wget --content-disposition https://packages.gitlab.com/gitlab/gitlab-ce/packages/ol/7/gitlab-ce-12.0.3-ce.0.el7.x86_64.rpm/download.rpm
4.解压
$ rpm -i gitlab-ce-12.0.3-ce.0.el7.x86_64.rpm
解压完后会出现如下界面:
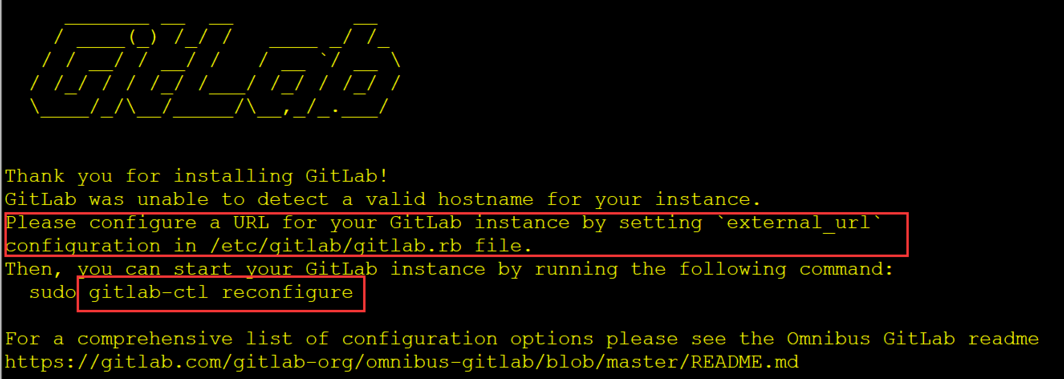
5.修改gitlab配置文件指定服务器ip和自定义端口
vim /etc/gitlab/gitlab.rb

6.重置并启动GitLab
$ gitlab-ctl reconfigure
7.访问 GitLab页面 http://服务器IP:端口
如果gitlab密码忘记了,可以执行如下步骤:
[root@localhost gitlab]# gitlab-rails console production

Loading production environment (Rails 4.1.12)

irb(main):001:0>
irb(main):001:0> user = User.where(id:1).first

=> #<User id: 1, email: "admin@example.com", encrypted_password: "$2a$10$DMtAMOAM0w9IobSlUm5H3.gprVLzulSsMKyCDkRALBh...", reset_password_token: nil, reset_password_sent_at: nil, remember_created_at: nil, sign_in_count: 0, current_sign_in_at: nil, last_sign_in_at: nil, current_sign_in_ip: nil, last_sign_in_ip: nil, created_at: "2018-06-14 13:14:23", updated_at: "2018-06-14 13:14:23", name: "Administrator", admin: true, projects_limit: 10000, skype: "", linkedin: "", twitter: "", authentication_token: "QsfSW1J1ffhNgM76AsHb", theme_id: 2, bio: nil, failed_attempts: 0, locked_at: nil, username: "root", can_create_group: true, can_create_team: false, state: "active", color_scheme_id: 1, notification_level: 1, password_expires_at: "2018-06-14 13:14:23", created_by_id: nil, last_credential_check_at: nil, avatar: nil, confirmation_token: "Rca6bsELVxBbGqbgykEn", confirmed_at: "2018-06-14 13:14:23", confirmation_sent_at: "2018-06-14 13:14:23", unconfirmed_email: nil, hide_no_ssh_key: false, website_url: "", notification_email: "admin@example.com", hide_no_password: false, password_automatically_set: false, location: nil, encrypted_otp_secret: nil, encrypted_otp_secret_iv: nil, encrypted_otp_secret_salt: nil, otp_required_for_login: false, otp_backup_codes: nil, public_email: "", dashboard: 0, project_view: 0, consumed_timestep: nil>

irb(main):002:0>
irb(main):002:0> user.password='66668888'

=> "66668888"

irb(main):003:0>
irb(main):003:0> user.save!

=> true

irb(main):004:0>
CentOS7 GitLab 安装的更多相关文章
- centos7 部署安装gitlab服务器
概念: git 是一种版本控制系统,是一个命令,是一种工具 gitlib 是用于实现git功能的开发库 github 是一个基于git实现的在线代码托管仓库,包含一个网站界面,向互联网开放 gitla ...
- centos7.3 gitlab 安装配置
1. 设备环境 硬件配置联想 TS250 E3-1225,16G内存,2X1 TB 软件CentOS-7-x86_64-DVD-1804.iso ,安装时选择桌面版 推荐配置参考:https://do ...
- Vmware安装CentOs7+gitlab(二)
在CentOS系统上安装所需的依赖:ssh,防火墙,postfix(用于邮件通知) ,wget,以下这些命令也会打开系统防火墙中的HTTP和SSH端口访问. 1.安装ssh和python sudo y ...
- GitLab在centos7上安装和使用
git的优点 git是分布式的,svn不是 git分布式本地就可以用,可以随便保存各种历史痕迹,不用担心污染服务器,连不上服务器也能提交代码.查看log. GIT分支和SVN的分支不同 分支在SVN中 ...
- CentOS 7 环境下GitLab安装及基本配置
新实验室要求重新建设GitLab,对于我来讲,是第一次有机会当元老参与实验室的建设.下面分享我自己的实测经验: 1. 安装依赖软件并设置开机启动 yum install curlpolicycoreu ...
- gitlab 安装和使用
正常 团队开发 不可能吧代码托管给 github 或者码云之类的 三方托管机构. 然后 原始的 git 没有图形用户界面. 这时候我们可以选择 gitlab . 安装环境 centos7 1 安装依 ...
- CentOS服务器上搭建Gitlab安装步骤、中文汉化详细步骤、日常管理以及异常故障排查
一, 服务器快速搭建gitlab方法 可以参考gitlab中文社区 的教程centos7安装gitlab:https://www.gitlab.cc/downloads/#centos7centos6 ...
- gitlab安装、配置与阿里云产品集成
https://www.ilanni.com/?p=12819 一.gitlab安装与部署 gitlab的安装可以分为源码安装和通过安装包进行安装,要是按照我以前的写作习惯的话,我也会把源码安装在本文 ...
- GitLab 安装和配置
一.GitLab 简介 GitLab 是一个利用Ruby on Rails 开发的开源版本控制系统,实现一个自托管的Git项目仓库,可通过Web界面进行访问公开的或者私人项目. 它拥有与GitHub类 ...
随机推荐
- 2019-11-29-WPF-模拟触摸设备
原文:2019-11-29-WPF-模拟触摸设备 title author date CreateTime categories WPF 模拟触摸设备 lindexi 2019-11-29 08:47 ...
- Prism——Window 必须是树的根目录。不能将 Window 添加为 Visual 的子目录。
这个错误就是作为Region的view添加时选成了界面,正确的应在添加时选择用户控件. 解决方法: 这俩处的Window改为UserControl即可.
- Windows 下MongoDB复制集配置
1.下载服务.https://www.mongodb.com/ 点击products 下拉第二列MongoDB server 选择 4.0.6 2.下载下来后 有限管理员运行 一路安装,可以不用 ...
- tomcat的基本应用
1.JVM基本介绍 JAVA编译型 ---> 编译 C 编译型---> linux --->编译一次 windows --->编译一次 macos ubuntu 跨平台 移值型 ...
- 面向对象的六大原则之 单一职责原则——SRP
SRP = Single Responsibility Principle 定义:就一个类而言,应该只有一个能引起他变化的原因.通俗的说,即一个类只负责一项职责. 作用: 1.减少了类之间的耦 ...
- 表单验证如何让select设置为必选
<select class="custom-select mr-sm-2" name="province" id="province" ...
- 一句DELETE引发的加班(Mysql 恢复Delete删除的数据)
本机用的Navicat连mysql测试DB又连了正式DB,因为本地与正式要频繁操作所以都打开了很多查询,本来要DELETE删除测试DB的数据,没看清在正式环境执行了.共删除了325条数据,然后在网上找 ...
- 互联网渗透测试之Wireshark的高级应用
互联网渗透测试之Wireshark的高级应用 1.1说明 在本节将介绍Wireshark的一些高级特性 1.2. "Follow TCP Stream" 如果你处理TCP协议,想要 ...
- 百度云人脸识别API人脸对比
from urllib import request import base64 import requests import re import json import urllib import ...
- dga model train and test code
# _*_coding:UTF-8_*_ import operator import tldextract import random import pickle import os import ...