SpringMVC学习笔记三 整合jdbc和事务
spring整合JDBC
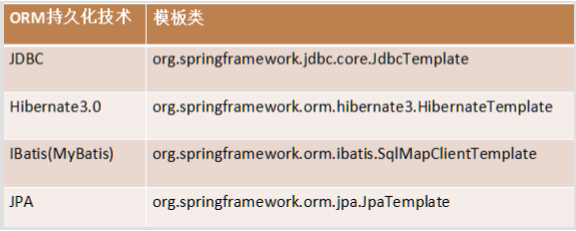
spring提供了很多模板整合Dao技术,用于简化编程。
引入相关jar包

spring中提供了一个可以操作数据库的对象,JDBCTemplate(JDBC模板对象)。对象封装了jdbc技术。与DBUtils中的QueryRunner非常相似。
@Test

public void fun1() throws Exception{

//0 准备连接池

ComboPooledDataSource dataSource = new ComboPooledDataSource();

dataSource.setDriverClass("com.mysql.jdbc.Driver");

dataSource.setJdbcUrl("jdbc:mysql:///hibernate_32");

dataSource.setUser("root");

dataSource.setPassword("1234");

//1 创建JDBC模板对象

JdbcTemplate jt = new JdbcTemplate();

jt.setDataSource(dataSource);

//2 书写sql,并执行

String sql = "insert into t_user values(null,'rose') ";

jt.update(sql);

}
以上方式并没有用到spring容器,下面演示将连接池的配置交给 Spring 管理
1、dao接口,UserDao.java
package cn.itcast.a_jdbctemplate;

import java.util.List;

import cn.itcast.bean.User;

public interface UserDao {

    //增

    void save(User u);

    //删

    void delete(Integer id);

    //改

    void update(User u);

    //查

    User getById(Integer id);

    //查

    int getTotalCount();

    //查

    List<User> getAll();

}
2、dao实现类
package cn.itcast.a_jdbctemplate;

import java.sql.ResultSet;

import java.sql.SQLException;

import java.util.List;

import org.springframework.jdbc.core.JdbcTemplate;

import org.springframework.jdbc.core.RowMapper;

import org.springframework.jdbc.core.support.JdbcDaoSupport;

import cn.itcast.bean.User;

//使用JDBC模板实现增删改查

public class UserDaoImpl implements UserDao {

    private JdbcTemplate jt;

    @Override

    public void save(User u) {

        String sql = "insert into t_user values(null,?) ";

        jt.update(sql, u.getName());

    }

    @Override

    public void delete(Integer id) {

        String sql = "delete from t_user where id = ? ";

        jt.update(sql,id);

    }

    @Override

    public void update(User u) {

        String sql = "update t_user set name = ? where id=? ";

        jt.update(sql, u.getName(),u.getId());

    }

    @Override

    public User getById(Integer id) {

        String sql = "select * from t_user where id = ? ";

        return jt.queryForObject(sql,new RowMapper<User>(){

            @Override

            public User mapRow(ResultSet rs, int arg1) throws SQLException {

                User u = new User();

                u.setId(rs.getInt("id"));

                u.setName(rs.getString("name"));

                return u;

            }}, id);

    }

    @Override

    public int getTotalCount() {

        String sql = "select count(*) from t_user ";

        Integer count = jt.queryForObject(sql, Integer.class);

        return count;

    }

    @Override

    public List<User> getAll() {

        String sql = "select * from t_user ";

        List<User> list = jt.query(sql, new RowMapper<User>(){

            @Override

            public User mapRow(ResultSet rs, int arg1) throws SQLException {

                User u = new User();

                u.setId(rs.getInt("id"));

                u.setName(rs.getString("name"));

                return u;

            }});

        return list;

    }
  public void setJt(JdbcTemplate jt) {
      this.jt = jt;
  }
}
Spring配置
<?xml version="1.0" encoding="UTF-8"?>

<beans xmlns:xsi="http://www.w3.org/2001/XMLSchema-instance" xmlns="http://www.springframework.org/schema/beans"

       xmlns:context="http://www.springframework.org/schema/context"

       xsi:schemaLocation="http://www.springframework.org/schema/beans http://www.springframework.org/schema/beans/spring-beans-4.2.xsd http://www.springframework.org/schema/context http://www.springframework.org/schema/context/spring-context-4.2.xsd ">

<!-- 1.将连接池放入spring容器 -->

<bean name="dataSource" class="com.mchange.v2.c3p0.ComboPooledDataSource">

    <property name="jdbcUrl" value="jdbc:mysql:///hibernate_crm"></property>

    <property name="driverClass" value="com.mysql.jdbc.Driver"></property>

    <property name="user" value="root"></property>

    <property name="password" value="123456"></property>

</bean>

<!-- 2.将JDBCTemplate放入spring容器 -->

<bean name="jdbcTemplate" class="org.springframework.jdbc.core.JdbcTemplate">

    <property name="dataSource" ref="dataSource"></property>

</bean>

<!-- 3.将UserDao放入spring容器 -->

<bean name="userDao" class="cn.itcast.a_jdbctemplate.UserDaoImpl">

    <property name="jt" ref="jdbcTemplate"></property>

</bean>

</beans>
测试类:
package cn.itcast.a_jdbctemplate;

import java.beans.PropertyVetoException;

import javax.annotation.Resource;

import org.junit.Test;

import org.junit.runner.RunWith;

import org.springframework.jdbc.core.JdbcTemplate;

import org.springframework.jdbc.core.support.JdbcDaoSupport;

import org.springframework.test.context.ContextConfiguration;

import org.springframework.test.context.junit4.SpringJUnit4ClassRunner;

import com.mchange.v2.c3p0.ComboPooledDataSource;

import cn.itcast.bean.User;

//演示JDBC模板

@RunWith(SpringJUnit4ClassRunner.class)

@ContextConfiguration("classpath:applicationContext.xml")

public class Demo {

    @Resource(name="userDao")

    private UserDao ud;

    @Test

    public void fun2() throws Exception{

        User u = new User();

        u.setName("tom");

        ud.save(u);

    }

}
JDBCDaoSupport类简化了上面的操作,不需要自己手动创建JDBCTemplate类。使用方式如下:
//使用JDBC模板实现增删改查

public class UserDaoImpl extends JdbcDaoSupport implements UserDao {

    @Override

    public void save(User u) {

        String sql = "insert into t_user values(null,?) ";

        super.getJdbcTemplate().update(sql, u.getName());

    }

}
配置文件如下:
<?xml version="1.0" encoding="UTF-8"?>

<beans xmlns:xsi="http://www.w3.org/2001/XMLSchema-instance" xmlns="http://www.springframework.org/schema/beans"

       xmlns:context="http://www.springframework.org/schema/context"

       xsi:schemaLocation="http://www.springframework.org/schema/beans http://www.springframework.org/schema/beans/spring-beans-4.2.xsd http://www.springframework.org/schema/context http://www.springframework.org/schema/context/spring-context-4.2.xsd ">

<!-- 指定spring读取db.properties配置 -->

<context:property-placeholder location="classpath:db.properties"/>

<!-- 1.将连接池放入spring容器 -->

<bean name="dataSource" class="com.mchange.v2.c3p0.ComboPooledDataSource">

    <property name="jdbcUrl" value="jdbc:mysql:///hibernate_crm"></property>

    <property name="driverClass" value="com.mysql.jdbc.Driver"></property>

    <property name="user" value="root"></property>

    <property name="password" value="123456"></property>

</bean>

<!-- 3.将UserDao放入spring容器 -->

<bean name="userDao" class="cn.itcast.a_jdbctemplate.UserDaoImpl">

    <property name="dataSource" ref="dataSource"></property>

</bean>

</beans>
读取外部的Properties配置
在db.properties中配置数据库连接信息,防止名称冲突,建议加前缀:
jdbc.jdbcUrl=jdbc:mysql:///hibernate_crm

jdbc.driverClass=com.mysql.jdbc.Driver

jdbc.user=root

jdbc.password=123456
配置文件:
<!-- 指定spring读取db.properties配置 -->

<context:property-placeholder location="classpath:db.properties" />

  <!-- 1.将连接池放入spring容器 -->

  <bean name="dataSource" class="com.mchange.v2.c3p0.ComboPooledDataSource" >

  <property name="jdbcUrl" value="${jdbc.jdbcUrl}" ></property>

  <property name="driverClass" value="${jdbc.driverClass}" ></property>

  <property name="user" value="${jdbc.user}" ></property>

  <property name="password" value="${jdbc.password}" ></property>

</bean>
最终完整配置
<?xml version="1.0" encoding="UTF-8"?>
<beans xmlns:xsi="http://www.w3.org/2001/XMLSchema-instance" xmlns="http://www.springframework.org/schema/beans" xmlns:context="http://www.springframework.org/schema/context" xsi:schemaLocation="http://www.springframework.org/schema/beans http://www.springframework.org/schema/beans/spring-beans-4.2.xsd http://www.springframework.org/schema/context http://www.springframework.org/schema/context/spring-context-4.2.xsd "> <!-- 指定spring读取db.properties配置 -->
<context:property-placeholder location="classpath:db.properties" /> <!-- 1.将连接池放入spring容器 -->
<bean name="dataSource" class="com.mchange.v2.c3p0.ComboPooledDataSource" >
<property name="jdbcUrl" value="${jdbc.jdbcUrl}" ></property>
<property name="driverClass" value="${jdbc.driverClass}" ></property>
<property name="user" value="${jdbc.user}" ></property>
<property name="password" value="${jdbc.password}" ></property>
</bean> <!--<!– 2.将JDBCTemplate放入spring容器 –>-->
<!--<bean name="jdbcTemplate" class="org.springframework.jdbc.core.JdbcTemplate" >-->
<!--<property name="dataSource" ref="dataSource" ></property>-->
<!--</bean>--> <!-- 3.将UserDao放入spring容器 -->
<bean name="userDao" class="cn.itcast.a_jdbctemplate.UserDaoImpl" >
<!-- <property name="jt" ref="jdbcTemplate" ></property> -->
<property name="dataSource" ref="dataSource" ></property>
</bean>
</beans>
spring中aop事务
spring封装了事务管理代码,因为在不同平台,操作事务的代码各不相同,spring提供了一个 PlatformTransactionManager 接口。
注意:在spring中玩事务管理.最为核心的对象就是TransactionManager对象
spring管理事务的属性介绍
1、事务的隔离级别
- 1 读未提交
- 2 读已提交
- 4 可重复读
- 8 串行化
2、是否只读
- true 只读
- false 可操作
3、事务的传播行为

spring管理事务方式
测试环境搭建
package com.yyb.dao;

public interface AccountDao {

    //加钱

    void increaseMoney(Integer id, Double money);

    //减钱

    void decreaseMoney(Integer id, Double money);

}
AccountDao
package com.yyb.dao;

import org.springframework.jdbc.core.support.JdbcDaoSupport;

public class AccountDaoImpl extends JdbcDaoSupport implements AccountDao  {

    @Override

    public void increaseMoney(Integer id, Double money) {

        getJdbcTemplate().update("update t_account set money = money+? where id = ? ", money,id);

    }

    @Override

    public void decreaseMoney(Integer id, Double money) {

        getJdbcTemplate().update("update t_account set money = money-? where id = ? ", money,id);

    }

}
AccountDaoImpl
package com.yyb.service;

public interface AccountService {

    //转账方法

    void transfer(Integer from, Integer to, Double money);

}
AccountService
package com.yyb.service;

import com.yyb.dao.AccountDao;

public class AccountServiceImpl implements AccountService {

    private AccountDao ad;

    @Override

    public void transfer(Integer from, Integer to, Double money) {

        //减钱

        ad.decreaseMoney(from,money);

        //加钱

        ad.increaseMoney(to,money);

    }

    public void setAd(AccountDao ad) {

        this.ad = ad;

    }

}
AccountServiceImpl
<?xml version="1.0" encoding="UTF-8"?>

<beans xmlns:xsi="http://www.w3.org/2001/XMLSchema-instance" xmlns="http://www.springframework.org/schema/beans"

       xmlns:context="http://www.springframework.org/schema/context"

       xmlns:aop="http://www.springframework.org/schema/aop" xmlns:tx="http://www.springframework.org/schema/tx"

       xsi:schemaLocation="http://www.springframework.org/schema/beans http://www.springframework.org/schema/beans/spring-beans-4.2.xsd http://www.springframework.org/schema/context http://www.springframework.org/schema/context/spring-context-4.2.xsd http://www.springframework.org/schema/aop http://www.springframework.org/schema/aop/spring-aop-4.2.xsd http://www.springframework.org/schema/tx http://www.springframework.org/schema/tx/spring-tx-4.2.xsd ">

    <!-- 指定spring读取db.properties配置 -->

    <context:property-placeholder location="classpath:db.properties"/>

    <!-- 1.连接池 -->

    <bean name="dataSource" class="com.mchange.v2.c3p0.ComboPooledDataSource">

        <property name="jdbcUrl" value="${jdbc.jdbcUrl}"></property>

        <property name="driverClass" value="${jdbc.driverClass}"></property>

        <property name="user" value="${jdbc.user}"></property>

        <property name="password" value="${jdbc.password}"></property>

    </bean>

    <!-- 2.Dao-->

    <bean name="accountDao" class="com.yyb.dao.AccountDaoImpl">

        <property name="dataSource" ref="dataSource"></property>

    </bean>

    <!-- 3.Service-->

    <bean name="accountService" class="com.yyb.service.AccountServiceImpl">

        <property name="ad" ref="accountDao"></property>

    </bean>

</beans>
applicationContext
jdbc.jdbcUrl=jdbc:mysql:///hibernate_crm

jdbc.driverClass=com.mysql.jdbc.Driver

jdbc.user=root

jdbc.password=123456
db.properties
package com.yyb.app;

import com.yyb.service.AccountService;

import org.junit.Test;

import org.junit.runner.RunWith;

import org.springframework.beans.factory.annotation.Autowired;

import org.springframework.context.annotation.Configuration;

import org.springframework.test.context.ContextConfiguration;

import org.springframework.test.context.junit4.SpringJUnit4ClassRunner;

/**

 * Created by Administrator on 2017/8/17.

 */

@RunWith(SpringJUnit4ClassRunner.class)

@ContextConfiguration("classpath:applicationContext.xml")

public class TransactionTest {

    @Autowired

   private AccountService accountService;

    @Test

    public void func1(){

        accountService.transfer(1,2,100d);

    }

}
TransactionTest
方式1:编码式(了解)
1.将核心事务管理器配置到spring容器,在applicationContext中配置如下代码:
    <!-- 事务核心管理器,封装了所有事务操作. 依赖于连接池 -->

    <bean name="transactionManager" class="org.springframework.jdbc.datasource.DataSourceTransactionManager">

        <property name="dataSource" ref="dataSource"></property>

    </bean>
2.配置TransactionTemplate模板,在applicationContext中配置如下代码:
   <!--事务模板对象-->

    <bean class="org.springframework.transaction.support.TransactionTemplate">

        <property name="transactionManager" ref="transactionManager"></property>

    </bean>
3.将事务模板注入Service
    <!-- 3.Service-->

    <bean name="accountService" class="com.yyb.service.AccountServiceImpl">

        <property name="ad" ref="accountDao"></property>

        <property name="tt" ref="transactionTemplate"></property>

    </bean>
4.在Service中调用模板
package com.yyb.service;

import com.yyb.dao.AccountDao;

import org.springframework.transaction.TransactionStatus;

import org.springframework.transaction.support.TransactionCallbackWithoutResult;

import org.springframework.transaction.support.TransactionTemplate;

public class AccountServiceImpl implements AccountService {

    private AccountDao ad;

    private TransactionTemplate tt;

    //匿名内部类访问外部变量得加final

    @Override

    public void transfer(final Integer from,final Integer to, Double money) {

        tt.execute(new TransactionCallbackWithoutResult() {

            @Override

            protected void doInTransactionWithoutResult(TransactionStatus transactionStatus) {

                //减钱

                ad.decreaseMoney(from,money);

                //int i=1/0;

                //加钱

                ad.increaseMoney(to,money);

            }

        });

    }

    public void setAd(AccountDao ad) {

        this.ad = ad;

    }

    public void setTt(TransactionTemplate tt) {

        this.tt = tt;

    }

}
方式2:xml配置(aop)
简单理解就是把通知织入到目标对象中,形成一个代理对象。比如通知要进行事务管理,目标对象要进行业务处理。那么代理对象则把事务管理和业务处理合到了一起。SpringAOP给我们准备了一个事务通知,目标对象即我们的service。所以只需要配置一下就可以了。
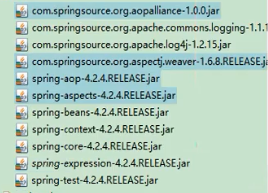
1、需要导包aop、aspect、aop联盟、weaving织入包
2.导入新的约束(tx)
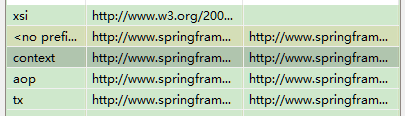
beans: 最基本约束;context:读取properties配置约束;aop:配置aop约束;tx:配置事务通知约束
3.配置通知和配置将通知织入目标
<!-- 事务核心管理器,封装了所有事务操作. 依赖于连接池 -->

    <bean name="transactionManager" class="org.springframework.jdbc.datasource.DataSourceTransactionManager">

        <property name="dataSource" ref="dataSource"></property>

    </bean>

    <!-- 配置事务通知 -->

    <tx:advice id="txAdvice" transaction-manager="transactionManager" >

        <tx:attributes>

            <!-- 以方法为单位,指定方法应用什么事务属性

                isolation:隔离级别

                propagation:传播行为

                read-only:是否只读

             -->

            <tx:method name="transfer" isolation="DEFAULT" propagation="REQUIRED" read-only="false"/>

            <!--上面的方式只适用单个方法,当我们业务有很多个方法都要操作事务时,则要配置很多个,可以使用下面的通配符配置方式-->

            <tx:method name="save*" isolation="REPEATABLE_READ" propagation="REQUIRED" read-only="false" />

            <tx:method name="persist*" isolation="REPEATABLE_READ" propagation="REQUIRED" read-only="false" />

            <tx:method name="update*" isolation="REPEATABLE_READ" propagation="REQUIRED" read-only="false" />

            <tx:method name="modify*" isolation="REPEATABLE_READ" propagation="REQUIRED" read-only="false" />

            <tx:method name="delete*" isolation="REPEATABLE_READ" propagation="REQUIRED" read-only="false" />

            <tx:method name="remove*" isolation="REPEATABLE_READ" propagation="REQUIRED" read-only="false" />

            <tx:method name="get*" isolation="REPEATABLE_READ" propagation="REQUIRED" read-only="true" />

            <tx:method name="find*" isolation="REPEATABLE_READ" propagation="REQUIRED" read-only="true" />

        </tx:attributes>

    </tx:advice>

    <!--配置织入-->

    <aop:config>

        <aop:pointcut id="txPc" expression="execution(* com.yyb.service.*ServiceImpl.*(..))"/>

        <!--配置切面-->

        <aop:advisor advice-ref="txAdvice" pointcut-ref="txPc"/>

    </aop:config>
方式3:注解配置(aop)
1.导包(同上)
2.导入新的约束(tx),同上
3.开启注解管理事务
<?xml version="1.0" encoding="UTF-8"?>

<beans xmlns:xsi="http://www.w3.org/2001/XMLSchema-instance" xmlns="http://www.springframework.org/schema/beans"

       xmlns:context="http://www.springframework.org/schema/context"

       xmlns:aop="http://www.springframework.org/schema/aop" xmlns:tx="http://www.springframework.org/schema/tx"

       xsi:schemaLocation="http://www.springframework.org/schema/beans http://www.springframework.org/schema/beans/spring-beans-4.2.xsd http://www.springframework.org/schema/context http://www.springframework.org/schema/context/spring-context-4.2.xsd http://www.springframework.org/schema/aop http://www.springframework.org/schema/aop/spring-aop-4.2.xsd http://www.springframework.org/schema/tx http://www.springframework.org/schema/tx/spring-tx-4.2.xsd ">

    <!-- 指定spring读取db.properties配置 -->

    <context:property-placeholder location="classpath:db.properties"/>

    <!-- 事务核心管理器,封装了所有事务操作. 依赖于连接池 -->

    <bean name="transactionManager" class="org.springframework.jdbc.datasource.DataSourceTransactionManager">

        <property name="dataSource" ref="dataSource"></property>

    </bean>

    <!--开启使用注解管理aop事务-->

    <tx:annotation-driven/>

    <!-- 1.连接池 -->

    <bean name="dataSource" class="com.mchange.v2.c3p0.ComboPooledDataSource">

        <property name="jdbcUrl" value="${jdbc.jdbcUrl}"></property>

        <property name="driverClass" value="${jdbc.driverClass}"></property>

        <property name="user" value="${jdbc.user}"></property>

        <property name="password" value="${jdbc.password}"></property>

    </bean>

    <!-- 2.Dao-->

    <bean name="accountDao" class="com.yyb.dao.AccountDaoImpl">

        <property name="dataSource" ref="dataSource"></property>

    </bean>

    <!-- 3.Service-->

    <bean name="accountService" class="com.yyb.service.AccountServiceImpl">

        <property name="ad" ref="accountDao"></property>

    </bean>

</beans>
4.使用注解
    @Transactional(isolation = Isolation.REPEATABLE_READ,propagation = Propagation.REQUIRED,readOnly = false)

    public void transfer(Integer from,Integer to, Double money) {
在方法上加注解,如果方法太多,嫌麻烦的话,可以在类上加,如果某个方法不适应,再在方法上写一份即可。
package com.yyb.service;

import com.yyb.dao.AccountDao;

import org.springframework.transaction.annotation.Isolation;

import org.springframework.transaction.annotation.Propagation;

import org.springframework.transaction.annotation.Transactional;

@Transactional(isolation = Isolation.REPEATABLE_READ,propagation = Propagation.REQUIRED,readOnly = false)

public class AccountServiceImpl implements AccountService {

    private AccountDao ad;

    @Override

    @Transactional(isolation = Isolation.DEFAULT,propagation = Propagation.REQUIRED,readOnly = false)

    public void transfer(Integer from,Integer to, Double money) {

        //减钱

        ad.decreaseMoney(from,money);

        //int i=1/0;

        //加钱

        ad.increaseMoney(to,money);

    }

    public void setAd(AccountDao ad) {

        this.ad = ad;

    }

}
更详细请参考:
http://www.mamicode.com/info-detail-1248286.html
http://www.cnblogs.com/yepei/p/4716112.html
SpringMVC学习笔记三 整合jdbc和事务的更多相关文章
- SpringMVC:学习笔记(10)——整合Ckeditor且实现图片上传
SpringMVC:学习笔记(10)——整合Ckeditor且实现图片上传 配置CKEDITOR 精简文件 解压之后可以看到ckeditor/lang下面有很多语言的js,如果不需要那么多种语言的,可 ...
- springmvc学习笔记三:整合JDBC,简单案例==数据库事务配置(切面)
package cn.itcast.bean; import org.springframework.jdbc.core.PreparedStatementSetter; public class U ...
- SpringMVC学习笔记(三)
一.SpringMVC使用注解完成 1.首先,导入SpringMVC需要的jar包. 2.添加Web.xml配置文件中关于SpringMVC的配置 <!--configure the setti ...
- SpringMVC 学习笔记(三)数据的校验
34. 尚硅谷_佟刚_SpringMVC_数据绑定流程分析.avi 例如:在jsp中输入一个String字符串类型,需要转换成Date类型的流程如下 convertservice对传入的数据进行转换 ...
- springMVC学习笔记三
十三.springMVC和spring集成 配置文件,spring的配置路径applicationContext.xml 在默认的web-inf下面 strut的配置文件默认在src下面 用了什么框架 ...
- SpringMVC学习笔记三:拦截器
一:拦截器工作原理 类比Struts2的拦截器,通过拦截器可以实现在调用controller的方法前.后进行一些操作. 二:拦截器实现 1:实现拦截器类 实现HandlerInterceptor 接口 ...
- SpringMVC学习笔记三:Controller的返回值
springMVC的返回值有ModelAndView,String,void,Object类型 项目目录树: 该项目是在前面项目的基础上修改的,这里的pom.xml文件需要加入使用到的包,应为@Res ...
- Spring Boot 学习笔记(六) 整合 RESTful 参数传递
Spring Boot 学习笔记 源码地址 Spring Boot 学习笔记(一) hello world Spring Boot 学习笔记(二) 整合 log4j2 Spring Boot 学习笔记 ...
- 史上最全的SpringMVC学习笔记
SpringMVC学习笔记---- 一.SpringMVC基础入门,创建一个HelloWorld程序 1.首先,导入SpringMVC需要的jar包. 2.添加Web.xml配置文件中关于Spring ...
随机推荐
- JavaScript总结-网页上显示时间
网页上显示时间 代码如下: <TABLE> <TR> <TD><span id="localtime"></span> ...
- iOS - XMPP 的使用
1.XMPP XMPP 是一个基于 Socket 通信的即时通讯的协议,它规范了即时通信在网络上数据的传输格式,比如登录,获取好友列表等等的格式.XMPP 在网络传输的数据是 XML 格式. 开发架构 ...
- C#图解教程 第二十章 异步编程
笔记 异步编程 什么是异步 示例 async/await特性的结构什么是异步方法 异步方法的控制流await表达式取消一个异步操作异常处理和await表达式在调用方法中同步地等待任务在异步方法中异步地 ...
- SpringMVC 框架系列之初识与入门实例
微信公众号:compassblog 欢迎关注.转发,互相学习,共同进步! 有任何问题,请后台留言联系! 1.SpringMVC 概述 (1). MVC:Model-View-Control Contr ...
- Autofac高级用法之动态代理
前言 Autofac的DynamicProxy来自老牌的Castle项目.DynamicProxy(以下称为动态代理)起作用主要是为我们的类生成一个代理类,这个代理类可以在我们调用原本类的方法之前,调 ...
- 【BZOJ3295】动态逆序对(线段树,树状数组)
[BZOJ3295]动态逆序对(线段树,树状数组) 题面 Description 对于序列A,它的逆序对数定义为满足iAj的数对(i,j)的个数.给1到n的一个排列,按照某种顺序依次删除m个元素,你的 ...
- [CodeVS2370] 小机房的树 (LCA, 树链剖分, LCT)
Description 小机房有棵焕狗种的树,树上有N个节点,节点标号为0到N-1,有两只虫子名叫飘狗和大吉狗,分居在两个不同的节点上.有一天,他们想爬到一个节点上去搞基,但是作为两只虫子,他们不想花 ...
- WPF自学入门(六)WPF带标题的内容控件简单介绍
在WPF自学入门(二)WPF-XAML布局控件的文章中分别介绍StackPanel,WarpPanel,DockPanel,Grid,Canvas五种布局容器的使用,可以让我们大致了解容器可以使用在什 ...
- 原来你是这样的Websocket--抓包分析
之前自己一个人负责完成了公司的消息推送服务,和移动端配合完成了扫码登录.订单消息推送.活动消息广播等功能.为了加深自己对Websocket协议的理解,自己通过进行抓包的方式学习了一番.现在分享出来,希 ...
- Django---第三方
第三方: 3.富文本编辑器:此处以tinymce为例 使用编辑器的显示效果为: 1.下载安装 在网站pypi网站搜索并下载"django-tinymce-2.4.0" 解压 tar ...