Locust性能测试_先登录场景案例
前言
有很多网站不登录的话,是无法访问到里面的页面的,这就需要先登录了
实现场景:先登录(只登录一次),然后访问页面->我的地盘页->产品页->项目页
官方案例
下面是一个简单的locustfile.py的简单示例:
from locust import HttpLocust, TaskSet

def login(l):

    l.client.post("/login", {"username":"ellen_key", "password":"education"})

def logout(l):

    l.client.post("/logout", {"username":"ellen_key", "password":"education"})

def index(l):

    l.client.get("/")

def profile(l):

    l.client.get("/profile")

class UserBehavior(TaskSet):

    tasks = {index: 2, profile: 1}

    def on_start(self):

        login(self)

    def on_stop(self):

        logout(self)

class WebsiteUser(HttpLocust):

    task_set = UserBehavior

    min_wait = 5000

    max_wait = 9000
这里我们定义了许多Locust任务,它们是带有一个参数(Locust类实例)的普通Python callables 。这些任务收集在tasks属性的TaskSet类下 。然后我们有一个代表用户的 类,我们在其中定义模拟用户在执行任务之间应该等待多长时间,以及哪个 类应该定义用户的“行为”。 类可以继承HttpLocust、TaskSet、TaskSet
HttpLocust类从继承 Locust的类,并把它添加一个客户端属性,它是的一个实例 HttpSession,可用于使HTTP请求。
另一种我们可以声明任务的方法,通常是更方便,就是使用 @task装饰器。以下代码与上述代码相同:
from locust import HttpLocust, TaskSet, task

class UserBehavior(TaskSet):

    def on_start(self):

        """ on_start is called when a Locust start before any task is scheduled """

        self.login()

    def on_stop(self):

        """ on_stop is called when the TaskSet is stopping """

        self.logout()

    def login(self):

        self.client.post("/login", {"username":"ellen_key", "password":"education"})

    def logout(self):

        self.client.post("/logout", {"username":"ellen_key", "password":"education"})

    @task(2)

    def index(self):

        self.client.get("/")

    @task(1)

    def profile(self):

        self.client.get("/profile")

class WebsiteUser(HttpLocust):

    task_set = UserBehavior

    min_wait = 5000

    max_wait = 9000
在Locust类(以及HttpLocust 因为它是一个子类),也可以让一个在指定最小和最大等待时间毫秒,每个模拟用户之间的任务执行(min_wait和MAX_WAIT)以及其他用户的行为。默认情况下,时间是在min_wait和max_wait之间统一随机选择的,但是可以通过将wait_function设置为任意函数来使用任何用户定义的时间分布。例如,对于指数分布的等待时间平均为1秒:
import random

class WebsiteUser(HttpLocust):

    task_set = UserBehaviour

    wait_function = lambda self: random.expovariate(1)*1000
项目实战:
上面的官方案例只是一些伪代码,不能在真实的环境中跑起来,接下来把上面的理论执行用到真实的项目环境中
http协议是无状态的,所以登录请求和登录后的请求它是独立的,但是登录后的请求需要依赖先登录拿到cookies,才能保持登录状态,可以用session来解决
s = requests.session()
HttpLocust类从继承 Locust的类,并把它添加一个客户端属性,它是的一个实例 HttpSession,可用于使HTTP请求,这就相当于它自动使用了session机制,类似于client = requests.session()
所以后面的请求,直接拿client.get()、client.post()请求就可以了
# -*- coding: utf_8 -*-

# locust性能测试

from locust import HttpLocust, TaskSet, task

import subprocess

import json

# 性能测试任务类 TaskSet.

class UserBehavior(TaskSet):

    # 账户登陆

    def _loginname(self):

        url = "/global/do-login.action"

        body = {

            "loginName": "%s" % self.locust.loginName,

            "password": "%s" % self.locust.password,

            "pcCodeForFocusMedia": 0

        }

        h = {

            "User-Agent": "Mozilla/5.0 (Windows NT 10.0; WOW64) AppleWebKit/537.36 (KHTML, like Gecko) Chrome/63.0.3239.132 Safari/537.36",

            "Content-Type": "application/x-www-form-urlencoded",

            }

        a = self.client.post(url=url, data=body, headers=h, verify=False)

        data = a.json()

        assert data['status'] == 202

    # 选择租户

    def _tenant(self):

        url = "/global/login-entry.action"

        body = {

            "tenantId": "%s" % self.locust.tenantId,

            "passport.id": self.locust.passport_id,

            "encryptionKey": "%s" % self.locust.encryptionKey,

            "loginName": "%s" % self.locust.loginName

        }

        h = {

            "User-Agent": "Mozilla/5.0 (Windows NT 10.0; WOW64) AppleWebKit/537.36 (KHTML, like Gecko) Chrome/63.0.3239.132 Safari/537.36",

            "Content-Type": "application/x-www-form-urlencoded",

            }

        b = self.client.post(url=url, data=body, headers=h, verify=False)

        data = b.json()

        assert data['status'] == 0

    def on_start(self):

        '''任务开始准备工作:只登录一次'''

        self._loginname()   # 账户登陆

        self._tenant()   # 选择租户

    # 任务

    @task(10)

    def getTagVals(self):

        u"""

        request_url:请求路径

        request_params:请求头参数

        request_json:请求json参数

        """

        request_url = "/json/crm_dimension/dim-tree.action" # (待测试的路径)

        body = {

            "belongId":35,

            "dimType":1

        }

        response = self.client.post(url=request_url, data=body, verify=False)

        if response.status_code != 200:

            print(u"返回异常")

            print(u"请求返回状态码:", response.status_code)

        elif response.status_code == 200:

            print(u"返回正常")

# 性能测试配置

class MobileUserLocust(HttpLocust):

    u"""

    min_wait :用户执行任务之间等待时间的下界,单位:毫秒。

    max_wait :用户执行任务之间等待时间的上界,单位:毫秒。

    """

    # weight = 3

    task_set = UserBehavior

    host = "自己公司的url"  # (待测试的ip或者域名)

    min_wait = 3000

    max_wait = 6000

    loginName = "账号"

    password = 密码

    tenantId = 公司租户Id # 租户ID

    encryptionKey = "keyId"  # 保持登陆的key

    passport_id = 默认

if __name__ == "__main__":

    subprocess.Popen("locust -f locustlearn.py", shell=True)
如何运行:首先打开到文件路径下、然后直接运行脚本  python locustlearn.py
设置1个虚拟用户,每秒启动1个服务,点start后运行结果
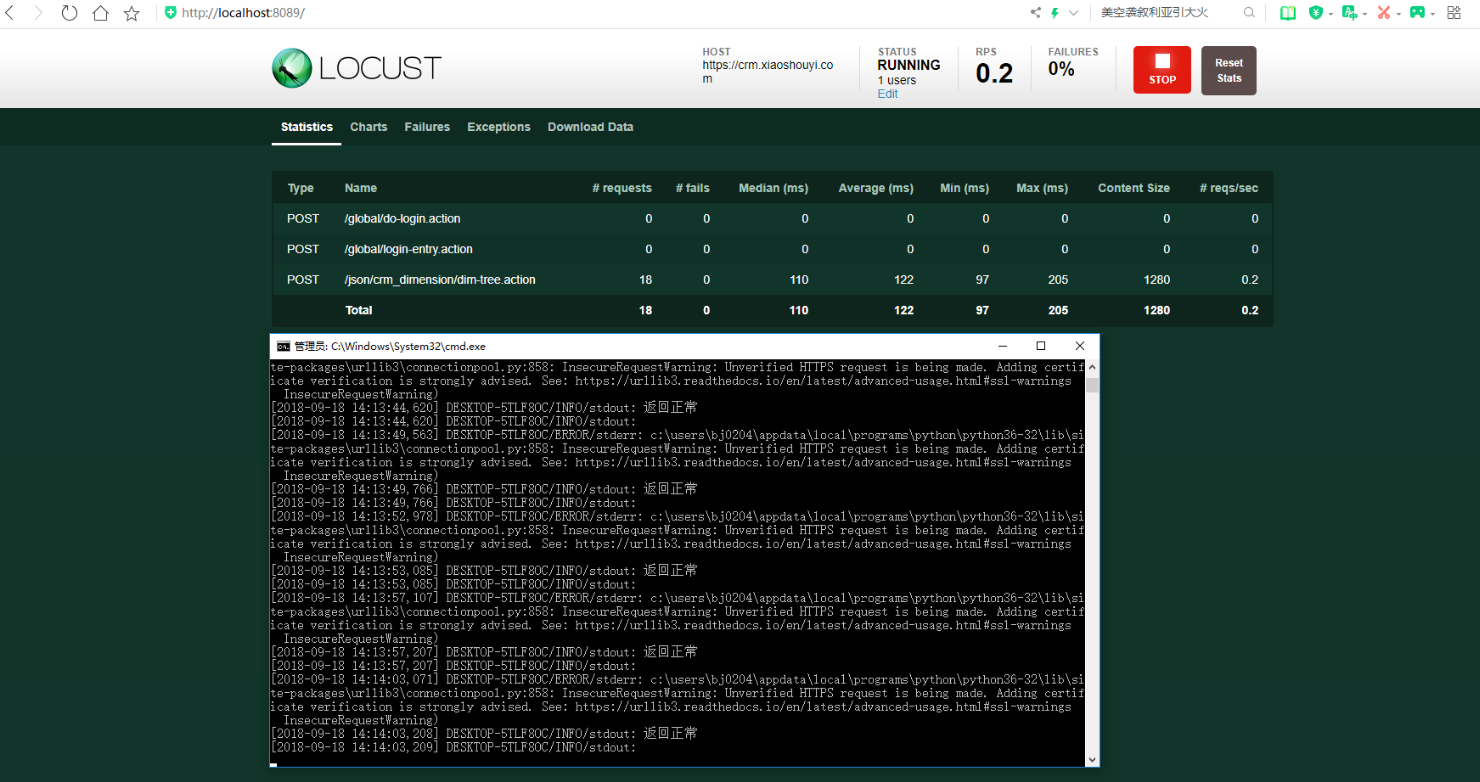
从结果可以看到登录的请求只访问了一次,定义on_start()相当于用例的准备操作,当然还有on_stop()用于数据清理操作
作者:含笑半步颠√
博客链接:https://www.cnblogs.com/lixy-88428977
声明:本文为博主学习感悟总结,水平有限,如果不当,欢迎指正。如果您认为还不错,欢迎转载。转载与引用请注明作者及出处。
Locust性能测试_先登录场景案例的更多相关文章
- Locust性能测试_参数关联
前言 前面[Locust性能测试2-先登录场景案例]讲了登录的案例,这种是直接传账号和密码就能登录了,有些登录的网站会复杂一点, 需要先从页面上动态获取参数,作为登录接口的请求参数,如[学信网:htt ...
- Locust性能测试_百度案例
一.安装: 1.Locust在PyPI上可用,可以通过pip或easy_install安装:pip install locustio 2.查看Locust可用选项:loc ...
- Locust性能测试2-先登录场景案例
前言 有很多网站不登录的话,是无法访问到里面的页面的,这就需要先登录了 实现场景:先登录(只登录一次),然后访问页面->我的地盘页->产品页->项目页 官方案例 下面是一个简单的lo ...
- Locust性能测试
https://www.cnblogs.com/yoyoketang/p/9638151.html https://www.cnblogs.com/yoyoketang/p/9642242.html ...
- Locust性能测试4-参数关联
前言 前面[Locust性能测试2-先登录场景案例]讲了登录的案例,这种是直接传账号和密码就能登录了,有些登录的网站会复杂一点, 需要先从页面上动态获取参数,作为登录接口的请求参数,如[学信网:htt ...
- Locust性能测试工具核心技术@task和@events
Tasks和Events是Locust性能测试工具的核心技术,有了它们,Locust才能称得上是一个性能工具. Tasks 从上篇文章知道,locustfile里面必须要有一个类,继承User类,当性 ...
- 深入MySQL用户自定义变量:使用详解及其使用场景案例
一.前言 在前段工作中,曾几次收到超级话题积分漏记的用户反馈.通过源码的阅读分析后,发现问题出在高并发分布式场景下的计数器上.计数器的值会影响用户当前行为所获得积分的大小.比如,当用户在某超级话题下连 ...
- Python Locust性能测试框架实践
[本文出自天外归云的博客园] Locust的介绍 Locust是一个python的性能测试工具,你可以通过写python脚本的方式来对web接口进行负载测试. Locust的安装 首先你要安装pyth ...
- cocos2dx2.2.2登录场景中Checkbox选择框的实现
在前两篇文章中,我们介绍了在注册场景中需要用到的输入框及弹出框的实现方式,这两篇文章中介绍的内容在登录场景同样会用到.而我们经常会在登录场景中见到的另一种元素就是自动登录或者记住密码的Checkbox ...
随机推荐
- 大厂HR面试必备ES6中的深入浅出面试题知识点
ESMAScript6简介,ES6是JavaScript语言的下一代标准,目的是让JavaScript语言可以写复杂的大型应用程序,成为企业级语言.那么ECMAScript和JavaScript的关系 ...
- 【CSGRound2】逐梦者的初心(洛谷11月月赛 II & CSG Round 2 T3)
题目描述# 给你一个长度为\(n\)的字符串\(S\). 有\(m\)个操作,保证\(m≤n\). 你还有一个字符串\(T\),刚开始为空. 共有两种操作. 第一种操作: 在字符串\(T\)的末尾加上 ...
- 小数据池 is和== 再谈编码
昨日回顾 上节课内容回顾 1. 字典 {key:value, key:value.....} 成对的保存数据 字典没有索引. 不能切片, 字典的key必须是可哈希的.不可变的 1. 增加: dic[新 ...
- nginx.conf 配置解析之 events配置
worker_connections 1024; 定义每个work_process同时开启的最大连接数,即允许最多只能有这么多连接. accept_mutex on; 当某一个时刻只有一个网络连接请求 ...
- 花了两个星期,我终于把 WSGI 整明白了
在 三百六十行,行行转 IT 的现状下,很多来自各行各业的同学,都选择 Python 这门胶水语言做为踏入互联网大门的第一块敲门砖,在这些人里,又有相当大比例的同学选择了 Web 开发这个方向(包括我 ...
- JPA批量插入优化
遇到一个需求是excel数据导入,一次大概会批量插入几万的数据.写完一测奇慢无比. 于是开始打日志,分析代码,发现是插入数据库的时候耗时很长,发现是spring data jpa的原因. 翻看jpa的 ...
- [Shell]多姿势反弹shell
客户端监听本地: nc -nvlp 4444 从原生的 shell 环境切换到 linux 的交互式 bash 环境: python -c 'import pty; pty.spawn("/ ...
- exception java.lang.IndexOutOfBoundsException: Index: 0, Size: 0
1.情景展示 Java 报错信息如下: java.lang.IndexOutOfBoundsException: Index: 0, Size: 0 2.原因分析 首先,这是越界异常,但不是数组越 ...
- HashMap多线程并发问题分析-正常和异常的rehash1(阿里)
多线程put后可能导致get死循环 从前我们的Java代码因为一些原因使用了HashMap这个东西,但是当时的程序是单线程的,一切都没有问题.后来,我们的程序性能有问题,所以需要变成多线程的,于是,变 ...
- poi导出word表格
代码如下: package com.ksource.pwlp.util; import java.io.FileOutputStream; import java.math.BigInteger; i ...