kvm虚拟化之convirt集中管理平台搭建
情况说明:
(1)本文采用OEL6.3x64操作系统,需要有KVM安装环境。
(2)convirt2.1.1采用源码方式安装,convirt环境分别两部分,一部分是cms,用于管理kvm/xen虚拟主机上的虚拟机,一部分做为客户端安装到kvm/xen虚拟主机上。
(3)convirt2.1.1是开源的管理xen/kvm虚拟化管理工具,是众多开源工具中的一种。
1.安装convirt环境
(1)安装KVM环境
(2)准备convirt安装源
# cd /etc/yum.repos.d

# wget --no-cache http://www.convirture.com/repos/definitions/rhel/6.x/convirt.repo
(3)下载convirt与cms安装包
# cd /root/

# wget --no-cache http://www.convirture.com/downloads/convirt/2.1.1/convirt-2.1.1.tar.gz

# wget --no-cache http://www.convirture.com/downloads/convirt/2.1.1/convirt-install-2.1.1.tar.gz
(4)安装convirt安装包
# tar -xzvf convirt-install-2.1.1.tar.gz

# cd convirt-install/install/cms/scripts/ && ./install_dependencies
…
初始化 MySQL 数据库: Installing MySQL system tables...
OK
Filling help tables...
OK
To start mysqld at boot time you have to copy
support-files/mysql.server to the right place for your system
PLEASE REMEMBER TO SET A PASSWORD FOR THE MySQL root USER !
To do so, start the server, then issue the following commands:
/usr/bin/mysqladmin -u root password 'new-password'
/usr/bin/mysqladmin -u root -h vmnode1 password 'new-password'
Alternatively you can run:
/usr/bin/mysql_secure_installation
which will also give you the option of removing the test
databases and anonymous user created by default. This is
strongly recommended for production servers.
See the manual for more instructions.
You can start the MySQL daemon with:
cd /usr ; /usr/bin/mysqld_safe &
You can test the MySQL daemon with mysql-test-run.pl
cd /usr/mysql-test ; perl mysql-test-run.pl
Please report any problems with the /usr/bin/mysqlbug script!
[确定]
正在启动 mysqld: [确定]
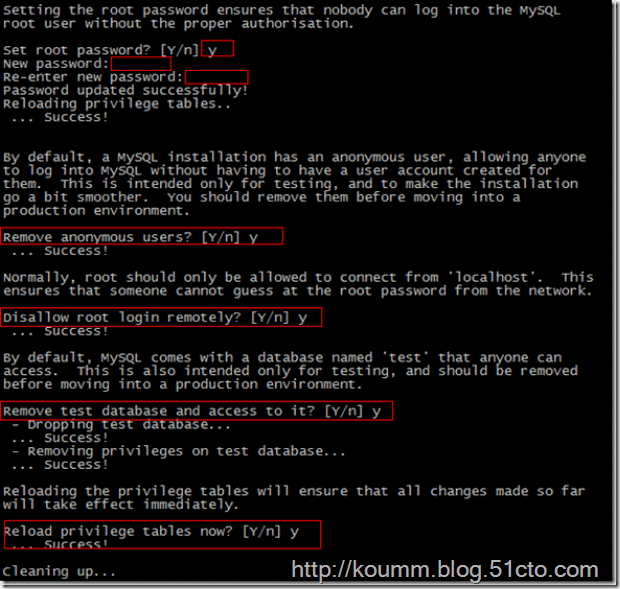
Running mysql_secure_installation.
Current root password for fresh installation is blank. So simple press enter.
NOTE: RUNNING ALL PARTS OF THIS SCRIPT IS RECOMMENDED FOR ALL MySQL
SERVERS IN PRODUCTION USE! PLEASE READ EACH STEP CAREFULLY!
In order to log into MySQL to secure it, we'll need the current
password for the root user. If you've just installed MySQL, and
you haven't set the root password yet, the password will be blank,
so you should just press enter here.
Enter current password for root (enter for none):
OK, successfully used password, moving on...
Setting the root password ensures that nobody can log into the MySQL
root user without the proper authorisation.
Set root password? [Y/n] y
New password:
Re-enter new password:
Password updated successfully!
Reloading privilege tables..
... Success!
By default, a MySQL installation has an anonymous user, allowing anyone
to log into MySQL without having to have a user account created for
them. This is intended only for testing, and to make the installation
go a bit smoother. You should remove them before moving into a
production environment.
Remove anonymous users? [Y/n] y
... Success!
Normally, root should only be allowed to connect from 'localhost'. This
ensures that someone cannot guess at the root password from the network.
Disallow root login remotely? [Y/n] y
... Success!
By default, MySQL comes with a database named 'test' that anyone can
access. This is also intended only for testing, and should be removed
before moving into a production environment.
Remove test database and access to it? [Y/n] y
- Dropping test database...
... Success!
- Removing privileges on test database...
... Success!
Reloading the privilege tables will ensure that all changes made so far
will take effect immediately.
Reload privilege tables now? [Y/n] y
... Success!
Cleaning up...
All done! If you've completed all of the above steps, your MySQL
installation should now be secure.
Thanks for using MySQL!
mysqld (pid 2691) 正在运行...
MySQL service is already running.
Prerequsite for ConVirt Management Server (CMS) installed.说明:安装过程会安装mysql数据库,并输入mysql数据库root帐号密码。
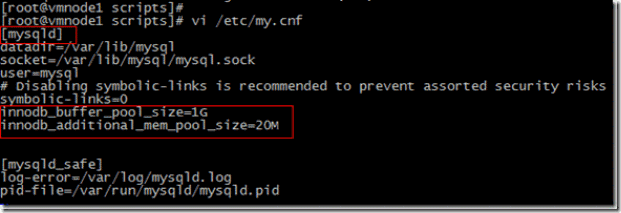
(5)修改mysql数据库配置文件

(6)解压CMS软件包并安装
# cd /root/
# cd convirt-install/install/cms/scripts/ && source install_config
# cd /root && tar -xzf convirt-2.1.1.tar.gz -C $CONVIRT_BASE
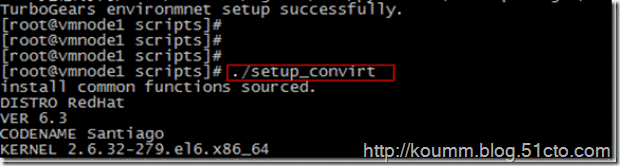
# ./setup_tg2
# ./setup_convirt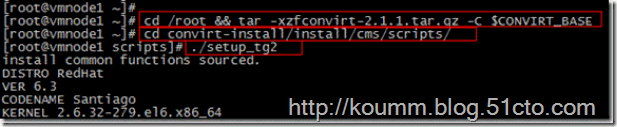
安装过程略…
(7)启动与关闭convirtCMS
启动convirt
关闭convirt
# /root/convirt/convirt-ctl stop(8)打开convirt2.1.1
输入admin/admin
还需要在kvm虚拟主机上安装convirt-tools工具之后才能添加。
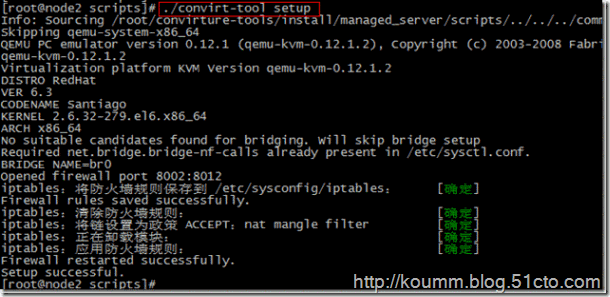
2.在KVM虚拟主机上安装convirt-tools工具
注:在kvm虚拟主机上安装convirt-tools工具。
# wget http://www.convirture.com/downloads/convirture-tools/2.1.1/convirture-tools-2.1.1.tar.gz

# tar zxvf convirture-tools-2.1.1.tar.gz

# cd convirture-tools/install/managed_server/scripts

# ./convirt-tool install_dependencies

# ./convirt-tool setup
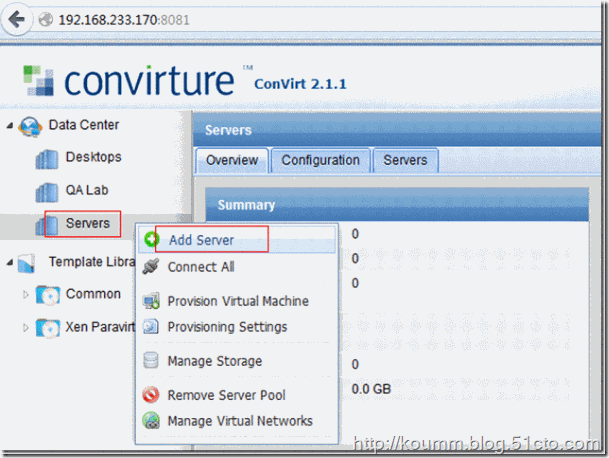
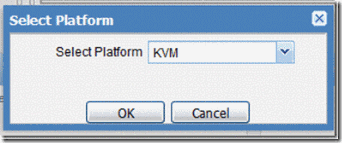
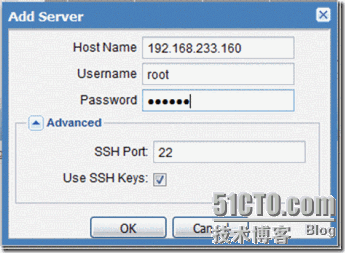
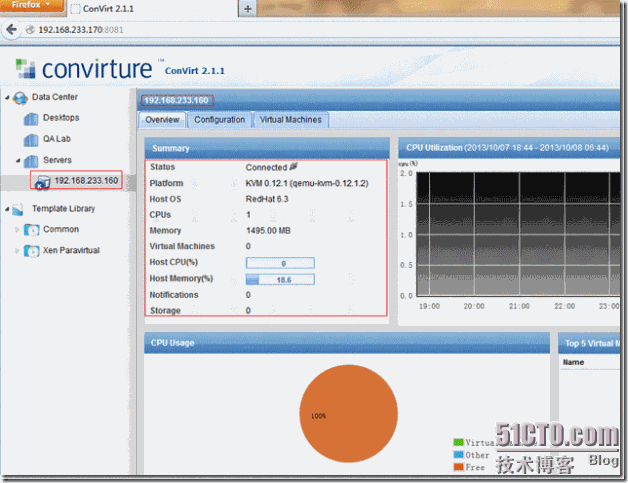
3.在convirtcms上添加KVM虚拟主机
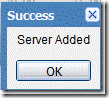
添加KVM虚拟主机。
kvm虚拟化之convirt集中管理平台搭建的更多相关文章
- convirt集中管理平台搭建
情况说明: (1)本文采用OEL6.3x64操作系统,需要有KVM安装环境.(2)convirt2.1.1采用源码方式安装,convirt环境分别两部分,一部分是cms,用于管理kvm/xen虚拟主机 ...
- KVM虚拟化学习笔记系列文章列表(转)
Kernel-based Virtual Machine KVM虚拟化学习笔记系列文章列表----------------------------------------kvm虚拟化学习笔记(一)之k ...
- kvm虚拟化学习笔记(四)之kvm虚拟机日常管理与配置
KVM虚拟化学习笔记系列文章列表----------------------------------------kvm虚拟化学习笔记(一)之kvm虚拟化环境安装http://koumm.blog.51 ...
- kvm虚拟化学习笔记(二)之linux kvm虚拟机安装
KVM虚拟化学习笔记系列文章列表----------------------------------------kvm虚拟化学习笔记(一)之kvm虚拟化环境安装http://koumm.blog.51 ...
- kvm虚拟化学习笔记(一)之kvm虚拟化环境安装
平时一直玩RHEL/CentOS/OEL系列的操作,玩虚拟化也是采这一类系统,kvm在RHEL6系列操作系统支持比较好,本文采用采用OEL6.3操作系统,网上所有文章都说KVM比xen简单,我怎么感觉 ...
- kvm虚拟化平台搭建入门
KVM虚拟化有两种网络模式:1)Bridge网桥模式2)NAT网络地址转换模式Bridge方式适用于服务器主机的虚拟化.NAT方式适用于桌面主机的虚拟化. 环境: 本次实验要开启VMWare中对应Ce ...
- <Mastering KVM Virtualization>:第三章 搭建独立的KVM虚拟化
在第二章,你了解了KVM的内部结构:在本章中,您将了解如何将Linux服务器设置为虚拟化主机.我们正在讨论将KVM用于虚拟化并将libvirt作为虚拟化管理引擎. KVM开启了虚拟化并利用你的服务器或 ...
- [原创]KVM虚拟化管理平台的实现
KVM虚拟化管理平台的实现 源码链接:https://github.com/wsjhk/IaaS_admin.git 根据KVM虚拟化管理的要求,设计并实现网页操作管理KVM虚拟机.设计原理架构如下图 ...
- kvm虚拟化管理平台WebVirtMgr部署-完整记录(3)
继下面三篇文章完成了kvm虚拟化管理平台webvirtmgr环境的部署安装:kvm虚拟化管理平台WebVirtMgr部署-虚拟化环境安装-完整记录(0)kvm虚拟化管理平台WebVirtMgr部署-完 ...
随机推荐
- Android 获取图片转bitmap
1. Resources resources = mContext.getResources(); Drawable drawable = resources.getDrawable(R.drawab ...
- 【转】volatile关键字。编译器不优化,多线程会改。防止随时变动的
来自:http://www.cnblogs.com/yc_sunniwell/archive/2010/07/14/1777432.html 1. 为什么用volatile? C/C++ 中的 vol ...
- js跳出for循环
1 使用普通的for循环 注意foreach使用return或break都无法跳出循环 2 使用every跳出循环, every 方法会遍历数组中的所有元素来判断是否满足条件,如果有一个元素返回fal ...
- shell中的字符串操作和数学运算
字符串操作 变量赋值: 说明:变量值可以用单引号.双引号.或者不加任何引号来赋值给变量 变量名="变量值" 变量名='变量值' 变量名=变量值 例如:str="hel ...
- jqzoom插件图片放大功能的一些BUG
建议使用cloud-zoom插件,jqzoom插件就不要使用了 点击查看——图片放大镜——jQuery插件Cloud Zoom 刚开始使用的是jqzoom插件,但问题太多了,就不说插入到页面中使用了, ...
- chrome url protocol 提示配置文件路径
%localappdata%\Google\Chrome\User Data\Default\Preferences 搜索对应的协议名,例如:{"x-github-client": ...
- UVaLive 3126 Taxi Cab Scheme (最小路径覆盖)
题意:有 n 个客人,要从 si 到 ti,每个人有一个出发时间,现在让你安排最少和出租车去接,在接客人时至少要提前一分钟到达客人的出发地点. 析:把每个客人看成一个结点,然后如果用同一个出租车接的话 ...
- 递归,回溯和DFS的区别
递归是一种算法结构,回溯是一种算法思想一个递归就是在函数中调用函数本身来解决问题回溯就是通过不同的尝试来生成问题的解,有点类似于穷举,但是和穷举不同的是回溯会“剪枝”,意思就是对已经知道错误的结果没必 ...
- 复杂HTML页面解析
1.层叠样式表CSS可以让html元素呈现出差异化,网络爬虫可以通过class属性的值,轻松分出不同标签 findAll函数通过标签的名称和属性来查找标签 from urllib.request im ...
- C++11新标准学习
<深入理解C++11:C++11新特性解析与应用> <华章科技:深入理解C++11:C++11新特性解析与应用>一共8章:第1章从设计思维和应用范畴两个维度对C++11新标准中 ...