spring整合ehcache 注解实现查询缓存,并实现实时缓存更新或删除
写在前面:上一篇博客写了spring cache和ehcache的基本介绍,个人建议先把这些最基本的知识了解了才能对今天主题有所感触。不多说了,开干!
注:引入jar
        <!-- 引入ehcache缓存 -->

        <dependency>

            <groupId>net.sf.ehcache</groupId>

            <artifactId>ehcache</artifactId>

            <version>2.8.3</version>

        </dependency>
第一步:首先配置ehcache.xml
<?xml version="1.0" encoding="UTF-8"?>

<ehcache xmlns:xsi="http://www.w3.org/2001/XMLSchema-instance"

         xsi:noNamespaceSchemaLocation="ehcache.xsd"

         updateCheck="true" monitoring="autodetect"

         dynamicConfig="true">

   <diskStore path="java.io.tmpdir"/>

   <defaultCache

            maxEntriesLocalHeap="10000"

            eternal="false"

            overflowToDisk="false"

            timeToIdleSeconds="120"

            timeToLiveSeconds="120"

            diskSpoolBufferSizeMB="30"

            maxEntriesLocalDisk="10000000"

            diskExpiryThreadIntervalSeconds="120"

            memoryStoreEvictionPolicy="LRU">

        <persistence strategy="localTempSwap"/>

    </defaultCache>

    <cache name="myCache"

           maxEntriesLocalHeap="10000"

           maxEntriesLocalDisk="1000"

           eternal="false"

           diskSpoolBufferSizeMB="30"

           timeToIdleSeconds="300"

           timeToLiveSeconds="600"

           memoryStoreEvictionPolicy="LFU"

           transactionalMode="off">

        <persistence strategy="localTempSwap"/>

    </cache>

</ehcache>
第二步:在spring.xml的配置文件中引入schema,
xmlns:aop="http://www.springframework.org/schema/aop"和http://www.springframework.org/schema/cache http://www.springframework.org/schema/cache/spring-cache-3.2.xsd
缓存的配置:
    <!-- 启用缓存注解功能,这个是必须的,否则注解不会生效,另外,该注解一定要声明在spring主配置文件中才会生效 -->

    <cache:annotation-driven cache-manager="ehcacheManager"/>

    <!-- cacheManager工厂类,指定ehcache.xml的位置 -->

    <bean id="ehcacheManagerFactory" class="org.springframework.cache.ehcache.EhCacheManagerFactoryBean">

         <property name="configLocation" value="classpath:ehcache.xml" />

    </bean>

    <!-- 声明cacheManager -->

    <bean id="ehcacheManager" class="org.springframework.cache.ehcache.EhCacheCacheManager">

         <property name="cacheManager" ref="ehcacheManagerFactory" />

    </bean>
OK!缓存的相关配置已经完成。下面开始编写测试程序。这里需要连接数据库,我就不写了。这里为了方便就随便找了之前写过的model,这个model就是AOP注解实现日志管理的实体,为了偷懒就直接用了,希望你们不要误解,没有特殊意义的
第三步:编写model,这里需要注意,要实现缓存的实体必须要序列化 private static final long serialVersionUID = -6579533328390250520L; 关于序列化的生成这里就不介绍了,大家可以百度看看。
package org.shop.entity;

import java.io.Serializable;

import java.util.Date;

public class SystemLog implements Serializable {

    private static final long serialVersionUID = -6579533328390250520L;

    private String id;

    private String description;

    private String method;

    private Long logType;

    private String requestIp;

    private String exceptioncode;

    private String exceptionDetail;

    private String params;

    private String createBy;

    private Date createDate;

    public String getId() {

        return id;

    }

    public void setId(String id) {

        this.id = id == null ? null : id.trim();

    }

    public String getDescription() {

        return description;

    }

    public void setDescription(String description) {

        this.description = description == null ? null : description.trim();

    }

    public String getMethod() {

        return method;

    }

    public void setMethod(String method) {

        this.method = method == null ? null : method.trim();

    }

    public Long getLogType() {

        return logType;

    }

    public void setLogType(Long logType) {

        this.logType = logType;

    }

    public String getRequestIp() {

        return requestIp;

    }

    public void setRequestIp(String requestIp) {

        this.requestIp = requestIp == null ? null : requestIp.trim();

    }

    public String getExceptioncode() {

        return exceptioncode;

    }

    public void setExceptioncode(String exceptioncode) {

        this.exceptioncode = exceptioncode == null ? null : exceptioncode.trim();

    }

    public String getExceptionDetail() {

        return exceptionDetail;

    }

    public void setExceptionDetail(String exceptionDetail) {

        this.exceptionDetail = exceptionDetail == null ? null : exceptionDetail.trim();

    }

    public String getParams() {

        return params;

    }

    public void setParams(String params) {

        this.params = params == null ? null : params.trim();

    }

    public String getCreateBy() {

        return createBy;

    }

    public void setCreateBy(String createBy) {

        this.createBy = createBy == null ? null : createBy.trim();

    }

    public Date getCreateDate() {

        return createDate;

    }

    public void setCreateDate(Date createDate) {

        this.createDate = createDate;

    }

}
第四步:编写dao,service
package org.shop.dao;

import org.shop.entity.SystemLog;

public interface SystemLogMapper {

    int deleteByPrimaryKey(String id);

    int insert(SystemLog record);

    int insertSelective(SystemLog record);

    SystemLog selectByPrimaryKey(String id);

    int updateByPrimaryKeySelective(SystemLog record);

    int updateByPrimaryKey(SystemLog record);

    int count();

}
public interface SystemLogService {

    int deleteSystemLog(String id);

    int insert(SystemLog record);

    int insertTest(SystemLog record);

    SystemLog findSystemLog(String id);

    int updateSystemLog(SystemLog record);

    int count();

}
第五步:编写serviceImpl并添加缓存注解。这里缓存注解的参数不介绍了,不懂得看我上一篇博客,我这里先把需要的注解都写上了,一会一个一个介绍。
@Service("systemLogService")

public class SystemLogServiceImpl implements SystemLogService {

    @Resource

    private SystemLogMapper systemLogMapper;

    @Override

    public int deleteSystemLog(String id) {

              return systemLogMapper.deleteByPrimaryKey(id);

    }

    @Override

    //@CachePut(value="myCache")

    //@CacheEvict(value="myCache",allEntries=true,beforeInvocation=true)

    @CacheEvict(value="myCache",key="0",beforeInvocation=true)

    public int insert(SystemLog record) {

              return systemLogMapper.insertSelective(record);

    }

    @Override

    @Cacheable(value="myCache",key="#id")

    public SystemLog findSystemLog(String id) {

             return systemLogMapper.selectByPrimaryKey(id);

    }

    @Override

    public int updateSystemLog(SystemLog record) {

             return systemLogMapper.updateByPrimaryKeySelective(record);

    }

    @Override

    public int insertTest(SystemLog record) {

           return systemLogMapper.insert(record);

    }

    @Override

    @Cacheable(value="myCache",key="0")

    public int count() {

           int num = systemLogMapper.count();

           return num;

    }

}
第六步:编写controller,即我们的测试。
@Controller

@RequestMapping("systemLogController")

public class SystemLogController {

    @Resource

    private SystemLogService systemLogService;

    @RequestMapping("testLog")

    public ModelAndView testLog(){

        ModelMap modelMap = new ModelMap();

        SystemLog systemLog = systemLogService.findSystemLog("c30e2398-079a-406b-a2f7-a85fa15ccac7");

        modelMap.addAttribute("data", systemLog);

        return new ModelAndView("index",modelMap);

    }

    @RequestMapping("insert")

    @ResponseBody

    public boolean Insert(SystemLog record){

        systemLogService.insert(record);

        return true;

    }

    @RequestMapping("test1")

    public ModelAndView test1(){

        ModelMap modelMap = new ModelMap();

        int num =systemLogService.count();

        modelMap.addAttribute("num", num);

        return  new ModelAndView("pageEhcache",modelMap);

    }

}
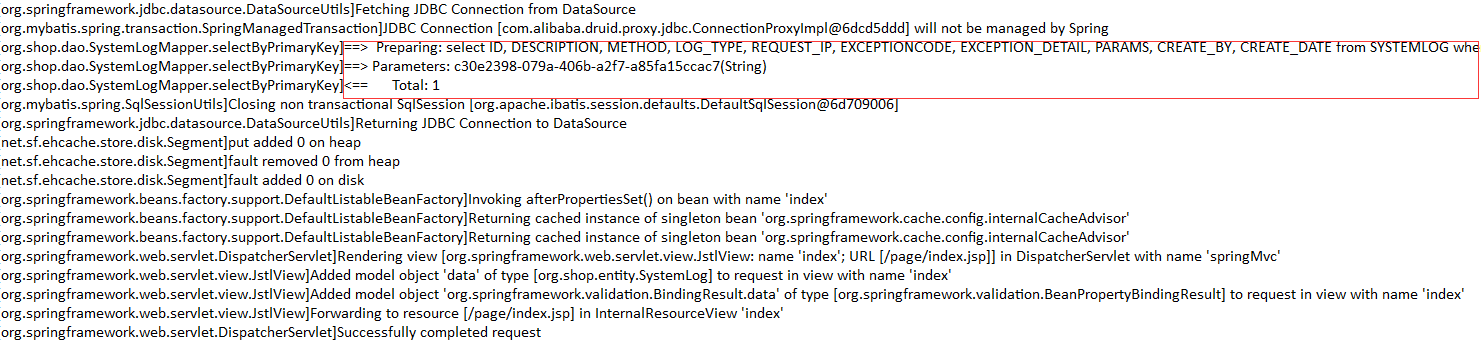
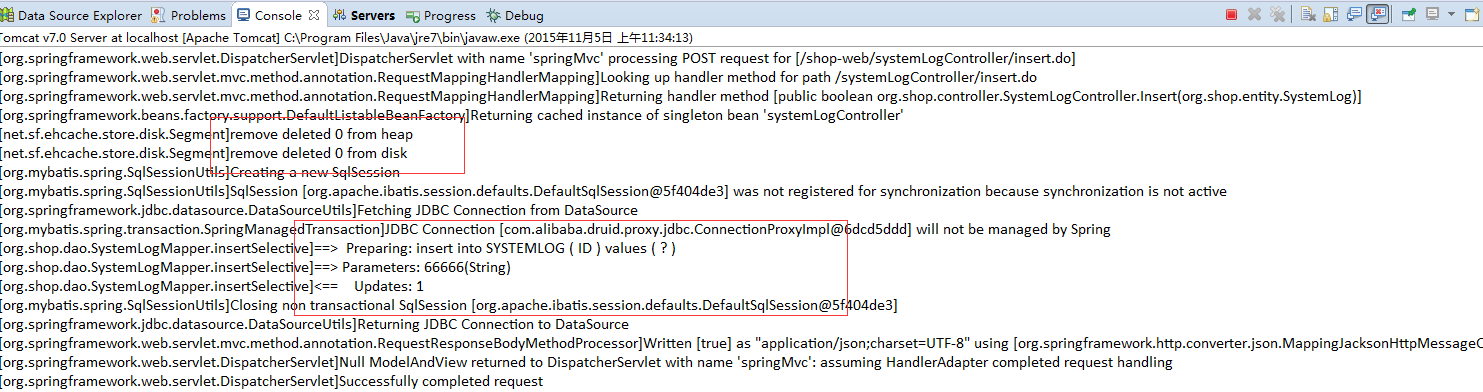
我们先测试查询的缓存,即serviceImpl中的 findSystemLog(String id) 方法,我们访问testLog.do,第一次运行如下图,注意控制台中的heap和 disk
再一次访问testLog.do,运行你会发现没有访问数据库,如图:

到此查询的缓存我们实现了,但是关于缓存的处理我们并没有做完,我们应该在深入思考下,在上面查询的缓存生命周期内,我们对刚才查询的表进行了增删改操作,这时我们再访问该查询方法,你会发现我们的数据并没有改变,还是增删改操作之前的数据(因为缓存的生命还在),这里是不是问题呢?此时我们需要对查询的缓存进行更新或删除。
下面我们看serviceImpl中的insert方法和count()方法,count的方法是统计表中的数据总记录,insert方法是对该表进行新增一条记录,insert的缓存注解用的是@CacheEvict(value="myCache",key="0",beforeInvocation=true),这里清除的是指定缓存,也就是count方法中@Cacheable(value="myCache",key="0")的,(serviceImpl中注释的@CacheEvict(value="myCache",allEntries=true,beforeInvocation=true)是清除所有的缓存,这里我就不演示了,道理是一样的)
这里我提供一个测试pageEhcache.jsp页面,
<%@ page language="java" import="java.util.*" pageEncoding="UTF-8"%>

<%

String path = request.getContextPath();

String basePath = request.getScheme()+"://"+request.getServerName()+":"+request.getServerPort()+path+"/";

%>

<!DOCTYPE HTML PUBLIC "-//W3C//DTD HTML 4.01 Transitional//EN">

<html>

  <head>

    <title>测试</title>

    <script type="text/javascript" src="<%=request.getContextPath()%>/js/jquery-1.11.1.min.js"></script>

    <script type="text/javascript">

       function insert(){

           var record = $("#formID").serializeArray();

           console.info(record);

           $.ajax({

                   url : "<%=request.getContextPath()%>/systemLogController/insert.do",

                   type : 'post',

                   async:true,

                   dataType:'json',

                   data : record,

                   success:function(result){

                       alert("插入成功!");

                   }

           });

       }

    </script>

  </head>

  <body>

  <h1><%=new Date()%></h1>

  <h1>这是一个练习</h1>

     <form id="formID" action="">

        id: <input name="id" type="text"/><br>

        <input type="button" value="插入" onclick="insert()"/>

    </form>

    <br>

    总数:

    <h4>${num}</h4>

  </body>

</html>
我们先访问test1.do,看下表中的记录数并注意控制台变化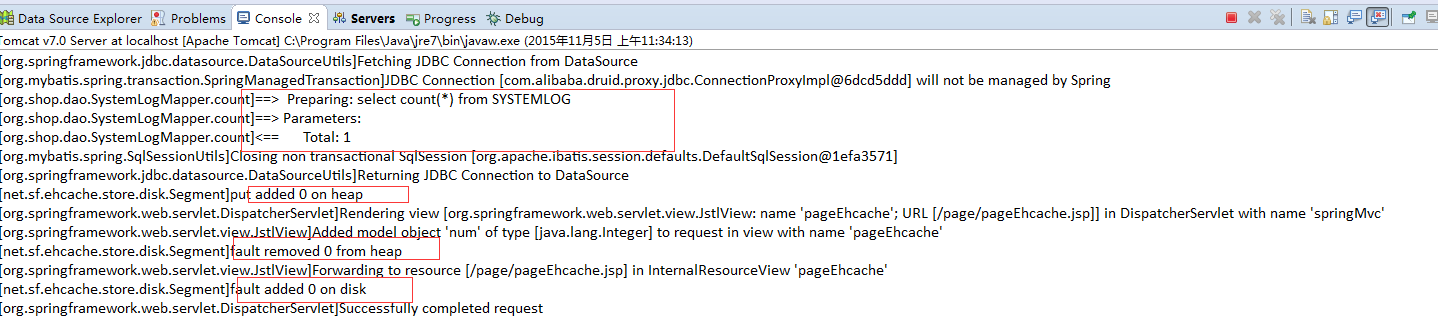
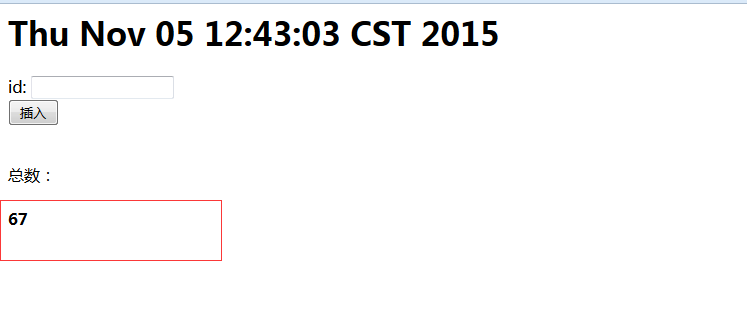
页面显示如下,注意总数是67,
再一次访问test1.do,没有访问数据库,说明count()方法的缓存生效了,

接下来开始新增记录,点击插入按钮
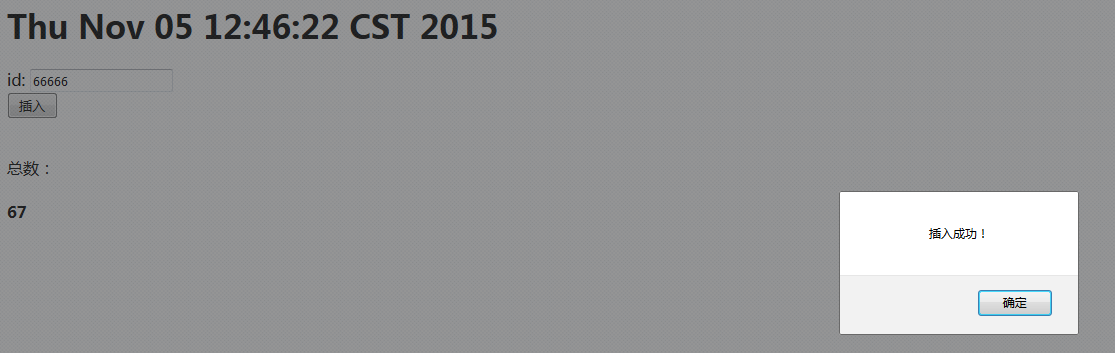
注意控制台显示,这里执行了inserSQL语句,并remove了count()方法上的缓存,
接下来再次访问test1.do,我们看到总数变化了,增加了一条,说明我们把之前count()方法上的缓存删除了,又执行了查询总数的sql

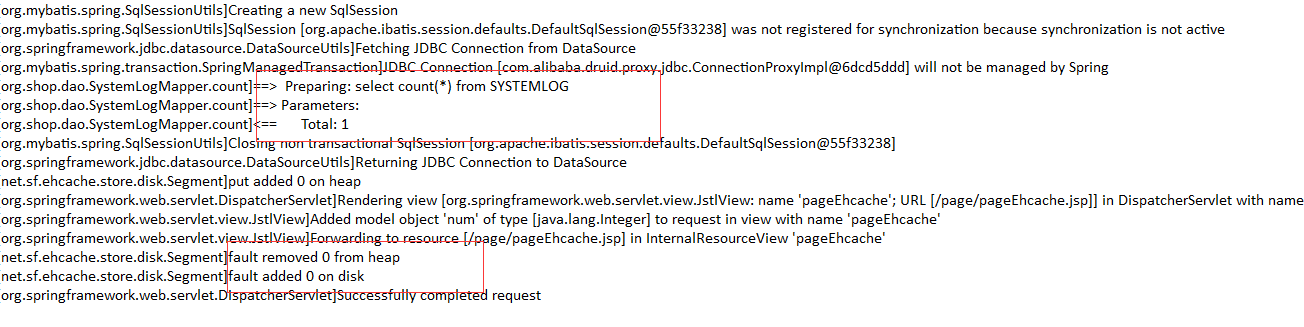
再次访问test1.do,count()方法的缓存生效了,对吧!这个就是@CacheEvict注解的作用。

在insert()方法上还有@CachePut(value="myCache")注解,上面的serviceImpl中注释了,它的作用是:@CachePut标注的方法在执行前不会去检查缓存中是否存在之前执行过的结果,而是每次都会执行该方法,并将执行结果以键值对的形式存入指定的缓存中。
我这里就不做演示了,你们可以自己动手试试。
总结:我个人的理解,对查询方法增加缓存容易,但对于缓存的更新的处理就比较麻烦,我上面的serviceImpl中写了三种处理方式,
1.用@CachePut处理,这中方法需要对指定缓存key保持一致,尽管这样,还是不行,因为它返回的缓存是int(增加或删除或修改的记录数或是该记录的对象,这对我们查询所有或部分记录的缓存还是不可行的)
2.用@CacheEvict(value="myCache",key="0",beforeInvocation=true)处理,清除我们指定key的缓存,这种方式缺点是麻烦,需要我们注意每一个缓存的key
.用@CacheEvict(value="myCache",allEntries=true,beforeInvocation=true)处理,清除所有缓存,这种方式最省事,但会把其他缓存也一同清除。
随着业务的复杂性的不断增加,这些处理方式,可能会增加代码的复杂性,然后我想到的是对DB层进行缓存,可以利用redis,mamchched的进行处理。当然对于一般的web应用运用ehcache已经刻一解决了,但是对大数据量的运用db级别的缓存效果性能可能会更好。
以上纯粹是个人想法。另外我也想了想缓存到底在哪些场景下应用会比较好,不知道你们是怎么认为的。也请大家给点建议。
spring整合ehcache 注解实现查询缓存,并实现实时缓存更新或删除的更多相关文章
- spring整合ehcache注解实现查询缓存,并实现实时缓存更新或删除
转载: http://www.importnew.com/23358.html 写在前面:上一篇博客写了spring cache和ehcache的基本介绍,个人建议先把这些最基本的知识了解了才能对今天 ...
- 2.spring整合ehcache 注解实现查询缓存,并实现实时缓存更新或删除
转自:http://www.importnew.com/23358.html 写在前面:上一篇博客写了spring cache和ehcache的基本介绍,个人建议先把这些最基本的知识了解了才能对今天主 ...
- Spring整合Ehcache管理缓存
前言 Ehcache 是一个成熟的缓存框架,你可以直接使用它来管理你的缓存. Spring 提供了对缓存功能的抽象:即允许绑定不同的缓存解决方案(如Ehcache),但本身不直接提供缓存功能的实现.它 ...
- Spring整合Ehcache管理缓存(转)
目录 前言 概述 安装 Ehcache的使用 HelloWorld范例 Ehcache基本操作 创建CacheManager 添加缓存 删除缓存 实现基本缓存操作 缓存配置 xml方式 API方式 S ...
- 以Spring整合EhCache为例从根本上了解Spring缓存这件事(转)
前两节"Spring缓存抽象"和"基于注解驱动的缓存"是为了更加清晰的了解Spring缓存机制,整合任何一个缓存实现或者叫缓存供应商都应该了解并清楚前两节,如果 ...
- Spring整合EHCache框架
在Spring中使用缓存可以有效地避免不断地获取相同数据,重复地访问数据库,导致程序性能恶化. 在Spring中已经定义了缓存的CacheManager和Cache接口,只需要实例化便可使用. Spr ...
- Spring整合EhCache详解
一.EhCache介绍 EhCache 是一个纯Java的进程内缓存框架,具有快速.精干等特点,是Hibernate中默认的CacheProvider.Ehcache是一种广泛使用的开 源Java分布 ...
- spring 整合hibernate注解时候,出现“Unknown entity: com.ssh.entry.Admin; nested exception is org.hibernate.MappingException: Unknown entity: com.ssh.entry.Admin”异常的问题
今天学习使用ssh框架的时候,出现一个异常,弄了好久才找到,在这记录一下,我的sb错误1.spring整合hibernate,取代*.hbm.xml配置文件 在applicationContext ...
- Hibernate Validation与Spring整合各注解的用法Demo
转自:https://www.aliyun.com/jiaocheng/1315650.html <dependency> <groupId>org.hibernate< ...
随机推荐
- DEMO6:坐标添加文字标签的JavaScript插件
Google地图API MarkerWithLabel Example http://google-maps-utility-library-v3.googlecode.com/svn/tags/ ...
- oracle数据库sql比较日期
select * from cc_random_check_info t where check_time > to_date('2016-09-09','yyyy-MM--dd')
- android基础---->LruCache的使用及原理
在你应用程序的UI界面加载一张图片是一件很简单的事情,但是当你需要在界面上加载一大堆图片的时候,情况就变得复杂起来.Android为我们提供了LruCache,今天我们就来学习这个缓存的知识以及原理. ...
- JZOJ.5335【NOIP2017模拟8.24】早苗
Description
- 【 Android】使手机屏幕常亮,不进入待机状态
Android中,申请WakeLock可以让你的进程持续执行即使手机进入睡眠模式,比较实用的是比如后台有网络功能,可以保证操作持续进行. 需要权限 <uses-permission androi ...
- Python - 字符串的方法及注释
%r非常有用,他的含义是不管是整形还是字符串,都将打印出来
- 查看Oracle的redo日志切换频率
1.Oracle log 每次切换会记录到告警日志中 设想写个方案来查看log切换频率来判断Oracle log是否应该更改大小. 2.sql a.查看redo日志信息 select * from v ...
- 双调欧几里得旅行商问题(TSPhdu2224)
http://acm.hdu.edu.cn/showproblem.php?pid=2224 The shortest path Time Limit: 1000/1000 MS (Java/Othe ...
- Floyd算法并输出路径
hdu1224 Free DIY Tour Time Limit: 2000/1000 MS (Java/Others) Memory Limit: 65536/32768 K (Java/Ot ...
- 处理URL传递中文乱码问题
在网上搜了很多资料都没有搞定,一般都有以下几种说法: 方法1:在后台中先获得字符串的iso-8859-1编码形式数组,再使用此数组实例一个UTF-8编码形式String类型字符串. 页面提交的url为 ...