
Arduino 3g shield using GSM bought from ITead
This is an old arduino 3G module bought half years ago.
Its wiki:
http://wiki.iteadstudio.com/ITEAD_3G_Shield
Its mall:
http://imall.itead.cc/itead-3g-shield.html
But as you can see that, the download link does not exist anymore. But after googling a bit, there are some alternatives for you to download the goodies.
Datasheet for ITEAD 3G Shield http://pan.baidu.com/s/1ntCH4UH
Schematic for ITEAD 3G Shield http://pan.baidu.com/s/1pJ5lRzt
Demo Code for ITEAD 3G Shield http://pan.baidu.com/s/1gdyaCYf

Its back where you insert a SIM card:

On arduino, switch VCC to 5V, switch Flight mode , RF to be On.
And for the UART multiplexer on the board,
When using the connection as Figure 4, the SIM900 connect to the ATMega328 chip on board.
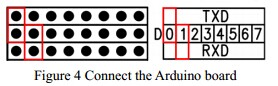
Pin D0 Tx on 3G shield <-----> Rx on Arduino
Pin D1 Rx on 3G shield <-----> Tx on Arduino
To test whether your board is working:
void setup()

{

  Serial.begin();

}

void loop()

{

  while()

  {

    // dail 13988899999

  Serial.print("ATD13988899999;\r");

  delay();

  }

}
This is gonna dial this number 13988899999 forever.
If you receive a call, your module is working perfectly.
This board uses AT commands to control itself.
Key: AT commands
What is AT commands?
For Chinese readers: http://baike.baidu.com/view/2420376.htm
For English readers: https://en.wikipedia.org/wiki/Motorola_phone_AT_commands ( This is very helpful )
The AT commands manual those are compatible for this board can be found here.
http://wiki.iteadstudio.com/images/2/20/SIM5215J_SIM5216J_AT_Command_Manual_V1.02.pdf
Or here: http://pan.baidu.com/s/1kDDQu (You do not need to be an expert)
It looks the manual is long enough to make you sleepy. :P Just check the exquisite down below.
You can find helpful tutorials from Arduino offcial forum:
http://forum.arduino.cc/index.php?topic=140526.0
And the problem was solved. You can use that scope of codes.
Setting the UART multiplexer

If you do not know anything about UART multiplexer, you could check it out here. http://wiki.iteadstudio.com/IComSat
From its schema:
It looks like this:

Play with the jumpers on the board.
It would looks like this before:
then re-set it to be like this:
Now you program on it.
Let's try some AT commands:
Send command:
ATI
You would get these in return:
ATI

Manufacturer: SIMCOM INCORPORATED

Model: SIMCOM_SIM5216E

Revision: SIM5216E_V1.

IMEI:

+GCAP: +CGSM,+DS,+ES

OK
To the UART SoftwareSerial ports.
If you want to debug this 3G shield module with arduino, PC , you should set baud rate to be 9600 or less.
The rate of 115200 is too high for SoftwareSerial on Arduino. ( That's why here later I used a FT232 USB2Serial module on PC to communicate with this 3G shield without arduino. )
It looks as what he said: http://forum.arduino.cc/index.php?topic=140526.msg1653999#msg1653999
Using A FT232 USB -> Serial module to control 3G module ( No arduino at all )

Sources from:
http://www.elecfreaks.com/wiki/index.php?title=3G_shield
See how I did it for real.

Settings with jumpers on shield:

On FT232 USB2Serial module :

Tx on FT232 <--> Rx on 3G module
Rx on FT232 <--> Tx on 3G module
Here I used cutecom on Linux.
Please notice the settings below:

Send in Plain text and select "CR line end".
If you want to dail one's number, for example, 18612341234, just input
ATD18612341234;
It works well. And with MIC and Phone, you can speak and hear from the other one.
Arduino 3g shield using GSM bought from ITead的更多相关文章
- Arduino 3G shield using SoftwareSerial to control
On the 3G shield, by default the power pin is on D8 and reset pin is on D9. Make it HIGH then it wor ...
- 如何使用Arduino和SIM900A GPRS / GSM模块将数据发送到Web服务器
今天我们在这里介绍一个非常有趣的项目,我们将使用Arduino开发板和GPRS将数据发送到SparkFun服务器.这是一个基于IoT的项目,我们将使用GSM模块SIM900A将一些数据发送到互联网上的 ...
- Arduino UNO开发板、Arduino CNC Shield V3.0扩展板、A4988驱动板、grbl固件使用教程
前言 CNC Shield V3.0可用作雕刻机,3D打印机等的驱动扩展板,板上一共有4路步进电机驱动模块的插槽,可驱动4路不进电机,而每一路步进电机都只需要2个IO口,也就是说,6个IO口就可以很好 ...
- 一百元的智能家居——Asp.Net Mvc Api+讯飞语音+Android+Arduino
大半夜的,先说些废话提提神 如今智能家居已经不再停留在概念阶段,高大上的科技公司都已经推出了自己的部分或全套的智能家居解决方案,不过就目前的现状而言,大多还停留在展厅阶段,还没有广泛的推广起来,有人说 ...
- Arduino 学习
Arduino 背景可以参考官方网站www.arduino.cc 先看一个最简单的示例程序: 打开 Arduino IDE , 选择菜单:文件 -> 示例 -> 01.Basics -&g ...
- Arduino Nano + WIZ550io = 简易上网
我爱Arduino Nano – 这是一个非常好外形小巧却功能齐全的Arduino Uno.然而.当我去将它连接到互联网,全部的干净利落小巧也消失在大尺寸的以太网盾底下了. 只是,我近期发现了一个更好 ...
- 用Arduino做一个可视化网络威胁级别指示器!
在当今世界,网络监控器是非常重要的.互联网是个可怕的地方.人们已经采取措施以提高警戒----他们安装了入侵检测系统(IDS)比如SNORT. 通过把可视化部分从电脑中移出来,我们想让它更容易去观察.一 ...
- 转]GSM模块信号强度CSQ与RSSI的对应关系
使用GSM或者3G模块时,都会接触到信号强度CSQ.通过指令AT+CSQ,模块返回当前的信号质量,例如: AT+CSQ +CSQ: 28,0 其中28就是信号强度CSQ,但它不是真实的CSQ,他应该叫 ...
- Arduino 网络时钟client
升级! 添加了12h/24h 的开关,还有标准/ 夏令时开关!见步骤7 & 步骤8. 你是否曾想要一个和办公室时间来源全然准确的表? 这就有一个网络的办公时间server,你能够根据它并同步你 ...
随机推荐
- 用DIV+css写Table
做出的效果样式如下图, 1,首先考虑的是如何显示border,就像是分割代码,我把border分割为最外层DIV全border,和内层DIV的right和bottom的border,就是右边和下边. ...
- Asp.net MVC + EF + Spring.Net 项目实践(四)
这篇写一写如何使用Spring.net来解耦各个项目 1. 在接口层添加IStudentBLL文件,里面有GetStudent和GetAllStudents两个方法:然后在StudentBLL类里实现 ...
- Exception dispatching input event. use XlistView
今天上午解决Bug,一个上午的时间: log: 11-01 14:49:14.826: E/InputEventReceiver(30810): Exception dispatching input ...
- linux 在系统启动过程
从学习<鸟哥linux私人厨房> 用于在计算机系统启动,计算机硬件和软件由(它包含的操作系统软件)包括.对于操作系统在同一台计算机硬件方面的表现,该系统配备有硬件是公用,不同的系统是 的操 ...
- windows下用c实现Socket通信
原文:windows下用c实现Socket通信 原本以为c是跨平台,所以,c在windows下和linux下的程序应该是类似于Java,什么都不用改变的,今儿才恍然大悟,他们的类库不一样啊-- 下面我 ...
- Java-DES算法加密解密工具类
import java.io.FileInputStream; import java.io.FileOutputStream; import java.io.InputStream; import ...
- javascript 控制台输出 图片 console.log 真强大 真佩服你们的创造力
无意中,在百度知道页面发现了这货.居然能输出图片到控制台. 完全颠覆自己的三观,果断查阅其输出方法.后得知,原来如此. 曾经做过的项目中,同事把控制台做成一个网页形式方便远程控制和远程调用.没想到过这 ...
- 清除css、javascript及背景图在浏览器中的缓存
在实际项目开发过过程中,页面是上传到服务器上的.而为了减少服务器的压力,让用户少加载,浏览器会将图片.css.js缓存到本地中,以便下次访问网站时使用.这样做不仅减少了服务器的压力,并且也减少了用户的 ...
- leetcode[89] Merge Sorted Array
合并两个有序数组,放在A中,A中的空间足够. Given two sorted integer arrays A and B, merge B into A as one sorted array. ...
- 使用JQUERY操作Radio
发展中经常使用Radio为了实现用户的选择的影响.我在该项目中使用的一些JQUERY操作Radio该方法.这里分享,对于有需要的朋友参考的. 1.变化radio选择.引发一些结果 $("in ...