
Centos 7 安装 Xilinx SDSoC Development Environment
1、CentOS版本信息
$ cat /etc/redhat-release
CentOS Linux release 7.6.1810 (Core)
2、SDSoC下载地址:
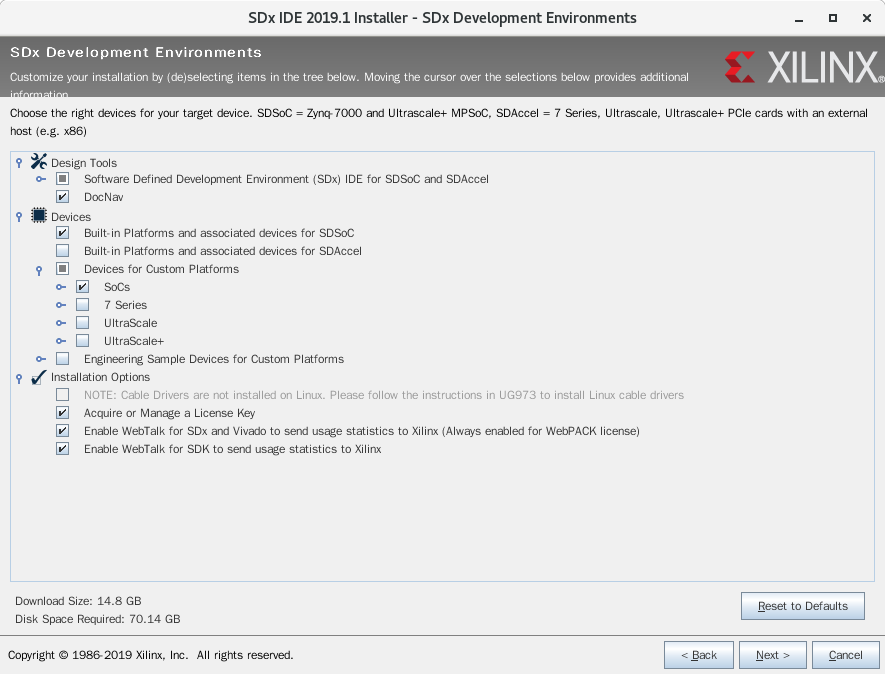
3、安装
4、驱动安装
4.1、install_drivers
$ cd ~/Xilinx/Vivado/2019.1/data/xicom/cable_drivers/lin64/install_script/install_drivers/
$ ls
52-xilinx-digilent-usb.rules install_digilent.sh setup_xilinx_ftdi
52-xilinx-ftdi-usb.rules install_drivers
52-xilinx-pcusb.rules setup_pcusb
$ sudo ./install_drivers
INFO: Installing cable drivers.
INFO: Script name = ./install_drivers
INFO: HostName = localhost.localdomain
INFO: Current working dir = /home/ac/Xilinx/Vivado/2019.1/data/xicom/cable_drivers/lin64/install_script/install_drivers
INFO: Kernel version = 3.10.0-957.el7.x86_64.
INFO: Arch = x86_64.
USB udev file exists and will not be updated.
--File /etc/udev/rules.d/52-xilinx-ftdi-usb.rules does not exist.
--File version of /etc/udev/rules.d/52-xilinx-ftdi-usb.rules = 0000.
--Updating rules file.
--File /etc/udev/rules.d/52-xilinx-pcusb.rules exists.
--File /etc/udev/rules.d/52-xilinx-pcusb.rules version = 0002
--File 52-xilinx-pcusb.rules exists.
--File 52-xilinx-pcusb.rules version = 0002
--File 52-xilinx-pcusb.rules is already updated.
INFO: Digilent Return code = 0
INFO: Xilinx Return code = 0
INFO: Xilinx FTDI Return code = 0
INFO: Return code = 0
INFO: Driver installation successful.
CRITICAL WARNING: Cable(s) on the system must be unplugged then plugged back in order for the driver scripts to update the cables.
$ ls /etc/udev/rules.d
52-digilent-usb.rules 99-vmware-scsi-udev.rules
52-xilinx-digilent-usb.rules 52-xilinx-pcusb.rules
52-xilinx-ftdi-usb.rules 70-persistent-ipoib.rules
$ sudo udevadm control --reload-rules
4.2、安装digilent.adept.runtime-2.19.2.x86_64.rpm和digilent.adept.utilities-2.2.1.x86_64.rpm
下载地址:https://reference.digilentinc.com/reference/software/adept/start
$ sudo dmesg --clear
$ dmesg
[ 2274.644948] usb 1-1: new high-speed USB device number 7 using ehci-pci
[ 2274.950294] usb 1-1: New USB device found, idVendor=0403, idProduct=6014
[ 2274.950299] usb 1-1: New USB device strings: Mfr=1, Product=2, SerialNumber=3
[ 2274.950301] usb 1-1: Product: Digilent USB Device
[ 2274.950303] usb 1-1: Manufacturer: Digilent
[ 2274.950304] usb 1-1: SerialNumber: 210512180081
[ 2275.089932] usbcore: registered new interface driver ftdi_sio
[ 2275.089960] usbserial: USB Serial support registered for FTDI USB Serial Device
[ 2275.089997] ftdi_sio 1-1:1.0: FTDI USB Serial Device converter detected
[ 2275.090056] usb 1-1: Detected FT232H
[ 2275.091996] usb 1-1: FTDI USB Serial Device converter now attached to ttyUSB0
[ 2275.950610] ftdi_sio ttyUSB0: FTDI USB Serial Device converter now disconnected from ttyUSB0
[ 2275.950631] ftdi_sio 1-1:1.0: device disconnected
$ dadutil enum
Found 1 device(s)
Device: JtagHs1
Product Name: Digilent JTAG-HS1
User Name: JtagHs1
Serial Number: 210512180081
$ djtgcfg enum
Found 1 device(s)
Device: JtagHs1
Product Name: Digilent JTAG-HS1
User Name: JtagHs1
Serial Number: 210512180081
$ djtgcfg init -d JtagHs1
Initializing scan chain...
Found Device ID: 13722093
Found Device ID: 4ba00477
Found 2 device(s):
Device 0: ARM_DAP
Device 1: XC7Z010
4.3、启动vivado, Open Hardware Manager, 点击Auto Connect
提示以下错误:
[Labtoolstcl 44-494] There is no active target available for server at localhost. Targets(s) ", jsn-JTAG-HS1-210512180081" may be locked by another hw_server.
解决办法:
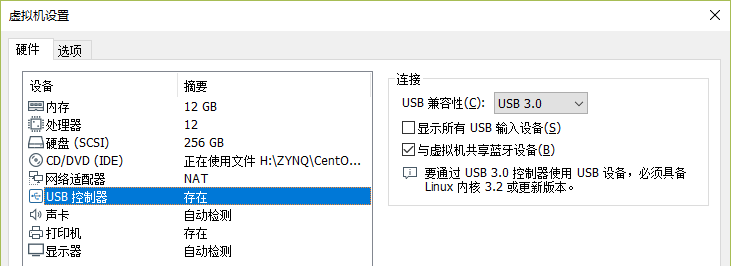
关机并更改虚拟机USB兼容性设置为USB 3.0
重新开机

Centos 7 安装 Xilinx SDSoC Development Environment的更多相关文章
- Create A .NET Core Development Environment Using Visual Studio Code
https://www.c-sharpcorner.com/article/create-a-net-core-development-environment-using-visual-studio- ...
- CentOS JAVA安装及查看路径方法
一.安装: 方法一:手动解压JDK的压缩包,然后设置环境变量 1.在/usr/目录下创建java目录 [root@localhost ~]# mkdir/usr/java[root@localhost ...
- centos 怎么安装 g++
centos 怎么安装 g++ 找了n久 找到一个实用的 有gcc 但是 是老版本的 tarball 编译 nmap 的时候说机器没有g++ 各种方法都试过 然后 找到下面这个方法: cento ...
- centos 6 安装
centos 6 安装步骤 说明: 1.install or upgrade an existing system安装或升级现有系统 2.install system with basic vide ...
- 在centos中安装jenkins master测试环境
在centos中安装jenkins 1)安装目录 pwd (/home/AAA) 2)检查java是否安装 [AAA@Centos_AAA jenkins]$ java -version j ...
- CentOS下安装JDK7 转载
转载地址:http://www.cnblogs.com/rilley/archive/2012/02/02/2335395.html CentOS下安装JDK7 下载地址:http://www.ora ...
- centos JDK安装
第一步:查看Linux自带的JDK是否已安装 (卸载centOS已安装的1.4) 安装好的CentOS会自带OpenJdk,用命令 java -version ,会有下面的信息: java versi ...
- 删:Centos 7安装Nginx 1.8
[CentOS 7] 安装nginx! 首先进行 nginx yum Nginx安装记录 注意:如果用源码安装,nginx配置时需要指定--with-pcer对应的压缩包路径,如果使用二进制安装不需要 ...
- Centos编译安装PHP 5.5笔记
本篇是在 Centos 6.4 32bit 下编译安装 php 5.5.5 的笔记,接上篇 Centos编译安装Apache 2.4.6笔记.php 5.5.x 和 centos 源里面的 php 5 ...
随机推荐
- CentOS7 Python3上安装paramiko
1. CentOS 7下安装Python3.5 CentOS7默认安装了python2.7.5,要用 Python3需要自己手动安装.注意不要删除python2. 1.1 下载python3源码包 w ...
- 命名规范 camel case, pascal case, hyphen
2019-11-08 refer : https://ux.stackexchange.com/questions/43174/update-vs-modify-vs-change-create-v ...
- IIS和apache并存windows服务器
方法三: 将apache设为使用80端口,IIS使用其它端口,比如81,然后将apache作为IIS的代理.速度有影响.在httpd.conf里面,取消下面四行的注释:LoadModule proxy ...
- vue 换肤
/* eslint-disable */ // 设置文件 import setting from "@/setting.js"; const themeList = setting ...
- C#面向对象17 23种设计模式
1.简单工厂模式 using System; using System.Collections.Generic; using System.Linq; using System.Text; using ...
- 洛谷UVA11987Almost Union-Find题解--并查集的删除
题目链接 https://www.luogu.org/problemnew/show/UVA11987 分析 分析下操作发现就是加了个删除操作的并查集,怎么做删除操作呢. 我们用一个\(id[]\)记 ...
- 设计模式及UML图
UML图 1. 依赖关系
- CentOS7安装Docker-CE并部署项目
前言 这是我第一次使用dokcer部署项目,现学现卖.成功之后把所有用到的安装及部署和操作命令做一个总结.如有不足,请指教. 使用的是阿里云服务器.CentOS7版本. Dokcer安装 1.Cent ...
- Vue异步请求最佳实践
一.当前存在的问题 目前项目前端请求后台数据的方式是这样的: 页面中method中dispatch到action action调用mutation,请求axios 请求到数据后存储到state中 页面 ...
- MySQL数据库笔记五:多表查询
1.表与表之间的关系 一对一:用户表和身份信息表,用户表是主表 例如:男人表 .女人表 create table man( mid int primary key auto_increment, mn ...