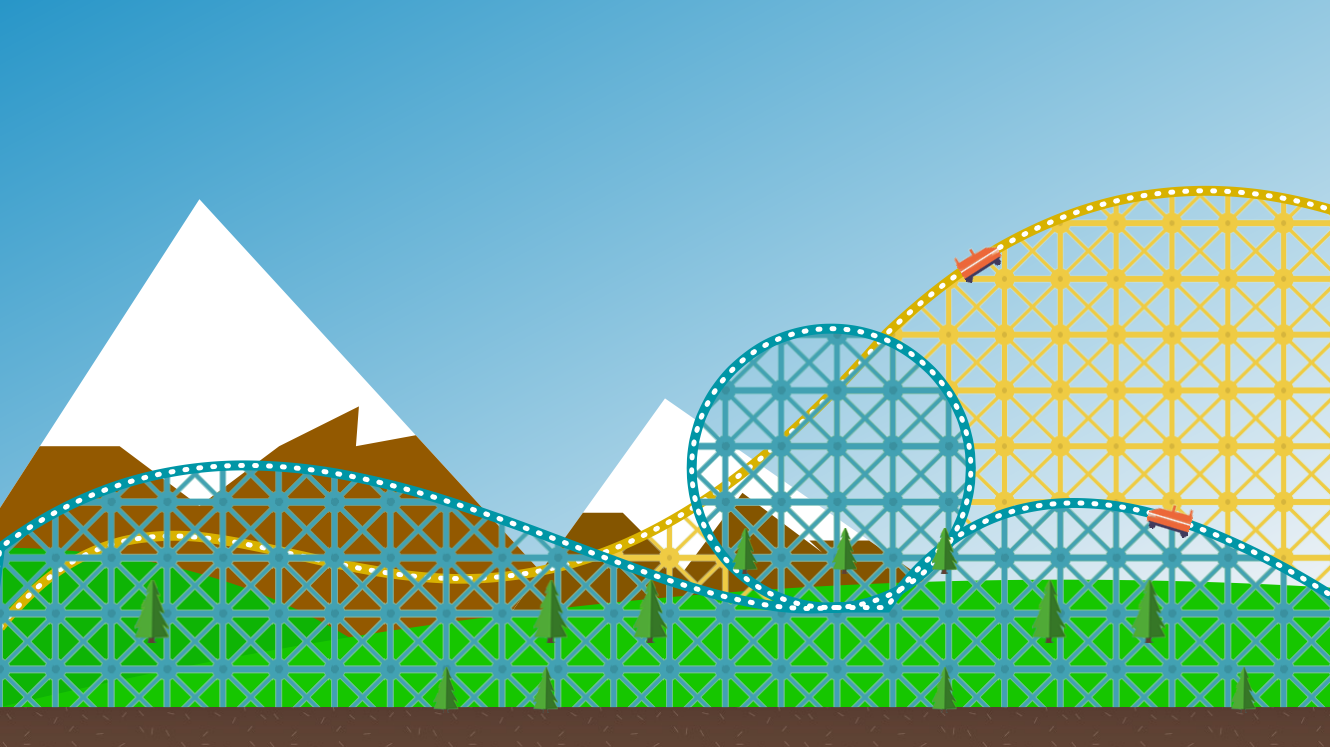
CAShapeLayer(UIBezierPath)、CAGradientLayer绘制动态小车
看到一个大神写的代码,引用过来让大家看看!
// 1、CAShapeLayer是一种特殊的层,可以在上面渲染图形。
// 2、CAShapeLayer继承自CALayer,可使用CALayer的所有属性。
// 3、CAShapeLayer需要和贝塞尔曲线配合使用才有意义,贝塞尔曲线为其提供渲染的图形。
// 4、使用CAShapeLayer与贝塞尔曲线可以实现不再view的drawRect方法中画出一些想要的图形。
// 关于CAShapeLayer和drawRect的比较:
// 在drawRect中绘制图形调用CoreGraphics框架中得方法,占用CPU,消耗性能大;
// CAShapeLayer属于CoreAnimation框架,通过GPU来渲染图形,节省性能。动画渲染直接提交给GPU,不消耗内存。
// 1、CAGradientLayer是一种特殊的层,用于渲染渐变效果。
// 2、CAGradientLayer继承自CALayer,可使用CALayer所有的属性。
// 3、CAGradientLayer是除了在图形上下文绘制渐变效果外的另一种方法,它不需要借助图形上下文,是直接渲染在层上的,因此易于使用。
#import "ViewController.h"

#define k_SCREEN_HEIGHT [UIScreen mainScreen].bounds.size.height

#define k_LAND_BEGIN_HEIGHT k_SCREEN_HEIGHT - 20

#define k_SIZE self.view.frame.size

@interface ViewController ()

@property(strong,nonatomic)CALayer * landLayer;

@property(strong,nonatomic)CAShapeLayer * greenTrack;

@property(strong,nonatomic)CAShapeLayer * yellowTrack;

@end

@implementation ViewController

- (void)viewDidLoad {

    [super viewDidLoad];

    self.view.backgroundColor = [UIColor lightGrayColor];

    //  初始化背景渐变的天空

    [self initBackgroundSky];

    //  初始化雪山

    [self initSnowberg];

    //  加载草坪

    [self initLawn];

    //  加载大地

    [self initLand];

    //  加载黄色轨道

    [self initYellowTrack];

    //  加载绿色轨道

    [self initGreenTrack];

    //  点缀小树

    [self initTree];

    //  启动云彩

    [self initCloudAnimation];

    //  添加黄色轨道小车动画   CACurrentMediaTime系统内建时间

    [self carAnimationWith:@"car" TrackLayer:_yellowTrack AnimationDuration:8.0 BeginTime:CACurrentMediaTime()];

    //  添加绿色轨道小车动画

    [self carAnimationWith:@"otherCar" TrackLayer:_greenTrack AnimationDuration:5.0 BeginTime:CACurrentMediaTime()];

}

//  初始化背景天空渐变色

- (void)initBackgroundSky{

    CAGradientLayer * backgroundLayer = [[CAGradientLayer alloc] init];

    //  设置背景渐变色层的大小。要减去屏幕最下方土地那条水平线的高度

    backgroundLayer.frame = CGRectMake(, , k_SIZE.width, k_LAND_BEGIN_HEIGHT);

    UIColor * lightColor = [UIColor colorWithRed:40.0 / 255.0 green:150.0 / 255.0 blue:200.0 / 255.0 alpha:1.0];

    UIColor * darkColor  = [UIColor colorWithRed:255.0 / 255.0 green:250.0 / 255.0 blue:250.0 / 255.0 alpha:1.0];

    backgroundLayer.colors = @[(__bridge id)lightColor.CGColor,(__bridge id)darkColor.CGColor];

    //  让变色层成45度角变色

    backgroundLayer.startPoint = CGPointMake(, );

    backgroundLayer.endPoint = CGPointMake(, );

    [self.view.layer addSublayer:backgroundLayer];

}

//初始化雪山,有两个雪山

- (void)initSnowberg {

    //  左边第一座山顶,其实就是一个白色的三角形

    CAShapeLayer * leftSnowberg     = [[CAShapeLayer alloc] init];

    UIBezierPath * leftSnowbergPath = [[UIBezierPath alloc] init];

    //  把bezierpath的起点移动到雪山左下角

    [leftSnowbergPath moveToPoint:CGPointMake(, k_SIZE.height - )];

    //  画一条线到山顶

    [leftSnowbergPath addLineToPoint:CGPointMake(, )];

    //  画一条线到右下角->左下角->闭合

    [leftSnowbergPath addLineToPoint:CGPointMake(k_SIZE.width / , k_LAND_BEGIN_HEIGHT)];

    [leftSnowbergPath addLineToPoint:CGPointMake(, k_LAND_BEGIN_HEIGHT)];

    [leftSnowbergPath closePath];

    leftSnowberg.path = leftSnowbergPath.CGPath;

    leftSnowberg.fillColor = [UIColor whiteColor].CGColor;

    [self.view.layer addSublayer:leftSnowberg];

    //  开始画山体没有被雪覆盖的部分

    CAShapeLayer * leftSnowbergBody     = [[CAShapeLayer alloc] init];

    UIBezierPath * leftSnowbergBodyPath = [[UIBezierPath alloc] init];

    //  把bezierpath的起点移动到雪山左下角相同的位置

    CGPoint startPoint = CGPointMake(, k_SIZE.height - );

    CGPoint endPoint = CGPointMake(, );

    CGPoint firstPathPoint = [self calculateWithXValue: startPoint:startPoint endpoint:endPoint];

    [leftSnowbergBodyPath moveToPoint:startPoint];

    [leftSnowbergBodyPath addLineToPoint:firstPathPoint];

    [leftSnowbergBodyPath addLineToPoint:CGPointMake(, firstPathPoint.y)];

    [leftSnowbergBodyPath addLineToPoint:CGPointMake(, firstPathPoint.y + )];

    [leftSnowbergBodyPath addLineToPoint:CGPointMake(, firstPathPoint.y)];

    [leftSnowbergBodyPath addLineToPoint:CGPointMake(, firstPathPoint.y - )];

    CGPoint secondPathPoint = [self calculateWithXValue:(k_SIZE.width /  - ) startPoint:endPoint endpoint:CGPointMake(k_SIZE.width / , k_LAND_BEGIN_HEIGHT)];

    [leftSnowbergBodyPath addLineToPoint:CGPointMake(secondPathPoint.x - , firstPathPoint.y)];

    [leftSnowbergBodyPath addLineToPoint:secondPathPoint];

    [leftSnowbergBodyPath addLineToPoint:CGPointMake(k_SIZE.width / , k_LAND_BEGIN_HEIGHT)];

    [leftSnowbergBodyPath addLineToPoint:CGPointMake(, k_LAND_BEGIN_HEIGHT)];

    [leftSnowbergBodyPath closePath];

    leftSnowbergBody.path = leftSnowbergBodyPath.CGPath;

    UIColor * snowColor = [UIColor colorWithDisplayP3Red:139.0 /255.0 green:92.0 /255.0 blue:0.0 /255.0 alpha:1.0];

    leftSnowbergBody.fillColor = snowColor.CGColor;

    [self.view.layer addSublayer:leftSnowbergBody];

    //  中间的山

    CAShapeLayer * middleSnowberg     = [[CAShapeLayer alloc] init];

    UIBezierPath * middleSnowbergPath = [[UIBezierPath alloc] init];

    //  把bezierpath的起点移动到雪山左下角。然后画一条线到山顶,再画一条线到右下角,闭合。

    CGPoint middleStartPoint = CGPointMake(k_SIZE.width / , k_LAND_BEGIN_HEIGHT);

    CGPoint middleTopPoint = CGPointMake(k_SIZE.width /, );

    CGPoint middleEndPoint = CGPointMake(k_SIZE.width / 1.2, k_LAND_BEGIN_HEIGHT);

    [middleSnowbergPath moveToPoint:middleStartPoint];

    [middleSnowbergPath addLineToPoint:middleTopPoint];

    [middleSnowbergPath addLineToPoint:middleEndPoint];

    [middleSnowbergPath closePath];

    middleSnowberg.path = middleSnowbergPath.CGPath;

    middleSnowberg.fillColor = [UIColor whiteColor].CGColor;

    [self.view.layer insertSublayer:middleSnowberg above:leftSnowbergBody];

    //  开始画山体没有被雪覆盖的部分

    CAShapeLayer * middleSnowbergBody     = [[CAShapeLayer alloc] init];

    UIBezierPath * middleSnowbergBodyPath = [[UIBezierPath alloc] init];

    //  把bezierpath的起点移动到雪山左下角相同的位置

    [middleSnowbergBodyPath moveToPoint:middleStartPoint];

    CGPoint middleFirstPathPoint = [self calculateWithXValue:(middleStartPoint.x + ) startPoint:middleStartPoint endpoint:middleTopPoint];

    [middleSnowbergBodyPath addLineToPoint:middleFirstPathPoint];

    [middleSnowbergBodyPath addLineToPoint:CGPointMake(middleFirstPathPoint.x + , middleFirstPathPoint.y)];

    [middleSnowbergBodyPath addLineToPoint:CGPointMake(middleFirstPathPoint.x + , middleFirstPathPoint.y + )];

    [middleSnowbergBodyPath addLineToPoint:CGPointMake(middleFirstPathPoint.x + , middleFirstPathPoint.y - )];

    [middleSnowbergBodyPath addLineToPoint:CGPointMake(middleFirstPathPoint.x + , middleFirstPathPoint.y + )];

    CGPoint middleSecondPathPoint = [self calculateWithXValue:(middleEndPoint.x - ) startPoint:middleTopPoint endpoint:middleEndPoint];

    [middleSnowbergBodyPath addLineToPoint:CGPointMake(middleSecondPathPoint.x - , middleSecondPathPoint.y)];

    [middleSnowbergBodyPath addLineToPoint:middleSecondPathPoint];

    [middleSnowbergBodyPath addLineToPoint:middleEndPoint];

    [middleSnowbergBodyPath closePath];

    middleSnowbergBody.path = middleSnowbergBodyPath.CGPath;

    UIColor * middleSnowColor = [UIColor colorWithDisplayP3Red:125.0 /255.0 green:87.0 /255.0 blue:7.0 /255.0 alpha:1.0];

    middleSnowbergBody.fillColor = middleSnowColor.CGColor;

    [self.view.layer insertSublayer:middleSnowbergBody above:middleSnowberg];

}

//根据起始点,算出指定的x在这条线段上对应的y。返回这个point。知道两点,根据两点坐标,求出两点连线的斜率。y=kx+b求出点坐标。

- (CGPoint)calculateWithXValue:(CGFloat)xvalue startPoint:(CGPoint)startPoint endpoint:(CGPoint)endpoint{

    //  求出两点连线的斜率

    CGFloat k = (endpoint.y - startPoint.y) / (endpoint.x - startPoint.x);

    CGFloat b = startPoint.y - startPoint.x * k;

    CGFloat yvalue = k * xvalue + b;

    return CGPointMake(xvalue, yvalue);

}

//初始化草坪

- (void)initLawn {

    CAShapeLayer * leftLawn     = [[CAShapeLayer alloc] init];

    UIBezierPath * leftLawnPath = [[UIBezierPath alloc] init];

    CGPoint leftStartPoint = CGPointMake(, k_LAND_BEGIN_HEIGHT);

    [leftLawnPath moveToPoint:leftStartPoint];

    [leftLawnPath addLineToPoint:CGPointMake(, k_SIZE.height - )];

    //  画一个二次贝塞尔曲线

    [leftLawnPath addQuadCurveToPoint:CGPointMake(k_SIZE.width / 3.0, k_LAND_BEGIN_HEIGHT) controlPoint:CGPointMake(k_SIZE.width / 5.0, k_SIZE.height - )];

    leftLawn.path = leftLawnPath.CGPath;

    leftLawn.fillColor = [UIColor colorWithDisplayP3Red:82.0 / 255.0 green:177.0 / 255.0 blue:52.0 / 255.0 alpha:1.0].CGColor;

    [self.view.layer addSublayer:leftLawn];

    CAShapeLayer * rightLawn     = [[CAShapeLayer alloc] init];

    UIBezierPath * rightLawnPath = [[UIBezierPath alloc] init];

    [rightLawnPath moveToPoint:leftStartPoint];

    //  画一个二次贝塞尔曲线

    [rightLawnPath addQuadCurveToPoint:CGPointMake(k_SIZE.width, k_SIZE.height - ) controlPoint:CGPointMake(k_SIZE.width / 2.0, k_SIZE.height - )];

    [rightLawnPath addLineToPoint:CGPointMake(k_SIZE.width, k_LAND_BEGIN_HEIGHT)];

    rightLawn.path = rightLawnPath.CGPath;

    rightLawn.fillColor = [UIColor colorWithDisplayP3Red:92.0/255.0 green:195.0/255.0 blue:52.0/255.0 alpha:1.0].CGColor;

    [self.view.layer insertSublayer:rightLawn above:leftLawn];

}

//初始化土地

- (void)initLand {

    _landLayer = [[CALayer alloc] init];

    _landLayer.frame = CGRectMake(, k_LAND_BEGIN_HEIGHT, k_SIZE.width, );

    _landLayer.backgroundColor = [UIColor colorWithPatternImage:[UIImage imageNamed:@"ground"]].CGColor;

    [self.view.layer addSublayer:_landLayer];

}

//初始化黄色轨道

- (void)initYellowTrack {

    _yellowTrack = [[CAShapeLayer alloc] init];

    _yellowTrack.lineWidth = ;

    _yellowTrack.strokeColor = [UIColor colorWithDisplayP3Red:210.0 / 255.0 green:179.0 / 255.0 blue:54.0 / 255.0 alpha:1.0].CGColor;

    UIBezierPath * trackPath = [[UIBezierPath alloc] init];

    //  画一个三次贝塞尔曲线 + 一个二次贝塞尔曲线

    //  左侧两个拐弯的三次贝塞尔曲线

    [trackPath moveToPoint:CGPointMake(, k_SIZE.height - )];

    [trackPath addCurveToPoint:CGPointMake(k_SIZE.width / 1.5, k_SIZE.height / 2.0 - ) controlPoint1:CGPointMake(k_SIZE.width / 6.0, k_SIZE.height - ) controlPoint2:CGPointMake(k_SIZE.width / 3.0, k_SIZE.height + )];

    //  右侧一个弯度的二次贝塞尔曲线

    [trackPath addQuadCurveToPoint:CGPointMake(k_SIZE.width + , k_SIZE.height / 3.0) controlPoint:CGPointMake(k_SIZE.width - , )];

    [trackPath addLineToPoint:CGPointMake(k_SIZE.width + , k_SIZE.height + )];

    [trackPath addLineToPoint:CGPointMake(, k_SIZE.height + )];

    _yellowTrack.fillColor = [UIColor colorWithPatternImage:[UIImage imageNamed:@"yellow"]].CGColor;

    _yellowTrack.path = trackPath.CGPath;

    [self.view.layer insertSublayer:_yellowTrack below:_landLayer];

    //  为了能够让弧线更好看一点,需要加入镂空的虚线

    CAShapeLayer * trackLine = [[CAShapeLayer alloc] init];

    trackLine.lineCap = kCALineCapRound;

    trackLine.strokeColor = [UIColor whiteColor].CGColor;

    trackLine.lineDashPattern = @[@1.0,@6.0];  //宽度,间距

    trackLine.lineWidth = 2.5;

    trackLine.fillColor = [UIColor clearColor].CGColor;

    trackLine.path = trackPath.CGPath;

    [_yellowTrack addSublayer:trackLine];

}

//  初始化绿色轨道

- (void)initGreenTrack {

    _greenTrack = [[CAShapeLayer alloc] init];

    _greenTrack.lineWidth = ;

    _greenTrack.strokeColor = [UIColor colorWithDisplayP3Red:0.0 / 255.0 green:147.0 / 255.0 blue:163.0 /255.0  alpha:1.0].CGColor;

    //  绿色铁轨的火车从右侧进入,所以从右侧开始绘画。需要画三条曲线,右边一条 + 中间的圆圈 + 左边一条

    UIBezierPath * path = [[UIBezierPath alloc] init];

    [path moveToPoint:CGPointMake(k_SIZE.width + , k_LAND_BEGIN_HEIGHT)];

    [path addLineToPoint:CGPointMake(k_SIZE.width + , k_SIZE.height - )];

    [path addQuadCurveToPoint:CGPointMake(k_SIZE.width / 1.5, k_SIZE.height - ) controlPoint:CGPointMake(k_SIZE.width - , )];

    //  画圆圈

    [path addArcWithCenter:CGPointMake(k_SIZE.width / 1.6, k_SIZE.height - ) radius: startAngle:M_PI_2 endAngle:2.5 * M_PI clockwise:YES];

    [path addCurveToPoint:CGPointMake(, k_SIZE.height - ) controlPoint1:CGPointMake(k_SIZE.width / 1.8 - , k_SIZE.height - ) controlPoint2:CGPointMake(, k_SIZE.height / 2.3)];

    [path addLineToPoint:CGPointMake(- , k_LAND_BEGIN_HEIGHT)];

    _greenTrack.path = path.CGPath;

    _greenTrack.fillColor = [UIColor colorWithPatternImage:[UIImage imageNamed:@"green"]].CGColor;

    [self.view.layer addSublayer:_greenTrack];

    //  为了能够让弧线更好看一点,需要加入镂空的虚线

    CAShapeLayer * trackLine = [[CAShapeLayer alloc] init];

    trackLine.lineCap = kCALineCapRound;

    trackLine.strokeColor = [UIColor whiteColor].CGColor;

    trackLine.lineDashPattern = @[@1.0,@6.0];

    trackLine.lineWidth = 2.5;

    trackLine.fillColor = [UIColor clearColor].CGColor;

    trackLine.path = path.CGPath;

    [_greenTrack addSublayer:trackLine];

}

//  添加点缀的小树

- (void)initTree {

    [self addTreesWithNumber: treeFrame:CGRectMake(, k_LAND_BEGIN_HEIGHT - , , )];

    [self addTreesWithNumber: treeFrame:CGRectMake(, k_LAND_BEGIN_HEIGHT - , , )];

    [self addTreesWithNumber: treeFrame:CGRectMake(, k_LAND_BEGIN_HEIGHT - , , )];

}

//  添加小树

- (void)addTreesWithNumber:(NSInteger)treesNumber treeFrame:(CGRect)frame {

    UIImage * tree = [UIImage imageNamed:@"tree"];

    for (NSInteger i = ; i < treesNumber + ; i++) {

        CALayer * treeLayer = [[CALayer alloc] init];

        treeLayer.contents = (__bridge id _Nullable)(tree.CGImage);

        treeLayer.frame = CGRectMake(k_SIZE.width -  * i * (arc4random_uniform() + ), frame.origin.y, frame.size.width, frame.size.height);

        [self.view.layer insertSublayer:treeLayer above:_greenTrack];

    }

}

//  云彩的动画

- (void)initCloudAnimation {

    CALayer * cloud = [[CALayer alloc]init];

    cloud.contents = (__bridge id _Nullable)([UIImage imageNamed:@"cloud"].CGImage);

    cloud.frame = CGRectMake(, , , );

    [self.view.layer addSublayer:cloud];

    UIBezierPath * cloudPath = [[UIBezierPath alloc] init];

    [cloudPath moveToPoint:CGPointMake(k_SIZE.width + , )];

    [cloudPath addLineToPoint:CGPointMake(- , )];

    CAKeyframeAnimation * ani = [CAKeyframeAnimation animationWithKeyPath:@"position"];

    ani.path = cloudPath.CGPath;

    ani.duration = ;

    ani.autoreverses = NO;

    ani.repeatCount = CGFLOAT_MAX;

    /*  kCAAnimationLinear calculationMode的默认值,表示当关键帧为座标点的时候,关键帧之间直接直线相连进行插值计算

     *  kCAAnimationDiscrete 离散的,就是不进行插值计算,所有关键帧直接逐个进行显示

     *  kCAAnimationPaced 使得动画均匀进行,而不是按keyTimes设置的或者按关键帧平分时间,此时keyTimes和timingFunctions无效

     *  kCAAnimationCubic 对关键帧为座标点的关键帧进行圆滑曲线相连后插值计算,对于曲线的形状还可以通过tensionValues,continuityValues,biasValues来进行调整自定义,这里的数学原理是Kochanek–Bartels spline,这里的主要目的是使得运行的轨迹变得圆滑;

     *  kCAAnimationCubicPaced 看这个名字就知道和kCAAnimationCubic有一定联系,其实就是在kCAAnimationCubic的基础上使得动画运行变得均匀,就是系统时间内运动的距离相同,此时keyTimes以及timingFunctions也是无效的.

     */

    ani.calculationMode = kCAAnimationPaced;

    [cloud addAnimation:ani forKey:@"position"];

}

//抽取过山车的动画

- (CAKeyframeAnimation *)carAnimationWith:(NSString *)carImageName TrackLayer:(CAShapeLayer *)track AnimationDuration:(CFTimeInterval)duration BeginTime:(CFTimeInterval)beginTime {

    CALayer * car = [[CALayer alloc] init];

    car.frame = CGRectMake(, , , );

    car.contents = (__bridge id _Nullable)([UIImage imageNamed:carImageName].CGImage);

    CAKeyframeAnimation * ani = [CAKeyframeAnimation animationWithKeyPath:@"position"];

    ani.path = track.path;

    ani.duration = duration;

    ani.beginTime = beginTime;

    ani.autoreverses = NO;

    ani.repeatCount = CGFLOAT_MAX;

    ani.calculationMode = kCAAnimationPaced;

    ani.rotationMode = kCAAnimationRotateAuto;

    [track addSublayer:car];

    [car addAnimation:ani forKey:@"carAni"];

    return ani;

}

- (void)didReceiveMemoryWarning {

    [super didReceiveMemoryWarning];

    // Dispose of any resources that can be recreated.

}

@end
CAShapeLayer(UIBezierPath)、CAGradientLayer绘制动态小车的更多相关文章
- C# 在PDF中绘制动态图章
我们知道,动态图章,因图章中的时间.日期可以动态的生成,因而具有较强的时效性.在本篇文章中将介绍通过C#编程在PDF中绘制动态图章的方法,该方法可自动获取当前系统登录用户名.日期及时间信息并生成图章. ...
- 用drawRect以及CAReplicatorLayer绘制动态水波纹
用drawRect以及CAReplicatorLayer绘制动态水波纹 大大简化了写水波纹效果的难度,你可以根据示例自己组装水波纹效果,本设计是几个工具组合在一起完成的效果, DrawRectObje ...
- [转载] MFC绘制动态曲线,用双缓冲绘图技术防闪烁
转载的原文地址 先上效果图 随着时间的推移,曲线向右平移,同时X轴的时间坐标跟着更新. 一.如何绘制动态曲线 所谓动画,都是一帧一帧的图像连续呈现在用户面前形成的.所以如果你掌握了如何绘制静态曲线,那 ...
- 【MFC】MFC绘制动态曲线,用双缓冲绘图技术防闪烁
摘自:http://zhy1987819.blog.163.com/blog/static/841427882011614103454335/ MFC绘制动态曲线,用双缓冲绘图技术防闪烁 2011 ...
- Achartengine.jar绘制动态图形-饼图
Achartengine.jar绘制动态图形一 --饼图 PS:我们在做安卓程序的时候,免不了会做一些图形,自己可以选择自定义view ,就是用Canvas画,也可以用写好的jar包,就是achart ...
- ASP.NET Core +Highchart+ajax绘制动态柱状图
一.项目介绍利用前端Highchart,以及ajax向后台获取数据,绘制动态柱状图.hightchart其他实例可查看官网文档.[Highchart](https://www.highcharts.c ...
- Matlab | 绘制动态曲线(使用 animatedline 对象)
效果如下: 示例代码: figure('Color','w'); h1 = animatedline; h1.Color = 'r'; h1.LineWidth = 1.0; h1.LineStyle ...
- CAShapeLayer和CAGradientLayer
两个动画效果来了解一下CALayer的两个重要的subClass,CAGradientLayer和CAShapeLayer. 微视录制视频的时候那个进度效果和Spark相机类似,但是个人还是比较喜欢S ...
- CAShapeLayer + UIBezierPath
UIBezierPath: UIBezierPath是在 UIKit 中的一个类,继承于NSObject,可以创建基于矢量的路径.使用此类可以定义常见的圆形.多边形等形状 .我们使用直线.弧(arc) ...
随机推荐
- css上传图片中等待不可点击效果
<!DOCTYPE html> <html> <head> <title>上传中</title> <style type=" ...
- List集合remove元素的问题
import java.util.*; public class object { public static void main(String[] args) { String str1 = new ...
- vim 命令图解
vim 命令,vim是一个很好的编辑工具,下面为大家介绍一下vim入门基本命令. 方法/步骤 1 [vim 命令-启动vimtutor]:执行命令:vimtutor.vimtutor是vim使用入 ...
- 【JavaScript】快速入门
摘抄地址快速入门 No1: JavaScript严格区分大小写 No2: JavaScript不区分整数和浮点数,统一用Number表示 NaN表示Not a Number,当无法计算结果时用NaN表 ...
- poj 1966(求点连通度,边连通度的一类方法)
题目链接:http://poj.org/problem?id=1966 思路:从网上找了一下大牛对于这类问题的总结:图的连通度问题是指:在图中删去部分元素(点或边),使得图中指定的两个点s和t不连通 ...
- Linux学习之RPM包管理-rpm命令管理(十六)
Linux学习之RPM包管理-rpm命令管理 目录 简介 RPM包依赖性 包全名与包名 rpm软件包安装 rpm软件包卸载 升级降级rpm软件包 rpm软件包的查询 rpm软件包校验 简介 RPM是R ...
- Springboot 1.5.x 集成基于Centos7的RabbitMQ集群安装及配置
RabbitMQ简介 RabbitMQ是实现了高级消息队列协议(AMQP)的开源消息代理软件(亦称面向消息的中间件). RabbitMQ是一套开源(MPL)的消息队列服务软件,是由LShift提供的一 ...
- php文件及文件夹操作(创建、删除、移动、复制)
<?php /** * 操纵文件类 * * 例子: * FileUtil::createDir('a/1/2/3'); 测试建立文件夹 建一个a/1/2/3文件夹 * FileUtil::cre ...
- 通用图片加载组件UniversalImageLoader
通用图片加载组件UniversalImageLoader UniversalImageLoader是一款通用图片加载组件.该组件支持多种图片来源,如网络.SD卡.Assets文件夹等.在网络请求的 ...
- BZOJ.5290.[AHOI/HNOI2018]道路(树形DP)
BZOJ LOJ 洛谷 老年退役选手,都写不出普及提高DP= = 在儿子那统计贡献,不是在父亲那统计啊!!!(这样的话不写这个提高DP写记忆化都能过= =) 然后就令\(f[x][a][b]\)表示在 ...