
一起学Spring之AOP
概述
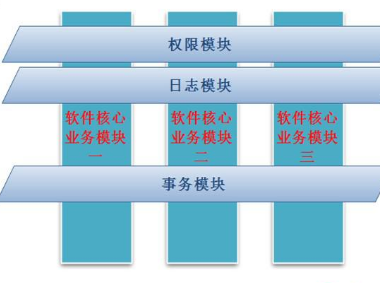
在软件开发中,我们重点关注的是业务逻辑代码,但在实际开发中,需要写的代码却不仅仅是业务逻辑,还需要处理记录日志,异常处理,事务控制等一些与业务无关的事情。而且这些代码也是服务端必须的,类似这样的代码分散在系统中的各个地方,如:几乎所有的重要操作方法前面都会加上日志记录代码,这样的代码写起来繁琐,又占用开发时间和精力,而且不容易维护。我们统一把这类代码成为【切面代码】,如何让我们从这些繁琐的工作中抽身而退,更加专注于业务逻辑,这就需要用到Spring的AOP技术。
AOP原理:将复杂的需求分解成不同的方面,将散落在系统中的公共功能集中解决,如下图所示:
通知(Advice)的分类
分类如下:
- 前置通知:在某个切入点之前执行的通知
- 后置通知:在某个切入点之后执行的通知
- 异常通知:在某个切入点出现异常时候的通知
- 环绕通知:包围某个切入点的通知,功能最强大
准备工作
AOP需要的jar包
除Spring必备的五个jar包外,还需要以下三个来支撑AOP:
- aopalliance-1.0.jar
- aspectjweaver-1.5.3.jar
- spring-aop-4.0.6.RELEASE.jar
定义一个接口和实现类
如下所示:
IStudentService接口 代码如下:
 package com.hex.second;

 /**

  * 学生服务接口

  * @author Administrator

  *

  */

 public interface IStudentService {

     /**

      * 新增学生

      * @param student

      */

     void addStudent(Student student);

     /**

      * 删除学生

      * @param id

      */

     void deleteStudent(int id);

     /**

      * 修改学生

      * @param id

      */

     void updateStudent(int id);

 }
StudentServiceImpl类 代码如下:
 package com.hex.second;

 /**

  * 学生服务事项类

  * @author Administrator

  *

  */

 public class StudentServiceImpl implements IStudentService {

     /**

      * 新增学生

      */

     public void addStudent(Student student) {

         // TODO Auto-generated method stub

         System.out.println("新增加学生。。。");

     }

     /**

      * 删除学生

      */

     @Override

     public void deleteStudent(int id) {

         // TODO Auto-generated method stub

         System.out.println("删除学生。。。");

     }

     /**

      * 修改学生

      */

     public void updateStudent(int id) {

         // TODO Auto-generated method stub

         System.out.println("修改学生");

         int i=1/0;

     }

 }
前置通知
1. 实现接口
前置通知类,需要实现【MethodBeforeAdvice】接口中的before方法,如下所示:
Method method 表示执行的目标方法
Object[] args 表示传入的参数数组
Object target 表示目标对象,即切入点所示的对象
 package com.hex.second;

 import java.lang.reflect.Method;

 import org.springframework.aop.MethodBeforeAdvice;

 public class LogBefore implements MethodBeforeAdvice {

     /***

      * 前置通知

      * method:表示调用的方法,即切入点

      * args:表示调用方法的参数

      * target:表示方法所在的目标对象

      */

     @Override

     public void before(Method method, Object[] args, Object target) throws Throwable {

         // TODO Auto-generated method stub

         System.out.println("前置通知。。。");

         System.out.println("method="+method+",args数量="+args.length+",target="+target);

     }

 }
2. 配置applicationContext.xml文件
如果要支持AOP,需要引入命名空间,如下所示:
 <?xml version="1.0" encoding="UTF-8"?>

 <beans xmlns="http://www.springframework.org/schema/beans"

 xmlns:xsi="http://www.w3.org/2001/XMLSchema-instance"

 xmlns:p="http://www.springframework.org/schema/p"

 xmlns:aop="http://www.springframework.org/schema/aop"

 xsi:schemaLocation="http://www.springframework.org/schema/beans

  http://www.springframework.org/schema/beans/spring-beans.xsd

  http://www.springframework.org/schema/aop

  http://www.springframework.org/schema/aop/spring-aop.xsd">
3. 配置两个类对应的bean
 <!-- 服务类 -->

 <bean id="studentService" class="com.hex.second.StudentServiceImpl"></bean>

 <!-- 前置通知类 -->

 <bean id="logBefore" class="com.hex.second.LogBefore"></bean>
4. 配置AOP
通过AOP配置,将通知类和业务逻辑类进行关联,说明如下:
一个配置文件中,可以有多个<aop:config>配置,每一个aop:config中只能有一个aop:pointcut配置,如果有多个切入点需要配置expression,且切入点必须是全路径配置。如下所示:
<!-- 将addStudent和通知进行关联 -->

<aop:config>

     <!-- 每一个config只有一个poingcut,如果有多个,则需要配置多个config -->

     <!-- 配置切入点  id自定义,expression表示切入点的函数名-->

     <aop:pointcut expression="execution(public void com.hex.second.StudentServiceImpl.addStudent(com.hex.second.Student))" id="pc"/>

     <!-- 配置通知 -->

     <aop:advisor advice-ref="logBefore" pointcut-ref="pc"/>

</aop:config>
后置通知
1. 实现接口
需要实现【AfterReturningAdvice】接口【afterReturning】方法中的 如下所示:
 package com.hex.second;

 import java.lang.reflect.Method;

 import org.springframework.aop.AfterReturningAdvice;

 /**

  * 通过实现接口将普通类变成后置通知

  * @author Administrator

  *

  */

 public class LogAfter implements AfterReturningAdvice {

     /**

      * 后置通知实现类

      * returnValue:返回值

      * method:表示调用的方法,即切入点

      * args:表示调用方法的参数

      * target:表示方法所在的目标对象

      */

     @Override

     public void afterReturning(Object returnValue, Method method, Object[] args, Object target) throws Throwable {

         // TODO Auto-generated method stub

         System.out.println("后置通知。。。");

         System.out.println("returnValue="+returnValue+",method="+method+",args数量="+args.length+",target="+target);

     }

 }
2. 配置切入点和通知的Bean
 <bean id="studentService" class="com.hex.second.StudentServiceImpl"></bean>

 <bean id="logAfter" class="com.hex.second.LogAfter"></bean>
3. AOP配置
如果前置通知和后置通知为同一个切入点,则可以配置在一个aop:config节点中,如下所示:
多个切入点用or连接,多个通知就配置多个aop:advisor
 <!-- 将addStudent和通知进行关联 -->

 <aop:config>

      <!-- 每一个config只有一个poingcut,如果有多个,则需要配置多个config -->

      <!-- 配置切入点  id自定义,expression表示切入点的函数名-->

      <aop:pointcut expression="execution(public void com.hex.second.StudentServiceImpl.deleteStudent(int)) or execution(public void com.hex.second.StudentServiceImpl.addStudent(com.hex.second.Student))" id="pc"/>

      <!-- 配置通知 -->

      <aop:advisor advice-ref="logBefore" pointcut-ref="pc"/>

      <aop:advisor advice-ref="logAfter" pointcut-ref="pc"/>

 </aop:config>
异常通知
1. 实现接口
异常通知是有异常发生时,才会触发的通知,需要实现【ThrowsAdvice】接口,且此接口没有需要实现的方法,但同时给出了约定:
必须以固定格式实现方法:public void afterThrowing([Method, args, target], ThrowableSubclass);
 package com.hex.second;

 import java.lang.reflect.Method;

 import org.springframework.aop.ThrowsAdvice;

 /**

  * 异常通知

  * @author Administrator

  *

  */

 public class LogException implements ThrowsAdvice {

     /**

      * 异常通知执行

      * @param method 切入点

      * @param args 参数个数

      * @param target 调用目标对象

      * @param ex 异常

      */

     public void afterThrowing(Method method, Object[] args, Object target, Exception ex){

         System.out.println("异常通知。。。");

         System.out.println("method="+method+",args数量="+args.length+",target="+target+",ex="+ex);

     }

 }
2. 配置Bean类
 <!-- 服务类 -->

 <bean id="studentService" class="com.hex.second.StudentServiceImpl"></bean>

 <bean id="logException" class="com.hex.second.LogException"></bean>
3. 配置AOP
如下所示:参数只需要写参数类型即可,不需要写参数名称
 <!-- 可以配置aop:config -->

 <aop:config>

         <aop:pointcut expression="execution(public void com.hex.second.StudentServiceImpl.updateStudent(int))" id="pc1"/>

      <!-- 配置通知 -->

      <aop:advisor advice-ref="logException" pointcut-ref="pc1"/>

 </aop:config>
环绕通知
1. 实现接口
环绕通知,需要实现【MethodInterceptor】接口并实现【invoke】方法,其中obj = invocation.proceed();表示调用目标方法,如果不写此句,则目标方法不会被调用。如下所示:
 package com.hex.second;

 import org.aopalliance.intercept.MethodInterceptor;

 import org.aopalliance.intercept.MethodInvocation;

 /**

  * 环绕通知

  * 环绕通知的本质上是一个拦截器

  * @author Administrator

  *

  */

 public class LogAround implements MethodInterceptor {

     /**

      *

      */

     @Override

     public Object invoke(MethodInvocation invocation) throws Throwable {

         Object obj = null;

         try {

             // 前置通知

             System.out.println("环绕实现前置通知。。。");

             System.out.println("环绕通知:target="+invocation.getThis()+",method="+invocation.getMethod().getName()+",args="+invocation.getArguments().length);

             // 控制目标方法的执行 obj表示目标方法的返回值,表示执行addStudent(student)方法

             //此方法控制目标方法的执行,如果不写此方法,则目标方法不会执行,此方法前的是前置通知,此方法后的是后置通知

             obj = invocation.proceed();

             // 后置通知

             System.out.println("环绕实现后置通知。。。");

         } catch (Exception e) {

             // 异常通知

             System.out.println("环绕实现异常通知。。。");

             throw e;

         }

         // TODO Auto-generated method stub

         return obj;

     }

 }
2. 配置Bean
 <!-- 服务类 -->

 <bean id="studentService" class="com.hex.second.StudentServiceImpl"></bean>

 <bean id="logAround" class="com.hex.second.LogAround"</bean>
3. 配置AOP
所有配置切入点通知的方式都是一样的。如下所示:
 <aop:config>

      <aop:pointcut expression="execution(public void com.hex.second.StudentServiceImpl.addStudent(com.hex.second.Student))" id="pc2"/>

      <aop:advisor advice-ref="logAround" pointcut-ref="pc2"/>

 </aop:config>
所有的调用方式是一致的,不需要调用通知类,系统会自动调用,如下所示:
 package com.hex.second;

 import org.springframework.context.ApplicationContext;

 import org.springframework.context.support.ClassPathXmlApplicationContext;

 public class TestMain {

     public static void main(String[] args) {

         // TODO Auto-generated method stub

         //通过Spring进行注入,Spring上下文对象

         ApplicationContext context=new ClassPathXmlApplicationContext("applicationContext.xml");

         IStudentService studentService=(IStudentService)context.getBean("studentService");

         Student student =new Student();

         studentService.addStudent(student);

         //studentService.deleteStudent(1);

         //studentService.updateStudent(0);

     }

 }
备注
合抱之木,生于毫末;九层之台,起于累土;千里之行,始于足下。
一起学Spring之AOP的更多相关文章
- Spring学习笔记(二)Spring基础AOP、IOC
Spring AOP 1. 代理模式 1.1. 静态代理 程序中经常需要为某些动作或事件作下记录,以便在事后检测或作为排错的依据,先看一个简单的例子: import java.util.logging ...
- 57. Spring 自定义properties升级篇【从零开始学Spring Boot】
之前在两篇文章中都有简单介绍或者提到过 自定义属性的用法: 25.Spring Boot使用自定义的properties[从零开始学Spring Boot] 51. spring boot属性文件之多 ...
- 学习spring1--跟我一起学Spring 3(2)–开发环境配置
http://www.importnew.com/13185.html#spring 首页 所有文章 资讯 Web 架构 基础技术 书籍 教程 我要投稿 更多频道 » - 导航条 - 首页 所 ...
- 17、Spring Boot普通类调用bean【从零开始学Spring Boot】
转载:http://blog.csdn.net/linxingliang/article/details/52013017 我们知道如果我们要在一个类使用spring提供的bean对象,我们需要把这个 ...
- 21. Spring Boot过滤器、监听器【从零开始学Spring Boot】
转载:http://blog.csdn.net/linxingliang/article/details/52069490 上一篇文章已经对定义Servlet 的方法进行了说明,过滤器(Filter) ...
- 81. Spring Boot集成JSP疑问【从零开始学Spring Boot】
[原创文章,转载请注明出处] 针对文章: ()Spring Boot 添加JSP支持[从零开始学Spring Boot] 有网友提了这么一些疑问: 1.Spring Boot使用jsp时,仍旧可以打成 ...
- 78. Spring Boot完美使用FastJson解析JSON数据【从零开始学Spring Boot】
[原创文章,转载请注明出处] 个人使用比较习惯的json框架是fastjson,所以spring boot默认的json使用起来就很陌生了,所以很自然我就想我能不能使用fastjson进行json解析 ...
- 77. Spring Boot Use Thymeleaf 3【从零开始学Spring Boot】
[原创文章,转载请注明出处] Spring Boot默认选择的Thymeleaf是2.0版本的,那么如果我们就想要使用3.0版本或者说指定版本呢,那么怎么操作呢?在这里要说明下 3.0的配置在spri ...
- 75. Spring Boot 定制URL匹配规则【从零开始学Spring Boot】
在之前有一篇文章说了,博客名称从原来的<从零开始学Spring Boot>更改为<Spring Boot常见异常汇总>,后来写了几篇文章之后发展,有些文章还是一些知识点,所以后 ...
随机推荐
- PHP安全之道3:常见漏洞和攻防
第一篇 SQL注入 安全配置和编程安全并不是万全之法,攻击者往往可以通过对漏洞的试探找到新的突破口,甚至0days. 下面总结以下常见漏洞,在日常开发维护工作中可以留意. *聊聊老朋友:SQL注入漏洞 ...
- mysql5.7 gruop by报错this is incompatible with sql_mode=only_full_group_by
解析:在mysql 工具 搜索或者插入数据时报下面错误: ERROR 1055 (42000): Expression #1 of SELECT list is not in GROUP BY cla ...
- linux中RabbitMQ安装教程
linux中RabbitMQ安装教程 在做一个微服务项目时候用到消息队列,于是深入了解了消息队列知识,并在linux上安装了Rabbitmq,本博客介绍Rabbitmq的安装教程,想要深入了解消息队列 ...
- Golang中的布隆过滤器
目录 1. 布隆过滤器的概念 2. 布隆过滤器应用场景 3. 布隆过滤器工作原理 4. 布隆过滤器的优缺点 5. 布隆过滤器注意事项 6. Go实现布隆过滤器 1. 布隆过滤器的概念 布隆过滤器(Bl ...
- luogu P3111 [USACO14DEC]牛慢跑Cow Jog_Sliver |贪心+模拟
有N (1 <= N <= 100,000)头奶牛在一个单人的超长跑道上慢跑,每头牛的起点位置都不同.由于是单人跑道,所有他们之间不能相互超越.当一头速度快的奶牛追上另外一头奶牛的时候,他 ...
- 学习go第一天-编写第一个go程序
开发环境构建 GOPATH 在1.8版本前必须设置这个环境变量 1.8以及更高版本如果没有设置,则使用默认值在Mac上GOPATH可以通过修改 -/.bash_profile来设置 程序基本结构 pa ...
- Vue&Cesium&Ribbon界面: 将桌面GIS搬进浏览器
上一篇文章在这里:vue集成cesium,webgis平台第一步 把界面改了一下,开始实际填充功能. Ribbon是一种以面板及标签页为架构的用户界面(User Interface),原先出现在Mic ...
- Node笔记 - process.cwd() 和 __dirname 的区别
process.cwd() 返回工作目录 __dirname 返回脚本所在的目录位置 单看概念觉得都差不多,有种似懂非懂的感觉,那么接下用一个简单易懂的例子来理解下这两者的区别,在此之前先看一个方法 ...
- Mysql多实例数据库
什么是Mysql的多实例? 简单的说,Mysql多实例就是一台服务器上同时开启多个不同的服务端口(如3306.3307)同时运行多个Mysql服务进程,这些服务进程通过不同socket监听不同的服务端 ...
- 167. 两数之和 II - 输入有序数组
给定一个已按照升序排列的有序数组,找到两个数使得它们相加之和等于目标数. 函数应该返回这两个下标值 index1 和 index2,其中 index1 必须小于 index2. 说明: 返回的下标值( ...