OpenDaylight开发hello-world项目之功能实现
OpenDaylight开发hello-world项目之开发环境搭建
OpenDaylight开发hello-world项目之开发工具安装
OpenDaylight开发hello-world项目之代码框架搭建
OpenDaylight开发hello-world项目之功能实现
来到最后的功能实现的步骤,功能实现其实很简单,添加一个yang文件,编译,添加接口实现代码,编译,ok,搞定收工。
yang文件编写
yang文件简单理解为是定义接口和传入参数的文件,在hello world项目中定了一个接口叫hello-world,需要传入的参数是:input标签中的name变量,类型为string,输出的信息为outpu标签中定义的greeting变量,类型也是string。

module example {

    yang-version 1;

    namespace "urn:opendaylight:params:xml:ns:yang:example";

    prefix "example";

    revision "2015-01-05" {

        description "Initial revision of example model";

    }

    rpc hello-world {

        input {

            leaf name {

                type string;

            }

        }

        output {

            leaf greeting {

                type string;

            }

        }

    }

}
定义好yang文件之后编译,odl的框架会自动生成很多代码,包括rpc中函数的定义,文件的引用等。
mvn clean install -DskipTests -Dmaven.javadoc.skip=true -Dcheckstyle.skip=true
[INFO]

[INFO] --- maven-site-plugin:3.6:attach-descriptor (generate-site) @ example-aggregator ---

[INFO] Attaching 'src/site/site.xml' site descriptor with classifier 'site'.

[INFO] ------------------------------------------------------------------------

[INFO] Reactor Summary:

[INFO]

[INFO] ODL :: org.opendaylight.example :: example-api ..... SUCCESS [ 30.916 s]

[INFO] ODL :: org.opendaylight.example :: example-impl .... SUCCESS [ 4.513 s]

[INFO] ODL :: org.opendaylight.example :: example-cli ..... SUCCESS [ 4.574 s]

[INFO] ODL :: org.opendaylight.example :: example-features SUCCESS [ 20.799 s]

[INFO] ODL :: org.opendaylight.example :: example-karaf ... SUCCESS [01:16 min]

[INFO] ODL :: org.opendaylight.example :: example-artifacts SUCCESS [ 5.072 s]

[INFO] ODL :: org.opendaylight.example :: example-it ...... SUCCESS [ 7.690 s]

[INFO] example ............................................ SUCCESS [ 14.771 s]

[INFO] ------------------------------------------------------------------------

[INFO] BUILD SUCCESS

[INFO] ------------------------------------------------------------------------

[INFO] Total time: 02:53 min

[INFO] Finished at: 2019-09-12T17:02:48+08:00

[INFO] Final Memory: 209M/483M

[INFO] ------------------------------------------------------------------------
hello world 函数
编译顺利完成之后,首先将该RPC注册到系统当中去。编写impl-blueprint.xml文件,注册ExampleProvider。

<?xml version="1.0" encoding="UTF-8"?>

<!-- vi: set et smarttab sw=4 tabstop=4: -->

<!--

Copyright © 2017 worker and others. All rights reserved.

This program and the accompanying materials are made available under the

terms of the Eclipse Public License v1.0 which accompanies this distribution,

and is available at http://www.eclipse.org/legal/epl-v10.html

-->

<blueprint xmlns="http://www.osgi.org/xmlns/blueprint/v1.0.0"

  xmlns:odl="http://opendaylight.org/xmlns/blueprint/v1.0.0"

  odl:use-default-for-reference-types="true">

  <bean id="provider"

    class="org.opendaylight.example.impl.ExampleProvider">

  </bean>

  <odl:rpc-implementation ref="provider"/>

</blueprint>
注册好函数之后,最后实现RPC的处理函数。获取input输入的内容,然后返回 ‘hello’ + input的内容。

package org.opendaylight.example.impl;

import org.opendaylight.yang.gen.v1.urn.opendaylight.params.xml.ns.yang.example.rev150105.ExampleService;

import org.opendaylight.yang.gen.v1.urn.opendaylight.params.xml.ns.yang.example.rev150105.HelloWorldInput;

import org.opendaylight.yang.gen.v1.urn.opendaylight.params.xml.ns.yang.example.rev150105.HelloWorldOutput;

import org.opendaylight.yang.gen.v1.urn.opendaylight.params.xml.ns.yang.example.rev150105.HelloWorldOutputBuilder;

import org.opendaylight.yangtools.yang.common.RpcResult;

import org.opendaylight.yangtools.yang.common.RpcResultBuilder;

import java.util.concurrent.Future;

public class ExampleProvider implements ExampleService {

    @Override

    public Future<RpcResult<HelloWorldOutput>> helloWorld(HelloWorldInput input) {

        HelloWorldOutputBuilder helloBuilder = new HelloWorldOutputBuilder();

        helloBuilder.setGreeting("Hello " + input.getName());

        return RpcResultBuilder.success(helloBuilder.build()).buildFuture();

    }

}
编译文件
mvn clean install -DskipTests -Dmaven.javadoc.skip=true -Dcheckstyle.skip=true
[INFO] --- maven-site-plugin:3.6:attach-descriptor (generate-site) @ example-aggregator ---

[INFO] Attaching 'src/site/site.xml' site descriptor with classifier 'site'.

[INFO] ------------------------------------------------------------------------

[INFO] Reactor Summary:

[INFO]

[INFO] ODL :: org.opendaylight.example :: example-api ..... SUCCESS [ 35.665 s]

[INFO] ODL :: org.opendaylight.example :: example-impl .... SUCCESS [  5.435 s]

[INFO] ODL :: org.opendaylight.example :: example-cli ..... SUCCESS [  4.453 s]

[INFO] ODL :: org.opendaylight.example :: example-features  SUCCESS [ 26.418 s]

[INFO] ODL :: org.opendaylight.example :: example-karaf ... SUCCESS [: min]

[INFO] ODL :: org.opendaylight.example :: example-artifacts SUCCESS [  5.602 s]

[INFO] ODL :: org.opendaylight.example :: example-it ...... SUCCESS [ 18.424 s]

[INFO] example ............................................ SUCCESS [ 22.318 s]

[INFO] ------------------------------------------------------------------------

[INFO] BUILD SUCCESS

[INFO] ------------------------------------------------------------------------

[INFO] Total time: : min

[INFO] Finished at: --04T17::+:

[INFO] Final Memory: 207M/483M

[INFO] ------------------------------------------------------------------------
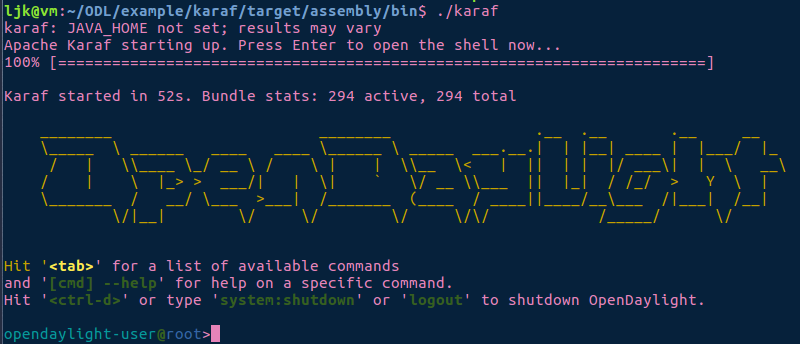
启动ODL
编译通过之后,在karaf文件夹下启动ODL,hello-world模块生效。

查看ODL的api文档
当启动ODL之后,可以查看该ODL所有的api文档,在浏览器中输入 地址:http://localhost:8181/apidoc/explorer/index.html,从中能够找新鲜出炉的example模块。
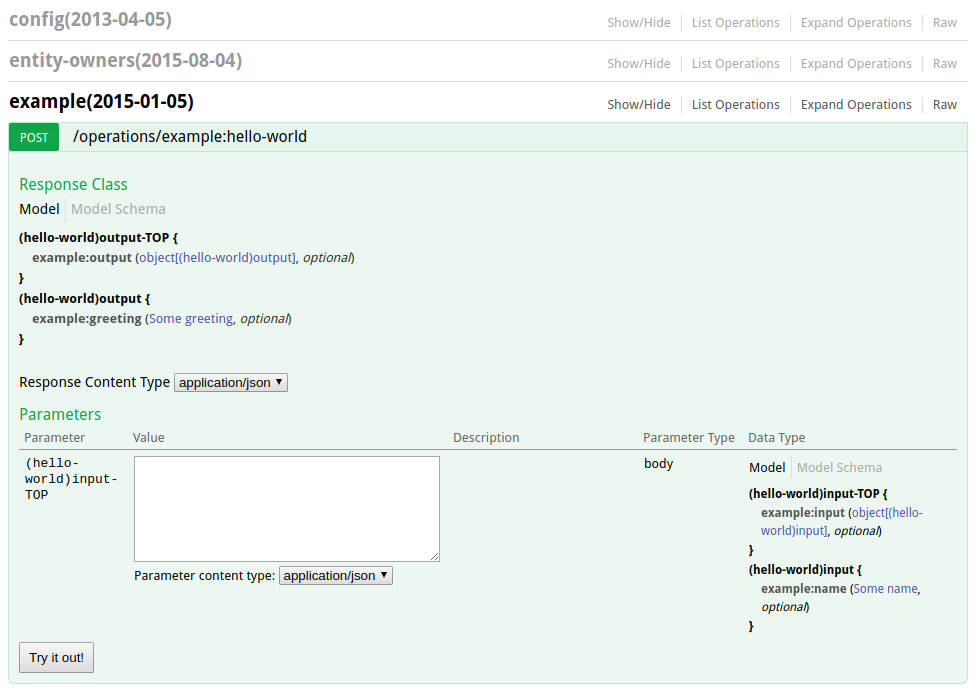
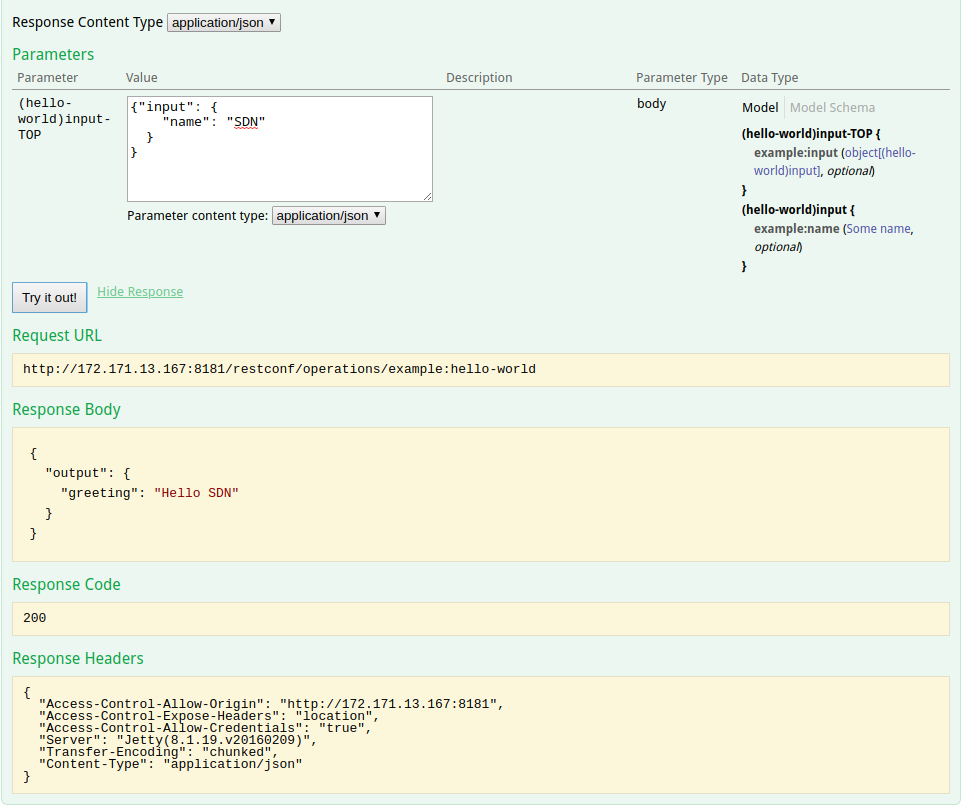
测试接口
在这个api文档中,可以直接测试接口的可用性,按照输入的格式将内容输入,然后try it out!
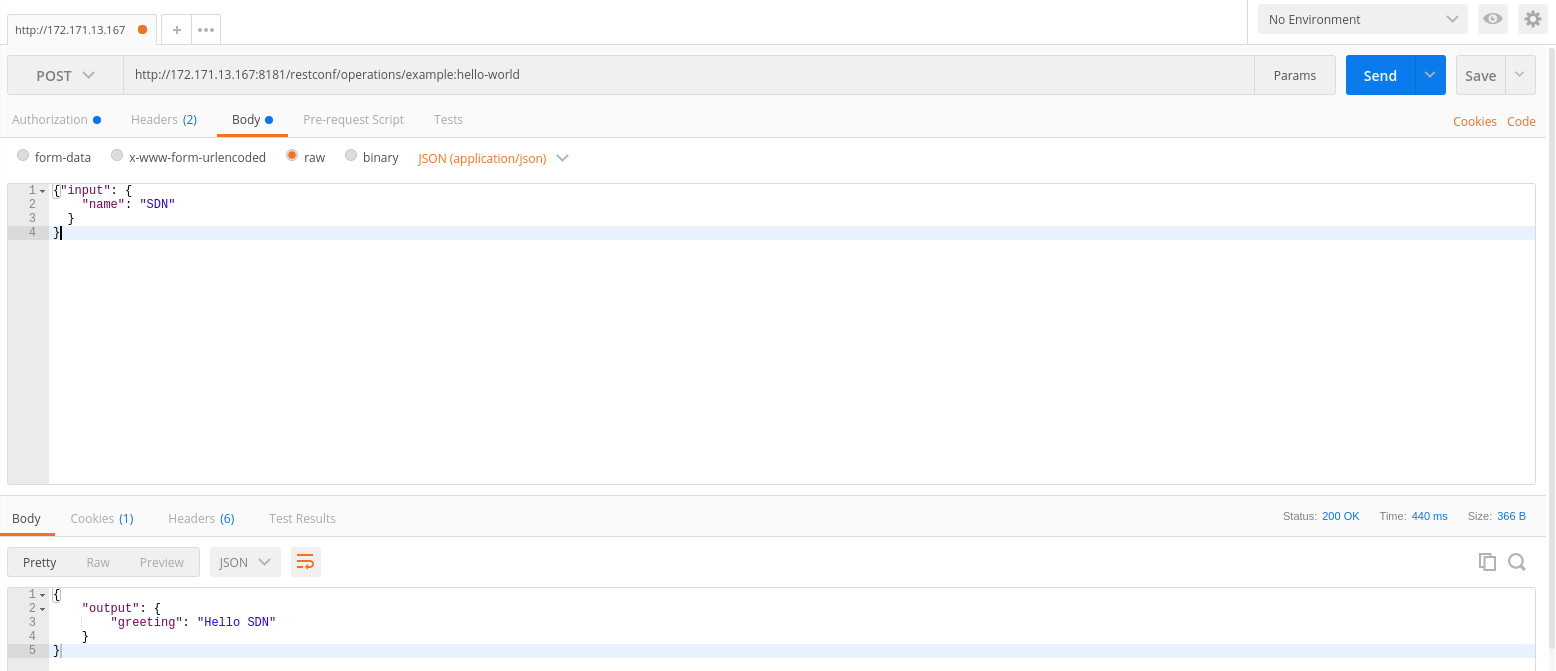
使用Postman测试接口
postman是最常见的测试工具,输入restful api的地址,请求方法,body体,认证方式,然后send。
ODL hello-world模块的学习重点不是功能实现,而是ODL开发模块的过程和套路,其中很多深入的内容并没有介绍全面,主要的注意力还是放在流程上,如何安装环境,构建框架代码,编译,实现功能代码等。
OpenDaylight开发hello-world项目之功能实现的更多相关文章
- OpenDaylight开发hello-world项目之代码框架搭建
OpenDaylight开发hello-world项目之开发环境搭建 OpenDaylight开发hello-world项目之开发工具安装 OpenDaylight开发hello-world项目之代码 ...
- OpenDaylight开发hello-world项目之开发环境搭建
OpenDaylight开发hello-world项目之开发环境搭建 OpenDaylight开发hello-world项目之开发工具安装 OpenDaylight开发hello-world项目之代码 ...
- OpenDaylight开发hello-world项目之开发工具安装
OpenDaylight开发hello-world项目之开发环境搭建 OpenDaylight开发hello-world项目之开发工具安装 OpenDaylight开发hello-world项目之代码 ...
- 基于.NetCore开发博客项目 StarBlog - (13) 加入友情链接功能
系列文章 基于.NetCore开发博客项目 StarBlog - (1) 为什么需要自己写一个博客? 基于.NetCore开发博客项目 StarBlog - (2) 环境准备和创建项目 基于.NetC ...
- 基于.NetCore开发博客项目 StarBlog - (14) 实现主题切换功能
系列文章 基于.NetCore开发博客项目 StarBlog - (1) 为什么需要自己写一个博客? 基于.NetCore开发博客项目 StarBlog - (2) 环境准备和创建项目 基于.NetC ...
- 基于.NetCore开发博客项目 StarBlog - (16) 一些新功能 (监控/统计/配置/初始化)
系列文章 基于.NetCore开发博客项目 StarBlog - (1) 为什么需要自己写一个博客? 基于.NetCore开发博客项目 StarBlog - (2) 环境准备和创建项目 基于.NetC ...
- MVC5 网站开发之三 数据存储层功能实现
数据存储层在项目Ninesky.DataLibrary中实现,整个项目只有一个类Repository. 目录 奔跑吧,代码小哥! MVC5网站开发之一 总体概述 MVC5 网站开发之二 创建项目 ...
- ASP.NET MVC5 网站开发实践(一) - 项目框架
前几天算是开题了,关于怎么做自己想了很多,但毕竟没做过项目既不知道这些想法有无必要,也不知道能不能实现,不过邓爷爷说过"摸着石头过河"吧.这段时间看了一些博主的文章收获很大,特别是 ...
- [ASP.NET MVC] 使用CLK.AspNet.Identity提供依权限显示选单项目的功能
[ASP.NET MVC] 使用CLK.AspNet.Identity提供依权限显示选单项目的功能 CLK.AspNet.Identity CLK.AspNet.Identity是一个基于ASP.NE ...
随机推荐
- JS---DOM---part3课程介绍和part2复习
part3课程介绍 节点 为什么要学节点 节点的操作的相关属性------>作用 12行代码----有用的----熟练的问题, 节点的案例 元素的创建三种方式------重点的内容 为什 ...
- iOS中截取字符串指定位置
直接上代码: NSString *string = @"今天是个好日子,忘记穿秋裤了"; NSString *string1 = [];//截取掉下标7之后的字符串 NSStrin ...
- InnoDB On-Disk Structures(一)-- Tables (转载)
转载.节选于https://dev.mysql.com/doc/refman/8.0/en/innodb-tables.html 1.InnoDB Architecture The following ...
- angularjs路由监听,uirouter感知路由变化,解决uirouter路由监听不生效的问题
壹 ❀ 引 angularjs除了惊为天人的双向数据绑定外,路由也是出彩的一笔,通过路由配置,我们能在不发起页面跳转的情况下,对当前页内容进行整体更新,angularjs提供了ngRoute模块用于 ...
- 由异常:Repeated column in mapping for entity/should be mapped with insert="false" update="false 引发对jpa关联的思考
由异常:Repeated column in mapping for entity/should be mapped with insert="false" update=&quo ...
- 损失函数--KL散度与交叉熵
损失函数 在逻辑回归建立过程中,我们需要一个关于模型参数的可导函数,并且它能够以某种方式衡量模型的效果.这种函数称为损失函数(loss function). 损失函数越小,则模型的预测效果越优.所以我 ...
- JQuery Ztree 树插件配置与应用小结
JQuery Ztree 树插件配置与应用小结 by:授客 QQ:1033553122 测试环境 Win7 jquery-3.2.1.min.js 下载地址: https://gitee.com/is ...
- for循环使用element的折叠面板遇到的问题-1
首先,效果是点击添加折叠面板,折叠面板的title右侧是关闭的小按钮,每次添加的面板都自动展开,其他的面板自动关闭,但其中发现一个问题是,每次点击关闭的时候,虽然上一个面板被关闭了,但他的下一个会自动 ...
- Vue.js+vue-element搭建属于自己的后台管理模板:创建一个项目(四)
Vue.js+vue-element搭建属于自己的后台管理模板:创建一个项目(四) 前言 本章主要讲解通过Vue CLI 脚手架构建工具创建一个项目,在学习Vue CLI之前我们需要先了解下webpa ...
- 2018最新cocoapods详细安装和使用
1查看当前终端里存在的源 终端输入:$ gem sources -l2移除淘宝镜像 $ gem sources --remove https://rubygems.org/ 3装上目前能用的源 终端输 ...