使用JFlex生成词法分析器 1:安装配置
环境:Windows 10
STEP 1: 下载 JFlex 文件,我选择的是 jflex-1.7.0.zip。下载完成后解压到想安装的位置。
文件结构如下(假设解压目录为 C:\):
C:\jflex-1.7.0\
+--bin\ (start scripts)
+--doc\ (FAQ and manual)
+--examples\
+--byaccj\ (calculator example for BYacc/J)
+--cup-maven\ (calculator example for cup and maven)
+--interpreter\ (interpreter example for cup)
+--java\ (Java lexer specification)
+--simple-maven\ (example scanner built with maven)
+--standalone-maven\ (a simple standalone scanner,
built with maven)
+--zero-reader\ (Readers that return 0 characters)
+--lib\ (precompiled classes)
+--src\
+--main\
+--config\ (PMD source analyzer configuration)
+--cup\ (JFlex parser spec)
+--java\
+--jflex\ (source code of JFlex)
+--anttask\ (source code of JFlex Ant Task)
+--gui\ (source code of JFlex UI classes)
+--unicode\ (source code for Unicode properties)
+--jflex\ (JFlex scanner spec)
+--resources\ (messages and default skeleton file)
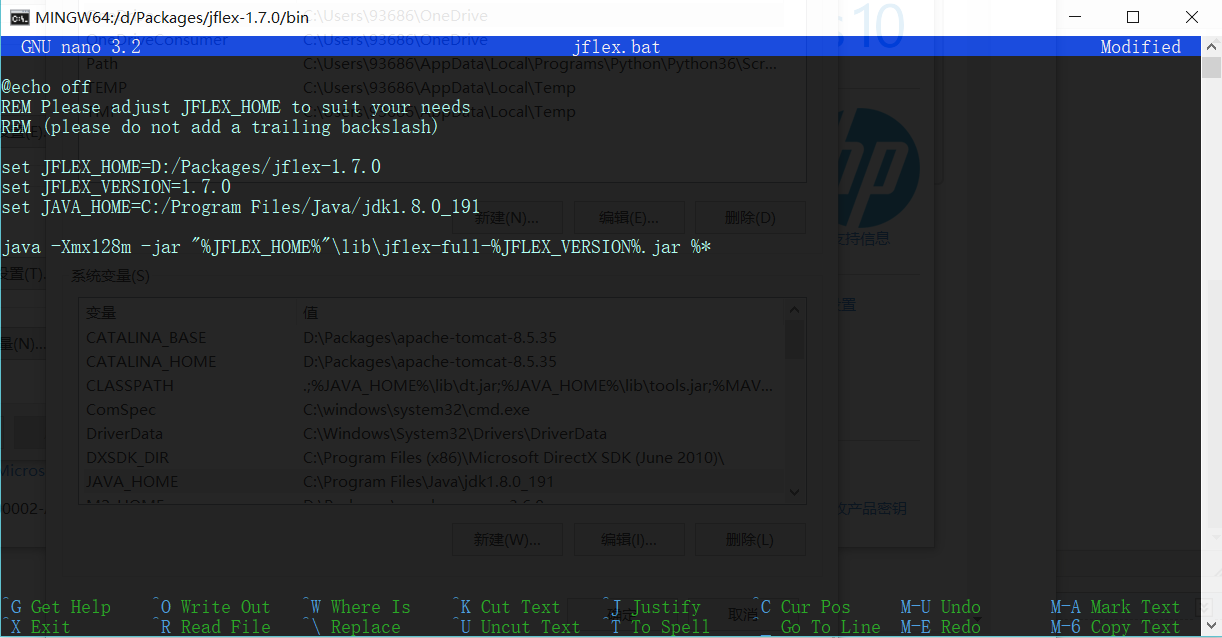
+--test\ (unit tests)STEP 2:修改 jflex.bat
1)进入 jflex解压目录/jflex-1.7.0/bin,打开jflex.bat
2)修改两个环境变量:
JAVA_HOME :Java JDK 的安装路径
JFLEX_HOME :JFlex 的安装路径
**由于直接打开 jflex.bat 会闪退,我是在 gitbash 中用 nano 编辑的。
STEP 3:将 jflex解压目录/jflex-1.7.0/bin 加入系统环境变量 Path
STEP 4:运行 jflex 检查是否配置成功(依旧用的是 gitbash)
文档说,命令格式为jflex <options> <inputfiles> (如果不在命令行输入文件名,jflex会有一个弹出一个输入文件名的窗口)
这里是所有选项的说明:
-d <directory> 在指定目录<directory>生成文件
--encoding <name> 使用<name>格式的编码读入此法规范并书写 java 文件
--skel <file> 使用外部骨架<file>
--nomin 在扫描生成时跳过 DFA 最小化的步骤
--jflex 执行 JLex 解释规范
--dot 为 NFA, DFA, minimised DFA 生成 Graphviz dot 文件
--dump 显示 NFA, initial DFA, minimised DFA 的转换表
--legacydot 元字符 dot (.) 匹配 [^\n] 而非 [^\n\r\u000B\u000C\u0085\u2028\u2029]
--verbose or -v 显示生成进度消息(默认开启)
--quiet or -q 只显示错误信息
--warn-unused 警告未使用的宏(在 verbose 模式中默认开启,quiet 模式中默认关闭)
--no-warn-unused 不警告未使用的宏
--time 显示代码生成进度的时间信息
--version 打印版本信息
--info 打印系统与 jdk 信息
--unicodever <ver> 打印所有 Unicode 版本<ver>支持的属性
--help or -h 打印帮助信息
按照习俗,跑跑看 jflex --version:

GOOD JOB!
接下来运行一个手册提供的简单例子
这段 lexical specitication 描述了 Java 语言的部分规则,从手册复制下来的时候每行会多出四个空格,要手动去掉。保存在 test.flex 文件中。
%%

%class Lexer

%unicode

%cup

%line

%column

%{

  StringBuffer string = new StringBuffer();

  private Symbol symbol(int type) {

    return new Symbol(type, yyline, yycolumn);

  }

  private Symbol symbol(int type, Object value) {

    return new Symbol(type, yyline, yycolumn, value);

  }

%}

LineTerminator = \r|\n|\r\n

InputCharacter = [^\r\n]

WhiteSpace     = {LineTerminator} | [ \t\f]

/* comments */

Comment = {TraditionalComment} | {EndOfLineComment} | {DocumentationComment}

TraditionalComment   = "/*" [^*] ~"*/" | "/*" "*"+ "/"

// Comment can be the last line of the file, without line terminator.

EndOfLineComment     = "//" {InputCharacter}* {LineTerminator}?

DocumentationComment = "/**" {CommentContent} "*"+ "/"

CommentContent       = ( [^*] | \*+ [^/*] )*

Identifier = [:jletter:] [:jletterdigit:]*

DecIntegerLiteral = 0 | [1-9][0-9]*

%state STRING

%%

/* keywords */

<YYINITIAL> "abstract"           { return symbol(sym.ABSTRACT); }

<YYINITIAL> "boolean"            { return symbol(sym.BOOLEAN); }

<YYINITIAL> "break"              { return symbol(sym.BREAK); }

<YYINITIAL> {

  /* identifiers */

  {Identifier}                   { return symbol(sym.IDENTIFIER); }

  /* literals */

  {DecIntegerLiteral}            { return symbol(sym.INTEGER_LITERAL); }

  \"                             { string.setLength(0); yybegin(STRING); }

  /* operators */

  "="                            { return symbol(sym.EQ); }

  "=="                           { return symbol(sym.EQEQ); }

  "+"                            { return symbol(sym.PLUS); }

  /* comments */

  {Comment}                      { /* ignore */ }

  /* whitespace */

  {WhiteSpace}                   { /* ignore */ }

}

<STRING> {

  \"                             { yybegin(YYINITIAL);

                                   return symbol(sym.STRING_LITERAL,

                                   string.toString()); }

  [^\n\r\"\\]+                   { string.append( yytext() ); }

  \\t                            { string.append('\t'); }

  \\n                            { string.append('\n'); }

  \\r                            { string.append('\r'); }

  \\\"                           { string.append('\"'); }

  \\                             { string.append('\\'); }

}

/* error fallback */

[^]                              { throw new Error("Illegal character <"+

                                                    yytext()+">"); }
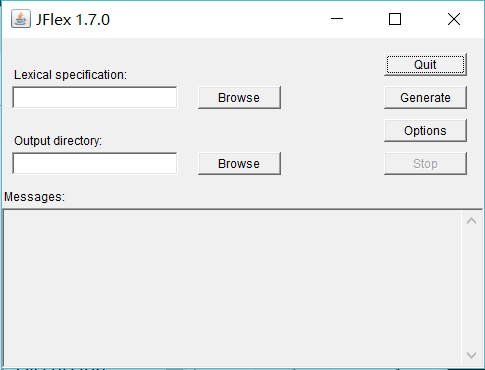
执行命令 jflex ,会弹出如下窗口,选择文件和目录,点击 Generate 即可生成 scanner,是一个叫 Lexer.java 的文件。
参考:http://www.jflex.de/manual.html#content(官方文档)
使用JFlex生成词法分析器 1:安装配置的更多相关文章
- macOS 安装配置yaf框架 生成yaf项目
macOS 安装配置yaf框架 Yaf只支持PHP5.2及以上的版本. 并支持最新的PHP5.3.3 Yaf需要SPL的支持. SPL在PHP5中是默认启用的扩展模块 Yaf需要PCRE的支持. PC ...
- 画图工具Graphviz安装配置
Graphviz (英文:Graph Visualization Software的缩写)是一个由AT&T实验室启动的开源工具包,用于绘制DOT语言脚本描述的图形.它也提供了供其它软件使用的库 ...
- Hive on Spark安装配置详解(都是坑啊)
个人主页:http://www.linbingdong.com 简书地址:http://www.jianshu.com/p/a7f75b868568 简介 本文主要记录如何安装配置Hive on Sp ...
- centos 6 安装配置openvpn
下载地址:http://swupdate.openvpn.org/community/releases/http://www.oberhumer.com/opensource/lzo/download ...
- redis的安装配置
主要讲下redis的安装配置,以及以服务的方式启动redis 1.下载最新版本的redis-3.0.7 到http://redis.io/download中下载最新版的redis-3.0.7 下载后 ...
- Django基础之安装配置
安装配置 一 MVC和MTV模式 著名的MVC模式:所谓MVC就是把web应用分为模型(M),控制器(C),视图(V)三层:他们之间以一种插件似的,松耦合的方式连接在一起. 模型负责业务对象与数据库的 ...
- Nexus安装配置
一.下载最新版本的nexus 1.下载地址:http://www.sonatype.org/nexus/go 2.官网如果下载不了,就找个zip下载,我下载的是:nexus-2.10.0-02-bun ...
- CentOS 7.0安装配置Vsftp服务器
一.配置防火墙,开启FTP服务器需要的端口 CentOS 7.0默认使用的是firewall作为防火墙,这里改为iptables防火墙. 1.关闭firewall: systemctl stop fi ...
- centos 系统下安装FastDFS+nginx+fastdfs-nginx-module安装配置
前言: 以前的项目上传的文件都是保存到本地或者是局域网内的共享文件夹下,由于数据量,服务器的负载均衡(分机的某些图片无法访问的问题处理)等因素的情况下,就想到用fastdfs来文件管理,花了几天时间硬 ...
随机推荐
- 关于如何在电脑上安装adb来操作手机(Android)的方法及步骤
1.需要真实的安卓手机: 2.安卓手机需要开启USB调试模式,允许电脑进行调试(各个手机的开启方式可能不同,不知道的自行百度): 3.电脑需要安装ADB驱动,这里提供一个下载地址:https://ad ...
- leetcode《按递增顺序显示卡牌》
题目描述: 牌组中的每张卡牌都对应有一个唯一的整数.你可以按你想要的顺序对这套卡片进行排序. 最初,这些卡牌在牌组里是正面朝下的(即,未显示状态). 现在,重复执行以下步骤,直到显示所有卡牌为止: 从 ...
- Python全栈开发记录_第五篇(装饰器)
单独记录装饰器这个知识点是因为这个知识点是非常重要的,必须掌握的(代码大约150行). 了解装饰器之前要知道三个知识点 作用域,上一篇讲到过顺序是L->E->G->B 高阶函数: 满 ...
- str中文初始化乱码,要用宽字符;if else
QString str = QString::fromUtf16(L"{\\"closeEt\": true,\\"data\" : [[1,1,10 ...
- LeetCode 102. Binary Tree Level Order Traversal 二叉树的层次遍历 C++
Given a binary tree, return the level order traversal of its nodes' values. (ie, from left to right, ...
- Linux 文本文件编辑命令
1.cat 查看纯文本文件,内容较少的,cat[选项][文件],显示行号的 -n 2.more 查看纯文本文件,内容较多的,more[选项]文件 3.head 查看纯文本文档的前N行,head -n ...
- MapReduce时mapping内存不足
17/11/07 16:53:50 INFO mapreduce.Job: Job job_1510042506570_0007 failed with state KILLED due to: MA ...
- python的str.format方法
format方法被用于字符串的格式化输出. print('{0}+{1}={2}'.format(1,2,1+2)) #in 1+2=3 #out 可见字符串中大括号内的数字分别对应着format的几 ...
- frist Django app — 五、Test
Test——很重要但是没有被重视起来的一个环节,至少是我自己,其实自己之前在做java web的时候就去尝试过怎么做REST接口的测试,一直没有找到一种合适方式,而且因为时间紧没有进一步深究,但是造成 ...
- javaweb复习(一)
学习网站开发一般都是3部走.1.基本的servlet.jsp.js.html的内容学习.2.ssm.ssh之类的框架学习.3.大型网站开发的框架和技术学习(目前我还没学到),我学习这部分主要的书是李兴 ...