keras—神经网络CNN—MNIST手写数字识别
from keras.datasets import mnist
from keras.utils import np_utils
from plot_image_1 import plot_image_1
from plot_prediction_1 import plot_image_labels_prediction_1
from show_train_history import show_train_history
import numpy as np
import pandas as pd
from keras.models import Sequential
from keras.layers import Dense,Dropout,Flatten,Conv2D,MaxPooling2D
np.random.seed()
(x_Train,y_Train),(x_Test,y_Test)=mnist.load_data()
print('train data=',len(x_Train))
print('test data=',len(x_Test))
print('x_train_image:',x_Train.shape)
print('y_train_label:',y_Train.shape)
x_Train4D=x_Train.reshape(x_Train.shape[],,,).astype('float32')
x_Test4D=x_Test.reshape(x_Test.shape[],,,).astype('float32')
x_Train4D_normalize=x_Train4D/
x_Test4D_normalize=x_Test4D/
y_TrainOneHot=np_utils.to_categorical(y_Train)
y_TestOneHot=np_utils.to_categorical(y_Test)
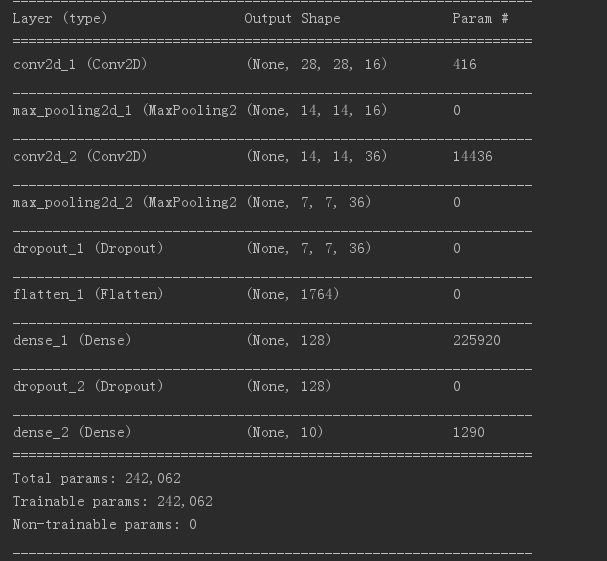
model=Sequential()
model.add(Conv2D(filters=,
kernel_size=(,),
padding='same',
input_shape=(,,),
activation='relu'))
model.add(MaxPooling2D(pool_size=(,)))
model.add(Conv2D(filters=,
kernel_size=(,),
padding='same',
activation='relu'))
model.add(MaxPooling2D(pool_size=(,)))
model.add(Dropout(0.25))
model.add(Flatten())
model.add(Dense(,activation='relu'))
model.add(Dropout(0.5))
model.add(Dense(,activation='softmax'))
print(model.summary())
model.compile(loss='categorical_crossentropy',
optimizer='adam',metrics=['accuracy'])
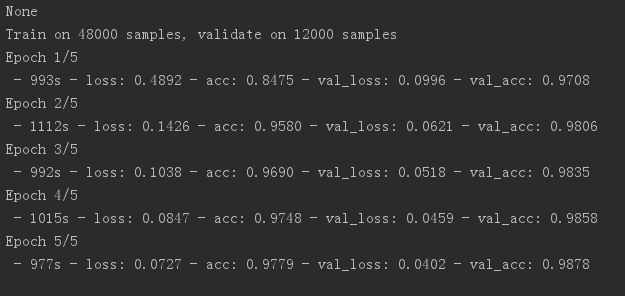
train_history=model.fit(x=x_Train4D_normalize,
y=y_TrainOneHot,validation_split=0.2,
epochs=,batch_size=,verbose=)
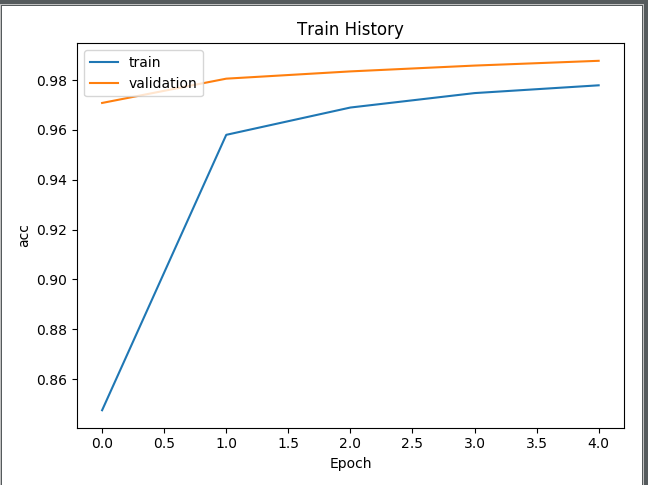
show_train_history(train_history,'acc','val_acc')
show_train_history(train_history,'loss','val_loss')
scores=model.evaluate(x_Test4D_normalize,y_TestOneHot)
print()
print('accuracy',scores[])
prediction=model.predict_classes(x_Test4D_normalize)
print("prediction[:10]",prediction[:])
plot_image_labels_prediction_1(x_Test,y_Test,prediction,idx=)
pd.crosstab(y_Test,prediction,rownames=['label'],colnames=['predict'])
 import matplotlib.pyplot as plt

 def plot_image_1(image):

     fig=plt.gcf()

     fig.set_size_inches(,)

     plt.imshow(image,cmap='binary')

     plt.show()
 import matplotlib.pyplot as plt

 def plot_image_labels_prediction_1(image,labels,prediction,idx,num=):

     fig=plt.gcf()

     fig.set_size_inches(,)

     if num>:num=

     for i in range(,num):

         ax=plt.subplot(,,i+)

         ax.imshow(image[idx],cmap='binary')

         title="label="+str(labels[idx])

         if len(prediction)>:

             title+=",predict="+str(prediction[idx])

         ax.set_title(title,fontsize=)

         ax.set_xticks([]);ax.set_yticks([])

         idx+=

     plt.show()
 import matplotlib.pyplot as plt

 def show_train_history(train_history,train,validation):

     plt.plot(train_history.history[train])

     plt.plot(train_history.history[validation])

     plt.title('Train History')

     plt.ylabel(train)

     plt.xlabel('Epoch')

     plt.legend(['train','validation'],loc='upper left')    #显示左上角标签

     plt.show()


keras—神经网络CNN—MNIST手写数字识别的更多相关文章
- Android+TensorFlow+CNN+MNIST 手写数字识别实现
Android+TensorFlow+CNN+MNIST 手写数字识别实现 SkySeraph 2018 Email:skyseraph00#163.com 更多精彩请直接访问SkySeraph个人站 ...
- Pytorch1.0入门实战一:LeNet神经网络实现 MNIST手写数字识别
记得第一次接触手写数字识别数据集还在学习TensorFlow,各种sess.run(),头都绕晕了.自从接触pytorch以来,一直想写点什么.曾经在2017年5月,Andrej Karpathy发表 ...
- 第三节,CNN案例-mnist手写数字识别
卷积:神经网络不再是对每个像素做处理,而是对一小块区域的处理,这种做法加强了图像信息的连续性,使得神经网络看到的是一个图像,而非一个点,同时也加深了神经网络对图像的理解,卷积神经网络有一个批量过滤器, ...
- 【TensorFlow-windows】(四) CNN(卷积神经网络)进行手写数字识别(mnist)
主要内容: 1.基于CNN的mnist手写数字识别(详细代码注释) 2.该实现中的函数总结 平台: 1.windows 10 64位 2.Anaconda3-4.2.0-Windows-x86_64. ...
- [Python]基于CNN的MNIST手写数字识别
目录 一.背景介绍 1.1 卷积神经网络 1.2 深度学习框架 1.3 MNIST 数据集 二.方法和原理 2.1 部署网络模型 (1)权重初始化 (2)卷积和池化 (3)搭建卷积层1 (4)搭建卷积 ...
- keras框架的MLP手写数字识别MNIST,梳理?
keras框架的MLP手写数字识别MNIST 代码: # coding: utf-8 # In[1]: import numpy as np import pandas as pd from kera ...
- mnist手写数字识别——深度学习入门项目(tensorflow+keras+Sequential模型)
前言 今天记录一下深度学习的另外一个入门项目——<mnist数据集手写数字识别>,这是一个入门必备的学习案例,主要使用了tensorflow下的keras网络结构的Sequential模型 ...
- 第三节,TensorFlow 使用CNN实现手写数字识别(卷积函数tf.nn.convd介绍)
上一节,我们已经讲解了使用全连接网络实现手写数字识别,其正确率大概能达到98%,这一节我们使用卷积神经网络来实现手写数字识别, 其准确率可以超过99%,程序主要包括以下几块内容 [1]: 导入数据,即 ...
- 基于tensorflow的MNIST手写数字识别(二)--入门篇
http://www.jianshu.com/p/4195577585e6 基于tensorflow的MNIST手写字识别(一)--白话卷积神经网络模型 基于tensorflow的MNIST手写数字识 ...
随机推荐
- 发邮件 文字+ 附件的方法(QQ or 网易 邮箱)
#coding:utf-8import smtplibfrom email.mime.text import MIMETextfrom email.mime.multipart import MIME ...
- SpringBoot 自定义线程池
本教程目录: 自定义线程池 配置spring默认的线程池 1. 自定义线程池 1.1 修改application.properties task.pool.corePoolSize=20 task.p ...
- 杂项:node.js
ylbtech-杂项:node.js Node.js是一个Javascript运行环境(runtime),发布于2009年5月,由Ryan Dahl开发,实质是对Chrome V8引擎进行了封装.No ...
- jquey XMLHttpRequest cannot load url.Origin null is not allowed by Access-Control-Allow-Origin
此篇文章原文地址:http://blog.csdn.net/wangsky2/article/details/22961345 正文: 原文地址:http://stackoverflow.com/qu ...
- Windows7无法访问共享文件夹(0x800704cf,0x80070035)解决方法
Windows7系统突然无法访问Linux的samba服务器,出现0x800704cf或者0x80070035错误,也不能访问其他windows机器的共享文件夹,解决方案如下两张图,配置与下面两张图为 ...
- Unreal Engine 4(虚幻UE4)GameplayAbilities 插件入门教程(五)技能属性集(AttributeSet)
如果没有完成前面的教程,请前往学习.先上一段理论介绍(源于https://wiki.unrealengine.com/GameplayAbilities_and_You#GameplayTasks): ...
- 企业常用的RPC框架比较
RPC框架比较 语言 协议 服务治理 社区 机构 Hessian 多语言 hessian(二进制) – 不活跃 Caucho Thrift 多语言 thrift – 活跃 Apache Fin ...
- API网关Kong系列(二)部署
部署环境: [OS] centos 6.8(如果是centos6.5,请自行先升级到6.8,否则不支持docker) [Docker] Client version: 1.7.1 Client API ...
- Executor框架(一)Executor框架介绍
Executor框架简介 Executor框架的两级调度模型 在HotSpot VM的线程模型中,Java线程被一对一映射为本地操作系统线程.Java线程启动时会创建一个本地操作系统线程:当Jav ...
- python函数入门
知识内容: 1.函数的作用 2.函数的定义与调用 3.函数的返回值 4.函数的参数 5.局部变量与全局变量 6.作用域 一.函数的作用 1.复用代码 将可能重复执行的代码封装成函数,并在需要执行的地方 ...