【Android】Android 8种对话框(Dialog)
1.写在前面
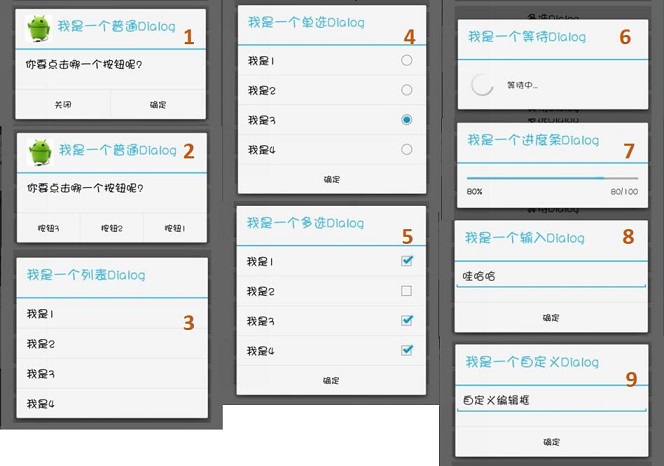
Android提供了丰富的Dialog函数,本文介绍最常用的8种对话框的使用方法,包括普通(包含提示消息和按钮)、列表、单选、多选、等待、进度条、编辑、自定义等多种形式,将在第2部分介绍。
有时,我们希望在对话框创建或关闭时完成一些特定的功能,这需要复写Dialog的create()、show()、dismiss()等方法,将在第3部分介绍。
2.代码示例
2.1 普通Dialog(图1和图2)
2个按钮
public class MainActivity extends Activity {

    @Override

    protected void onCreate(Bundle savedInstanceState) {

        super.onCreate(savedInstanceState);

        setContentView(R.layout.activity_main);

        Button buttonNormal = (Button) findViewById(R.id.button_normal);

        buttonNormal.setOnClickListener(new View.OnClickListener() {

            @Override

            public void onClick(View v) {

                showNormalDialog();

            }

        });

    }

    private void showNormalDialog(){

        /* @setIcon 设置对话框图标

         * @setTitle 设置对话框标题

         * @setMessage 设置对话框消息提示

         * setXXX方法返回Dialog对象,因此可以链式设置属性

         */

        final AlertDialog.Builder normalDialog =

            new AlertDialog.Builder(MainActivity.this);

        normalDialog.setIcon(R.drawable.icon_dialog);

        normalDialog.setTitle("我是一个普通Dialog")

        normalDialog.setMessage("你要点击哪一个按钮呢?");

        normalDialog.setPositiveButton("确定",

            new DialogInterface.OnClickListener() {

            @Override

            public void onClick(DialogInterface dialog, int which) {

                //...To-do

            }

        });

        normalDialog.setNegativeButton("关闭",

            new DialogInterface.OnClickListener() {

            @Override

            public void onClick(DialogInterface dialog, int which) {

                //...To-do

            }

        });

        // 显示

        normalDialog.show();

    }

}
3个按钮
/* @setNeutralButton 设置中间的按钮

 * 若只需一个按钮,仅设置 setPositiveButton 即可

 */

private void showMultiBtnDialog(){

    AlertDialog.Builder normalDialog =

        new AlertDialog.Builder(MainActivity.this);

    normalDialog.setIcon(R.drawable.icon_dialog);

    normalDialog.setTitle("我是一个普通Dialog").setMessage("你要点击哪一个按钮呢?");

    normalDialog.setPositiveButton("按钮1",

        new DialogInterface.OnClickListener() {

        @Override

        public void onClick(DialogInterface dialog, int which) {

            // ...To-do

        }

    });

    normalDialog.setNeutralButton("按钮2",

        new DialogInterface.OnClickListener() {

        @Override

        public void onClick(DialogInterface dialog, int which) {

            // ...To-do

        }

    });

    normalDialog.setNegativeButton("按钮3", new DialogInterface.OnClickListener() {

        @Override

        public void onClick(DialogInterface dialog, int which) {

            // ...To-do

        }

    });

    // 创建实例并显示

    normalDialog.show();

}
2.2 列表Dialog(图3)
private void showListDialog() {

    final String[] items = { "我是1","我是2","我是3","我是4" };

    AlertDialog.Builder listDialog =

        new AlertDialog.Builder(MainActivity.this);

    listDialog.setTitle("我是一个列表Dialog");

    listDialog.setItems(items, new DialogInterface.OnClickListener() {

        @Override

        public void onClick(DialogInterface dialog, int which) {

            // which 下标从0开始

            // ...To-do

            Toast.makeText(MainActivity.this,

                "你点击了" + items[which],

                Toast.LENGTH_SHORT).show();

        }

    });

    listDialog.show();

}
2.3 单选Dialog(图4)
int yourChoice;

private void showSingleChoiceDialog(){

    final String[] items = { "我是1","我是2","我是3","我是4" };

    yourChoice = -1;

    AlertDialog.Builder singleChoiceDialog =

        new AlertDialog.Builder(MainActivity.this);

    singleChoiceDialog.setTitle("我是一个单选Dialog");

    // 第二个参数是默认选项,此处设置为0

    singleChoiceDialog.setSingleChoiceItems(items, 0,

        new DialogInterface.OnClickListener() {

        @Override

        public void onClick(DialogInterface dialog, int which) {

            yourChoice = which;

        }

    });

    singleChoiceDialog.setPositiveButton("确定",

        new DialogInterface.OnClickListener() {

        @Override

        public void onClick(DialogInterface dialog, int which) {

            if (yourChoice != -1) {

                Toast.makeText(MainActivity.this,

                "你选择了" + items[yourChoice],

                Toast.LENGTH_SHORT).show();

            }

        }

    });

    singleChoiceDialog.show();

}
2.4 多选Dialog(图5)
ArrayList<Integer> yourChoices = new ArrayList<>();

private void showMultiChoiceDialog() {

    final String[] items = { "我是1","我是2","我是3","我是4" };

    // 设置默认选中的选项,全为false默认均未选中

    final boolean initChoiceSets[]={false,false,false,false};

    yourChoices.clear();

    AlertDialog.Builder multiChoiceDialog =

        new AlertDialog.Builder(MainActivity.this);

    multiChoiceDialog.setTitle("我是一个多选Dialog");

    multiChoiceDialog.setMultiChoiceItems(items, initChoiceSets,

        new DialogInterface.OnMultiChoiceClickListener() {

        @Override

        public void onClick(DialogInterface dialog, int which,

            boolean isChecked) {

            if (isChecked) {

                yourChoices.add(which);

            } else {

                yourChoices.remove(which);

            }

        }

    });

    multiChoiceDialog.setPositiveButton("确定",

        new DialogInterface.OnClickListener() {

        @Override

        public void onClick(DialogInterface dialog, int which) {

            int size = yourChoices.size();

            String str = "";

            for (int i = 0; i < size; i++) {

                str += items[yourChoices.get(i)] + " ";

            }

            Toast.makeText(MainActivity.this,

                "你选中了" + str,

                Toast.LENGTH_SHORT).show();

        }

    });

    multiChoiceDialog.show();

}
2.5 等待Dialog(图6)
private void showWaitingDialog() {

    /* 等待Dialog具有屏蔽其他控件的交互能力

     * @setCancelable 为使屏幕不可点击,设置为不可取消(false)

     * 下载等事件完成后,主动调用函数关闭该Dialog

     */

    ProgressDialog waitingDialog=

        new ProgressDialog(MainActivity.this);

    waitingDialog.setTitle("我是一个等待Dialog");

    waitingDialog.setMessage("等待中...");

    waitingDialog.setIndeterminate(true);

    waitingDialog.setCancelable(false);

    waitingDialog.show();

}
2.6 进度条Dialog(图7)
private void showProgressDialog() {

    /* @setProgress 设置初始进度

     * @setProgressStyle 设置样式(水平进度条)

     * @setMax 设置进度最大值

     */

    final int MAX_PROGRESS = 100;

    final ProgressDialog progressDialog =

        new ProgressDialog(MainActivity.this);

    progressDialog.setProgress(0);

    progressDialog.setTitle("我是一个进度条Dialog");

    progressDialog.setProgressStyle(ProgressDialog.STYLE_HORIZONTAL);

    progressDialog.setMax(MAX_PROGRESS);

    progressDialog.show();

    /* 模拟进度增加的过程

     * 新开一个线程,每个100ms,进度增加1

     */

    new Thread(new Runnable() {

        @Override

        public void run() {

            int progress= 0;

            while (progress < MAX_PROGRESS){

                try {

                    Thread.sleep(100);

                    progress++;

                    progressDialog.setProgress(progress);

                } catch (InterruptedException e){

                    e.printStackTrace();

                }

            }

            // 进度达到最大值后,窗口消失

            progressDialog.cancel();

        }

    }).start();

}
2.7 编辑Dialog(图8)
private void showInputDialog() {

    /*@setView 装入一个EditView

     */

    final EditText editText = new EditText(MainActivity.this);

    AlertDialog.Builder inputDialog =

        new AlertDialog.Builder(MainActivity.this);

    inputDialog.setTitle("我是一个输入Dialog").setView(editText);

    inputDialog.setPositiveButton("确定",

        new DialogInterface.OnClickListener() {

        @Override

        public void onClick(DialogInterface dialog, int which) {

            Toast.makeText(MainActivity.this,

            editText.getText().toString(),

            Toast.LENGTH_SHORT).show();

        }

    }).show();

}
2.8 自定义Dialog(图9)
<!-- res/layout/dialog_customize.xml-->

<!-- 自定义View -->

<LinearLayout xmlns:android="http://schemas.android.com/apk/res/android"

    android:orientation="vertical"

    android:layout_width="match_parent"

    android:layout_height="match_parent">

    <EditText

        android:id="@+id/edit_text"

        android:layout_width="match_parent"

        android:layout_height="wrap_content"

        />

</LinearLayout>
private void showCustomizeDialog() {

    /* @setView 装入自定义View ==> R.layout.dialog_customize

     * 由于dialog_customize.xml只放置了一个EditView,因此和图8一样

     * dialog_customize.xml可自定义更复杂的View

     */

    AlertDialog.Builder customizeDialog =

        new AlertDialog.Builder(MainActivity.this);

    final View dialogView = LayoutInflater.from(MainActivity.this)

        .inflate(R.layout.dialog_customize,null);

    customizeDialog.setTitle("我是一个自定义Dialog");

    customizeDialog.setView(dialogView);

    customizeDialog.setPositiveButton("确定",

        new DialogInterface.OnClickListener() {

        @Override

        public void onClick(DialogInterface dialog, int which) {

            // 获取EditView中的输入内容

            EditText edit_text =

                (EditText) dialogView.findViewById(R.id.edit_text);

            Toast.makeText(MainActivity.this,

                edit_text.getText().toString(),

                Toast.LENGTH_SHORT).show();

        }

    });

    customizeDialog.show();

}
我们经常需要进行自定义Dialog,使用上面的AlertDialog.Builder类在处理背景的时候,灵活性不强。笔者推荐使用Dialog类进行窗口定义:
Dialog dialog = new Dialog(getActivity());

dialog.requestWindowFeature(Window.FEATURE_NO_TITLE);//无标题

View dialogView = LayoutInflater.from(MainActivity.this).inflate(R.layout.dialog_customize,null);

dialog.setContentView(dialogView);

dialog.getWindow().setBackgroundDrawableResource(android.R.color.transparent);//设置背景透明

dialog.show();
上面使用了setBackgroundDrawableResource设置透明背景,如果是通过AlertDialog.Builder实例的getWindow().setBackgroundDrawableResource()设置的话是没有效果的。
inflate()方法的第二个参数是ViewGroup类型,如果这个参数传入的是空的话,那么dialogView的rootView将会是你自己的XML文件中定义的rootView。但是笔者发现,即使我的XML的root view是RelativeLayout,但是却会出现布局错误的现象,如果在inflate中传入RelativeLayout的话,就正常了:
View dialogView = LayoutInflater.from(MainActivity.this).inflate(R.layout.dialog_customize,new RelativeLayout(context));
3 复写回调函数
/* 复写Builder的create和show函数,可以在Dialog显示前实现必要设置

 * 例如初始化列表、默认选项等

 * @create 第一次创建时调用

 * @show 每次显示时调用

 */

private void showListDialog() {

    final String[] items = { "我是1","我是2","我是3","我是4" };

    AlertDialog.Builder listDialog =

        new AlertDialog.Builder(MainActivity.this){

        @Override

        public AlertDialog create() {

            items[0] = "我是No.1";

            return super.create();

        }

        @Override

        public AlertDialog show() {

            items[1] = "我是No.2";

            return super.show();

        }

    };

    listDialog.setTitle("我是一个列表Dialog");

    listDialog.setItems(items, new DialogInterface.OnClickListener() {

        @Override

        public void onClick(DialogInterface dialog, int which) {

            // ...To-do

        }

    });

    /* @setOnDismissListener Dialog销毁时调用

     * @setOnCancelListener Dialog关闭时调用

     */

    listDialog.setOnDismissListener(new DialogInterface.OnDismissListener() {

        public void onDismiss(DialogInterface dialog) {

            Toast.makeText(getApplicationContext(),

                "Dialog被销毁了",

                Toast.LENGTH_SHORT).show();

        }

    });

    listDialog.show();

}
4 方法介绍
dismiss()
AlertDialog.Builder对话框没有类似finish()或者dismiss()这样的关闭窗口方法,,但是他的父类具有这样的方法。可以通过他的父类,关闭对话框
    AlertDialog.Builder builder = new AlertDialog.Builder(this);

    AlertDialog dialog = builder.show();

    dialog.dismiss();
原文连接:Android的8种对话框
【Android】Android 8种对话框(Dialog)的更多相关文章
- Android实现“是否退出”对话框和“带图标的列表”对话框
今天我们学习的内容是实现两种对话框(Dialog),第一种是询问是否退出对话框,另外一种是带图标的列表对话框,程序的执行效果是,我们点击button1的时候,弹出第一种对话框,我们点击button2的 ...
- android 8种对话框(Dialog)使用方法汇总
1.写在前面 Android提供了丰富的Dialog函数,本文介绍最常用的8种对话框的使用方法,包括普通(包含提示消息和按钮).列表.单选.多选.等待.进度条.编辑.自定义等多种形式,将在第2部分介绍 ...
- Android 对话框(Dialog)大全 建立你自己的对话框
Android 对话框(Dialog)大全 建立你自己的对话框 原文地址: http://www.cnblogs.com/salam/archive/2010/11/15/1877512.html A ...
- Android下常见的四种对话框
摘要:在实际开发过程有时为了能够和用户进行很好的交互,需要使用到对话框,在Android中常用的对话框有四种:普通对话框.单选对话框.多选对话框.进度对话框. 一.普度对话框 public void ...
- 转 Android 对话框(Dialog)大全 建立你自己的对话框
Activities提供了一种方便管理的创建.保存.回复的对话框机制,例如 onCreateDialog(int), onPrepareDialog(int, Dialog), showDialog( ...
- Android的几种alert对话框
@Override public void onClick(View v) { switch (v.getId()) { case R.id.d1: AlertDialog.Builder build ...
- Android 常用对话框Dialog封装
Android 6种 常用对话框Dialog封装 包括: 消息对话框.警示(含确认.取消)对话框.单选对话框. 复选对话框.列表对话框.自定义视图(含确认.取消)对话框 分别如下图所示: ...
- Android简易实战教程--第四十五话《几种对话框》
Android中提供了各种原生的对话框,在使用简单的功能的时候,还不比考虑自定义,使用原生的也能完成功能.本篇简单小案例就介绍三种对话框. 还是直接上代码吧: 布局中三个点击事件的按钮: <Li ...
- Android对话框Dialog深度剖析
对话框 对话框是提示用户作出决定或输入额外信息的小窗口. 对话框不会填充屏幕,通常用于需要用户采取行动才能继续执行的模式事件. 对话框设计 Dialog 类是对话框的基类,但您应该避免直接实例化 Di ...
随机推荐
- springmvc-servlet.xml中use-default-filters的作用
1.<!-- 启用注解扫描,并定义组件查找规则 ,mvc层只负责扫描@Controller --> [java] view plain copy <context:component ...
- WinRAR如何批量分别压缩不同的文件夹
全选所有文件夹,然后右击添加到压缩文件,然后在文件选项中勾选把每个文件放到单独的压缩文件中 OK了
- APUE 3rd
以下是APUE 3rd edition 的preface,从04年的第二版到现在的第三版,APUE内容有所更新.点击下载. It’s been almost eight years since I fi ...
- javascript学习网址
教程:JavaScript征途 http://www1.huachu.com.cn/read/readbook.asp?bookid=10109449 教程:JScript 参考 http://msd ...
- 关于testNG和JUnit的对比
关于选择JUnit还是选testNG,这几篇文章,建议读一读: API参考文档: Junit API文档:http://junit.org/junit4/javadoc/latest/index.ht ...
- 微信小程序 - 支持html空格(提示)
仅限于text标签,decode参数:官方api.
- JAVA i++于++i的区别
大家看一下下面一个程序: 一.问题说明 Test.java public class Test { public static void main(String[] args) { int i = 1 ...
- vuejs组件交互 - 02 - 事件中心管理组件间的通信
事件中心 这个可以是一个空的全局的Vue实例,其他的组件利用这个实例emit和on自定义事件,这样组件定义了自己的事件处理方法. import Vue from 'Vue' window.eventH ...
- The cast to value type 'System.Decimal' failed because the materialized value is null. Either the result type's generic parameter or the query must use a nullable type.
CurrentStock = db.BillEntry.Where(b => b.GoodsId == item.GoodsId).Sum(b => (decimal?)b.Qty) ?? ...
- eclipse mavenWeb项目真正实现热部署(修改java代码和页面文件不用重启tomcat)
1.前言 首先,本文创作灵感源于博客园园作者signheart,特此鸣谢!原文链接见文末推荐: 百度都搜破了,全网讲的都是如何将maven项目部署到tomcat上,对于热部署的认知,真 ...