Cocos2d-x之事件处理机制
| 版权声明:本文为博主原创文章,未经博主允许不得转载。

事件处理机制分为单点触屏,多点触屏,加速度事件,键盘事件和鼠标事件。在现在的智能手机中,触屏的应用比较的广泛,尤其是多点触屏事件的技术,使很多触屏事件操作在游戏中更泛的应用,使得操作更加的丰富。
单点触屏事件:
1.单点触屏事件
Touch的重要方法:
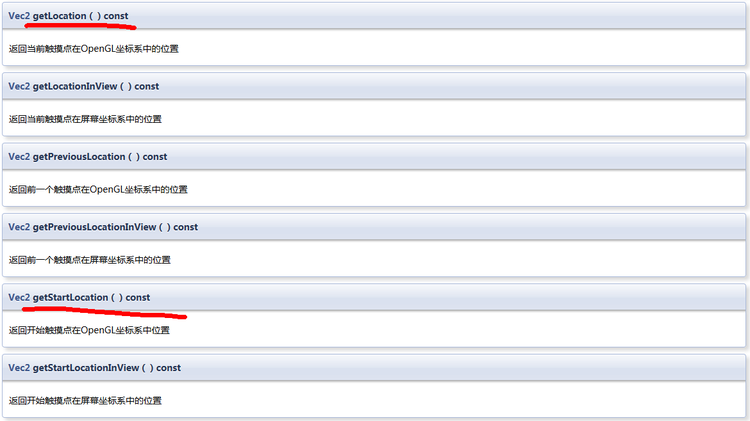
cocos2d::Vec2 getLocation() const;
//获得GL坐标
cocos2d::Vec2 getLocationInView() const;
//获得屏幕的坐标点
2. 监听器: EventListenerTouchOneByOne
事件方法:
 virtual bool onTouchBegan(cocos2d::Touch* touch, cocos2d::Event* unused_event);

 触摸开始,返回true可以使得该触摸点属于该函数的目标对象,该点的变化只会影响该目标对象函数的调用,不会影响其他对象

 virtual bool onTouchMoved(cocos2d::Touch* touch, cocos2d::Event* unused_event);

 触摸点移动

 virtual bool onTouchEnded(cocos2d::Touch* touch, cocos2d::Event* unused_event);

 触摸动作结束

 virtual bool onTouchCancelled(cocos2d::Touch* touch, cocos2d::Event* unused_event);

 系统中断通知需要取消触摸事件的时候会调用此函数,这个中断往往是因为应用时间没有响应或者当前视图从系统的顶层上移除
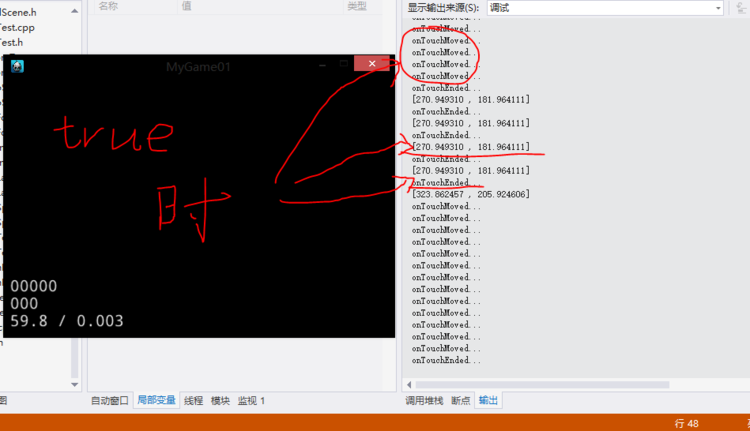
*.如果在onTouchBegan中返回的为false,则onTouchMoved,onTouchEnded,onTouchCancelled这几个方法均不会执行。如果返回的是true的话,则这几个方法会执行
3. 注册监听器
auto listener = EventListenerTouchOneByOne::create();
listener->onTouchBegan = CC_CALLBACK_2(HelloWorld::onTouchBegan, this);
listener->onTouchMoved = CC_CALLBACK_2(HelloWorld::onTouchMoved, this);
listener->onTouchEnded = CC_CALLBACK_2(HelloWorld::onTouchEnded, this);
_eventDispatcher->addEventListenerWithSceneGraphPriority(listener,this);
实例:
.h files

#ifndef _ONETOUCHTEST_SCENE_H_

#define _ONETOUCHTEST_SCENE_H_

#include "cocos2d.h"

class touchTest : public cocos2d::Layer

{

private:

	cocos2d::Size visible;

	cocos2d::Vec2 origin;

public:

	static cocos2d::Scene* createScene();

	virtual bool init();

	virtual bool onTouchBegan(cocos2d::Touch *touch, cocos2d::Event *unused_event);

	virtual void onTouchMoved(cocos2d::Touch *touch, cocos2d::Event *unused_event);

	virtual void onTouchEnded(cocos2d::Touch *touch, cocos2d::Event *unused_event);

	CREATE_FUNC(touchTest);

};

#endif // _ONETOUCHTEST_SCENE_H_

.cpp files

#include "OneTouchTest.h"

USING_NS_CC;

Scene* touchTest::createScene()

{

	auto scene = Scene::create();

	auto layer = touchTest::create();

	scene->addChild(layer);

	return scene;

}

bool touchTest::init()

{

	if (!Layer::init())

	{

		return false;

	}

	//第一步创建一个监听器listener

	auto listener = EventListenerTouchOneByOne::create();

	//注册监听器

	listener->onTouchBegan = CC_CALLBACK_2(touchTest::onTouchBegan, this);

	listener->onTouchMoved = CC_CALLBACK_2(touchTest::onTouchMoved, this);

	listener->onTouchEnded = CC_CALLBACK_2(touchTest::onTouchEnded, this);

	_eventDispatcher->addEventListenerWithSceneGraphPriority(listener, this);

	return true;

}

bool touchTest::onTouchBegan(cocos2d::Touch *touch, cocos2d::Event *unused_event)

{

	//取得单击屏幕处那个位置的点

	origin = touch->getLocationInView();

	//转换成GL坐标

	origin = Director::getInstance()->convertToGL(origin);

	CCLOG("[%f , %f]", origin.x, origin.y);

	//return true;

	return false;

}

void touchTest::onTouchMoved(cocos2d::Touch *touch, cocos2d::Event *unused_event)

{

	CCLOG("onTouchMoved...");

}

void touchTest::onTouchEnded(cocos2d::Touch *touch, cocos2d::Event *unused_event)

{

	CCLOG("onTouchEnded...");

}

多点触屏事件:
1. 多点触屏事件
Touch重要方法
cocos2d::Vec2 getLocation() const;
//获得GL坐标
cocos2d::Vec2 getLocationInView() const;
//获得屏幕坐标点
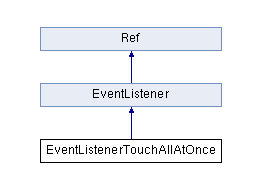
2. 监听器: EventListenerTouchAllAtOnce
事件方法:
 virtual void onTouchesBegan(const std::vector<Touch*>& touches, Event* unused_envent);

 触摸开始,与单点触屏不同的是,多点触屏事件的返回不是bool类型,而是void类型

 virtual void onTouchesMoved(const std::vector<Touch*>& touches, Event* unused_envent);

 触摸点移动

 virtual void onTouchesEnded(const std::vector<Touch*>& touches, Event* unused_envent);

 触摸动作结束

 virtual void onTouchesCancelled(const std::vector<Touch*>& touches, Event* unused_envent);

 系统中断通知需要取消触摸事件的时候调用此函数
实例:
.h files #ifndef _MOSTTOUCHTEST_SCENE_H_
#define _MOSTTOUCHTEST_SCENE_H_
#include "cocos2d.h"
class mostTouch : public cocos2d::Layer
{
private:
cocos2d::Vec2 origin;
public:
static cocos2d::Scene* createScene();
virtual bool init();
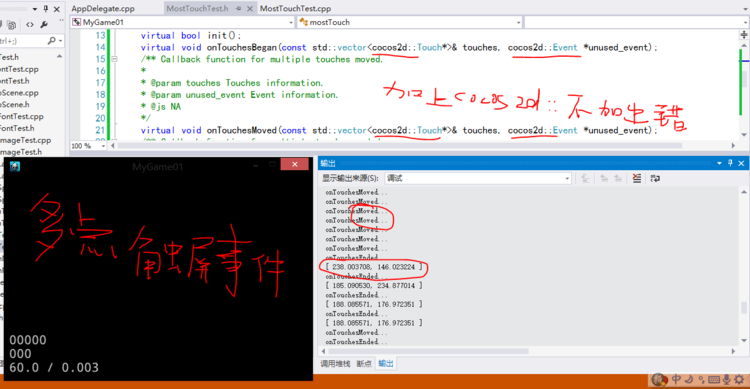
virtual void onTouchesBegan(const std::vector<cocos2d::Touch*>& touches, cocos2d::Event *unused_event);
/** Callback function for multiple touches moved.
*
* @param touches Touches information.
* @param unused_event Event information.
* @js NA
*/
virtual void onTouchesMoved(const std::vector<cocos2d::Touch*>& touches, cocos2d::Event *unused_event);
/** Callback function for multiple touches ended.
*
* @param touches Touches information.
* @param unused_event Event information.
* @js NA
*/
virtual void onTouchesEnded(const std::vector<cocos2d::Touch*>& touches, cocos2d::Event *unused_event);
/** Callback function for multiple touches cancelled.
*
* @param touches Touches information.
* @param unused_event Event information.
* @js NA
*/
CREATE_FUNC(mostTouch);
};
#endif // _MOSTTOUCHTEST_SCENE_H_ .cpp files #include "MostTouchTest.h"
USING_NS_CC;
Scene* mostTouch::createScene()
{
auto scene = Scene::create();
auto layer = mostTouch::create();
scene->addChild(layer);
return scene;
}
bool mostTouch::init()
{
if (!Layer::init())
{
return false;
}
//设置监听器
auto listener = EventListenerTouchAllAtOnce::create();
listener->onTouchesBegan = CC_CALLBACK_2(mostTouch::onTouchesBegan, this);
listener->onTouchesMoved = CC_CALLBACK_2(mostTouch::onTouchesMoved, this);
listener->onTouchesEnded = CC_CALLBACK_2(mostTouch::onTouchesEnded, this);
//注册监听器
_eventDispatcher->addEventListenerWithSceneGraphPriority(listener, this);
return true;
}
void mostTouch::onTouchesBegan(const std::vector<cocos2d::Touch*>& touches, cocos2d::Event *unused_event)
{
//首先设置屏幕上取一个点,[n]表示取得多个点
Touch* touch = touches[0];
//取得这个点在屏幕上的位置
origin = touch->getLocationInView();
//再将这个点转换成坐标表示
origin = Director::getInstance()->convertToGL(origin);
//输出这个点
CCLOG("[ %f, %f ]", origin.x, origin.y);
}
void mostTouch::onTouchesMoved(const std::vector<cocos2d::Touch*>& touches, cocos2d::Event *unused_event)
{
CCLOG("onTouchesMoved...");
}
void mostTouch::onTouchesEnded(const std::vector<cocos2d::Touch*>& touches, cocos2d::Event *unused_event)
{
CCLOG("onTouchesEnded...");
}
一些重要的函数及功能
加速度事件:
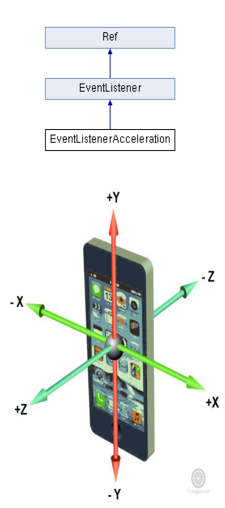
移动设备上一个很重要的输入源是设备的方向,大多数设备都配备了加速计,用于测量设备静止或匀速运动时所受到的重力方向。重力感应来自移动设备的加速计,通常支持X、Y和Z三个方向的加速度感应,又称为三向加速计。实际应用中,可以根据三个方向的力度大小来计算手机倾斜的角度和方向。3.0机制中,我们只需要创建一个加速计监听器EventListenerAcceleration,实现响应的回调函数,在回调函数中实现相应的游戏逻辑即可,最后把创建的监听器注册到事件分发器_eventDispatcher中即可。
1. 加速度事件简介
virtual void onAcceleration(Acceleration* acc,
Event* unused_event);
class Acceleration
{
public:
double x;
double y;
double z;
double timestamp;
Acceleration():x(0),y(0),z(0),timestamp(0){}
};
2. 注册事件
Device::setAccelerometerEnabled(true);
auto listener =
EventListenerAcceleration::create(CC_CALLBACK_2(HelloWorld::onAcceleration,
this));
_eventDispather->addEventListenerWithSceneGraphPriority(listener, this);
实例:
.h files

#ifndef _ACCELERATIONTEST_SCENE_H_

#define _ACCELERATIONTEST_SCENE_H_

#include "cocos2d.h"

class accelerationTest : public cocos2d::Layer

{

private:

public:

	static cocos2d::Scene* createScene();

	virtual bool init();

	virtual void onAcceleration(cocos2d::Acceleration* acc, cocos2d::Event* unused_event);

	/** If isTouchEnabled, this method is called onEnter. Override it to change the

	way Layer receives touch events.

	( Default: TouchDispatcher::sharedDispatcher()->addStandardDelegate(this,0); )

	Example:

	void Layer::registerWithTouchDispatcher()

	{

	TouchDispatcher::sharedDispatcher()->addTargetedDelegate(this,INT_MIN+1,true);

	}

	@since v0.8.0

	@js NA

	*/

	CREATE_FUNC(accelerationTest);

};

#endif // _ACCELERATIONTEST_SCENE_H_

.cpp files

#include "AccelerationTest.h"

USING_NS_CC;

Scene* accelerationTest::createScene()

{

	auto scene = Scene::create();

	auto layer = accelerationTest::create();

	scene->addChild(layer);

	return scene;

}

bool accelerationTest::init()

{

	if (!Layer::init())

	{

		return false;

	}

	Device::setAccelerometerEnabled(true);

	auto listener = EventListenerAcceleration::create(CC_CALLBACK_2(accelerationTest::onAcceleration, this));

	_eventDispatcher->addEventListenerWithSceneGraphPriority(listener, this);

	return true;

}

void accelerationTest::onAcceleration(cocos2d::Acceleration* acc, cocos2d::Event* unused_event)

{

	float x = acc->x;

	float y = acc->y;

	float z = acc->z;

	//一些加速度事件的操作

	//.....

	CCLOG("[%f, %f, %f]", x, y, z);

}

键盘事件:
1. 键盘事件:
EventKeyboard::KeyCode
重要常量(键盘按键常量a~z,0~9...);
KEY_0 ='0'
KEY_1 ='1'
KEY_2 ='2'
KEY_3 ='3'
KEY_4 ='4'
KEY_5 ='5'
KEY_6 ='6'
....
2. 监听器: EventListenerKeyboard
事件方法:
 //按下

 virtual void onKeyPressed(EventKeyboard::KeyCode keycode, Event* event);

 //抬起

 virtual void onKeyReleased(EventKeyboard::KeyCode keycode, Event* event);
3. 注册监听器
auto listener =
EventListenerKeyboard::create();
listener->onKeyPressed = CC_CALLBACK_2(HelloWorld::onKeyPressed, this);
listener->onKeyReleased = CC_CALLBACK_2(HelloWorld::onKeyReleased, this);
_eventDispatcher->addEventListenerWithSceneGraphPriority(listener, this);
实例:
.h files #ifndef _ONKEYBOARDTEST_SCENE_H_
#define _ONKEYBOARDTEST_SCENE_H_
#include "cocos2d.h"
class KeyBoardTest : cocos2d::Layer
{
private:
public:
static cocos2d::Scene* createScene();
virtual bool init();
virtual void onKeyPressed(cocos2d::EventKeyboard::KeyCode keyCode, cocos2d::Event* event);
/** Callback function for key released.
* @param keyCode KeyCode information.
* @param event Event information.
* @js NA
*/
virtual void onKeyReleased(cocos2d::EventKeyboard::KeyCode keyCode, cocos2d::Event* event);
CREATE_FUNC(KeyBoardTest);
};
//KeyBoard
#endif // _ONKEYBOARDTEST_SCENE_H_ .cpp files #include "onKeyBoardTest.h"
USING_NS_CC;
Scene* KeyBoardTest::createScene()
{
auto scene = Scene::create();
auto layer = KeyBoardTest::create();
scene->addChild(layer);
return scene;
}
bool KeyBoardTest::init()
{
if (!Layer::init())
{
return false;
}
//设置键盘事件的监听器
auto listener = EventListenerKeyboard::create();
//设置监听的对象,按下对象和抬起状态
listener->onKeyPressed = CC_CALLBACK_2(KeyBoardTest::onKeyPressed, this);
listener->onKeyReleased = CC_CALLBACK_2(KeyBoardTest::onKeyReleased, this);
//注册监听器
_eventDispatcher->addEventListenerWithSceneGraphPriority(listener, this);
return true;
}
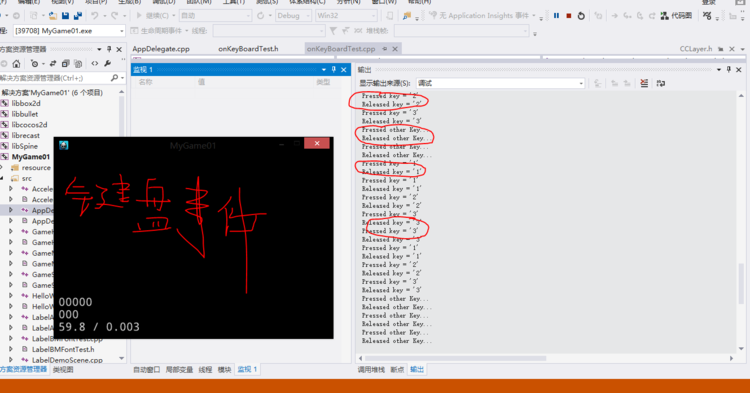
void KeyBoardTest::onKeyPressed(cocos2d::EventKeyboard::KeyCode keyCode, cocos2d::Event* event)
{
switch (keyCode)
{
case cocos2d::EventKeyboard::KeyCode::KEY_0:
CCLOG("Pressed key = '0'");
break;
case cocos2d::EventKeyboard::KeyCode::KEY_1:
CCLOG("Pressed key = '1'");
break;
case cocos2d::EventKeyboard::KeyCode::KEY_2:
CCLOG("Pressed key = '2'");
break;
case cocos2d::EventKeyboard::KeyCode::KEY_3:
CCLOG("Pressed key = '3'");
break;
default:
CCLOG("Pressed other Key...");
break;
}
}
void KeyBoardTest::onKeyReleased(cocos2d::EventKeyboard::KeyCode keyCode, cocos2d::Event* event)
{
switch (keyCode)
{
case cocos2d::EventKeyboard::KeyCode::KEY_0:
CCLOG("Released key = '0'");
break;
case cocos2d::EventKeyboard::KeyCode::KEY_1:
CCLOG("Released key = '1'");
break;
case cocos2d::EventKeyboard::KeyCode::KEY_2:
CCLOG("Released key = '2'");
break;
case cocos2d::EventKeyboard::KeyCode::KEY_3:
CCLOG("Released key = '3'");
break;
default:
CCLOG("Released other Key...");
break;
}
}

鼠标事件:
1.1、 事件类 EventMouse
重要属性和方法:
//事件类型
MouseEventType
_mouseEventType;
enum class MouseEventType
{
MOUSE_NONE, //无
MOUSE_DOWN, //按下,鼠标左右键
MOUSE_UP, //抬起,鼠标左右键
MOUSE_MOVE, //移动
MOUSE_SCROLL, //滚轮
};
//鼠标按键 左键:0 右键:1
int _mouseButtom;
//x坐标
float _x;
//y坐标
float _y;
//滚动坐标
float _scrollX;
float _scrollY;
1.2、 事件监听器EventListenerMouse回调方法
 //down

 void onMouseDown(Event* event);

 //up

 void onMouseUp(Event* event);

 //move   移动

 void onMouseMove(Event* event);

 //scroll 滚动

 void onMouseScroll(Event* event);
实例:
.h files

#ifndef _MOUSEEVENTTEST_SCENE_H_

#define _MOUSEEVENTTEST_SCENE_H_

#include "cocos2d.h"

class eventMouse : public cocos2d::Layer

{

private:

public:

	static cocos2d::Scene* createScene();

	virtual bool init();

	void onMouseDown(cocos2d::Event* e);

	void onMouseUp(cocos2d::Event* e);

	void onMouseMove(cocos2d::Event* e);

	void onMouseScroll(cocos2d::Event* e);

	CREATE_FUNC(eventMouse);

};

#endif // _MOUSEEVENTTEST_SCENE_H_

.cpp files

#include "MouseEventTest.h"

USING_NS_CC;

Scene* eventMouse::createScene()

{

	auto scene = Scene::create();

	auto layer = eventMouse::create();

	scene->addChild(layer);

	return scene;

}

bool eventMouse::init()

{

	if (!Layer::init())

	{

		return false;

	}

	//设置鼠标事件的监听器

	auto listener = EventListenerMouse::create();

	//设置监听的对象

	listener->onMouseDown = CC_CALLBACK_1(eventMouse::onMouseDown, this);

	listener->onMouseUp = CC_CALLBACK_1(eventMouse::onMouseUp, this);

	listener->onMouseMove = CC_CALLBACK_1(eventMouse::onMouseMove, this);

	listener->onMouseScroll = CC_CALLBACK_1(eventMouse::onMouseScroll, this);

	//注册监听器

	_eventDispatcher->addEventListenerWithSceneGraphPriority(listener, this);

	return true;

}

void eventMouse::onMouseDown(cocos2d::Event* event)

{

	EventMouse* elem = (EventMouse*)event;

	//判断鼠标按下的是那个键

	int flag = elem->getMouseButton();

	CCLOG("bottom = %d", flag);

}

void eventMouse::onMouseUp(cocos2d::Event* event)

{

	CCLOG("Relax buttom");

}

void eventMouse::onMouseMove(cocos2d::Event* event)

{

	EventMouse* elem = (EventMouse*)event;

	//取得当前鼠标位置的x,y坐标值

	float x = elem->getCursorX();

	float y = elem->getCursorY();

	CCLOG("[%f , %f]", x, y);

}

void eventMouse::onMouseScroll(cocos2d::Event* event)

{

	//取得鼠标事件

	EventMouse* elem = (EventMouse*)event;

	//取得滚轮滚动的值

	float sx = elem->getScrollX();

	float sy = elem->getScrollY();

	CCLOG("[%f , %f]", sx, sy);

}

Cocos2d-x之事件处理机制的更多相关文章
- java 事件处理机制:按下上下左右键控制小球的运动
/** * 加深对事件处理机制的理解 * 通过上下左右键来控制一个小球的位置 */package com.test3;import java.awt.*;import javax.swing.*;im ...
- Android事件处理机制
包括监听和回调两种机制. 1. 基于监听的事件处理: 事件监听包含三类对象,事件源,事件,事件监听器.Android的事件处理机制是一种委派式(Delegation)事件处理方式:普通组件(事件源)将 ...
- Android的两种事件处理机制
UI编程通常都会伴随事件处理,Android也不例外,它提供了两种方式的事件处理:基于回调的事件处理和基于监听器的事件处理. 对于基于监听器的事件处理而言,主要就是为Android界面组件绑定特定的事 ...
- Android的Touch事件处理机制
Android的Touch事件处理机制比较复杂,特别是在考虑了多点触摸以及事件拦截之后. Android的Touch事件处理分3个层面:Activity层,ViewGroup层,View层. 首先说一 ...
- IOS事件处理机制(关于触发者和响应者的确认)
事件处理机制 在iOS中发生触摸后,事件会加入到UIApplication事件队列(在这个系列关于iOS开发的第一篇文章中我们分析iOS程序原理的时候就说过程序运行后UIApplication会循环监 ...
- Java Swing事件处理机制
Java Swing的事件处理机制 Swing GUI启动后,Java虚拟机就启动三个线程,分别为主线程,事件派发线程(也是事件处理线程)和系统工具包线程. 主线程 :负责创建并显示该程序的初始界面: ...
- Qt事件处理机制
研一的时候开始使用Qt,感觉用Qt开发图形界面比MFC的一套框架来方便的多.后来由于项目的需要,也没有再接触Qt了.现在要重新拾起来,于是要从基础学起. Now,开始学习Qt事件处理机制. 先给出原文 ...
- core java 8~9(GUI & AWT事件处理机制)
MODULE 8 GUIs--------------------------------GUI中的包: java.awt.*; javax.swing.*; java.awt.event.*; 要求 ...
- Android的事件处理机制详解(二)-----基于监听的事件处理机制
基于监听的事件处理机制 前言: 我们开发的app更多的时候是需要与用户的交互----即对用户的操作进行响应 这就涉及到了android的事件处理机制; android给我们提供了两套功能强大的处理机制 ...
随机推荐
- [暑假集训Day2T3]团建活动
个人认为这周题中较难的一道. 题意大概为:给定一张N个点M条边的无向图,求出无向图的一棵最小生成树,满足一号节点的度数不超过给定的整数K.保证 N <= 20 首先用map存取节点,之后抛去1号 ...
- 报错: no such table:django_session解决方式
如果出现这个错误 “no such table:django_session” 这个错误跟Session的机制有关, 既然要从Web服务器端来记录用户信息, 那么一定要有存放用户session id对 ...
- 61-python基础-python3-格式化浮点数方法-%e、%f、%g
1-%e是用科学记数法计数: %f是按指定精确格式化浮点数(默认保留6位): %g是根据数值的大小采用e或%f. 2-%f可以按长度和精度格式化浮点数,如%a.bf,a表示浮点数的长度,b表示浮点数小 ...
- java Activiti6.0 后台 框架 spring5 SSM 工作流引擎 审批流程
1.模型管理 :web在线流程设计器.预览流程xml.导出xml.部署流程 2.流程管理 :导入导出流程资源文件.查看流程图.根据流程实例反射出流程模型.激活挂起 3.运行中流程:查看流程信息.当前任 ...
- jsp常用代码
1.头部 <%@ page language="java" import="java.util.*" pageEncoding="UTF-8&q ...
- [BZOJ2341][Shoi2011]双倍回文 manacher+std::set
题目链接 发现双倍回文串一定是中心是#的回文串. 所以考虑枚举#点.发现以\(i\)为中心的双倍回文的左半部分是个回文串,其中心一定位于\(i-\frac{pal[i]-1}2\)到\(i-1\)之间 ...
- MVC模式设计的Web层框架初识
struts是个什么东西? struts是一个按MVC模式设计的Web层框架,其实它就是一个大大的servlet,这个Servlet名为ActionServlet,或是ActionServlet的子类 ...
- webRTC脱坑笔记(二)— webRTC API之MediaStream(getUserMedia)
webRTC API WebRTC API包括媒体捕获.音频视频的编码和解码.传输层和会话管理. getUserMedia():捕获音频和视频. MediaRecorder:录制音频和视频. RTCP ...
- pycharm远程连接的步骤(有一项需特别注意)
1.设置远程服务器,在这里配置服务器地址等: 要注意下边的这个mappings设置好,跟编译器的path mapping设置为同一个,这里我没设置为同一个,后边就出现了点问题. 2.配置远程的编译器 ...
- MySQL学习笔记_时间,多表更新,数据库元数据
MySQL技术内幕一.MySQL基础知识1.1.显示表中的列SHOW COLUMNS FROM order_info like 'order%'1.2.显示表SHOW TABLES LIKE 'ord ...