
使用SSM 或者 springboot +mybatis时,对数据库的认证信息(用户名,密码)进行加密。
通常情况下,为了提高安全性,我们需要对数据库的认证信息进行加密操作,然后在启动项目的时候,会自动解密来核对信息是否正确。下面介绍在SSM和springboot项目中分别是怎样实现的。
无论是使用SSM还是springboot,首先我们需要一个加密工具,这里我采用的是AES 高级加密算法。
import javax.crypto.Cipher;

import javax.crypto.spec.IvParameterSpec;

import javax.crypto.spec.SecretKeySpec;

import sun.misc.BASE64Decoder;

import sun.misc.BASE64Encoder;

/**

 * AES 高级加密算法,本项目中用于对数据库的验证信息进行加密

  */

public class AESUtil {

    private static String key="111";

    /**

     * 加密

     * @param content

* @param strKey

* @return

* @throws Exception

     */

public static byte[] encrypt(String content,String strKey ) throws Exception {

        SecretKeySpec skeySpec = getKey(strKey);

        Cipher cipher = Cipher.getInstance("AES/CBC/PKCS5Padding");

        IvParameterSpec iv = new IvParameterSpec("0102030405060708".getBytes());

        cipher.init(Cipher.ENCRYPT_MODE, skeySpec, iv);

        byte[] encrypted = cipher.doFinal(content.getBytes());

        return  encrypted;

    }

    /**

     * 解密

     * @param strKey

* @param content

* @return

* @throws Exception

     */

public static String decrypt(byte[] content,String strKey ) throws Exception {

        SecretKeySpec skeySpec = getKey(strKey);

        Cipher cipher = Cipher.getInstance("AES/CBC/PKCS5Padding");

        IvParameterSpec iv = new IvParameterSpec("0102030405060708".getBytes());

        cipher.init(Cipher.DECRYPT_MODE, skeySpec, iv);

        byte[] original = cipher.doFinal(content);

        String originalString = new String(original);

        return originalString;

    }

    private static SecretKeySpec getKey(String strKey) throws Exception {

        byte[] arrBTmp = strKey.getBytes();

        byte[] arrB = new byte[]; // 创建一个空的16位字节数组(默认值为0)

for (int i = ; i < arrBTmp.length && i < arrB.length; i++) {

            arrB[i] = arrBTmp[i];

        }

        SecretKeySpec skeySpec = new SecretKeySpec(arrB, "AES");

        return skeySpec;

    }

    /**

     * base 64 encode

     * @param bytes 待编码的byte[]

     * @return 编码后的base 64 code

     */

public static String base64Encode(byte[] bytes){

        return new BASE64Encoder().encode(bytes);

    }

    /**

     * base 64 decode

     * @param base64Code 待解码的base 64 code

     * @return 解码后的byte[]

     * @throws Exception

     */

public static byte[] base64Decode(String base64Code) throws Exception{

        return base64Code.isEmpty() ? null : new BASE64Decoder().decodeBuffer(base64Code);

    }

    /**

     * AES加密为base 64 code

     * @param content 待加密的内容

     * @param encryptKey 加密密钥

     * @return 加密后的base 64 code

     * @throws Exception  //加密传String类型,返回String类型

     */

public static String aesEncrypt(String content) throws Exception {

        return base64Encode(encrypt(content, key));

    }

    /**

     * 将base 64 code AES解密

     * @param encryptStr 待解密的base 64 code

     * @param decryptKey 解密密钥

     * @return 解密后的string   //解密传String类型,返回String类型

     * @throws Exception

     */

public static String aesDecrypt(String encryptStr) throws Exception {

        return encryptStr.isEmpty() ? null : decrypt(base64Decode(encryptStr), key);

    }

    public static void main(String[] args) throws Exception {

        String encrypt = aesEncrypt("123456");

        System.out.println(encrypt);

//        String decrypt = aesDecrypt("+hf8qB4LhS7L7BzBy83bLg==");

//        System.out.println(decrypt);

}

}
一、SSM项目对数据库认证信息进行加密
1.首先我们需要自定义一个类,继承 PropertyPlaceholderConfigurer。编写代码,达到启动服务器时判断哪些字段需要解密,并将解密后的值返回出去
import org.springframework.beans.factory.config.PropertyPlaceholderConfigurer;

public class EncryptPropertyPlaceholderConfigurer extends PropertyPlaceholderConfigurer{

   // 需要加密的字段数组 。这里需要和db.properties中一致

private String[] encryptPropNames = { "db.username", "db.password"};

   //解密

protected String convertProperty(String propertyName,String propertyValue) {

      if(judgeEncryptOrNot(propertyName)) {

         try {

            String realPropertyValue = AESUtil.aesDecrypt(propertyValue);

            return  realPropertyValue;//返回解密后的值

} catch (Exception e) {

            e.printStackTrace();

         }

      }

      return propertyValue;

   }

   //判断是否需要加密

public boolean judgeEncryptOrNot(String propertyName) {

      for(String encryptPropName : encryptPropNames ) {

         if(encryptPropName.equals(propertyName)) {

            return true;

         }

      }

      return false;

   }

}
2.此时,我们的db.properties中的信息
就可以填写为我们在AES.util类中数据库认证信息进行加密之后的字符串了。

3.最后,在配置文件中(applicationContext-dao.xml)中定义这个bean即可
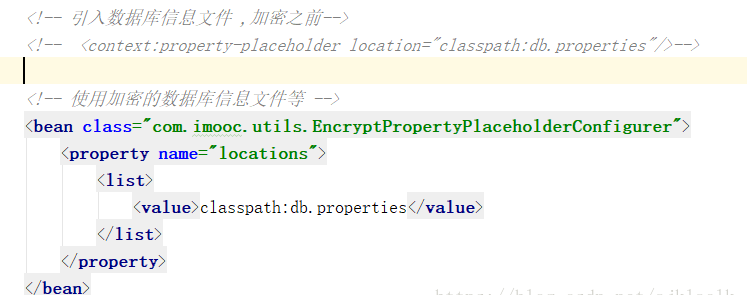
二、springboot项目对数据库认证信息进行加密
1.首先我们需要自定义一个类,继承 PropertyPlaceholderConfigurer。编写代码,达到启动服务器时判断哪些字段需要解密,并将解密后的值返回出去
package net.cqwu.collegeo2o.util;

import org.springframework.beans.factory.config.PropertyPlaceholderConfigurer;

//继承该类之后在spring-dao 中引入 可以实现加解密

public class EncryptPropertyPlaceholderConfigurer extends PropertyPlaceholderConfigurer{

    // 需要加密的字段数组 。这里需要和db.properties中一致

private String[] encryptPropNames = { "jdbc.username", "jdbc.password"};

    //解密

protected String convertProperty(String propertyName,String propertyValue) {

        if(judgeEncryptOrNot(propertyName)) {

            try {

                String realPropertyValue = AESUtil.aesDecrypt(propertyValue);

                return  realPropertyValue;//返回解密后的值

} catch (Exception e) {

                e.printStackTrace();

            }

        }

        return propertyValue;

    }

    //判断是否需要加密

public boolean judgeEncryptOrNot(String propertyName) {

        for(String encryptPropName : encryptPropNames ) {

            if(encryptPropName.equals(propertyName)) {

                return true;

            }

        }

        return false;

    }

}
2.此时,我们的application.yml或application.properties中的信息
就可以填写为我们在AES.util类中数据库认证信息进行加密之后的字符串了。

3.创建一个类,对应于SSM中的applicationContext-dao.xml
package net.cqwu.collegeo2o.config.dao;
import com.mchange.v2.c3p0.ComboPooledDataSource;
import net.cqwu.collegeo2o.util.AESUtil;
import org.mybatis.spring.annotation.MapperScan;
import org.springframework.beans.factory.annotation.Value;
import org.springframework.context.annotation.Bean;
import org.springframework.context.annotation.Configuration;
/**
* 对应spring 的 application-dao.xml
*/
@Configuration //表示该配置是需要写入spring的IOC容器中
@MapperScan("net.cqwu.collegeo2o.dao") //指定mapper接口所在的包,进行自动扫描(配置mybatismapper的扫描路径)
public class DataSourceConfiguration {
//定义数据库的基本信息属性
@Value("${jdbc.driver}")
private String jdbcDriver;
@Value("${jdbc.url}")
private String jdbcUrl;
@Value("${jdbc.username}")
private String jdbcUsername;
@Value("${jdbc.password}")
private String jdbcPassword;
//创建一个dataSource对象
@Bean(name = "dataSource")
public ComboPooledDataSource createDataSourceBean() throws Exception {
//创建dataSource对象 并设置属性
ComboPooledDataSource dataSource = new ComboPooledDataSource();
dataSource.setDriverClass(jdbcDriver);
dataSource.setJdbcUrl(jdbcUrl);
dataSource.setUser(AESUtil.aesDecrypt(jdbcUsername)); //需要先进行解密工作
dataSource.setPassword(AESUtil.aesDecrypt(jdbcPassword));
return dataSource;
}
}
=========================================================================================================
至此,我们就成功实现了在SSM 和springboot中对数据库认证信息进行加密。
使用SSM 或者 springboot +mybatis时,对数据库的认证信息(用户名,密码)进行加密。的更多相关文章
- cxf 调用 webservice服务时传递 服务器验证需要的用户名密码
cxf通过wsdl2java生成客户端调用webservice时,如果服务器端需要通过用户名和密码验证,则客户端必须传递验证所必须的用户名和密码,刚开始想通过url传递用户名和密码,于是在wsdl文件 ...
- springMVC web项目 对访问数据库的用户名密码进行加密解密
在使用springMVC开发web项目中,数据库的用户名,密码一般都是配置在.properties文件中 然后在通过.xml配置文件引入.properties的变量,例如 在config.proper ...
- 通用mapper版+SpringBoot+MyBatis框架+mysql数据库的整合
转:https://blog.csdn.net/qq_35153200/article/details/79538440 开发环境: 开发工具:Intellij IDEA 2017.2.3 JDK : ...
- springboot+mybatis+达梦数据库
准备工作: 首先,安装达梦6数据库.安装完之后如下建表 然后,很重要的一点(写法一定要这样写,否则无限报错) 达梦数据库查表方式: select * from "库名". ...
- 第二篇 Springboot mybatis generate根据数据库表自动生成实体类、Mapper和Mapper.xml
源码链接:https://pan.baidu.com/s/1iP4UguBufHbcIEv4Ux4wDw 提取码:j6z9 目录结构如下:只需增加一个generatorConfig.xml文件和在po ...
- idea中运行ssm 或springboot项目时,project Structure的配置
ctrl+alt+shift+s进入 project Structure 首先是project选项 Modules 标明source testsource 以及 resource 和 testreso ...
- AXIS 调用 webservice服务时传递 服务器验证需要的用户名密码
System.setProperty("javax.net.ssl.trustStore", T.class.getResource(".").getPath( ...
- CSDN数据库下载地址 CSDN 用户名密码泄漏,600万数据下载
原文发布时间为:2011-12-21 -- 来源于本人的百度文章 [由搬家工具导入] 12月21日消息,下午有网友爆料称国内最大的开发者社区CSDN.NET的安全系统遭到黑客攻击,CSDN数据库中的6 ...
- springboot+mybatis集成多数据源MySQL/Oracle/SqlServer
日常开发中可能时常会遇到一些这样的需求,业务数据库和第三方数据库,两个或多个数据库属于不同数据库厂商,这时候就需要通过配置来实现对数据库实现多源处理.大致说一下我的业务场景,框架本身是配置的sprin ...
随机推荐
- VirtualBox 安装ghost版windows XP
昨天尝试在VirtualBox中安装深度技术的GhostXP SP3 V8.02版本的系统,可是安装过程中出现了问题,无法安装,错误提示如下图: 昨天搞了一会,没有结果,今天对于这个无法安装的问题耿耿 ...
- c++IO对象不可复制
IO类型的3个独立的头文件: iostream定义读写控制窗口的类型, fstream 定义读写已命名文件的类型, (包含fstream类) sstream定义读写存储在内存中 ...
- kubernetes中node心跳处理逻辑分析
最近在查看一个kubernetes集群中node not ready的奇怪现象,顺便阅读了一下kubernetes kube-controller-manager中管理node健康状态的组件node ...
- Python3(十) 函数式编程: 匿名函数、高阶函数、装饰器
一.匿名函数 1.定义:定义函数的时候不需要定义函数名 2.具体例子: #普通函数 def add(x,y): return x + y #匿名函数 lambda x,y: x + y 调用匿名函数: ...
- ELF文件之七——使用链接脚本-2个函数-data-bss-temp-call
main.c int enable; ; int main() { int temp; add(); ; } int add() { ; } o反汇编的地址都是0起始,elf的地址都是映射后的地址. ...
- ubuntu 14.04 下安装 selenium 2.0
文章参考出处:http://blog.sina.com.cn/s/blog_5042ea610102we4y.html 1.安装 python-pip sudo apt-get install pyt ...
- React中setState注意事项
setState是一个异步函数,异步获取数据 学习react在使用ref和setState操作DOM时会遇到的问题: ref获取ul结点元素 错误写法:得到的ul长度总是上一次输入后的长度 结果: 正 ...
- js模拟post提交表单
function post(URL, PARAMS) { var temp = document.createElement("form"); ...
- MySql基础补漏笔记
在MySQL教程|菜鸟教程系统复习的时候有一些知识点还没掌握透的或者思维方式还没完全跟上的地方,写了一个笔记,讲道理此笔记对除我之外的任何读者不具有任何实用价值,只针对我在复习MySQL基础过程中的查 ...
- 在React中使用WebUploader实现大文件分片上传的踩坑日记!
前段时间公司项目有个大文件分片上传的需求,项目是用React写的,大文件分片上传这个功能使用了WebUploader这个组件. 具体交互是: 1. 点击上传文件button后出现弹窗,弹窗内有选择文件 ...