曹工说Spring Boot源码(9)-- Spring解析xml文件,到底从中得到了什么(context命名空间上)
写在前面的话
相关背景及资源:
曹工说Spring Boot源码(1)-- Bean Definition到底是什么,附spring思维导图分享
曹工说Spring Boot源码(2)-- Bean Definition到底是什么,咱们对着接口,逐个方法讲解
曹工说Spring Boot源码(3)-- 手动注册Bean Definition不比游戏好玩吗,我们来试一下
曹工说Spring Boot源码(4)-- 我是怎么自定义ApplicationContext,从json文件读取bean definition的?
曹工说Spring Boot源码(5)-- 怎么从properties文件读取bean
曹工说Spring Boot源码(6)-- Spring怎么从xml文件里解析bean的
曹工说Spring Boot源码(7)-- Spring解析xml文件,到底从中得到了什么(上)
曹工说Spring Boot源码(8)-- Spring解析xml文件,到底从中得到了什么(util命名空间)
工程结构图:

概要
先给大家看看spring支持的xml配置,我列了个表格如下:
| namespace | element |
|---|---|
| util | constant、property-path、list、set、map、properties |
| context | property-placeholder、property-override、annotation-config、component-scan、load-time-weaver、spring-configured、mbean-export、mbean-server |
| beans | import、bean、alias |
| task | annotation-driven、scheduler、scheduled-tasks、executor |
| cache | advice、annotation-driven |
| aop | config、scoped-proxy、aspectj-autoproxy |
我题目的意思是,spring在解析每个不同的xml元素时,其实是有共性的。所有这些元素的解析器,都实现了BeanDefinitionParser。这个接口只有一个方法,作用就是解析元素时,根据元素的配置,来收集beanDefinition,正所谓:条条大道通罗马,各种xml配置元素,各种注解配置,就是那些大道,罗马是什么?
就是beanDefinition。
从第一篇到现在,已经第9篇了,我们还在讲bean definition,其实就是因为,只有深刻地理解了它,后面才能更方便地理解spring boot,理解configuration注解,理解enable,理解自动装配。
好了,切入本篇,本篇要讲解的xml元素是context命名空间里的。
context:property-placeholder
用法
<beans xmlns="http://www.springframework.org/schema/beans"

       xmlns:xsi="http://www.w3.org/2001/XMLSchema-instance"

       xmlns:context="http://www.springframework.org/schema/context"

       xsi:schemaLocation="http://www.springframework.org/schema/beans

        http://www.springframework.org/schema/beans/spring-beans.xsd

                http://www.springframework.org/schema/context

                 http://www.springframework.org/schema/context/spring-context.xsd">

    <context:property-placeholder location="classpath*:application.properties"/>

    <bean class="org.springframework.contextnamespace.TestPropertiesVO">

        <property name="name" value="${name}"/>

    </bean>

</beans>
@Data

public class TestPropertiesVO {

    private String name;

}
#application.properties

name: Phil
测试代码:
package org.springframework.contextnamespace;

import com.alibaba.fastjson.JSONObject;

import lombok.extern.slf4j.Slf4j;

import org.springframework.beans.factory.config.BeanDefinition;

import org.springframework.context.support.ClassPathXmlApplicationContext;

import org.springframework.util.MyFastJson;

import java.util.List;

import java.util.Map;

@Slf4j

public class TestPropertyPlaceholder {

    public static void main(String[] args) {

        ClassPathXmlApplicationContext context = new ClassPathXmlApplicationContext(

                new String[]{"classpath:context-namespace-test-property-holder.xml"},false);

        context.refresh();

        Map<String, Object> map = context.getDefaultListableBeanFactory().getAllSingletonObjectMap();

        log.info("singletons:{}", JSONObject.toJSONString(map));

        List<BeanDefinition> list =

                context.getBeanFactory().getBeanDefinitionList();

        MyFastJson.printJsonStringForBeanDefinitionList(list);

	    // 获取该bean,打印

        Object bean = context.getBean(TestPropertiesVO.class);

        System.out.println("bean:" + bean);

    }

}
输出如下:
bean:TestPropertiesVO(name=Phil)
如果我们修改xml:
<beans xmlns="http://www.springframework.org/schema/beans"

       xmlns:xsi="http://www.w3.org/2001/XMLSchema-instance"

       xmlns:context="http://www.springframework.org/schema/context"

       xsi:schemaLocation="http://www.springframework.org/schema/beans

        http://www.springframework.org/schema/beans/spring-beans.xsd

                http://www.springframework.org/schema/context

                 http://www.springframework.org/schema/context/spring-context.xsd">

	//注释之,看看会怎样

    <!--<context:property-placeholder location="classpath*:application.properties"/>-->

    <bean class="org.springframework.contextnamespace.TestPropertiesVO">

        <property name="name" value="${name}"/>

    </bean>

</beans>
输出如下:
bean:TestPropertiesVO(name=${name})
可以看到,这样子呢,就没法解析到properties中的值了。
等价用法
<?xml version="1.0" encoding="UTF-8"?>

<beans xmlns="http://www.springframework.org/schema/beans"

       xmlns:xsi="http://www.w3.org/2001/XMLSchema-instance"

       xmlns:context="http://www.springframework.org/schema/context"

       xsi:schemaLocation="http://www.springframework.org/schema/beans

        http://www.springframework.org/schema/beans/spring-beans.xsd

                http://www.springframework.org/schema/context

                 http://www.springframework.org/schema/context/spring-context.xsd">

    <!--<context:property-placeholder location="classpath*:application.properties"/>-->

    // 这个配置方式,和上面那个,效果其实是一样的;上面那个,是对下边这种的封装

    <bean id="propertyPlaceholderConfigurer"

          class="org.springframework.beans.factory.config.PropertyPlaceholderConfigurer">

        <property name="locations">

            <list>

                <value>classpath:application.properties</value>

            </list>

        </property>

    </bean>

    <bean class="org.springframework.contextnamespace.TestPropertiesVO">

        <property name="name" value="${name}"/>

    </bean>

</beans>
元素解析
我们切入到org.springframework.context.config.ContextNamespaceHandler,查找下该元素的解析器。
public class ContextNamespaceHandler extends NamespaceHandlerSupport {

	public void init() {

		registerBeanDefinitionParser("property-placeholder", new PropertyPlaceholderBeanDefinitionParser());

		registerBeanDefinitionParser("property-override", new PropertyOverrideBeanDefinitionParser());

		registerBeanDefinitionParser("annotation-config", new AnnotationConfigBeanDefinitionParser());

		registerBeanDefinitionParser("component-scan", new ComponentScanBeanDefinitionParser());

		registerBeanDefinitionParser("load-time-weaver", new LoadTimeWeaverBeanDefinitionParser());

		registerBeanDefinitionParser("spring-configured", new SpringConfiguredBeanDefinitionParser());

		registerBeanDefinitionParser("mbean-export", new MBeanExportBeanDefinitionParser());

		registerBeanDefinitionParser("mbean-server", new MBeanServerBeanDefinitionParser());

	}

}
我们可以看到,本元素的解析器是:PropertyPlaceholderBeanDefinitionParser。
先看看类继承结构:
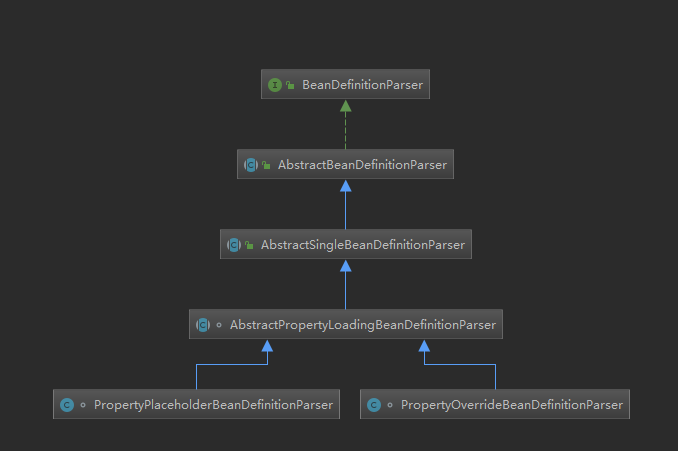
大家注意第三层,类名里,有Single字样,说明了它是单身狗?不是。说明这个xml元素解析器,最终只得到一个bean definition。
第四层的AbstractPropertyLoadingBeanDefinitionParser,就是提供一个抽象类,提取一些context:property-placeholder和context:property-override对应的解析器中公共的方法。
可以简单一看:
abstract class AbstractPropertyLoadingBeanDefinitionParser extends AbstractSingleBeanDefinitionParser {

   @Override

   protected boolean shouldGenerateId() {

      return true;

   }

   // 获取一些属性

   @Override

   protected void doParse(Element element, BeanDefinitionBuilder builder) {

      String location = element.getAttribute("location");

      if (StringUtils.hasLength(location)) {

         String[] locations = StringUtils.commaDelimitedListToStringArray(location);

         builder.addPropertyValue("locations", locations);

      }

      String propertiesRef = element.getAttribute("properties-ref");

      if (StringUtils.hasLength(propertiesRef)) {

         builder.addPropertyReference("properties", propertiesRef);

      }

      String fileEncoding = element.getAttribute("file-encoding");

      if (StringUtils.hasLength(fileEncoding)) {

         builder.addPropertyValue("fileEncoding", fileEncoding);

      }

      String order = element.getAttribute("order");

      if (StringUtils.hasLength(order)) {

         builder.addPropertyValue("order", Integer.valueOf(order));

      }

      builder.addPropertyValue("ignoreResourceNotFound",

            Boolean.valueOf(element.getAttribute("ignore-resource-not-found")));

      builder.addPropertyValue("localOverride",

            Boolean.valueOf(element.getAttribute("local-override")));

      builder.setRole(BeanDefinition.ROLE_INFRASTRUCTURE);

   }

}
看了父,不看正主也说不过去,这里呢,正主是真的简单:
class PropertyPlaceholderBeanDefinitionParser extends AbstractPropertyLoadingBeanDefinitionParser {

   private static final String SYSTEM_PROPERTIES_MODE_ATTRIB = "system-properties-mode";

   private static final String SYSTEM_PROPERTIES_MODE_DEFAULT = "ENVIRONMENT";

   // 这里获取bean的class,注意,这里的class,是不是和前面:等价用法那一节里,配置的bean的class一样

   // 所以啊,context:property-placeholder和等价用法里的底层实现,还是一样的

   @Override

   protected Class<?> getBeanClass(Element element) {

	  ...

      return PropertyPlaceholderConfigurer.class;

   }

   @Override

   protected void doParse(Element element, BeanDefinitionBuilder builder) {

      super.doParse(element, builder);

      builder.addPropertyValue("ignoreUnresolvablePlaceholders",

            Boolean.valueOf(element.getAttribute("ignore-unresolvable")));

      String systemPropertiesModeName = element.getAttribute(SYSTEM_PROPERTIES_MODE_ATTRIB);

      if (StringUtils.hasLength(systemPropertiesModeName) &&

            !systemPropertiesModeName.equals(SYSTEM_PROPERTIES_MODE_DEFAULT)) {

         builder.addPropertyValue("systemPropertiesModeName", "SYSTEM_PROPERTIES_MODE_"+systemPropertiesModeName);

      }

   }

}
大家可以看注释,这里返回的class,和等价用法里的的class是一模一样。说明了什么呢?大家这么聪明,不用我多说了。
这个class,PropertyPlaceholderConfigurer,其实还是比较特别的,我们看看其类图:
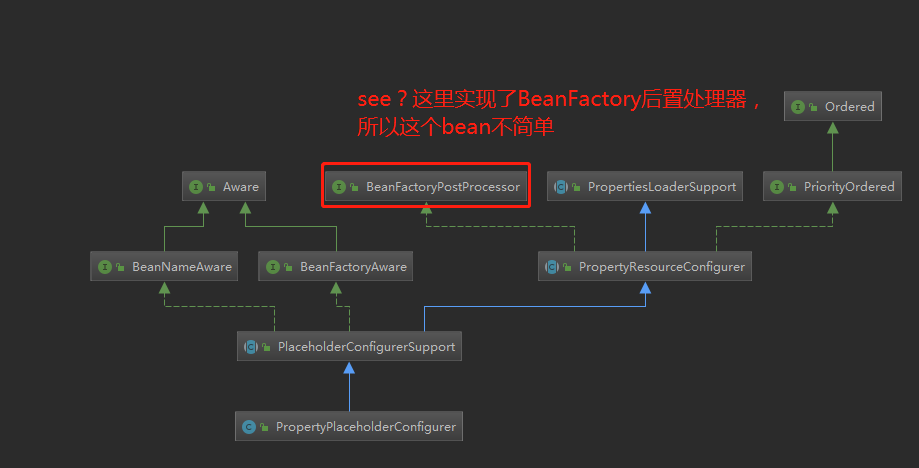
这里,我们发现这个bean class,竟然是一个BeanFactoryPostProcessor。这个接口有什么作用呢,大概就是,等所有的beanDefinition都装载了之后,会调用实现了BeanFactoryPostProcessor接口的bean,对beanDefinition进行处理。
如果对这块感兴趣,可以看博主之前的一篇文章,网上也很多解析,可自行搜索:
曹工杂谈:为什么很少需要改Spring源码,因为扩展点太多了,说说Spring的后置处理器
context:property-override
用法
这个元素,一般比较少用,但今天查了一下,我觉得这个还比较有意思,而且很奇妙地和当前spring boot外部化配置的思想吻合。
它的用途说起来比较晦涩,我们看例子就知道了:
<?xml version="1.0" encoding="UTF-8"?>

<beans xmlns="http://www.springframework.org/schema/beans"

       xmlns:xsi="http://www.w3.org/2001/XMLSchema-instance"

       xmlns:context="http://www.springframework.org/schema/context"

       xsi:schemaLocation="http://www.springframework.org/schema/beans

        http://www.springframework.org/schema/beans/spring-beans.xsd

                http://www.springframework.org/schema/context

                 http://www.springframework.org/schema/context/spring-context.xsd">

    <bean id="person" class="org.springframework.contextnamespace.Person" >

        <property name="name" value="Ram"/>

        <property name="age" value="20"/>

        <property name="location" value="Varanasi"/>

    </bean>

</beans>
package org.springframework.contextnamespace;

import lombok.Data;

@Data

public class Person {

    private String name;

    private int age;

    private String location;

}
测试代码:
package org.springframework.contextnamespace;

import com.alibaba.fastjson.JSONObject;

import lombok.extern.slf4j.Slf4j;

import org.springframework.beans.factory.config.BeanDefinition;

import org.springframework.context.support.ClassPathXmlApplicationContext;

import org.springframework.util.MyFastJson;

import java.util.List;

import java.util.Map;

/**

 * desc:

 *

 * @author : caokunliang

 * creat_date: 2019/12/25 0025

 * creat_time: 15:50

 **/

@Slf4j

public class TestPropertyOverride {

    public static void main(String[] args) {

        ClassPathXmlApplicationContext context = new ClassPathXmlApplicationContext(

                new String[]{"classpath:context-namespace-test-property-override.xml"},false);

        context.refresh();

	    // 获取bean

        Object bean = context.getBean(Person.class);

        System.out.println("bean:" + bean);

    }

}
输出如下:
bean:Person(name=Ram, age=20, location=Varanasi)
这个应该大家都懂。
接下来,我们在xml里定义一个元素:
	<?xml version="1.0" encoding="UTF-8"?>

<beans xmlns="http://www.springframework.org/schema/beans"

       xmlns:xsi="http://www.w3.org/2001/XMLSchema-instance"

       xmlns:context="http://www.springframework.org/schema/context"

       xsi:schemaLocation="http://www.springframework.org/schema/beans

        http://www.springframework.org/schema/beans/spring-beans.xsd

                http://www.springframework.org/schema/context

                 http://www.springframework.org/schema/context/spring-context.xsd">

	// 配置了这个玩意

    <context:property-override location="classpath:beanOverride.properties"/>

    <bean id="person" class="org.springframework.contextnamespace.Person" >

        <property name="name" value="Ram"/>

        <property name="age" value="20"/>

        <property name="location" value="Varanasi"/>

    </bean>

</beans>
#beanOverride.properties

person.age=40

person.location=Delhi
测试程序不变,这次的输出如下:
bean:Person(name=Ram, age=40, location=Delhi)
也就是说,外部配置文件:beanOverride.properties中的属性,覆盖了xml中的bean的属性。
而现在,spring boot的environment解析变量时,也是外部的配置文件、命令行参数、环境变量等,优先级高于jar包内的配置,是不是和我们这个元素的作用比较像呢?
等价用法
如果不使用:context:property-override,也可以像下面这样使用:
<bean class="org.springframework.beans.factory.config.PropertyOverrideConfigurer">

	<property name="location" value="classpath:beanOverride.properties" />

</bean>
元素解析
从ContextNamespaceHandler,我们可以找到该元素对应的parser:PropertyOverrideBeanDefinitionParser
public void init() {

   registerBeanDefinitionParser("property-placeholder", new PropertyPlaceholderBeanDefinitionParser());

   registerBeanDefinitionParser("property-override", new PropertyOverrideBeanDefinitionParser());

   registerBeanDefinitionParser("annotation-config", new AnnotationConfigBeanDefinitionParser());

   registerBeanDefinitionParser("component-scan", new ComponentScanBeanDefinitionParser());

   registerBeanDefinitionParser("load-time-weaver", new LoadTimeWeaverBeanDefinitionParser());

   registerBeanDefinitionParser("spring-configured", new SpringConfiguredBeanDefinitionParser());

   registerBeanDefinitionParser("mbean-export", new MBeanExportBeanDefinitionParser());

   registerBeanDefinitionParser("mbean-server", new MBeanServerBeanDefinitionParser());

}
类实现也很简单,和前面的context:property-placeholder一样,都继承了同一个基类:AbstractPropertyLoadingBeanDefinitionParser。
简单看看其实现吧:
class PropertyOverrideBeanDefinitionParser extends AbstractPropertyLoadingBeanDefinitionParser {

	@Override

	protected Class getBeanClass(Element element) {

		return PropertyOverrideConfigurer.class;

	}

	@Override

	protected void doParse(Element element, BeanDefinitionBuilder builder) {

		super.doParse(element, builder);

		builder.addPropertyValue("ignoreInvalidKeys",

				Boolean.valueOf(element.getAttribute("ignore-unresolvable")));

	}

}
这里,看看我们获得的bean class:

和前面讨论的一样,也是一个BeanFactoryPostProcessor。
总结
又需要回答题目的问题了,从xml文件里,解析得到了什么呢,答案依然是beanDefinition。
不过呢,这次的beanClass,略有不同,因为他们是特殊的class,是可以参与beanDefinition生命周期的class,
因为他们实现了BeanFactoryPostProcessor。
大家可以再看看前面util命名空间,那些bean class呢,主要就是FactoryBean。
本篇源码位置:
由于context命名空间都是些大人物,所以本篇主要是先给大家热身,下一讲,我们讲讲这里面的:
annotation-config、component-scan
我简单看了两眼,还挺有意思,欢迎大家和我一起学习。
曹工说Spring Boot源码(9)-- Spring解析xml文件,到底从中得到了什么(context命名空间上)的更多相关文章
- 曹工说Spring Boot源码(2)-- Bean Definition到底是什么,咱们对着接口,逐个方法讲解
写在前面的话 相关背景及资源: 曹工说Spring Boot源码系列开讲了(1)-- Bean Definition到底是什么,附spring思维导图分享 工程代码地址 思维导图地址 工程结构图: 正 ...
- Spring mybatis源码篇章-Mybatis的XML文件加载
通过阅读源码对实现机制进行了解有利于陶冶情操,承接前文Spring mybatis源码篇章-Mybatis主文件加载 前话 前文主要讲解了Mybatis的主文件加载方式,本文则分析不使用主文件加载方式 ...
- 曹工说Spring Boot源码系列开讲了(1)-- Bean Definition到底是什么,附spring思维导图分享
写在前面的话&&About me 网上写spring的文章多如牛毛,为什么还要写呢,因为,很简单,那是人家写的:网上都鼓励你不要造轮子,为什么你还要造呢,因为,那不是你造的. 我不是要 ...
- 曹工说Spring Boot源码(5)-- 怎么从properties文件读取bean
写在前面的话 相关背景及资源: 曹工说Spring Boot源码(1)-- Bean Definition到底是什么,附spring思维导图分享 曹工说Spring Boot源码(2)-- Bean ...
- 曹工说Spring Boot源码(6)-- Spring怎么从xml文件里解析bean的
写在前面的话 相关背景及资源: 曹工说Spring Boot源码(1)-- Bean Definition到底是什么,附spring思维导图分享 曹工说Spring Boot源码(2)-- Bean ...
- 曹工说Spring Boot源码(7)-- Spring解析xml文件,到底从中得到了什么(上)
写在前面的话 相关背景及资源: 曹工说Spring Boot源码(1)-- Bean Definition到底是什么,附spring思维导图分享 曹工说Spring Boot源码(2)-- Bean ...
- 曹工说Spring Boot源码(8)-- Spring解析xml文件,到底从中得到了什么(util命名空间)
写在前面的话 相关背景及资源: 曹工说Spring Boot源码(1)-- Bean Definition到底是什么,附spring思维导图分享 曹工说Spring Boot源码(2)-- Bean ...
- # 曹工说Spring Boot源码(10)-- Spring解析xml文件,到底从中得到了什么(context:annotation-config 解析)
写在前面的话 相关背景及资源: 曹工说Spring Boot源码(1)-- Bean Definition到底是什么,附spring思维导图分享 曹工说Spring Boot源码(2)-- Bean ...
- 曹工说Spring Boot源码(11)-- context:component-scan,你真的会用吗(这次来说说它的奇技淫巧)
写在前面的话 相关背景及资源: 曹工说Spring Boot源码(1)-- Bean Definition到底是什么,附spring思维导图分享 曹工说Spring Boot源码(2)-- Bean ...
随机推荐
- C#的选择语句练习(二)
1.输入a,b,c三个数,计算一元二次方程ax²+bx+c的根:若a=0,则不是一元二次方程:△=b²-4ac,根的计算公式为-b±√b²-4ac/2a:若△=b²-4ac>0,则方程有两个不一 ...
- const(每个对象中的常量), static const(类的编译时常量)
1 每个对象中的常量 --- const数据成员 const限定,意味着“在该对象生命周期内,它是一个常量”. 关键字const 使被限定的量为常量 在该类的每个对象中,编译器都为其const数据成员 ...
- 陈志生:德国信贷工厂风控模式对P2P的启发
上海合盘金融信息服务股份有限公司董事长陈志生 和讯银行消息 "2014中国金融论坛"于5月14-15日在北京召开,本次论坛主题为“全面深化金融体制改革与实体经济增长”.和讯网作为指 ...
- element-ui tree 根据不同叶子节点设置是否显示复选框
公司业务要求不同根节点配置显示与否复选框,官方文档没有这样的配置,所以想到了修改element-ui源码. 1.这里将“node_modules\element-ui\packages”下的tree文 ...
- LuoguP3045牛券Cow Coupons
LuoguP3045 [USACO12FEB]牛券Cow Coupons 果然我贪心能力还是太差了 ZR讲过的原题我回来对做法没有一丁点印象 有时候有这样一种题目 每个数有两种不同的价值 你可以选择价 ...
- HDU6578 2019HDU多校训练赛第一场 1001 (dp)
HDU6578 2019HDU多校训练赛第一场 1001 (dp) 传送门:http://acm.hdu.edu.cn/showproblem.php?pid=6578 题意: 你有n个空需要去填,有 ...
- spring boot 实践总结(转)
pring Boot是最流行的用于开发微服务的Java框架.在本文主要分享的是在专业开发中使用Spring Boot所采用的最佳实践.这些内容是基于个人经验和一些熟知的Spring Boot专家的文章 ...
- flutter 安装环境 Mac
1.这是我第二次mac 安装 flutter环境了,但是这种东西记不住.打开写一下 有用的东西 一. ls vi 等命令 command not found原因是因为环境变量的问题,编辑profile ...
- javascript继承的几种方法
继承是面向对象编程中很重要的概念,在其它面向对象的语言中大都很简单,例如java中有关键词extends来实现 javascript语言在ES6也新增了extends关键词可以实现继承,用法与java ...
- [译文] 为什么你在 C# 里总是应该使用 "var" 关键字
[译文] Why You Should Always Use the 'var' Keyword in C# (为什么你总是应该在 C# 里使用 "var" 关键字) Using ...