[ python ] 项目二:主机批量管理程序
开发要求:
1. 对主机进行批量管理
2. 可对单台或主机组批量执行命令
3. 可上传文件到对应的主机或组
4. 使用多线程实现
程序:
1. README
# 作者:hkey

# 博客地址:

# 功能实现:

    1. 对主机进行批量管理

    2. 可对单台或主机组批量执行命令

    3. 可上传文件到对应的主机或组

    4. 使用多线程实现

# 目录结构:

batch/

├── batch_server.py     # 启动程序

├── conf/    # 配置文件目录

│   ├── hosts.ini     # 主机信息配置文件

│   └── settings.py    # 程序配置文件

└── modules/     # 核心模块

    ├── batch_hosts.py     # 主机信息模块

    └── execute.py    # 执行命令模块

# 使用说明:

通过序号选择主机或组,'q'表示返回上一级;
README
2. 程序结构

3. 程序代码
启动程序:
#!/usr/bin/env python

# -*- coding:utf-8 -*-

import os, configparser

from conf import settings

from modules import execute

from modules import batch_hosts

from multiprocessing import Process

import threading

configfile = settings.configfile

conf = configparser.ConfigParser()

conf.read(configfile)

config = batch_hosts.Config(conf, configfile)

if not os.path.isfile(configfile):

    config.create_conf()

if __name__ == '__main__':

    while True:

        for index, item in enumerate(conf.sections(), 1):   # 循环主机或组信息

            print(index, item)

        choice = input('-->').strip()

        if not choice: continue

        if choice == 'q':

            break

        if choice.isdigit() == False:

            print('输入编号错误,请重新输入。')

        elif int(choice) > len(conf.sections()) or int(choice) < 1:     # 输入的序号不在主机列表内

            print('编号不在列表中,请重新输入')

        else:

            section_host = config.show_host(choice)     # 通过choice 作为section索引获取主机信息字典

            section_index = int(choice) - 1

            print('[%s]'.center(30, '*') % conf.sections()[section_index])

            for host in section_host:

                print('主机IP:', host['ip'])

            print('[请输入要执行的命令]')

            while True:

                command = input('-->').strip()

                if not command: continue

                if command == 'q':

                    break

                process_list = []

                # 通过多线程运行,每一台主机任务通过一个线程去执行

                for host in section_host:

                    exec_cmd = execute.ExecCommand(host, command)

                    t = threading.Thread(target=exec_cmd.run,)

                    t.start()   # 并发执行,这里不需要join阻塞

                    process_list.append(t)

                for t in process_list:

                    t.join()
batch_server.py
conf /
主机信息文件:
[host1]

password = 123456

username = root

ip = 192.168.118.15

port = 22

[host2]

password = 123456

username = root

ip = 192.168.118.16

port = 22

[web group]

group = host1,host2
hosts.ini
程序环境变量配置:
#!/usr/bin/env python

# -*- coding:utf-8 -*-

import  sys, os

import configparser

# 程序主目录

BASE_DIR = os.path.dirname(os.path.dirname(os.path.abspath(__file__)))

sys.path.insert(0, BASE_DIR)

# 配置目录

CONF_DIR = os.path.join(BASE_DIR, r'conf')

# 配置文件目录

configfile = os.path.join(CONF_DIR, 'hosts.ini')
settings.py
modules /
主机信息处理模块
#!/usr/bin/env python

# -*- coding:utf-8 -*-

import os

import configparser, paramiko

from conf import settings

class Config(object):

    '''对配置文件的创建和查看'''

    def __init__(self, config, configfile):

        self.configfile = configfile

        self.config = config

    def create_conf(self):

        '''创建配置文件'''

        self.config['host1'] = {

            'ip': '192.168.118.15',

            'port': 22,

            'username': 'root',

            'password': ''

        }

        self.config['host2'] = {

            'ip': '192.168.118.16',

            'port': 22,

            'username': 'root',

            'password': ''

        }

        self.config['web group'] = {

            'group': 'host1,host2'

        }

        with open(self.configfile, 'w') as file:

            self.config.write(file)

    def show_host(self, choice):

        '''获取主机信息字典'''

        print('choice', choice)

        section_index = int(choice) - 1

        section_name = self.config.sections()[section_index]

        section = self.config[section_name]

        host_data_list = []

        if 'group' in section:

            host_list = section['group'].split(',')

            for host in host_list:

                host_data_list.append(self.config[host])

        else:

            host_data_list.append(section)

        return host_data_list
batch_hosts.py
命令执行模块
#!/usr/bin/env python

# -*- coding:utf-8 -*-

import paramiko

import os

class ExecCommand(object):

    '''执行命令类'''

    def __init__(self, host, command):

        self.hostname = host['ip']

        self.port = int(host['port'])

        self.username = host['username']

        self.password = host['password']

        self.command = command

    def run(self):

        cmd = self.command.split()[0]

        if cmd.startswith('put') and hasattr(self, cmd):

            func = getattr(self, cmd)

            func()

        else:

            setattr(self, cmd, self.exec_command)

            func = getattr(self, cmd)

            func()

    def put(self):

        transport = paramiko.Transport(self.hostname, self.port)

        transport.connect(username=self.username, password=self.password)

        sftp = paramiko.SFTPClient.from_transport(transport)

        sftp.put(self.command.split()[1], self.command.split()[2])

        transport.close()

        print('【%s】上传文件【%s】成功!' % (self.hostname, self.command.split()[1]))

    def exec_command(self):

        self.ssh = paramiko.SSHClient()

        self.ssh.set_missing_host_key_policy(paramiko.AutoAddPolicy())

        self.ssh.connect(self.hostname, self.port, self.username, self.password)

        stdin, stdout, stderr = self.ssh.exec_command(self.command)

        res, err = stdout.read(), stderr.read()

        result = res if res else err    # 三元运算,默认stdout,错误登录 stderr

        print('[%s]'.center(80, '*') % self.hostname)

        print(result.decode())
execute.py
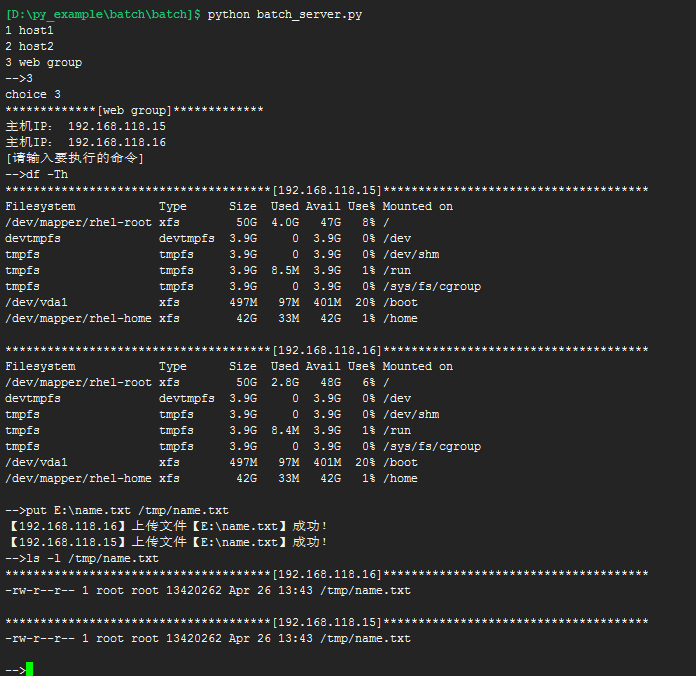
程序运行如下图:
[ python ] 项目二:主机批量管理程序的更多相关文章
- python之简单主机批量管理工具
今天做了一个很简单的小项目,感受到paramiko模块的强大. 一.需求 二.简单需求分析及流程图 需求很少,我就简单地说下: 1. 主机分组可以配置文件实现(我用字典存数据的). 2. 登陆功能不做 ...
- Python简单主机批量管理工具
一.程序介绍 需求: 简单主机批量管理工具 需求: 1.主机分组 2.主机信息使用配置文件 3.可批量执行命令.发送文件,结果实时返回 4.主机用户名密码.端口可以不同 5.执行远程命令使用param ...
- Python开发程序:简单主机批量管理工具
题目:简单主机批量管理工具 需求: 主机分组 登录后显示主机分组,选择分组后查看主机列表 可批量执行命令.发送文件,结果实时返回 主机用户名密码可以不同 流程图: 说明: ### 作者介绍: * au ...
- 【Python之旅】第六篇(七):开发简易主机批量管理工具
[Python之旅]第六篇(七):开发简易主机批量管理工具 python 软件开发 Paramiko模块 批量主机管理 摘要: 通过前面对Paramiko模块的学习与使用,以及Python中多线程与多 ...
- 简单主机批量管理工具(这里实现了paramiko 用su切换到root用户)
项目名:简单主机批量管理工具 一.需求 1.主机分组 2.可批量执行命令.发送文件,结果实时返回,执行格式如下 batch_run -h h1,h2,h3 -g web_clusters,db_ ...
- 2013流行Python项目汇总
2013流行Python项目汇总 转自:http://www.kankanews.com/ICkengine/archives/102963.shtml Python作为程序员的宠儿,越来越得到人们的 ...
- 以正确的方式开源 Python 项目
以正确的方式开源 Python 项目 大多数Python开发者至少都写过一个像工具.脚本.库或框架等对其他人也有用的工具.我写这篇文章的目的是让现有Python代码的开源过程尽可能清 晰和无痛.我不是 ...
- 流行的Python项目汇总
年有哪些流行的Python项目呢?下面,我们一起来看下. 一.测试和调试 python_koans :Python Koans 算 “Ruby Koans” 的一部分,作为交互式教程,可以学习 TDD ...
- Docker如何部署Python项目
Docker 部署Python项目 作者:白宁超 2019年5月24日09:09:00 导读: 软件开发最大的麻烦事之一就是环境配置,操作系统设置,各种库和组件的安装.只有它们都正确,软件才能运行.如 ...
随机推荐
- Android Service 生命周期
Service概念及用途: Android中的服务,它与Activity不同,它是不能与用户交互的,不能自己启动的,运行在后台的程序,如果我们退出应用时,Service进程并没有结束,它仍然在后台运行 ...
- BZOJ3990:[SDOI2015]排序——题解
https://www.lydsy.com/JudgeOnline/problem.php?id=3990 小A有一个1-2^N的排列A[1..2^N],他希望将A数组从小到大排序,小A可以执行的操作 ...
- BZOJ4552:[HEOI2016/TJOI2016]排序——题解
https://www.lydsy.com/JudgeOnline/problem.php?id=4552 https://www.luogu.org/problemnew/show/P2824 在2 ...
- 51NOD 1773:A国的贸易——题解
http://www.51nod.com/onlineJudge/questionCode.html#!problemId=1773 参考1:FWT讲解 https://www.cnblogs.com ...
- [bzoj] 3673 3674 可持久化并查集 || 可持久化数组
原题 加强版 题意: 可持久化并查集模板-- 题解: 用可持久化线段树维护一个可持久化数组,来记录每一次操作后的状态. 不能用路径压缩,但是要按置合并,使复杂度保证在O(log) #include&l ...
- Java的各种中文乱码解决方法
一.Servlet输出乱码 1. 用servlet.getOutStream字节流输出中文,假设要输出的是String str ="钓鱼岛是中国的,无耻才是日本的". 1.1 若是 ...
- Poco::File
基于入门的环境及makefile. #include<iostream> #include<Poco/File.h> using namespace std; using na ...
- HDU3068:最长回文(Manacher模板)
最长回文 Time Limit: 4000/2000 MS (Java/Others) Memory Limit: 32768/32768 K (Java/Others)Total Submis ...
- HDU1542 扫描线+离散化
Atlantis Time Limit: 2000/1000 MS (Java/Others) Memory Limit: 65536/32768 K (Java/Others)Total Su ...
- phpstorm license 解决
http://idea.lanyus.com/ sudo vim /etc/hosts 最后添加: 0.0.0.0 account.jetbrains.com 然后把获得的注册码,复制到,licen ...